https://github.com/msdx/gradledoc
本文翻译所在分支:
https://github.com/msdx/gradledoc/tree/2.0 。
在线浏览地址:
http://gradledoc.qiniudn.com/2.0/userguide/userguide.html 。
另外,Android 手机用户可通过我写的一个程序浏览文档,带缓存功能的,目前0.6开发中版本兼容 Android 2.3以上系统,项目地址如下:
https://github.com/msdx/gradle-doc-apk
翻译不易,转载请注明本文在CSDN博客上的出处:
http://blog.csdn.net/maosidiaoxian/article/details/79231532
关于我对Gradle的翻译,以Github上的项目及http://gradledoc.qiniudn.com 上的文档为准。如发现翻译有误的地方,将首先在以上两个地方更新。因时间精力问题,博客中发表的译文基本不会同步修改。
在入门教程(《第六章,构建脚本基础》)中,你已经学会了如何创建简单的任务。之后你还学习了如何在向任务添加额外的行为。你也已经学会了如何创建任务之间的依赖。这都是简单的任务。但是Gradle将任务的概念推得更深远。 Gradle支持增强任务,也就是有自己的属性和方法的任务。这是真正的与你所使用的Ant目标(target)的不同之处。这些增强的任务可以由你或者是Gradle提供。
In the introductory tutorial (Chapter 6, Build Script Basics) you have learned how to create simple tasks. You have also learned how to add additional behavior to these tasks later on. And you have learned how to create dependencies between tasks. This was all about simple tasks. But Gradle takes the concept of tasks further. Gradle supports enhanced tasks, that is, tasks which have their own properties and methods. This is really different to what you are used to with Ant targets. Such enhanced tasks are either provided by you or are provided by Gradle.
在《第六章,构建脚本基础 》中我们已经看到如何通过关键字这种风格来定义任务。这种风格有一些变式,可能你在一些具体的场景中会需要。例如,在表达式中不能使用这种关键字风格。
We have already seen how to define tasks using a keyword style in Chapter 6, Build Script Basics. There are a few variations on this style, which you may need to use in certain situations. For example, the keyword style does not work in expressions.
示例 15.1. 定义任务 - Example 15.1. Defining tasks
build.gradle
task(hello) << {
    println "hello"
}

task(copy, type: Copy) {
    from(file('srcDir'))
    into(buildDir)
}
你还可以使用字符串作为任务名称:
You can also use strings for the task names:
示例 15.2. 定义任务 —— 使用字符串作为任务名称 - Example 15.2. Defining tasks - using strings for task names
build.gradle
task('hello') <<
{
    println "hello"
}

task('copy', type: Copy) {
    from(file('srcDir'))
    into(buildDir)
}
有一种用于定义任务的替代语法,你可能更希望使用:
There is an alternative syntax for defining tasks, which you may prefer to use:
示例 15.3. 使用替代语法定义任务 - Example 15.3. Defining tasks with alternative syntax
build.gradle
tasks.create(name: 'hello') << {
    println "hello"
}

tasks.create(name: 'copy', type: Copy) {
    from(file('srcDir'))
    into(buildDir)
}
在这里我们将任务添加到tasks集合。关于create()方法的其他重载方法,可以看一下TaskContainer接口。
Here we add tasks to the tasks collection. Have a look at TaskContainer for more variations of the create() method.
我们经常需要在构建文件中查找所定义的任务。例如,为了去配置它们,或是依赖它们。对这样的情况,有很多种方法可以解决。首先,每个任务都可以使用任务名称作为属性名称,当为项目的属性来使用:
You often need to locate the tasks that you have defined in the build file, for example, to configure them or use them for dependencies. There are a number of ways of doing this. Firstly, each task is available as a property of the project, using the task name as the property name:
示例 15.4. 以属性方式访问任务 - Example 15.4. Accessing tasks as properties
build.gradle
task hello

println hello.name
println project.hello.name
任务也可以通过tasks集合来访问。
Tasks are also available through the tasks collection.
示例 15.5. 通过tasks集合访问任务 - Example 15.5. Accessing tasks via tasks collection
build.gradle
task hello

println tasks.hello.name
println tasks['hello'].name
你可以在任何项目中使用tasks.getByPath()方法获取任务路径,并且通过这个路径来访问任务。你也可以用一个任务的名称,相对路径或者是绝对路径作为参数,来调用getByPath()方法。
You can access tasks from any project using the task's path using the tasks.getByPath() method. You can call the getByPath() method with a task name, or a relative path, or an absolute path.
示例 15.6. 通过路径访问任务 - Example 15.6. Accessing tasks by path
build.gradle
project(':projectA') {
    task hello
}

task hello

println tasks.getByPath('hello').path
println tasks.getByPath(':hello').path
println tasks.getByPath('projectA:hello').path
println tasks.getByPath(':projectA:hello').path
gradle -q hello的输出结果
Output of gradle -q hello
> gradle -q hello
:hello
:hello
:projectA:hello
:projectA:hello
有关查找任务的更多选项,可以看一下TaskContainer。
Have a look at TaskContainer for more options for locating tasks.
举个例子,我们来看看Gradle提供的Copy 任务。如果要创建一个Copy任务,你可以在构建脚本中声明:
As an example, let's look at the Copy task provided by Gradle. To create a Copy task for your build, you can declare in your build script:
上面的代码创建了一个没有默认行为的复制任务,这个任务可以使用它的API(参见Copy)来配置。下面的示例演示了实现相同配置的几种不同的方法。
This creates a copy task with no default behavior. The task can be configured using its API (see Copy). The following examples show several different ways to achieve the same configuration.
示例 15.8. 配置任务——多种方式 - Example 15.8. Configuring a task - various ways
build.gradle
Copy myCopy = task(myCopy, type: Copy)
myCopy.from 'resources'
myCopy.into 'target'
myCopy.include('**/*.txt', '**/*.xml', '**/*.properties')
这类似于我们通常在Java中配置对象的方式。你必须在每一次的配置语句重复上下文 (myCopy)。这显得很冗余也不好阅读。
This is similar to the way we would normally configure objects in Java. You have to repeat the context (myCopy) in the configuration statement every time. This is a redundancy and not very nice to read.
还有一种配置任务的方式。它也保留了上下文,可以说是可读性最强的。它是我们通常最喜欢的方式。
There is another way of configuring a task. It also preserves the context and it is arguably the most readable. It is usually our favorite.
示例 15.9. 配置任务——使用闭包 - Example 15.9. Configuring a task - with closure
build.gradle
task myCopy(type: Copy)

myCopy {
   from 'resources'
   into 'target'
   include('**/*.txt', '**/*.xml', '**/*.properties')
}
这种方式适用于任何的任务。该例子的第3行只是tasks.getByName()方法的快捷写法。特别要注意的是,如果你向getByName()方法传入一个闭包,这个闭包是在配置这个任务的时候应用,而不是任务执行的时候。
This works for any task. Line 3 of the example is just a shortcut for the tasks.getByName() method. It is important to note that if you pass a closure to the getByName() method, this closure is applied to configure the task, not when the task executes.
你也可以在定义任务的时候使用配置闭包。
You can also use a configuration closure when you define a task.
定义任务的依赖关系有几种方法。在《第6.5节,“任务依赖”》已经向你介绍了使用任务名称来定义依赖。任务名称可以可以引用与该任务相同项目的任务,或者用于其他项目中的任务。要在另一个项目中引用任务,你需要将任务所属项目的路径作为前缀,加到它的名字中。下面的例子演示了如何添加projectA:taskX对projectB:taskY的依赖:
There are several ways you can define the dependencies of a task. In Section 6.5, “Task dependencies” you were introduced to defining dependencies using task names. Task names can refer to tasks in the same project as the task, or to tasks in other projects. To refer to a task in another project, you prefix the name of the task with the path of the project it belongs to. Below is an example which adds a dependency from projectA:taskX to projectB:taskY:
示例 15.11. 添加对另一个项目的任务的依赖 - Example 15.11. Adding dependency on task from another project
build.gradle
project('projectA') {
    task taskX(dependsOn: ':projectB:taskY') << {
        println 'taskX'
    }
}

project('projectB') {
    task taskY << {
        println 'taskY'
    }
}
gradle -q taskX的输出结果
Output of gradle -q taskX
> gradle -q taskX
taskY
taskX
可以使用一个Task对象而不是任务名称来定义依赖,如下:
Instead of using a task name, you can define a dependency using a Task object, as shown in this example:
示例 15.12. 使用任务对象添加依赖 - Example 15.12. Adding dependency using task object
build.gradle
task taskX << {
    println 'taskX'
}

task taskY << {
    println 'taskY'
}

taskX.dependsOn taskY
gradle -q taskX的输出结果
Output of gradle -q taskX
> gradle -q taskX
taskY
taskX
对于更高级的用法,你可以使用闭包来定义任务依赖。在Gradle评估时,这个闭包会被传入正在计算依赖的任务。这个闭包应该返回一个Task或Task对象的集合,然后返回值会被当作任务的依赖。以下示例添加了taskX对名称以lib开头的所有任务的依赖:
For more advanced uses, you can define a task dependency using a closure. When evaluated, the closure is passed the task whose dependencies are being calculated. The closure should return a single Task or collection of Taskobjects, which are then treated as dependencies of the task. The following example adds a dependency from taskX to all the tasks in the project whose name starts with lib:
示例 15.13. 使用闭包添加依赖 - Example 15.13. Adding dependency using closure
build.gradle
task taskX << {
    println 'taskX'
}

taskX.dependsOn {
    tasks.findAll { task -> task.name.startsWith('lib') }
}

task lib1 << {
    println 'lib1'
}

task lib2 << {
    println 'lib2'
}

task notALib << {
    println 'notALib'
}
gradle -q taskX的输出结果
Output of gradle -q taskX
> gradle -q taskX
lib1
lib2
taskX
有关任务依赖的详细信息,请参阅Task的 API。
For more information about task dependencies, see the Task API.
任务排序是一个孵化中的功能。请注意,此功能可能会在以后的Gradle版本中有所更改。
Task ordering is an incubating feature. Please be aware that this feature may change in later Gradle versions.
在某些情况下,控制两个任务的执行顺序,而不引入这些任务之间的依赖,是很有用的。任务排序和任务依赖之间的主要区别是,排序规则不会影响执行哪些任务,只会影响任务执行的顺序。
In some cases it is useful to control the order in which 2 tasks will execute, without introducing an explicit dependency between those tasks. The primary difference between a task ordering and a task dependency is that an ordering rule does not influence which tasks will be executed, only the order in which they will be executed.
任务排序在许多情况下可能有用:
Task ordering can be useful in a number of scenarios:
- 强制任务顺序排序:如“build”永远不会在“clean”之前运行。
Enforce sequential ordering of tasks: eg. 'build' never runs before 'clean'. - 在构建初期运行构建验证:例如,在开始发布之前验证是否拥有正确的证书。
Run build validations early in the build: eg. validate I have the correct credentials before starting the work for a release build. - 在耗时较长的验证任务之前先运行较快的验证任务,可以更快地获得反馈:如,单元测试应在集成测试之前运行。
Get feedback faster by running quick verification tasks before long verification tasks: eg. unit tests should run before integration tests. - 聚合特定类型的所有任务的结果的任务:例如,测试报告任务结合了所有执行的测试任务的输出。
A task that aggregates the results of all tasks of a particular type: eg. test report task combines the outputs of all executed test tasks.
有两种排序规则可用:“必须在之后运行”和“应该在之后运行”。
There are two ordering rules available: "must run after" and "should run after".
通过使用“必须在之后运行”的排序规则,你可以指定taskB必须总是运行在taskA之后,无论taskA和taskB这两者在什么时候调度执行。这被表示为taskB.mustRunAfter(taskA)。 “应该运行”的排序规则与其类似,但没有那么严格,因为它在两种情况下会被忽略:首先,如果使用该规则引入了排序循环;其次,当使用并行执行时,一个任务除了应该在之后运行这个条件之外,它的所有依赖都已经满足,那么这个任务就会运行,不管它的“应该在之后运行”的依赖关系是否已经运行或。当对任务的排序倾向于更快的反馈时,你应该使用“应该在之后运行”的规则,它对于排序很有帮助但不会严格要求。
By using 'must run after" ordering rule you can specify that taskB must always run after taskA, whenever both taskA and taskB are scheduled for execution. This is expressed as taskB.mustRunAfter(taskA). The 'should run after' ordering rule is similar but less strict as it will be ignored in two situations. Firstly if using that rule introduces an ordering cycle. Secondly when using parallel execution and all dependencies of a task have been satisfied apart from should run after then this task will be run regardless of weather its 'should run after' dependencies have been run or not. You would use 'should run after' rule when ordering preference for faster feedback, where the ordering is helpful but not strictly required.
目前使用这些规则仍有可能出现taskA执行而taskB 没有执行,或者taskB执行而taskA 没有执行。
With these rules present it is still possible to execute taskA without taskB and vice-versa.
示例15.14. 添加“必须在之后运行”的任务排序 - Example 15.14. Adding a 'must run after' task ordering
build.gradle
task taskX << {
    println 'taskX'
}
task taskY << {
    println 'taskY'
}
taskY.mustRunAfter taskX
gradle -q taskY taskX 的输出结果
Output of gradle -q taskY taskX
> gradle -q taskY taskX
taskX
taskY
示例 15.15. 添加 “应该在之后运行”的任务排序 - Example 15.15. Adding a 'should run after' task ordering
build.gradle
task taskX << {
    println 'taskX'
}
task taskY << {
    println 'taskY'
}
taskY.shouldRunAfter taskX
gradle -q taskY taskX 的输出结果
Output of gradle -q taskY taskX
> gradle -q taskY taskX
taskX
taskY
在上面的例子中,它仍有可能执行taskY而不会造成taskX也运行:
In the examples above, it is still possible to execute taskY without causing taskX to run:
示例 15.16. 任务排序并不意味着任务执行 - Example 15.16. Task ordering does not imply task execution
gradle -q taskY 的输出结果
Output of gradle -q taskY
> gradle -q taskY
taskY
如果想指定两个任务之间的“必须在之后运行”或“应该在之后运行”的排序,可以使用Task.mustRunAfter()和Task.shouldRunAfter()方法。这些方法接受一个任务实例、任务名称或Task.dependsOn()所接受的任何其他输入。
To specify a "must run after" or "should run after" ordering between 2 tasks, you use the Task.mustRunAfter() and Task.shouldRunAfter() methods. These method accept a task instance, a task name or any other input accepted by Task.dependsOn().
请注意“B.mustRunAfter(A)”或“B.shouldRunAfter(A)”并不意味着这些任务之间有任何执行上的依赖关系:
Note that "B.mustRunAfter(A)" or "B.shouldRunAfter(A)" does not imply any execution dependency between the tasks:
- 任务
A和B可以独立执行。排序规则只有在两个任务都计划执行时才有作用。
It is possible to execute tasksAandBindependently. The ordering rule only has an effect when both tasks are scheduled for execution. - 当使用
--continue参数运行时,可能会存在A执行失败后B执行了。
When run with--continue, it is possible forBto execute in the event thatAfails.
如前所述,如果“应该在之后运行”的排序规则引入了排序循环,那么这条规则将被忽略。
As mentioned before 'should run after' ordering rule will be ignored if it introduces an ordering cycle:
示例 15.17. 当引入循环时,“应该在之后运行”的任务排序会被忽略 - Example 15.17. A 'should run after' task ordering is ignored if it introduces an ordering cycle
build.gradle
task taskX << {
    println 'taskX'
}
task taskY << {
    println 'taskY'
}
task taskZ << {
    println 'taskZ'
}
taskX.dependsOn taskY
taskY.dependsOn taskZ
taskZ.shouldRunAfter taskX
gradle -q taskX的输出结果
Output of gradle -q taskX
> gradle -q taskX
taskZ
taskY
taskX
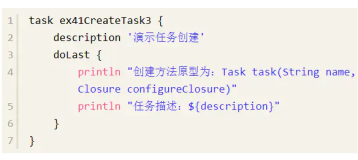
你可以向你的任务添加描述。例如在执行gradle tasks时显示该描述。
You can add a description to your task. This description is for example displayed when executing gradle tasks.
有时你会想要替换一个任务。例如,你想要将Java插件添加的任务替换成一个不同类型的自定义任务。你可以通过以下方式实现:
Sometimes you want to replace a task. For example if you want to exchange a task added by the Java plugin with a custom task of a different type. You can achieve this with:
示例 15.19. 重写任务 - Example 15.19. Overwriting a task
build.gradle
task copy(type: Copy)

task copy(overwrite: true) << {
    println('I am the new one.')
}
gradle -q copy 的输出结果
Output of gradle -q copy
> gradle -q copy
I am the new one.
这里我们把一个Copy类型的任务替换为一个简单的任务。当创建这个简单任务时,你必须把overwrite属性设置为true。否则,Gradle会抛出一个异常,称这个名称的任务已经存在。
Here we replace a task of type Copy with a simple task. When creating the simple task, you have to set the overwrite property to true. Otherwise Gradle throws an exception, saying that a task with such a name already exists.
Gradle 提供了多种方式来跳过任务的执行。
Gradle offers multiple ways to skip the execution of a task.
你可以使用onlyIf()方法将断言附加到任务中。只有当断言结果为true时,才会执行该任务的操作。你可以用闭包来实现断言。闭包会作为一个参数传给任务,如果任务应该执行,应该返回true,如果任务应该被跳过,则返回false。断言只会在任务执行之前才评估。
You can use the onlyIf() method to attach a predicate to a task. The task's actions are only executed if the predicate evaluates to true. You implement the predicate as a closure. The closure is passed the task as a parameter, and should return true if the task should execute and false if the task should be skipped. The predicate is evaluated just before the task is due to be executed.
示例 15.20. 使用断言跳过一个任务 - Example 15.20. Skipping a task using a predicate
build.gradle
task hello << {
    println 'hello world'
}

hello.onlyIf { !project.hasProperty('skipHello') }
gradle hello -PskipHello的输出结果
Output of gradle hello -PskipHello
> gradle hello -PskipHello
:hello SKIPPED

BUILD SUCCESSFUL

Total time: 1 secs
如果跳过任务的规则不能用断言来表达,你可以使用StopExecutionException。如果一个操作抛出此异常,则此操作的接下来的执行以及该任务的任何后续操作都会跳过。构建会继续执行下一个任务。
If the rules for skipping a task can't be expressed with predicate, you can use the StopExecutionException. If this exception is thrown by an action, the further execution of this action as well as the execution of any following action of this task is skipped. The build continues with executing the next task.
示例 15.21. 使用 StopExecutionException 跳过任务 - Example 15.21. Skipping tasks with StopExecutionException
build.gradle
task compile << {
    println 'We are doing the compile.'
}

compile.doFirst {
    // Here you would put arbitrary conditions in real life. But we use this as an integration test, so we want defined behavior.
    if (true) { throw new StopExecutionException() }
}
task myTask(dependsOn: 'compile') << {
   println 'I am not affected'
}
gradle -q myTask 的输出结果
Output of gradle -q myTask
> gradle -q myTask
I am not affected
如果你使用Gradle提供的任务,那么此功能将非常有用。它允许你向一个任务的内置操作添加执行条件。 [7]
This feature is helpful if you work with tasks provided by Gradle. It allows you to add conditional execution of the built-in actions of such a task. [7]
每一项任务有一个默认值为true的enabled标记。将它设置为false,可以不让这个任务的任何操作执行。
Every task has also an enabled flag which defaults to true. Setting it to false prevents the execution of any of the task's actions.
示例 15.22. 启用和禁用任务 - Example 15.22. Enabling and disabling tasks
build.gradle
task disableMe << {
    println 'This should not be printed if the task is disabled.'
}
disableMe.enabled = false
Gradle disableMe的输出结果
Output of gradle disableMe
> gradle disableMe
:disableMe SKIPPED

BUILD SUCCESSFUL

Total time: 1 secs
如果你使用 Gradle 自带的任务,如 Java 插件所添加的任务的话,你可能已经注意到 Gradle 将跳过最新的任务。这种行为也可以用于你的任务,而不仅仅是内置任务
If you are using one of the tasks that come with Gradle, such as a task added by the Java plugin, you might have noticed that Gradle will skip tasks that are up-to-date. This behaviour is also available for your tasks, not just for built-in tasks.
我们来看一个例子。在这里,我们的任务从一个 XML 源文件生成了多个输出文件。
Let's have a look at an example. Here our task generates several output files from a source XML file. Let's run it a couple of times.
示例 15.23. 一个生成任务 - Example 15.23. A generator task
build.gradle
task transform {
    ext.srcFile = file('mountains.xml')
    ext.destDir = new File(buildDir, 'generated')
    doLast {
        println "Transforming source file."
        destDir.mkdirs()
        def mountains = new XmlParser().parse(srcFile)
        mountains.mountain.each { mountain ->
            def name = mountain.name[0].text()
            def height = mountain.height[0].text()
            def destFile = new File(destDir, "${name}.txt")
            destFile.text = "$name -> ${height}\n"
        }
    }
}
gradle transform的输出结果
Output of gradle transform
> gradle transform
:transform
Transforming source file.
gradle transform的输出结果
Output of gradle transform
> gradle transform
:transform
Transforming source file.
请注意,Gradle第二次执行此任务的时候,即使没有任何变化也不会跳过该任务。我们的示例任务是使用一个动作闭包定义的。 Gradle不知道这个闭包做了什么,不能自动判断这个任务是否是最新的。要使用Gradle的最新检查,你需要声明任务的输入和输出。
Notice that Gradle executes this task a second time, and does not skip the task even though nothing has changed. Our example task was defined using an action closure. Gradle has no idea what the closure does and cannot automatically figure out whether the task is up-to-date or not. To use Gradle's up-to-date checking, you need to declare the inputs and outputs of the task.
每一个任务都有一个inputs和outputs属性,用来声明这个任务的输入和输出。下面,我们修改了我们的示例,声明它将 XML 源文件作为输入,并产生到目标目录的输出。让我们运行几次。
Each task has an inputs and outputs property, which you use to declare the inputs and outputs of the task. Below, we have changed our example to declare that it takes the source XML file as an input and produces output to a destination directory. Let's run it a couple of times.
示例 15.24. 声明一个任务的输入和输出 - Example 15.24. Declaring the inputs and outputs of a task
build.gradle
task transform {
    ext.srcFile = file('mountains.xml')
    ext.destDir = new File(buildDir, 'generated')
    inputs.file srcFile
    outputs.dir destDir
    doLast {
        println "Transforming source file."
        destDir.mkdirs()
        def mountains = new XmlParser().parse(srcFile)
        mountains.mountain.each { mountain ->
            def name = mountain.name[0].text()
            def height = mountain.height[0].text()
            def destFile = new File(destDir, "${name}.txt")
            destFile.text = "$name -> ${height}\n"
        }
    }
}
gradle transform的输出结果
Output of gradle transform
> gradle transform
:transform
Transforming source file.
gradle transform的输出结果
Output of gradle transform
> gradle transform
:transform UP-TO-DATE
现在,Gradle 知道要检查哪些文件,以确定任务是否为最新的。
Now, Gradle knows which files to check to determine whether the task is up-to-date or not.
任务的 inputs 属性是 TaskInputs类型。任务的 outputs 属性是 TaskOutputs类型。
The task's inputs property is of type TaskInputs. The task's outputs property is of type TaskOutputs.
一个任务如果没有定义输出,那么它将永远不会被当作是最新的。对于任务的输出不是文件或是更复杂的场景, TaskOutputs.upToDateWhen()方法允许你以编程方式计算任务的输出是否应该被视为最新的。
A task with no defined outputs will never be considered up-to-date. For scenarios where the outputs of a task are not files, or for more complex scenarios, the TaskOutputs.upToDateWhen() method allows you to calculate programmatically if the tasks outputs should be considered up to date.
一个只定义了输出的任务,如果自上次构建以来它的输出没变,那么它会被视为最新的。
A task with only outputs defined will be considered up-to-date if those outputs are unchanged since the previous build.
在第一次执行任务之前,Gradle会获取输入的快照。此快照包含一组输入文件和每个文件的内容的散列。然后Gradle执行任务。如果任务成功完成,则Gradle会对输出进行快照。此快照包含一组输出文件和每个文件的内容的散列。 Gradle会保存这两个快照,用于这个任务下一次的执行。
Before a task is executed for the first time, Gradle takes a snapshot of the inputs. This snapshot contains the set of input files and a hash of the contents of each file. Gradle then executes the task. If the task completes successfully, Gradle takes a snapshot of the outputs. This snapshot contains the set of output files and a hash of the contents of each file. Gradle persists both snapshots for next time the task is executed.
在这之后每一次执行任务之前,Gradle将输入和输出进行新的快照。如果新快照与以前的快照相同,则Gradle会假定输出是最新的,并跳过任务。如果它们不一样,则Gradle会执行任务。Gradle会保存这两个快照,用于这个任务的下一次执行。
Each time after that, before the task is executed, Gradle takes a new snapshot of the inputs and outputs. If the new snapshots are the same as the previous snapshots, Gradle assumes that the outputs are up to date and skips the task. If they are not the same, Gradle executes the task. Gradle persists both snapshots for next time the task is executed.
请注意,如果一个任务有指定的输出目录,在它上一次执行之后添加到该目录的所有文件都将被忽略,并且不会使这个任务过期。这样,那些不相关的任务之间就可以共用一个输出目录,而不会产生互相干扰。如果因为一些原因你不想要这样的行为,请考虑使用TaskOutputs.upToDateWhen()。
Note that if a task has an output directory specified, any files added to that directory since the last time it was executed are ignored and will NOT cause the task to be out of date. This is so unrelated tasks may share an output directory without interfering with each other. If this is not the behaviour you want for some reason, consider using TaskOutputs.upToDateWhen()
有时你想要有一个任务,它的行为依赖于一个大的或是无限的数值范围的参数。任务规则是提供这样的任务的一种很好的表达方式:
Sometimes you want to have a task whose behavior depends on a large or infinite number value range of parameters. A very nice and expressive way to provide such tasks are task rules:
示例 15.25. 任务规则 - Example 15.25. Task rule
build.gradle
tasks.addRule("Pattern: ping<ID>") { String taskName ->
    if (taskName.startsWith("ping")) {
        task(taskName) << {
            println "Pinging: " + (taskName - 'ping')
        }
    }
}
gradle -q task1的输出结果
Output of gradle -q pingServer1
> gradle -q pingServer1
Pinging: Server1
这个String参数用作规则的描述,当对这个例子运行gradle tasks时会显示这个描述。
The String parameter is used as a description for the rule. This description is shown when running for example gradle tasks.
规则不只是从命令行调用任务才起作用,你也可以对基于规则的任务创建依赖关系:
Rules not just work when calling tasks from the command line. You can also create dependsOn relations on rule based tasks:
示例 15.26. 依赖于基于规则的任务 - Example 15.26. Dependency on rule based tasks
build.gradle
tasks.addRule("Pattern: ping<ID>") { String taskName ->
    if (taskName.startsWith("ping")) {
        task(taskName) << {
            println "Pinging: " + (taskName - 'ping')
        }
    }
}

task groupPing {
    dependsOn pingServer1, pingServer2
}
Gradle q groupPing的输出结果
Output of gradle -q groupPing
> gradle -q groupPing
Pinging: Server1
Pinging: Server2
析构器任务是一个 孵化中 的功能 (请参阅 C.1.2 节, “孵化”)。
Finalizers tasks are an incubating feature (see Section C.1.2, “Incubating”).
析构器任务会在最终的任务准备运行时,自动地添加到任务图中。
Finalizer tasks are automatically added to the task graph when the finalized task is scheduled to run.
示例 15.27. 添加一个任务析构器 - Example 15.27. Adding a task finalizer
build.gradle
task taskX << {
    println 'taskX'
}
task taskY << {
    println 'taskY'
}

taskX.finalizedBy taskY
gradle -q taskX的输出结果
Output of gradle -q taskX
> gradle -q taskX
taskX
taskY
即使最终的任务执行失败,析构器任务也会被执行。
Finalizer task will be executed even if the finalized task fails.
示例 15.28. 执行失败的任务的任务析构器 - Example 15.28. Task finalizer for a failing task
build.gradle
task taskX << {
    println 'taskX'
    throw new RuntimeException()
}
task taskY << {
    println 'taskY'
}

taskX.finalizedBy taskY
gradle -q taskX的输出结果
Output of gradle -q taskX
> gradle -q taskX
taskX
taskY
另一方面,如果最终的任务什么都没执行,比如因为失败的任务依赖或如果它被认为是最新的话,析构任务不会执行。
On the other hand, finalizer tasks are not executed if the finalized task didn't do any work, for example due to failed task dependency or if it's considered up to date.
在不管构建是否成功都必须清理所创建的资源的情况下,析构任务很有用。这种资源的一个例子是,在集成测试任务前开始启动的Web容器,即使有些测试失败也始终应该关闭。
Finalizer tasks are useful in situations where build creates a resource that has to be cleaned up regardless of the build failing or succeeding. An example of such resource is a web container started before an integration test task and which should be always shut down, even if some of the tests fail.
你可以使用Task.finalizedBy()方法来指定一个析构器任务。这个方法接受一个任务实例,任务名称或Task.dependsOn()所能接受的任何其他输入。
To specify a finalizer task you use the Task.finalizedBy() method. This method accepts a task instance, a task name or any other input accepted by Task.dependsOn().
如果你是从 Ant 转过来的,像Copy这种增强的Gradle任务,看起来就像一个Ant目标和Ant任务之间的混合。实际上确实是这样子。Gradle 不像Ant那样对任务和目标进行分离。简单的Gradle任务就像Ant的目标,而增强的Gradle任务也包含了Ant任务方面的内容。所有的Gradle任务共享一个通用的API,你可以创建它们之间的依赖关系。这样的任务可能比Ant任务更好配置,它充分利用了类型系统,更具表现力也更易于维护。
If you are coming from Ant, such an enhanced Gradle task as Copy looks like a mixture between an Ant target and an Ant task. And this is actually the case. The separation that Ant does between tasks and targets is not done by Gradle. The simple Gradle tasks are like Ant's targets and the enhanced Gradle tasks also include the Ant task aspects. All of Gradle's tasks share a common API and you can create dependencies between them. Such a task might be nicer to configure than an Ant task. It makes full use of the type system, is more expressive and easier to maintain.
[7]你可能会想,为什么没有导入StopExecutionException,我们也没有通过其完全限定名来访问它。原因是,Gradle会向你的脚本添加一些默认的导入。这些导入是可以自定义的(参见附录E,现有的IDE支持及没有支持时如何应对)。
[7] You might be wondering why there is neither an import for the StopExecutionException nor do we access it via its fully qualified name. The reason is, that Gradle adds a set of default imports to your script. These imports are customizable (see Appendix E, Existing IDE Support and how to cope without it).