1、具体原理我这里不再重述,只是记录下自己安装的过程,以便以后可以快速部署;
2、首先我的配置环境是Centos6.4.32位操作系统桌面版
需要的设备为:
DHCP服务器
TFTP服务器
KickStart所生成的ks.cfg配置文件
一台存放系统安装文件的服务器,如NFS,HTTP或者FTP服务器
一个带有PXE支持网卡的主机
3、首先安装的是tftp服务,tftp是udp协议
|
1
|
yum
install
install
tftp-server tftp xinetd
|
tftp安装好之后是不会自己启动的,我们打开
|
1
|
vim
/etc/xinetd
.d
/tftp
|
把里面的disable=yes 改为no,如下:
|
1
2
3
4
5
6
7
8
9
10
11
12
13
|
service tftp
{
socket_type = dgram
protocol = udp
wait =
yes
user = root
server =
/usr/sbin/in
.tftpd
server_args = -s
/var/lib/tftpboot
disable = no
per_source = 11
cps = 100 2
flags = IPv4
}
|
重启xinetd:
|
1
2
3
|
service xinetd restart
停止 xinetd: [失败]
正在启动 xinetd: [确定]
|
检查端口是否开启:
|
1
2
|
netstat
-auntp|
grep
69
udp 0 0 0.0.0.0:69 0.0.0.0:* 25392
/xinetd
|
4、复制pxelinux.0 initrd vmlinuz复制到/var/lib/tftpboot/
pexlinux.0需要安装syslinux才可以有
|
1
2
|
yum
install
-y syslinux
cp
/usr/share/syslinux/pxelinux
.0
/var/lib/tftpboot/
|
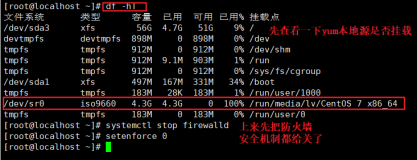
把系统安装光盘挂载到/mnt
|
1
2
|
mount
/dev/sr0
/mnt
cp
/mnt/images/pxeboot/
{initrd.img,vmlinuz}
/var/lib/tftpboot/
|
5、在/var/lib/tftpboot/创建一个目录pxelinux.cfg
|
1
2
3
|
mkdir
/var/lib/tftpboot/pxelinux
.cfg
cp
/mnt/isolinux/isolinux
.cfg pxelinux.cfg
/default
chmod
u+w default
|
6、下一步安装DHCP服务,如果所在局域网有dhcp服务,我们可以不用安装dhcp服务,如果需要给安装的系统设定主机名,我们可以安装dns服务,这里暂不设置。
|
1
2
3
4
5
6
7
8
9
10
11
12
13
14
|
yum
install
-y dhcp
cat
/usr/share/doc/dhcp-4
.1.1
/dhcpd
.conf.sample >
/etc/dhcp/dhcpd
.conf
把
/etc/dhcp/dhcpd
.conf的内容修改无如下
subnet 192.168.0.0 netmask 255.255.255.0 {
range 192.168.0.100 192.168.0.200;
option domain-name-servers 192.168.0.211;
option domain-name
"internal.example.org"
;
option routers 192.168.0.211;
option broadcast-address 192.168.0.255;
filename
"/pxelinux.0"
;
next-server 192.168.0.211;
default-lease-
time
600;
max-lease-
time
7200;
}
|
现在我这台制作的设备的IP就是192.168.0.211;
7、安装vsftpd服务器(也可以使用HTTP,NFS服务来提供所需的安装文件)
|
1
|
yum
install
vsftpd -y
|
在/var/ftp目录下面创建iso目录
然后把系统安装盘内容复制到iso目录下面
|
1
|
cp
-a
/mnt/
*
/var/ftp/iso
|
8、安装kickstart
|
1
|
yum
install
-y system-config-kickstart
|
然后在桌面环境下运行
|
1
|
system-config-kickstart
|

按照如上安装系统的过程选择配置kickstart
配置好之后保存在/var/ftp/pub目录下面,命名为ks.cfg
以下是文件的内容:
|
1
2
3
4
5
6
7
8
9
10
11
12
13
14
15
16
17
18
19
20
21
22
23
24
25
26
27
28
29
30
31
32
33
34
35
36
37
38
39
40
41
42
43
|
#platform=x86, AMD64, 或 Intel EM64T
#version=DEVEL
# Firewall configuration
firewall --disabled
# Install OS instead of upgrade
install
# Use network installation
url --url=
"ftp://192.168.0.211/iso"
# Root password
rootpw --iscrypted $1$NTpjSSiC$Rc9VMmQN
/oNkcdOUYDn6z0
# System authorization information
auth --useshadow --passalgo=sha512
# Use text mode install
text
firstboot --disable
# System keyboard
keyboard us
# System language
lang zh_CN
# SELinux configuration
selinux --permissive
# Installation logging level
logging --level=info
# Reboot after installation
reboot
# System timezone
timezone Asia
/Shanghai
# Network information
network --bootproto=dhcp --device=eth0 --onboot=on
# System bootloader configuration
bootloader --location=mbr
# Clear the Master Boot Record
zerombr
# Partition clearing information
clearpart --all --initlabel
# Disk partitioning information
part / --fstype=
"ext4"
--size=10240
part
/boot
--fstype=
"ext4"
--size=200
part swap --fstype=
"swap"
--size=1024
%packages
@base
@chinese-support
%end
|
9、修改/var/lib/tftpboot/pxelinux.cfg/default
第一行改为:default linux
|
1
2
3
4
5
|
label linux
menu label ^Install or upgrade an existing system
menu default
kernel vmlinuz
append initrd=initrd.img ks=
ftp
:
//192
.168.0.211
/pub/ks
.cfg
|
10、确定好所有服务都启动后,重新创建一个虚拟机进行测试,从网卡启动,网卡会自动查找的。
 首先从网卡启动,我们会看到bootloader加载内核和虚拟根文件系统,我们可以自定义显示效果,我上面显示的效果是water linux的,这个显示效果我们可以使用软件来实现,figlet这个软件包大家可以在网上下载http://pan.baidu.com/s/1qWuiYJy,解压好,直接编译安装就行make;make install,然后运行;
[root@localhost ~]# figlet hello
_ _ _
| |__ ___| | | ___
| '_ \ / _ \ | |/ _ \
| | | | __/ | | (_) |
|_| |_|\___|_|_|\___/

检查软件包依赖性

系统正式开始安装

系统安装好之后会自动重新启动正常运行。
本文转自 wzlinux 51CTO博客,原文链接:http://blog.51cto.com/wzlinux/1590823,如需转载请自行联系原作者