一、Corosync概述
1、什么是AIS和OpenAIS?
AIS是应用接口规范,是用来定义应用程序接口(API)的开放性规范的集合,这些应用程序作为中间件为应用服务提供一种开放、高移植性的程序接口。是在实现高可用应用过程中是亟需的。服务可用性论坛(SA Forum)是一个开放性论坛,它开发并发布这些免费规范。使用AIS规范的应用程序接口(API),可以减少应用程序的复杂性和缩短应用程序的开发时间,这些规范的主要目的就是为了提高中间组件可移植性和应用程序的高可用性。
OpenAIS是基于SA Forum 标准的集群框架的应用程序接口规范。OpenAIS提供一种集群模式,这个模式包括集群框架,集群成员管理,通信方式,集群监测等,能够为集群软件或工具提供满足 AIS标准的集群接口,但是它没有集群资源管理功能,不能独立形成一个集群。
2、corosync简介
corosync最初只是用来演示OpenAIS集群框架接口规范的一个应用,可以说corosync是OpenAIS的一部分,但后面的发展明显超越了官方最初的设想,越来越多的厂商尝试使用corosync作为集群解决方案。如Redhat的RHCS集群套件就是基于corosync实现。
corosync只提供了message layer,而没有直接提供CRM,一般使用Pacemaker进行资源管理。
3、小结
不管是heartbeat,还是corosync都是高可用集群中的Cluster Messaging Layer(集群信息层),是主要传递发集群信息与心跳信息的,并没有资源管理功能,资源管理还得依赖于上层的crm(Cluster resource Manager,集群资源管理器)。最著名的资源管理器,就是pacemaker,它是heartbeat v3分离出去的子项目。而现在corosync+pacemaker成了高可用集群中的最佳组合。好了,到这里corosync与pacemaker的基础知识就说到这里了,下面我们来看看怎么安装corosync与pacemaker。
二、环境准备
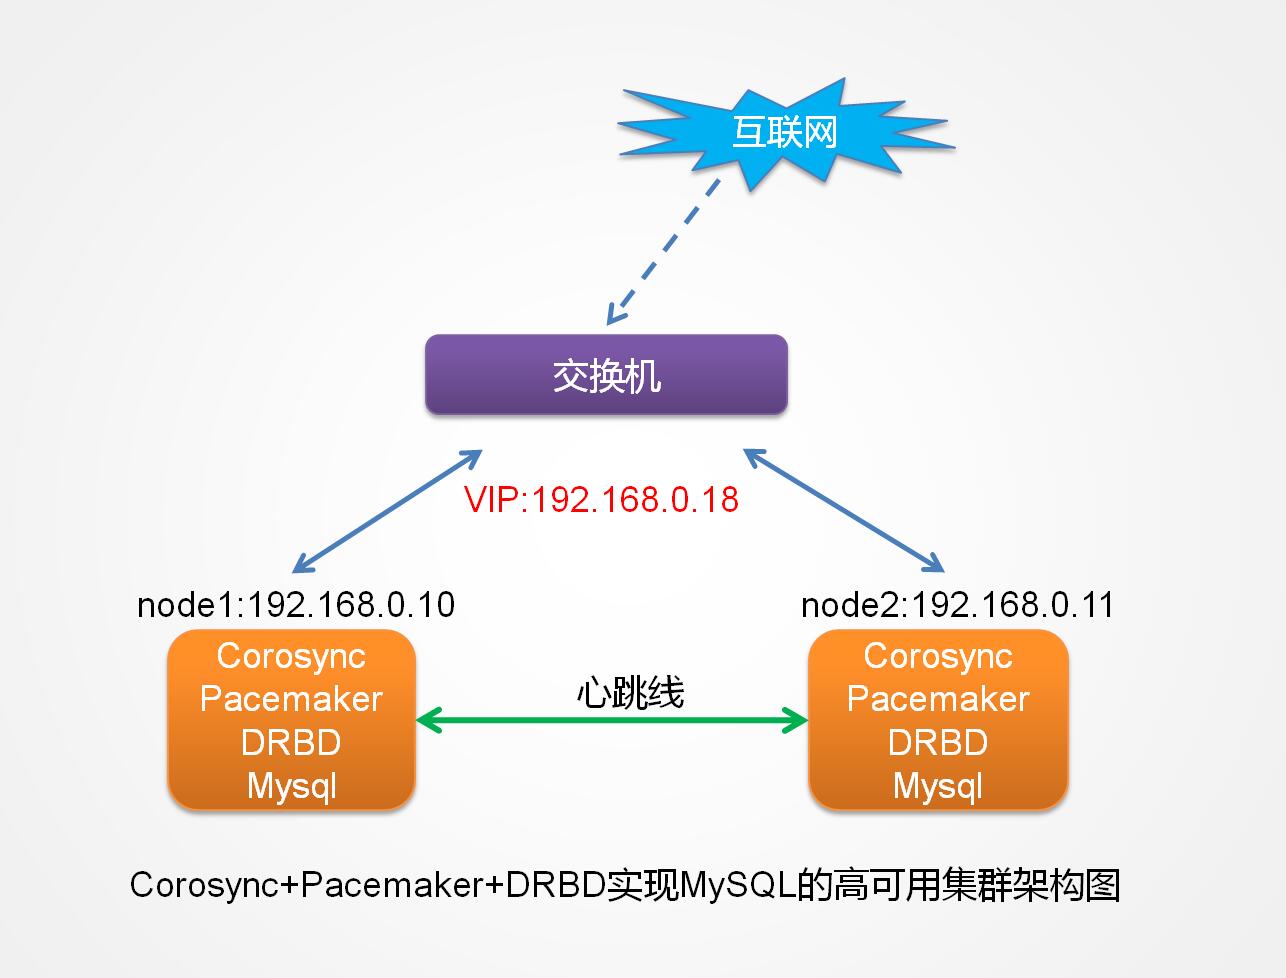
1、拓扑结构
2、服务器配置情况
| 名称 | IP | 安装软件 | 系统 |
| node1.wzlinux.com | VIP:192.168.0.18 eth0:192.168.0.10 |
corosync、pacemaker DRBD、Mysql |
CentOS 6.5 64位 |
| node2.wzlinux.com | VIP:192.168.0.18 eth0:192.168.0.11 |
corosync、pacemaker DRBD、Mysql |
CentOS 6.5 64位 |
3、关闭防火墙、SELinux和配置时间同步
|
1
2
3
4
5
|
#关闭防火墙
service iptables stop
#关闭SELinux
sed
-i
's/enforcing/disabled/g'
/etc/sysconfig/selinux
setenforce 0
|
4、配置各节点互相解析
node1:
|
1
2
3
4
5
6
7
|
[root@node1 ~]
# uname -n
node1.wzlinux.com
[root@node1 ~]
# cat /etc/hosts
127.0.0.1 localhost localhost.localdomain localhost4 localhost4.localdomain4
::1 localhost localhost.localdomain localhost6 localhost6.localdomain6
192.168.0.10 node1.wzlinux.com node1
192.168.0.11 node2.wzlinux.com node2
|
node2:
|
1
2
3
4
5
6
7
|
[root@node2 ~]
# uname -n
node2.wzlinux.com
[root@node2 ~]
# cat /etc/hosts
127.0.0.1 localhost localhost.localdomain localhost4 localhost4.localdomain4
::1 localhost localhost.localdomain localhost6 localhost6.localdomain6
192.168.0.10 node1.wzlinux.com node1
192.168.0.11 node2.wzlinux.com node2
|
5、配置各节点ssh互信
node1:
|
1
2
|
[root@node1 ~]
# ssh-keygen -t rsa -f ~/.ssh/id_rsa -P ''
[root@node1 ~]
# ssh-copy-id -i .ssh/id_rsa.pub root@node2.wzlinux.com
|
node2:
|
1
2
|
[root@node2 ~]
# ssh-keygen -t rsa -f ~/.ssh/id_rsa -P ''
[root@node2 ~]
# ssh-copy-id -i .ssh/id_rsa.pub root@node1.wzlinux.com
|
三、DRBD的安装与配置
1、下载安装
下载地址为ftp://rpmfind.net/linux/atrpms/,请按照需要下载,也可以在本文附件下载。
|
1
|
rpm -ivh drbd-8.4.3-33.el6.x86_64.rpm drbd-kmdl-2.6.32-431.el6-8.4.3-33.el6.x86_64.rpm
|
2、drbd的配置
以下两个配置文件node1和node2节点必须相同。
|
1
|
cat
/etc/drbd
.d
/global-common
.conf
|
|
1
2
3
4
5
6
7
8
9
10
11
12
13
14
15
16
17
18
19
20
21
22
23
24
25
26
27
28
29
30
31
32
|
global {
usage-count no;
# minor-count dialog-refresh disable-ip-verification
}
common {
protocol C;
handlers {
pri-on-incon-degr
"/usr/lib/drbd/notify-pri-on-incon-degr.sh; /usr/lib/drbd/notify-emergency-reboot.sh; echo b > /proc/sysrq-trigger ; reboot -f"
;
pri-lost-after-sb
"/usr/lib/drbd/notify-pri-lost-after-sb.sh; /usr/lib/drbd/notify-emergency-reboot.sh; echo b > /proc/sysrq-trigger ; reboot -f"
;
local
-io-error
"/usr/lib/drbd/notify-io-error.sh; /usr/lib/drbd/notify-emergency-shutdown.sh; echo o > /proc/sysrq-trigger ; halt -f"
;
# fence-peer "/usr/lib/drbd/crm-fence-peer.sh";
# split-brain "/usr/lib/drbd/notify-split-brain.sh root";
# out-of-sync "/usr/lib/drbd/notify-out-of-sync.sh root";
# before-resync-target "/usr/lib/drbd/snapshot-resync-target-lvm.sh -p 15 -- -c 16k";
# after-resync-target /usr/lib/drbd/unsnapshot-resync-target-lvm.sh;
}
startup {
#wfc-timeout 120;
#degr-wfc-timeout 120;
}
disk {
on-io-error detach;
#fencing resource-only;
}
net {
cram-hmac-alg
"sha1"
;
shared-secret
"mydrbd"
;
}
syncer {
rate 1000M;
}
}
|
定义一个资源/etc/drbd.d/mysql.res,内容如下:
|
1
2
3
4
5
6
7
8
9
10
11
12
13
14
|
resource mydata {
on node1.wzlinux.com {
device
/dev/drbd0
;
disk
/dev/sdb
;
address 192.168.0.10:7789;
meta-disk internal;
}
on node2.wzlinux.com {
device
/dev/drbd0
;
disk
/dev/sdb
;
address 192.168.0.11:7789;
meta-disk internal;
}
}
|
然后把文件同步到另一个节点
|
1
|
scp
/etc/drbd
.d/{global_common.conf,mysql.res} node2:
/etc/drbd
.d
|
分别在两个节点初始化资源,然后启动服务
|
1
2
|
drbdadm create-md web
service drbd start
|
四、Mysql的安装与配置
1、安装mysql
为了实验方便一些,我这里直接使用yum进行安装
|
1
|
yum
install
mysql-server
|
2、配置mysql
在其配置文件里面填写如下内容/etc/my.cf,提前创建需要的目录。
|
1
2
|
datadir=
/mydata
innodb_file_per_table=1
|
五、corosync的安装与配置
以下如果没有特别说明,就是在node1和node2上面同时执行。
1、corosync和pacemaker的安装
RHEL6.x以后的版本中,直接集成了corosync和pacemaker,因此直接使用yum安装即可。
|
1
|
yum
install
corosync pacemaker -y
|
2、查看corosync安装生成文件
# rpm -ql corosync
|
1
2
3
4
5
6
7
8
9
10
11
12
13
14
15
16
17
18
19
20
21
22
23
24
25
26
27
28
29
30
31
32
33
|
/etc/corosync
#配置文件目录
/etc/corosync/corosync.conf.example
#配置事例文件
/etc/corosync/corosync.conf.example.udpu
/etc/corosync/service.d
/etc/corosync/uidgid.d
/etc/dbus-1/system.d/corosync-signals.conf
/etc/rc.d/init.d/corosync
#服务脚本
/etc/rc.d/init.d/corosync-notifyd
/etc/sysconfig/corosync-notifyd
/usr/bin/corosync-blackbox
/usr/libexec/lcrso
/usr/libexec/lcrso/coroparse.lcrso
/usr/libexec/lcrso/objdb.lcrso
/usr/libexec/lcrso/quorum_testquorum.lcrso
/usr/libexec/lcrso/quorum_votequorum.lcrso
/usr/libexec/lcrso/service_cfg.lcrso
/usr/libexec/lcrso/service_confdb.lcrso
/usr/libexec/lcrso/service_cpg.lcrso
/usr/libexec/lcrso/service_evs.lcrso
/usr/libexec/lcrso/service_pload.lcrso
/usr/libexec/lcrso/vsf_quorum.lcrso
/usr/libexec/lcrso/vsf_ykd.lcrso
/usr/sbin/corosync
/usr/sbin/corosync-cfgtool
/usr/sbin/corosync-cpgtool
/usr/sbin/corosync-fplay
/usr/sbin/corosync-keygen
#集群间通讯秘钥生成工具
/usr/sbin/corosync-notifyd
/usr/sbin/corosync-objctl
/usr/sbin/corosync-pload
/usr/sbin/corosync-quorumtool
/usr/share/doc/corosync-1.4.7
…… ……
|
3、配置corosync
|
1
2
|
cd
/etc/corosync/
cp
corosync.conf.example corosync.conf
|
# cat corosync.conf
|
1
2
3
4
5
6
7
8
9
10
11
12
13
14
15
16
17
18
19
20
21
22
23
24
25
26
27
28
29
30
31
32
33
|
# Please read the corosync.conf.5 manual page
compatibility: whitetank
totem {
version: 2
#版本号,只能是2,不能修改
secauth: on
#安全认证,当使用aisexec时,会非常消耗CPU
threads: 0
#线程数,根据CPU个数和核心数确定
interface {
ringnumber: 0
#冗余环号,节点有多个网卡是可定义对应网卡在一个环内
bindnetaddr: 192.168.0.0
#绑定心跳网段
mcastaddr: 226.94.8.8
#心跳组播地址
mcastport: 5405
#心跳组播使用端口
ttl: 1
}
}
logging {
fileline: off
#指定要打印的行
to_stderr: no
#是否发送到标准错误输出
to_logfile:
yes
#记录到文件
to_syslog: no
#记录到syslog
logfile:
/var/log/cluster/corosync
.log
debug: off
timestamp: on
#是否打印时间戳,利于定位错误,但会消耗CPU
logger_subsys {
subsys: AMF
debug: off
}
}
service {
ver: 1
name: pacemaker
}
|
注:ver: 1,当值为0时,启动corosync时自动启动pacemaker;当值为1时,手动启动pacemaker。
前面测试的时候我使用自动启动,但是使用crm的时候会报如下错误,而且日志里面也会有很多错误,后来改成手动启动pacemaker之后问题变不再出现,具体问题出现在哪里我目前还不清楚。
4、生成密钥文件
使用corosync生成key文件会默认调用/dev/random随机数设备,一旦系统中断的IRQS的随机数不够用,将会产生大量的等待时间,如果对安全不是要求太高,此过程可以使用伪随机数,伪随机数是有规律的,所以可能会被找到规律从而破解密钥,因此,为了节约时间,我们在生成key之前讲random替换成urandom,以便节约时间。
|
1
2
3
4
5
6
7
|
[root@node1 corosync]
# mv /dev/{random,random.bak}
[root@node1 corosync]
# ln -s /dev/urandom /dev/random
[root@node1 corosync]
# corosync-keygen
Corosync Cluster Engine Authentication key generator.
Gathering 1024 bits
for
key from
/dev/random
.
Press keys on your keyboard to generate entropy.
Writing corosync key to
/etc/corosync/authkey
.
|
然后把配置好的配置文件传输到领一台设备上面
|
1
|
[root@node1 corosync]
# scp -p authkey corosync.conf node2:/etc/corosync/
|
六、corosync的启动与检查
1、corosync的启动
|
1
2
3
4
5
6
7
8
9
|
[root@node1 corosync]
# service corosync start
Starting Corosync Cluster Engine (corosync): [OK]
[root@node1 corosync]
# service pacemaker start
Starting Pacemaker Cluster Manager [OK]
[root@node1 corosync]
# ssh node2 'service corosync start'
Starting Corosync Cluster Engine (corosync): [OK]
[root@node1 corosync]
# ssh node2 'service pacemaker start'
Starting Pacemaker Cluster Manager [OK]
|
2、查看启动是否成功
# netstat -anpu
查看corosync引擎是否正常启动
# grep -e "Corosync Cluster Engine" -e "configuration file" /var/log/cluster/corosync.log
查看初始化成员节点通知是否正常发出
# grep TOTEM /var/log/cluster/corosync.log
查看pacemaker是否正常启动
# grep pcmk_startup /var/log/cluster/corosync.log
五、集群资源管理软件crm安装与配置
1、安装crmsh资源管理
RHEL自6.4起不再提供集群的命令行配置工具crmsh,转而使用pcs;如果想继续使用crm命令,必须下载相关的程序包自行安装才可。
从pacemaker 1.1.8开始,crm发展成了一个独立项目,叫crmsh。也就是说,我们安装了pacemaker后,并没有crm这个命令,我们要实现对集群资源管理,还需要独立安装crmsh。crmsh的rpm安装可从如下地址下载:http://download.opensuse.org/repositories/network:/ha-clustering:/Stable/CentOS_CentOS-6/,根据自己操作系统的版本进行选择下载。
crmsh依赖于pssh,因此也需要通过上面地址下载pssh.rpm,pssh需要python-pssh,可以直接通过地址下载,也可以使用我附近进行安装,我的是32位版的。
|
1
2
3
|
[root@node1 ~]
# wget http://download.opensuse.org/repositories/network:/ha-clustering:/Stable/CentOS_CentOS-6/i686/crmsh-2.1-1.6.i686.rpm
[root@node1 ~]
# wget http://download.opensuse.org/repositories/network:/ha-clustering:/Stable/CentOS_CentOS-6/i686/pssh-2.3.1-4.2.i686.rpm
[root@node1 ~]
# yum install crmsh-2.1-1.6.i686.rpm pssh-2.3.1-4.2.i686.rpm python-pssh-2.3.1-4.2.i686.rpm
|
安装完成,我们先通过crm status指令查看一下集群状态。
|
1
2
3
4
5
6
7
8
9
10
|
[root@node1 yum.repos.d]
# crm status
Last updated: Fri Dec 11 19:46:39 2015
Last change: Fri Dec 11 18:29:51 2015
Stack: classic openais (with plugin)
Current DC: node2.wzlinux.com - partition with quorum
Version: 1.1.11-97629de
2 Nodes configured, 2 expected votes
0 Resources configured
Online: [ node1.wzlinux.com node2.wzlinux.com ]
|
可以看到节点node1目前是主节点,已经在线。
用crm status查看状态时,如果报Could not establish cib_ro connection: Connection refused (111) ,说明本节点,连不上其他节点,可以重新corosync-keygen命令生成文件,要在修改主机名成功以后进行,尽量使用计算机熵池中的数据来生成。
2、crmsh基本介绍
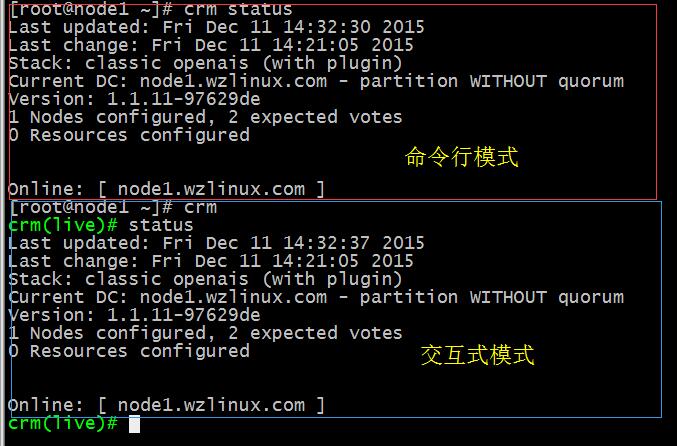
我们可以直接进入crm shell进行交互式操作,也可以在命令行直接操作,效果是一样的,比如我们查看集群状态,可以使用如下两种方法。
注:如果不清楚某个命令的用法,都可以直接help查看帮助,TAB键也可以进行补全。
3、禁用stonith
corosync默认启用了stonith功能,而我们要配置的集群并没有stonith设备,因此在配置集群的全局属性时要对其禁用。
方法1:
|
1
2
3
4
5
6
7
8
9
10
11
12
13
|
[root@node1 corosync]
# crm
crm(live)
# configure #进入配置模式
crm(live)configure
# property stonith-enabled=false #禁用stonith
crm(live)configure
# verify #验证配置是否有误
crm(live)configure
# commit #配置提交到集群每个节点
crm(live)configure
# show #查看当前配置
node node1.wzlinux.com
node node2.wzlinux.com
property cib-bootstrap-options: \
dc
-version=1.1.11-97629de \
cluster-infrastructure=
"classic openais (with plugin)"
\
expected-quorum-votes=2 \
stonith-enabled=
false
|
方法2:
|
1
|
[root@node1 ~]
# crm configure property stonith-enabled=false #直接提交到每个节点
|
4、定义法定票数不够时应该做忽略操作
法定票数(quorum, 票数)半数票数的集群成为满足法定票数)是为了避免集群分裂而出现的。在集群通信故障时,为了避免资源抢占,所以进行投票操作,只有具有法定票数的一方才有资格做为集群,不满足的一方就应该退出集群,但它放弃后并不代表服务停止,所以应该让其释放资源,关闭电源。stonith设备的用处就在于此。
方法1:
同上原理。
方法2:
|
1
|
[root@node1 ~]
# crm configure property no-quorum-policy=ignore
|
5、添加资源
corosync支持heartbeat,LSB和ocf等类型的资源代理,目前较为常用的类型为LSB和OCF两类,stonith类专为配置stonith设备而用;
可以通过如下命令查看当前集群系统所支持的类型:
|
1
2
3
4
5
|
[root@node1 ~]
# crm ra classes
lsb
ocf / heartbeat linbit pacemaker
service
stonith
|
如果想要查看某种类别下的所有资源代理的列表,可以使用类似如下命令实现:
|
1
|
[root@node1 ~]
# crm ra list ocf
|
如果想要查看某个资源代理支持那些参数,可以使用如下命令
|
1
|
[root@node1 ~]
# crm ra info ocf:heartbeat:IPaddr
|
接下来要创建集群的一个IP地址资源,以在通过集群提供服务时使用;这可以通过如下方式实现:
|
1
2
3
4
5
6
|
语法:
primitive <rsc> [<class>:[<provider>:]]<
type
>
[params attr_list]
[operations id_spec]
[
op
op_type [<attribute>=<value>...] ...]
op_type :: start | stop | monitor
|
添加VIP:
不要单个资源提交,等所有资源及约束一起建立之后提交。
|
1
2
|
crm(live)configure
# primitive VIP ocf:heartbeat:IPaddr params ip=192.168.0.18 op monitor interval="20" timeout="20" on-fail="restart"
crm(live)configure
# verify #验证一下参数是否正确
|
添加mysql服务:
|
1
2
|
crm(live)configure
# primitive myserver lsb:mysqld op monitor interval="20" timeout="20" on-fail="restart"
crm(live)configure
# verify
|
添加drdb服务:
|
1
2
|
crm(live)configure
# primitive mysql_drbd ocf:linbit:drbd params drbd_resource="mydata" op monitor role="Master" interval="10" timeout="20" op monitor role="Slave" interval="20" timeout="20" op start timeout="240" interval="0" op stop timeout="100" interval="0"
crm(live)configure
# verify
|
文件系统挂载服务:
|
1
2
|
crm(live)configure
# primitive mystore ocf:heartbeat:Filesystem params device="/dev/drbd0" directory="/mydata" fstype="ext4" op monitor interval="40" timeout="40" op start timeout="60" interval="0" op stop timeout="60" interval="0"
crm(live)configure
# verify
|
把drbd设为主从资源:
|
1
2
|
crm(live)configure
# ms ms_mysql_drbd mysql_drbd meta master-max="1" master-node-max="1" clone-max="2" clone-node-max="1" notify="true"
crm(live)configure
# verify
|
定义排列约束:
|
1
2
3
4
|
crm(live)configure
# colocation VIP_with_myserver inf: VIP myserver
crm(live)configure
# colocation myserver_with_mystore inf: myserver mystore
crm(live)configure
# colocation mystore_with_ms_mysql_drbd_master inf: mystore ms_mysql_drbd:Master
crm(live)configure
# verify
|
定义资源启动顺序:
|
1
2
3
4
5
6
7
8
9
10
11
12
13
14
15
16
17
18
19
20
21
22
23
24
25
26
27
28
29
30
31
32
33
34
35
36
37
|
crm(live)configure
# order ms_mysql_drbd_before_mystore inf: ms_mysql_drbd:promote mystore:start
crm(live)configure
# order VIP_before_myserver inf: VIP myserver
crm(live)configure
# order mystore_before_myserver inf: mystore:start myserver:start
crm(live)configure
# verify
crm(live)configure
# show
node node1.wzlinux.com
node node2.wzlinux.com
primitive VIP IPaddr \
params ip=192.168.0.18 \
op
monitor interval=20 timeout=20 on-fail=restart
primitive myserver lsb:mysqld \
op
monitor interval=20 timeout=20 on-fail=restart
primitive mysql_drbd ocf:linbit:drbd \
params drbd_resource=mydata \
op
monitor role=Master interval=10 timeout=20 \
op
monitor role=Slave interval=20 timeout=20 \
op
start timeout=240 interval=0 \
op
stop timeout=100 interval=0
primitive mystore Filesystem \
params device=
"/dev/drbd0"
directory=
"/mydata"
fstype=ext4 \
op
monitor interval=40 timeout=40 \
op
start timeout=60 interval=0 \
op
stop timeout=60 interval=0
ms ms_mysql_drbd mysql_drbd \
meta master-max=1 master-node-max=1 clone-max=2 clone-node-max=1 notify=
true
colocation VIP_with_myserver inf: VIP myserver
colocation myserver_with_mystore inf: myserver mystore
colocation mystore_with_ms_mysql_drbd_master inf: mystore ms_mysql_drbd:Master
order VIP_before_myserver inf: VIP myserver
order ms_mysql_drbd_before_mystore inf: ms_mysql_drbd:promote mystore:start
order mystore_before_myserver inf: mystore:start myserver:start
property cib-bootstrap-options: \
dc
-version=1.1.11-97629de \
cluster-infrastructure=
"classic openais (with plugin)"
\
expected-quorum-votes=2 \
stonith-enabled=
false
\
no-quorum-policy=ignore
|
检验没有错误之后我们就可以提交配置了。
|
1
2
3
4
5
6
7
8
9
10
11
12
13
14
15
16
17
18
19
|
crm(live)configure
# commit
crm(live)configure
# cd ..
crm(live)
# status
Last updated: Mon Dec 14 17:42:11 2015
Last change: Mon Dec 14 17:42:04 2015
Stack: classic openais (with plugin)
Current DC: node1.wzlinux.com - partition with quorum
Version: 1.1.11-97629de
2 Nodes configured, 2 expected votes
5 Resources configured
Online: [ node1.wzlinux.com node2.wzlinux.com ]
VIP (ocf::heartbeat:IPaddr): Started node1.wzlinux.com
myserver (lsb:mysqld): Started node1.wzlinux.com
mystore (ocf::heartbeat:Filesystem): Started node1.wzlinux.com
Master
/Slave
Set: ms_mysql_drbd [mysql_drbd]
Masters: [ node1.wzlinux.com ]
Slaves: [ node2.wzlinux.com ]
|
从状态里面可以看出所有服务都在Node1节点起来了。
六、结果检验
1、检查VIP
2、检查挂载
3、检查mysql服务
4、创建数据库
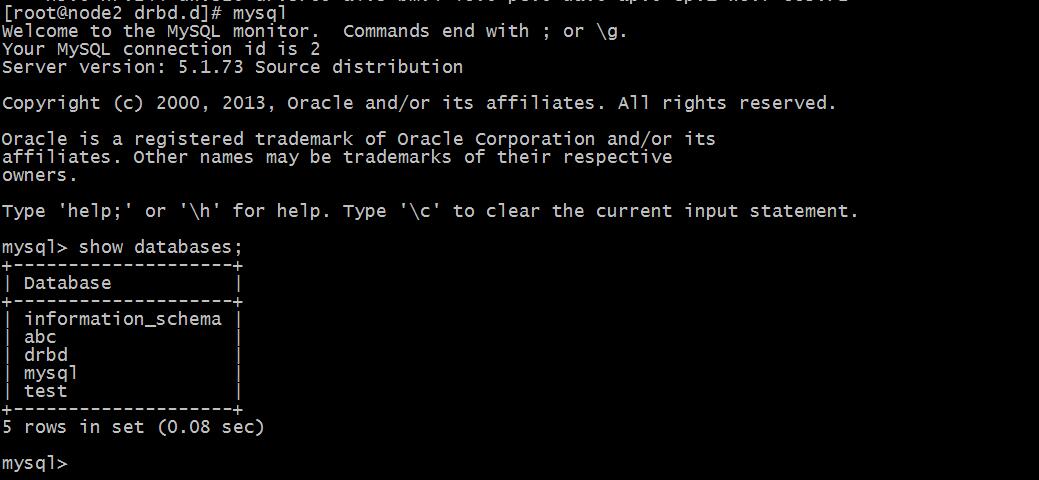
可以看出一切正常,那我们直接连入数据库创建一个数据库abc。
5、把node1切换为备节点,然后去node2数据库登录查看
记得,切换为备节点之后节点就下线了,数据就不会再同步了,可以立刻在设置其为在线状态。
6、node2登录数据库查看
从结果可以看到mysql的高可用服务搭建成功了。
问题:
DRBD 状态始终是 Secondary/Unknown?
|
1
2
3
4
|
version: 8.4.3 (api:1
/proto
:86-101)
GIT-
hash
: 89a294209144b68adb3ee85a73221f964d3ee515 build by gardner@, 2013-11-29 12:28:00
0: cs:WFConnection ro:Primary
/Unknown
ds:UpToDate
/DUnknown
C r-----
ns:0 nr:172 dw:376 dr:3793 al:5 bm:3 lo:0 pe:0 ua:0 ap:0 ep:1 wo:f oos:176
|
Ans:
1、可能是某个节点的drbd服务没有启动着,只有两个节点服务都正常的时候才会数据同步,所以务必要两节点都是online,可以使用crm status查看。
2、可能发生了脑裂行为,一般出现在ha切换时,解决方法:
在一节点执行:
drbdadm secondary mydata
drbdadm connect --discard-my-data mydata
另一节点执行:
drbdadm connect mydata
本文转自 wzlinux 51CTO博客,原文链接:http://blog.51cto.com/wzlinux/1721564,如需转载请自行联系原作者


