activemq 启动是非常简单的。
如
1.从二进制发布包启动
On Windows:
|
1
2
|
cd
[activemq_install_dir]
bin\activemq start
|
2.从源码方式启动

Main class : org.apache.activemq.console.Main
arguments : start xbean:activemq2.xml
其中activemq2.xml内容一个最简单的配置文件
|
1
2
3
4
5
6
7
8
9
10
11
12
13
14
15
16
|
<
beans
xmlns
=
"http://www.springframework.org/schema/beans"
xmlns:amq
=
"http://activemq.apache.org/schema/core"
xmlns:xsi
=
"http://www.w3.org/2001/XMLSchema-instance"
xsi:schemaLocation="http://www.springframework.org/schema/beans http://www.springframework.org/schema/beans/spring-beans-2.0.xsd
http://activemq.apache.org/schema/core http://activemq.apache.org/schema/core/activemq-core.xsd
http://activemq.apache.org/camel/schema/spring http://activemq.apache.org/camel/schema/spring/camel-spring.xsd">
<!-- Allows us to use system properties as variables in this configuration file -->
<
bean
class
=
"org.springframework.beans.factory.config.PropertyPlaceholderConfigurer"
/>
<
broker
xmlns
=
"http://activemq.apache.org/schema/core"
brokerName
=
"localhost"
dataDirectory
=
"${activemq.base}/data"
>
<!-- The transport connectors ActiveMQ will listen to -->
<
transportConnectors
>
<
transportConnector
name
=
"openwire"
uri
=
"tcp://localhost:61616"
/>
</
transportConnectors
>
</
broker
>
</
beans
>
|
命令列表
有很多命令,启动命令只是其中之一
|
1
2
3
4
5
6
7
8
9
10
11
12
|
Tasks:
browse - Display selected messages
in
a specified destination.
bstat - Performs a predefined query that displays useful statistics regarding the specified broker
create - Creates a runnable broker instance
in
the specified path.
decrypt - Decrypts given text
encrypt - Encrypts given text
export
- Exports a stopped brokers data files to an archive
file
list - Lists all available brokers
in
the specified JMX context
purge - Delete selected destination's messages that matches the message selector
query - Display selected broker component's attributes and statistics.
start - Creates and starts a broker using a configuration
file
, or a broker URI.
stop - Stops a running broker specified by the broker name.
|
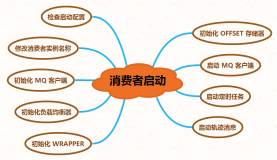
启动过程序列图

通过分析activemq*.jar,查看main方法入口。定位到org.apache.activemq.console.Main。
通过反射,调用ShellCommand的main方法
|
1
2
3
4
5
6
7
8
9
10
11
12
13
14
15
16
17
18
|
public
static
final
String TASK_DEFAULT_CLASS =
"org.apache.activemq.console.command.ShellCommand"
;
public
void
runTaskClass(List<String> tokens)
throws
Throwable {
...
ClassLoader cl = getClassLoader();
Thread.currentThread().setContextClassLoader(cl);
// Use reflection to run the task.
try
{
String[] args = tokens.toArray(
new
String[tokens.size()]);
Class<?> task = cl.loadClass(TASK_DEFAULT_CLASS);
Method runTask = task.getMethod(
"main"
,
new
Class[] {
String[].
class
, InputStream.
class
, PrintStream.
class
});
runTask.invoke(task.newInstance(), args, System.in, System.out);
}
catch
(InvocationTargetException e) {
throw
e.getCause();
}
}
|
步骤2
org.apache.activemq.console.command.ShellCommand :main方法
构造运行上下文及Formatter
|
1
2
3
4
5
6
7
8
9
10
11
12
13
14
15
|
public
static
int
main(String[] args, InputStream in, PrintStream out) {
CommandContext context =
new
CommandContext();
context.setFormatter(
new
CommandShellOutputFormatter(out));
// Convert arguments to list for easier management
List<String> tokens =
new
ArrayList<String>(Arrays.asList(args));
ShellCommand main =
new
ShellCommand();
try
{
main.setCommandContext(context);
main.execute(tokens);
return
0
;
}
catch
(Exception e) {
context.printException(e);
return
-
1
;
}
}
|
步骤3:
org.apache.activemq.console.command.ShellCommand :runTask
找出适配的Command ,处理请求
|
1
2
3
4
5
6
7
8
9
10
11
12
13
14
15
16
17
18
19
20
21
22
23
24
25
26
27
28
|
protected
void
runTask(List<String> tokens)
throws
Exception {
// Process task token
if
(tokens.size() >
0
) {
Command command=
null
;
String taskToken = (String)tokens.remove(
0
);
for
( Command c: getCommands() ) {
if
( taskToken.equals(c.getName()) ) {
//根据每个command的名称与参数比对
command = c;
break
;
}
}
if
( command ==
null
) {
if
(taskToken.equals(
"help"
)) {
printHelp();
}
else
{
printHelp();
}
}
if
( command!=
null
) {
command.setCommandContext(context);
command.execute(tokens);
}
}
else
{
printHelp();
}
}
|
步骤5:org.apache.activemq.console.command.StartCommand : runTask
启动broker,先判断参数是否有brokerURI
|
1
2
3
4
5
6
7
8
9
10
11
12
13
14
15
16
17
18
19
20
21
22
23
24
25
26
27
28
29
30
31
32
33
34
|
protected
void
runTask(List<String> brokerURIs)
throws
Exception {
try
{
// If no config uri, use default setting
if
(brokerURIs.isEmpty()) {
setConfigUri(
new
URI(DEFAULT_CONFIG_URI));
startBroker(getConfigUri());
// Set configuration data, if available, which in this case
// would be the config URI
}
else
{
String strConfigURI;
while
(!brokerURIs.isEmpty()) {
strConfigURI = (String)brokerURIs.remove(
0
);
try
{
setConfigUri(
new
URI(strConfigURI));
}
catch
(URISyntaxException e) {
context.printException(e);
return
;
}
startBroker(getConfigUri());
}
}
// Prevent the main thread from exiting unless it is terminated
// elsewhere
}
catch
(Exception e) {
context.printException(
new
RuntimeException(
"Failed to execute start task. Reason: "
+ e, e));
throw
new
Exception(e);
}
// The broker start up fine. If this unblocks it's cause they were stopped
// and this would occur because of an internal error (like the DB going offline)
waitForShutdown();
}
|
类图

本文转自 randy_shandong 51CTO博客,原文链接:http://blog.51cto.com/dba10g/1817646,如需转载请自行联系原作者