Web资源,指的是(如html页面,图片,js,数据等)。一个完整的网页,往往需要访问很多的资源,才能顺利完成,而请求每个资源的都需要耗费时间和带宽。缓存提到了资源的复用率,意义重大。
Web缓存的作用
使用Web缓存的作用其实是非常显而易见的:
减少网络带宽消耗
无论对于网站运营者或者用户,带宽都代表着金钱,过多的带宽消耗,只会便宜了网络运营商。当Web缓存副本被使用时,只会产生极小的网络流量,可以有效的降低运营成本。
降低服务器压力
给网络资源设定有效期之后,用户可以重复使用本地的缓存,减少对源服务器的请求,间接降低服务器的压力。同时,搜索引擎的爬虫机器人也能根据过期机制降低爬取的频率,也能有效降低服务器的压力。
减少网络延迟,加快页面打开速度(提高用户体验)
带宽对于个人网站运营者来说是十分重要,而对于大型的互联网公司来说,可能有时因为钱多而真的不在乎。那Web缓存还有作用吗?答案是肯定的,对于最终用户,缓存的使用能够明显加快页面打开速度,达到更好的体验。
nginx作为流行的反向代理的利器,理所当然提供了缓存方面的支持。
本文,首先对HTTP协议缓存相关的标签简单介绍,然后对各个标签进行演练,形象说明下各个HTTP标签的含义,以求补充市面上这一方面的空白。
1.HTTP协议缓存知识概述
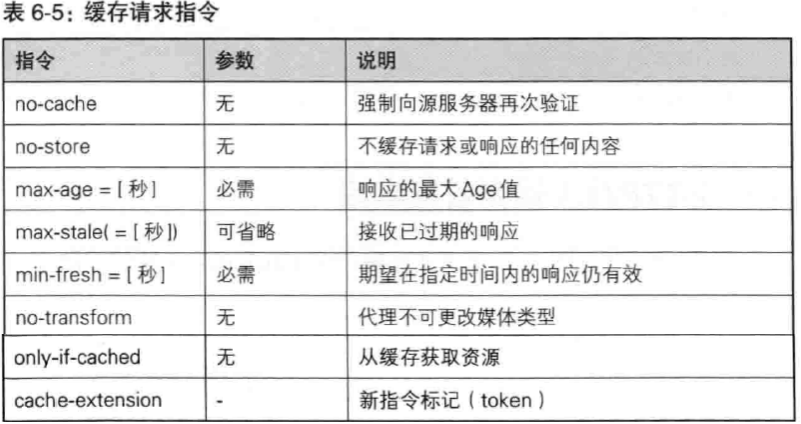
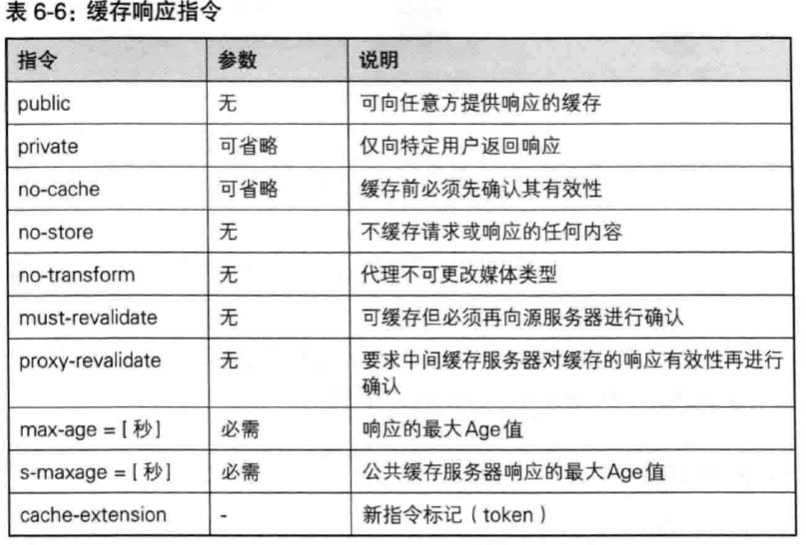
1.1 Cache-Control
Cache-Control = “Cache-Control” “:” cache-directive。
| Cache-directive | 说明 |
|---|---|
| public | 所有内容都将被缓存 |
| private | 内容只缓存到私有缓存中 |
| no-cache | 所有内容都不会被缓存 |
| no-store | 所有内容都不会被缓存到缓存或 Internet 临时文件中 |
| must-revalidation/proxy-revalidation | 如果缓存的内容失效,请求必须发送到服务器/代理以进行重新验证 |
| max-age=xxx (xxx is numeric) | 缓存的内容将在 xxx 秒后失效, 这个选项只在HTTP 1.1可用, 并如果和Last-Modified一起使用时, 优先级较高 |
Cache-Control 标签,属于通用标签,可以存在于请求头,也可以存在于响应头。
不同位置的Cache-Control,具体会有所区别
1.2 Expires
Expires = "Expires" ":" HTTP-date
Expires 字段接收以下格式的值:“Expires: Sun, 08 Nov 2009 03:37:26 GMT”。
如果查看内容时的日期在给定的日期之前,则认为该内容没有失效并从缓存中提取出来。反之,则认为该内容失效。失效的缓存条目通常不会被缓存(无论是代理缓存还是用户代理缓存)返回,除非首先通过原始服务器(或者拥有该实体的最新副本的中介缓存)验证。(注意:cache-control max-age 和 s-maxage 将覆盖 Expires 头部。)
1.3 验证器Last-Modified/Etag
Last-Modified = "Last-Modified" ":" HTTP-date
Last-Modified 实体头部字段值通常用作一个缓存验证器。简单来说,如果实体值在 Last-Modified 值之后没有被更改,则认为该缓存条目有效。
ETag 响应头部字段值是一个实体标记,它提供一个 “不透明” 的缓存验证器。这可能在以下几种情况下提供更可靠的验证:不方便存储修改日期;HTTP 日期值的 one-second 解决方案不够用;或者原始服务器希望避免由于使用修改日期而导致的某些冲突。
HTTP1.1中Etag的出现主要是为了解决几个Last-Modified比较难解决的问题:
Last-Modified标注的最后修改只能精确到秒级,如果某些文件在1秒钟以内,被修改多次的话,它将不能准确标注文件的新鲜度
如果某些文件会被定期生成,当有时内容并没有任何变化,但Last-Modified却改变了,导致文件没法使用缓存
有可能存在服务器没有准确获取文件修改时间,或者与代理服务器时间不一致等情形
2.Nginx演练
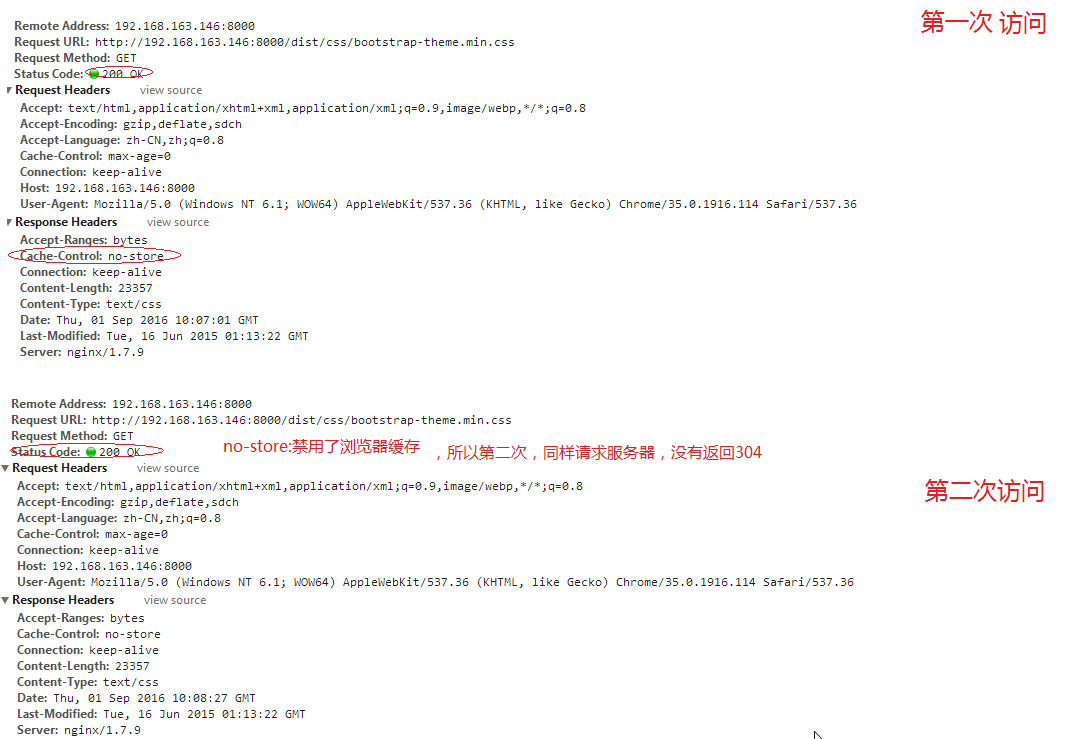
2.1 Cache-Control no-store VS no-store
2.1.1 Cache-Control 为no-store时
|
1
2
3
4
5
6
7
8
9
10
11
12
13
|
server {
listen 8000;
access_log logs
/server1
.access.log main;
location /
{
index index.html index.htm;
add_header Cache-Control no-store;
#add_header Expires 0;
#if_modified_since off;
etag off;
root
/u01/up1/bootstrap-3
.3.5
/docs
;
}
}
|
第一次访问 VS 第二次访问对比
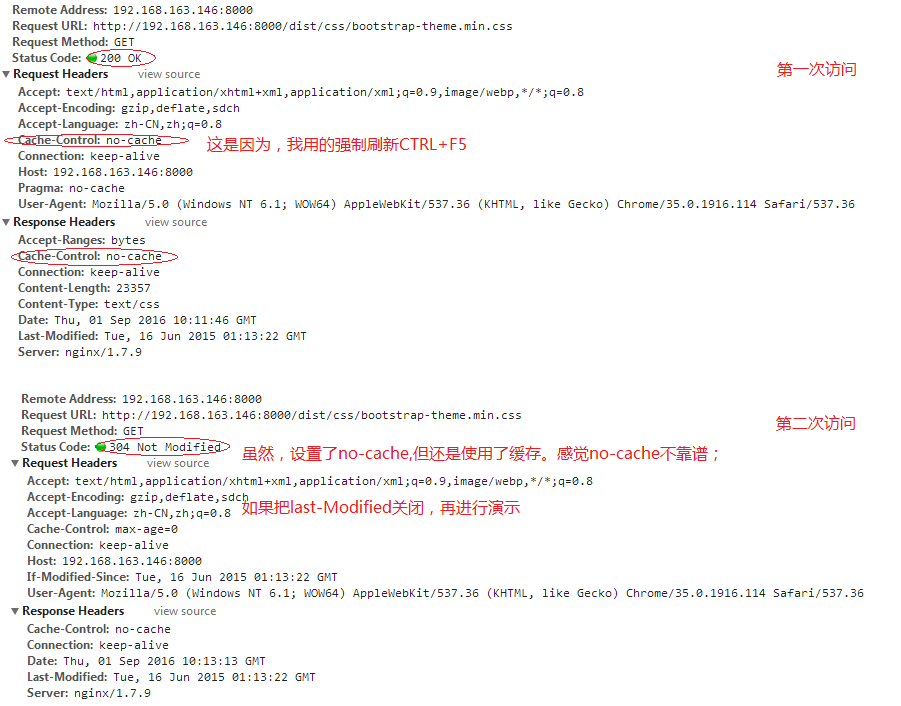
2.1.2 Cache-Control 为no-cache时
|
1
2
3
4
5
6
7
8
9
10
11
12
13
|
server {
listen 8000;
access_log logs
/server1
.access.log main;
location /
{
index index.html index.htm;
add_header Cache-Control no-cache;
#add_header Expires 0;
#if_modified_since off;
etag off;
root
/u01/up1/bootstrap-3
.3.5
/docs
;
}
}
|
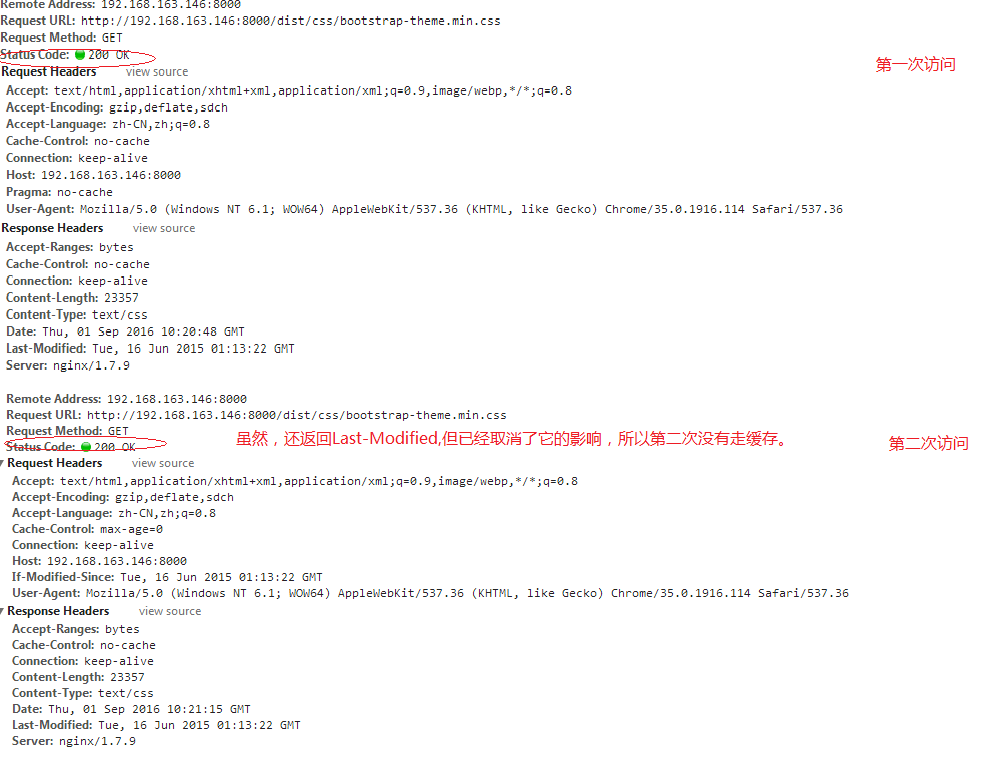
第一次访问 VS 第二次访问对比
2.1.3 Cache-Control 为no-cache时,且关闭Last-Modified.
|
1
2
3
4
5
6
7
8
9
10
11
12
13
|
server {
listen 8000;
access_log logs
/server1
.access.log main;
location /
{
index index.html index.htm;
add_header Cache-Control no-cache;
#add_header Expires 0;
if_modified_since off;
etag off;
root
/u01/up1/bootstrap-3
.3.5
/docs
;
}
}
|
第一次访问 VS 第二次访问对比
2.2 Cache-Control public VS private
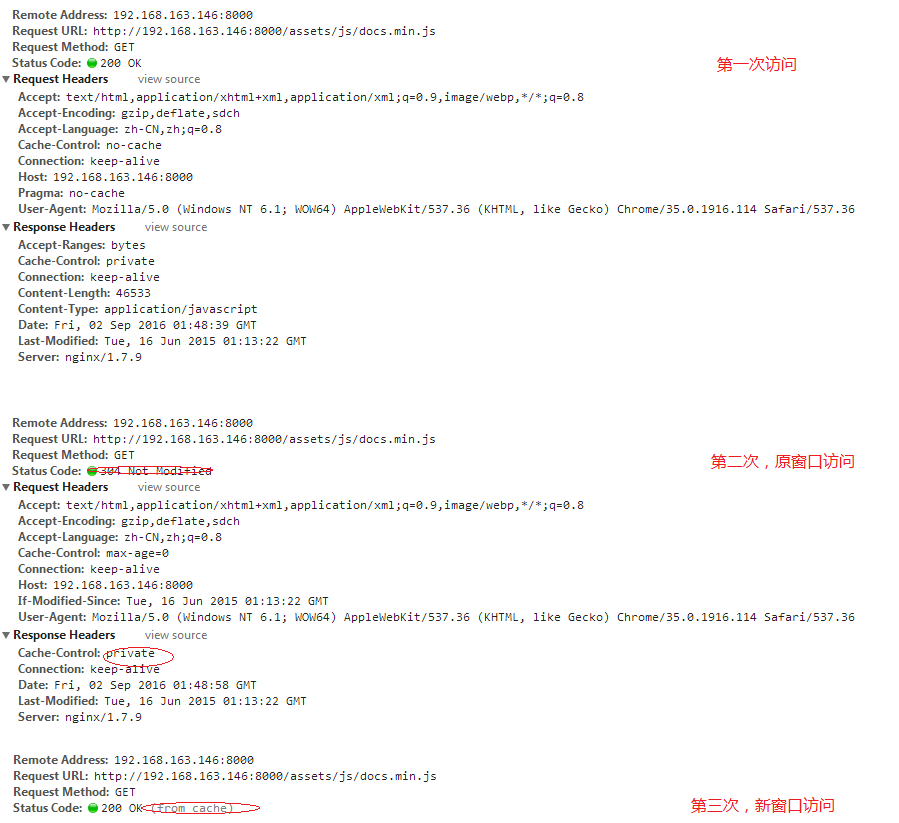
2.2.1 设置Cache-Control private
配置信息
|
1
2
3
4
5
6
7
8
9
10
11
12
13
|
server {
listen 8000;
access_log logs
/server1
.access.log main;
location /
{
index index.html index.htm;
add_header Cache-Control public;
#add_header Expires 0;
if_modified_since exact;
etag off;
root
/u01/up1/bootstrap-3
.3.5
/docs
;
}
}
|
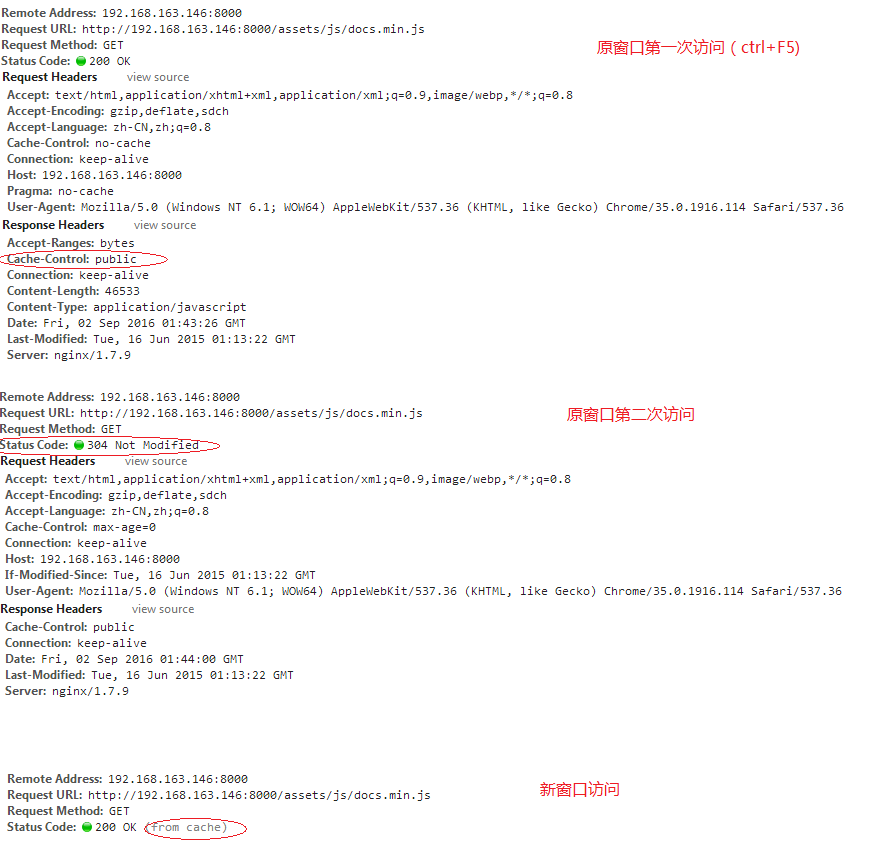
测试结果
1.设置private效果
2.设置public效果
通过验证,在浏览器段两者效果是一样的。在新窗口中都访问了缓存。
可见,按字面理解的“private按浏览器私有是错误的“
引用
http://stackoverflow.com/questions/3492319/private-vs-public-in-cache-control
的解释:
The only difference is that with Private you are not allowing proxies to cache the data that travels through them. In the end, it all boils down to the data contained in the pages/files you are sending.
For example, your ISP could have an invisible proxy between you and the Internet, that is caching web pages to reduce the amount of bandwidth needed and lower costs.By using cache-control:private, you are specifying that it shouldn't cache the page (but allowing the final user to do so). If you use cache-control: public, you are saying that it's okay for everyone to cache the page, and so the proxy would keep a copy.
As a rule of thumb, if it's something everybody can access (for example, the logo in this page) cache-control: public might be better, because the more people that cache it, the less bandwidth you'll need. If it's something that is related to the connected user (for example, the HTML in this page includes my username, so it won't be useful to anyone else) cache-control: private will be better, as the proxies would be caching data that won't be requested by other users, and they might also be keeping data that you don't want to be kept in servers that you don't trust.
And, of course, everything that is not public should have a private cache. Otherwise the data might be stored in a middle proxy server, were it could be accessed by anyone with access to it.
走了一段弯路,继续重新测试。
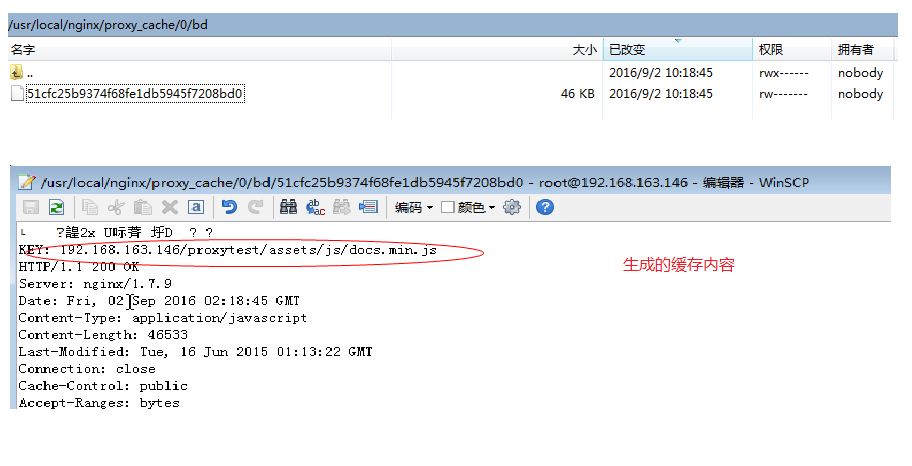
首先开启proxy_cache
|
1
2
3
4
5
6
7
8
9
10
11
12
13
14
15
16
17
18
19
20
21
22
23
24
25
26
27
28
29
30
31
32
33
34
35
36
37
38
39
40
41
42
43
44
|
http {
include mime.types;
default_type application
/octet-stream
;
log_format main
'$remote_addr - $remote_user [$time_local] "$request" '
'$status $body_bytes_sent "$http_referer" '
'"$http_user_agent" "$http_x_forwarded_for"'
;
access_log logs
/access
.log main;
sendfile on;
#tcp_nopush on;
#keepalive_timeout 0;
keepalive_timeout 65;
proxy_cache_path
/usr/local/nginx/proxy_cache
levels=1:2 keys_zone=content:20m inactive=1d max_size=100m;
proxy_cache content;
server {
listen 80;
add_header X-Via $server_addr;
location
/proxytest
{
proxy_cache content;
proxy_cache_valid 200 304 301 302 10d;
proxy_cache_valid any 1d;
proxy_cache_key $host$uri$is_args$args;
proxy_pass http:
//localhost
:8000/;
}
}
server {
listen 8000;
access_log logs
/server1
.access.log main;
location /
{
index index.html index.htm;
add_header Cache-Control public;
#add_header Expires 0;
if_modified_since exact;
etag off;
root
/u01/up1/bootstrap-3
.3.5
/docs
;
}
}
etag off;
}
|
访问http://192.168.163.146/proxytest/assets/js/docs.min.js
add_header Cache-Control public;修改为add_header Cache-Control private;
访问另外一个资源,不会生成缓存文件。
余下相关内容包括,下回继续演练。
2.3 Expires
if-modified-since
if-unmodified-since
2.4 ETag
与ETag相关的请求首部(条件请求)
if-match
if-none-match
if-range
2.5 条件验证
本文转自 randy_shandong 51CTO博客,原文链接:http://blog.51cto.com/dba10g/1845490,如需转载请自行联系原作者
