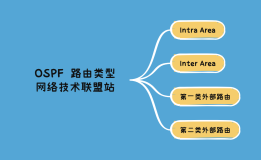
ospf单area调整为多area试验手记
原环境介绍:
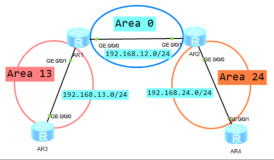
该拓扑原来环境为单区域ospf路由环境,area为0。
各个接口如图所示,图中没有画出部分point to point链路。
该拓扑原来环境为单区域ospf路由环境,area为0。
各个接口如图所示,图中没有画出部分point to point链路。
新的拓扑不考虑汇总问题,因此区域内IP地址划分是无法聚合的。
这是为了在stub和绝对stub试验的时候对比强烈一点。^_^
这是为了在stub和绝对stub试验的时候对比强烈一点。^_^
先将原来的network配置删除,注意,这里想偷懒的人可以有两种办法:
1是先配新的区域,然后删除老的(可能会引发问题,反正我这是试验
环境,无所谓,卡咔咔)
2是用设备接口地址步进式登陆,这样省力的地方在于不用老是起身改接
console线,哈哈哈
1是先配新的区域,然后删除老的(可能会引发问题,反正我这是试验
环境,无所谓,卡咔咔)
2是用设备接口地址步进式登陆,这样省力的地方在于不用老是起身改接
console线,哈哈哈
然后要注意loopback地址区域的配置,虽然LP地址都是一个网段的,但是
在我们这个网络里面不能设置这么大的区域覆盖其他区域,这对ospf来说
是非法的,因此我们只需要将lp地址设置在各自路由器对应的区域里就行
了。其实,其他的比如10.1.0.0和172.16.0.0也可以采取这种办法配置。
在我们这个网络里面不能设置这么大的区域覆盖其他区域,这对ospf来说
是非法的,因此我们只需要将lp地址设置在各自路由器对应的区域里就行
了。其实,其他的比如10.1.0.0和172.16.0.0也可以采取这种办法配置。
按照这个原则,我们采取从内向外的办法,就是以manager机为中心扩散,
因为这样最能有效的在配置时不中断网络,避免麻烦。
具体到每个链路来说,先配远端的,因为配好以后会断开,然后配本身的,
这样学习到就通了,否则,如果先配近端的立马断开,你又只能从接口
步步推进了,呵呵。
因为这样最能有效的在配置时不中断网络,避免麻烦。
具体到每个链路来说,先配远端的,因为配好以后会断开,然后配本身的,
这样学习到就通了,否则,如果先配近端的立马断开,你又只能从接口
步步推进了,呵呵。
先是area0周围的三台设备,然后是2610出口。(我还要挂QQ啊,^_^)
然后是2621xm_up,这样10.0.1.0网段内的实验机都可以上网啦。
然后是2621xm_up,这样10.0.1.0网段内的实验机都可以上网啦。
接下来是area3的另外两台。
然后是area4和area5。
然后是area4和area5。
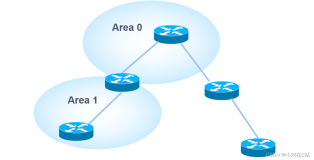
配完area5以后会发现,area5内的都学习不到,这因为中间隔了一个area4
根据ospf的法则,需要配虚链路。
那么虚链路在哪里配呢?显然要连接5和0,必须在area4内做文章。
根据ospf的法则,需要配虚链路。
那么虚链路在哪里配呢?显然要连接5和0,必须在area4内做文章。
C2621XM_down#
router ospf 103
log-adjacency-changes
area 4 virtual-link 10.10.10.7
router ospf 103
log-adjacency-changes
area 4 virtual-link 10.10.10.7
C3745#
router ospf 103
log-adjacency-changes
area 4 virtual-link 10.10.10.3
router ospf 103
log-adjacency-changes
area 4 virtual-link 10.10.10.3
这样,我们就连接了area5和area0,互相学习到了路由信息。
但是我们看看1720上的路由表:
Gateway of last resort is 10.0.10.254 to network 0.0.0.0
172.16.0.0/16 is variably subnetted, 4 subnets, 2 masks
C 172.16.6.254/32 is directly connected, Serial0
O IA 172.16.5.0/24 [110/1787] via 10.0.10.254, 00:01:53, FastEthernet0
C 172.16.6.0/24 is directly connected, Serial0
O IA 172.16.3.0/24 [110/66] via 10.0.10.254, 00:01:53, FastEthernet0
10.0.0.0/8 is variably subnetted, 23 subnets, 2 masks
C 10.0.10.0/24 is directly connected, FastEthernet0
O IA 10.0.8.0/24 [110/4] via 10.0.10.254, 00:01:53, FastEthernet0
O IA 10.0.9.0/24 [110/2] via 10.0.10.254, 00:02:22, FastEthernet0
O IA 10.10.10.12/32 [110/4] via 10.0.10.254, 00:01:53, FastEthernet0
O IA 10.10.10.13/32 [110/4] via 10.0.10.254, 00:01:53, FastEthernet0
O IA 10.0.2.0/24 [110/3] via 10.0.10.254, 00:01:53, FastEthernet0
O IA 10.10.10.2/32 [110/14] via 10.0.10.254, 00:01:53, FastEthernet0
O IA 10.0.3.0/24 [110/3] via 10.0.10.254, 00:01:53, FastEthernet0
O IA 10.1.2.0/24 [110/3] via 10.0.10.254, 00:01:53, FastEthernet0
O IA 10.10.10.3/32 [110/2] via 10.0.10.254, 00:02:22, FastEthernet0
O IA 10.0.0.0/24 [110/13] via 10.0.10.254, 00:01:53, FastEthernet0
O IA 10.1.1.0/24 [110/4] via 10.0.10.254, 00:01:53, FastEthernet0
C 10.10.10.0/24 is directly connected, Loopback0
O IA 10.0.1.0/24 [110/4] via 10.0.10.254, 00:01:53, FastEthernet0
O IA 10.1.0.0/24 [110/4] via 10.0.10.254, 00:01:53, FastEthernet0
O IA 10.0.6.0/24 [110/3] via 10.0.10.254, 00:01:53, FastEthernet0
O IA 10.10.10.6/32 [110/4] via 10.0.10.254, 00:01:53, FastEthernet0
O IA 10.0.7.0/24 [110/3] via 10.0.10.254, 00:01:53, FastEthernet0
O IA 10.10.10.7/32 [110/3] via 10.0.10.254, 00:01:53, FastEthernet0
O IA 10.10.10.4/32 [110/4] via 10.0.10.254, 00:01:53, FastEthernet0
O IA 10.0.4.0/24 [110/3] via 10.0.10.254, 00:01:53, FastEthernet0
O IA 10.10.10.5/32 [110/4] via 10.0.10.254, 00:01:53, FastEthernet0
O IA 10.0.5.0/24 [110/4] via 10.0.10.254, 00:01:53, FastEthernet0
O*E2 0.0.0.0/0 [110/1] via 10.0.10.254, 00:01:48, FastEthernet0
C1720#
恐怖啊,他已经是个末节(STUB)的路由器了,而且还是一个绝对stub的路由,
那么我们先后尝试一下两种情况的区别。
先是配置成stub路由器:
那么我们先后尝试一下两种情况的区别。
先是配置成stub路由器:
C1720(config-router)#area 5 stub
C2621XM_down(config-router)#area 5 stub
结果发现没大变化,为什么呢?因为stub只是禁止了5类LSA,所以,AS内部的路由
都还在。
都还在。
接下来换绝对末节:
C1720(config-router)#area 5 stub no-summary
C2621XM_down(config-router)#area 5 stub no-summary
在看看我们的1720的路由表:
Gateway of last resort is 10.0.10.254 to network 0.0.0.0
Gateway of last resort is 10.0.10.254 to network 0.0.0.0
172.16.0.0/16 is variably subnetted, 2 subnets, 2 masks
C 172.16.6.254/32 is directly connected, Serial0
C 172.16.6.0/24 is directly connected, Serial0
10.0.0.0/24 is subnetted, 2 subnets
C 10.0.10.0 is directly connected, FastEthernet0
C 10.10.10.0 is directly connected, Loopback0
O*IA 0.0.0.0/0 [110/2] via 10.0.10.254, 00:01:40, FastEthernet0
C 172.16.6.254/32 is directly connected, Serial0
C 172.16.6.0/24 is directly connected, Serial0
10.0.0.0/24 is subnetted, 2 subnets
C 10.0.10.0 is directly connected, FastEthernet0
C 10.10.10.0 is directly connected, Loopback0
O*IA 0.0.0.0/0 [110/2] via 10.0.10.254, 00:01:40, FastEthernet0
世界清净了。。。。^_^
接下来我们用同样的方式给2621xm_up减肥,因为他同样是个stub区域。
减肥前:
Gateway of last resort is 10.0.2.1 to network 0.0.0.0
减肥前:
Gateway of last resort is 10.0.2.1 to network 0.0.0.0
172.16.0.0/16 is variably subnetted, 7 subnets, 2 masks
C 172.16.4.254/32 is directly connected, Serial0/1
C 172.16.4.0/24 is directly connected, Serial0/1
O IA 172.16.5.0/24 [110/1786] via 10.0.2.1, 00:00:36, FastEthernet0/0
O IA 172.16.6.0/24 [110/65] via 10.0.2.1, 00:00:36, FastEthernet0/0
C 172.16.2.0/24 is directly connected, Serial0/0
O IA 172.16.3.0/24 [110/65] via 10.0.2.1, 00:00:36, FastEthernet0/0
C 172.16.2.1/32 is directly connected, Serial0/0
10.0.0.0/8 is variably subnetted, 17 subnets, 2 masks
O IA 10.0.9.0/24 [110/2] via 10.0.2.1, 00:00:36, FastEthernet0/0
O IA 10.10.10.12/32 [110/3] via 10.0.2.1, 00:00:36, FastEthernet0/0
O IA 10.10.10.13/32 [110/3] via 10.0.2.1, 00:00:36, FastEthernet0/0
O IA 10.10.10.2/32 [110/13] via 10.0.2.1, 00:00:36, FastEthernet0/0
C 10.0.2.0/24 is directly connected, FastEthernet0/0
O IA 10.1.2.0/24 [110/2] via 10.0.2.1, 00:00:36, FastEthernet0/0
O IA 10.0.3.0/24 [110/2] via 10.0.2.1, 00:00:36, FastEthernet0/0
C 10.10.10.0/24 is directly connected, Loopback0
O IA 10.1.1.0/24 [110/3] via 10.0.2.1, 00:00:36, FastEthernet0/0
O IA 10.0.0.0/24 [110/12] via 10.0.2.1, 00:00:36, FastEthernet0/0
O IA 10.1.0.0/24 [110/3] via 10.0.2.1, 00:00:36, FastEthernet0/0
C 10.0.1.0/24 is directly connected, FastEthernet0/1
O IA 10.0.6.0/24 [110/2] via 10.0.2.1, 00:00:36, FastEthernet0/0
O IA 10.10.10.7/32 [110/2] via 10.0.2.1, 00:00:36, FastEthernet0/0
O IA 10.0.7.0/24 [110/2] via 10.0.2.1, 00:00:36, FastEthernet0/0
O IA 10.0.4.0/24 [110/2] via 10.0.2.1, 00:00:36, FastEthernet0/0
O IA 10.0.5.0/24 [110/3] via 10.0.2.1, 00:00:36, FastEthernet0/0
O*E2 0.0.0.0/0 [110/1] via 10.0.2.1, 00:00:36, FastEthernet0/0
减肥后:
Gateway of last resort is 10.0.2.1 to network 0.0.0.0
Gateway of last resort is 10.0.2.1 to network 0.0.0.0
172.16.0.0/16 is variably subnetted, 4 subnets, 2 masks
C 172.16.4.254/32 is directly connected, Serial0/1
C 172.16.4.0/24 is directly connected, Serial0/1
C 172.16.2.0/24 is directly connected, Serial0/0
C 172.16.2.1/32 is directly connected, Serial0/0
10.0.0.0/24 is subnetted, 3 subnets
C 10.0.2.0 is directly connected, FastEthernet0/0
C 10.10.10.0 is directly connected, Loopback0
C 10.0.1.0 is directly connected, FastEthernet0/1
O*IA 0.0.0.0/0 [110/2] via 10.0.2.1, 00:00:14, FastEthernet0/0
我们同样的将area3也设置成stub区域。
下面我们将目光放到area1上;
这里2610也可以作为一个stub区域,但是他必须向内网公布默认路由,
不然我们实验室都上不了网了;这样的情况下,就必须配置2610为
NSSA区域(not so stub area),老外的定义很有意思,呵呵~
这里2610也可以作为一个stub区域,但是他必须向内网公布默认路由,
不然我们实验室都上不了网了;这样的情况下,就必须配置2610为
NSSA区域(not so stub area),老外的定义很有意思,呵呵~
在3550_down上:
router ospf 103
area 1 nssa
area 1 nssa
在2610上:
router ospf 103
area 1 nssa default-information-originate
default-information originate
为什么这里写了两个default路由呢?下面那个是原来用来向内网公布默认
路由的,现在area1做了nssa,需要用nssa里面的default语句公布一条nssa
特有的7类路由:
Type-7 AS External Link States (Area 1)
router ospf 103
area 1 nssa default-information-originate
default-information originate
为什么这里写了两个default路由呢?下面那个是原来用来向内网公布默认
路由的,现在area1做了nssa,需要用nssa里面的default语句公布一条nssa
特有的7类路由:
Type-7 AS External Link States (Area 1)
Link ID ADV Router Age Seq# Checksum Tag
0.0.0.0 10.10.10.2 534 0x80000001 0x001D4C 0
0.0.0.0 10.10.10.2 534 0x80000001 0x001D4C 0
这个时候,我们发现2610上的路由还是太多了,我们认为2610上只要知道
10.0.0.0等内网在自己左侧就可以了;
我们在3550_down上设置:
area 1 nssa no-summary
这个时候你会发现2610和大家断开了;分析原因是no-summary禁止了3、4、5
类路由进来,我们精简路由表的效果虽然达到,然是他仅仅生成了一条
0.0.0.0的默认路由替代,这显然和2610上原来的默认路由不符,2610原来的
默认路由是上外网的静态路由,也不可能被这条默认路由说占据。
这条路走不通。
10.0.0.0等内网在自己左侧就可以了;
我们在3550_down上设置:
area 1 nssa no-summary
这个时候你会发现2610和大家断开了;分析原因是no-summary禁止了3、4、5
类路由进来,我们精简路由表的效果虽然达到,然是他仅仅生成了一条
0.0.0.0的默认路由替代,这显然和2610上原来的默认路由不符,2610原来的
默认路由是上外网的静态路由,也不可能被这条默认路由说占据。
这条路走不通。
那么采用汇总路由的方式呢?
3550_down作为ABR,可以采用area id range的方式汇总,但是他的左边没有
成地址块的网络,如果配置成10.0.0.0/8,那么area1也是属于这个领域的;
因此这个方式也不适用。
3550_down作为ABR,可以采用area id range的方式汇总,但是他的左边没有
成地址块的网络,如果配置成10.0.0.0/8,那么area1也是属于这个领域的;
因此这个方式也不适用。
总结是因为地址设计不适合nssa中no-summary的试验,下次重新规划IP时,
可以考虑让nssa内的路由表再次减少一点。
可以考虑让nssa内的路由表再次减少一点。
最后,我们来看看几个具有代表性的ospf database数据:
C3550_down#sh ip ospf da
OSPF Router with ID (10.10.10.12) (Process ID 103)
Router Link States (Area 0)(类型1;隔壁的路由器)
Link ID ADV Router Age Seq# Checksum Link count
10.10.10.3 10.10.10.3 1581 (DNA) 0x80000094 0x00849C 1
10.10.10.7 10.10.10.7 1509 0x800000A6 0x006508 8
10.10.10.12 10.10.10.12 390 0x800000A5 0x00ACEC 4
10.10.10.13 10.10.10.13 780 0x80000095 0x000E92 4
10.10.10.3 10.10.10.3 1581 (DNA) 0x80000094 0x00849C 1
10.10.10.7 10.10.10.7 1509 0x800000A6 0x006508 8
10.10.10.12 10.10.10.12 390 0x800000A5 0x00ACEC 4
10.10.10.13 10.10.10.13 780 0x80000095 0x000E92 4
Net Link States (Area 0)(类型2;area内都有哪些网络)
Link ID ADV Router Age Seq# Checksum
10.0.3.254 10.10.10.12 1671 0x8000008B 0x00EC3D
10.0.4.1 10.10.10.13 1280 0x8000008B 0x00D153
10.0.5.1 10.10.10.13 1281 0x8000008B 0x000D12
10.0.3.254 10.10.10.12 1671 0x8000008B 0x00EC3D
10.0.4.1 10.10.10.13 1280 0x8000008B 0x00D153
10.0.5.1 10.10.10.13 1281 0x8000008B 0x000D12
Summary Net Link States (Area 0)(类型3;area外哪些网络)
Link ID ADV Router Age Seq# Checksum
10.0.0.0 10.10.10.12 390 0x80000012 0x0010DD
10.0.1.0 10.10.10.7 262 0x80000003 0x00F018
10.0.2.0 10.10.10.7 262 0x80000011 0x00BF3B
10.0.6.0 10.10.10.7 760 0x80000012 0x009164
10.0.7.0 10.10.10.7 760 0x80000012 0x00866E
10.0.8.0 10.10.10.7 760 0x80000004 0x00A15F
10.0.9.0 10.10.10.3 1580 (DNA) 0x80000007 0x009E63
10.0.9.0 10.10.10.7 262 0x8000000E 0x00787E
10.0.10.0 10.10.10.3 2 (DNA) 0x80000005 0x00976B
10.10.10.1 10.10.10.3 2 (DNA) 0x80000001 0x0027D3
10.10.10.2 10.10.10.12 390 0x80000002 0x003FA7
10.10.10.3 10.10.10.3 3458 0x80000008 0x00FAF7
10.10.10.3 10.10.10.7 262 0x8000000A 0x00E803
10.10.10.4 10.10.10.7 262 0x80000003 0x00EC05
10.10.10.5 10.10.10.7 760 0x80000002 0x00E40D
10.10.10.6 10.10.10.7 1001 0x80000002 0x00DA16
Type-7 AS External Link States (Area 1)(类型7:NSSA
引入的网络)
引入的网络)
Link ID ADV Router Age Seq# Checksum Tag
0.0.0.0 10.10.10.2 201 0x80000002 0x001B4D 0
0.0.0.0 10.10.10.2 201 0x80000002 0x001B4D 0
Type-5 AS External Link States(类型5;AS外面哪些网络)
Link ID ADV Router Age Seq# Checksum Tag
0.0.0.0 10.10.10.12 392 0x80000002 0x0073F4 0
0.0.0.0 10.10.10.12 392 0x80000002 0x0073F4 0
由于我们没有其他的AS在2610外面,因此没有看到(类型4;ASBR在哪里的)
网络;具体描述应该是:Summary ASB Link States
本文转自 beansprouts 51CTO博客,原文链接:http://blog.51cto.com/netwalk/66254
,如需转载请自行联系原作者