Ant跟make很相似,它有target,和生成target的一系列操作。
但它又与make不同,ant具有如下特点:
(1)跨平台。(它是基于java的)
(2)用xml来实现脚本,控制运行过程。
一、准备
1、下载安装ant。
下载地址:
http://ant.apache.org/
安装方法:
(1)解压缩。
(2)设置环境变量。
set ANT_HOME=c:\ant
set JAVA_HOME=c:\jdk-1.5.0.05
set PATH=%PATH%;%ANT_HOME%\bin
set ANT_HOME=c:\ant
set JAVA_HOME=c:\jdk-1.5.0.05
set PATH=%PATH%;%ANT_HOME%\bin
2、下载安装jdk。
二、基本概念
参见: http://ant.apache.org/manual/index.html
参见: http://ant.apache.org/manual/index.html
1、Projects
它有三个属性:项目名字、默认目标、基础目录(所有相对路径均基于它计算)
它有三个属性:项目名字、默认目标、基础目录(所有相对路径均基于它计算)
| Attribute | Description | Required |
| name | the name of the project. | No |
| default | the default target to use when no target is supplied. | No; however, since Ant 1.6.0, every project includes an implicit target that contains any and all top-level tasks and/or types. This target will always be executed as part of the project's initialization, even when Ant is run with the -projecthelp option. |
| basedir | the base directory from which all path calculations are done. This attribute might be overridden by setting the "basedir" property beforehand. When this is done, it must be omitted in the project tag. If neither the attribute nor the property have been set, the parent directory of the buildfile will be used. | No |
2、Targets
目标。可以依赖其它目标。Ant会处理这个依赖关系。(类似于make)
3、Tasks
Task是可以被执行的一段代码。
基本结构:
<name attribute1="value1" attribute2="value2" ... />
Ant有一系列的内建task,和很多的可选task。
4、Properties
属性,用于定义构建过程,或者定义一些变量代表某个长字符串。
4、Properties
属性,用于定义构建过程,或者定义一些变量代表某个长字符串。
三、脚本示例
1、一个基本的构建脚本。
<project name="MyProject" default="dist" basedir=".">
<description>
simple example build file
</description>
<!-- set global properties for this build -->
<property name="src" location="src"/>
<property name="build" location="build"/>
<property name="dist" location="dist"/>
<target name="init">
<!-- Create the time stamp -->
<tstamp/>
<!-- Create the build directory structure used by compile -->
<mkdir dir="${build}"/>
</target>
<target name="compile" depends="init"
description="compile the source " >
<!-- Compile the java code from ${src} into ${build} -->
<javac srcdir="${src}" destdir="${build}"/>
</target>
<target name="dist" depends="compile"
description="generate the distribution" >
<!-- Create the distribution directory -->
<mkdir dir="${dist}/lib"/>
<!-- Put everything in ${build} into the MyProject-${DSTAMP}.jar file -->
<jar jarfile="${dist}/lib/MyProject-${DSTAMP}.jar" basedir="${build}"/>
</target>
<target name="clean"
description="clean up" >
<!-- Delete the ${build} and ${dist} directory trees -->
<delete dir="${build}"/>
<delete dir="${dist}"/>
</target>
</project>
把此文件保存为build.xml,并且建立与之平级的src目录,里面写入HelloWorld.java,再运行ant,可以自动编译出class和jar。
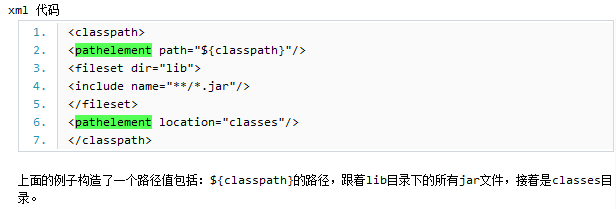
2、path定义和使用。
<path id="base.path">
<pathelement path="${classpath}"/>
<fileset dir="lib">
<include name="**/*.jar"/>
</fileset>
<pathelement location="classes"/>
</path>
<path id="tests.path" cache="true">
<path refid="base.path"/>
<pathelement location="testclasses"/>
</path>
<pathelement path="${classpath}"/>
<fileset dir="lib">
<include name="**/*.jar"/>
</fileset>
<pathelement location="classes"/>
</path>
<path id="tests.path" cache="true">
<path refid="base.path"/>
<pathelement location="testclasses"/>
</path>
例子:下面代码定义classpath为三部分组成,${classpath}、多个jar、classes目录。
四、基本使用
1、查看帮助。
D:\Tools\apache-ant-1.8.0-bin>ant -help
ant [options] [target [target2 [target3] ...]]
Options:
-help, -h print this message
-projecthelp, -p print project help information
-version print the version information and exit
-diagnostics print information that might be helpful to
diagnose or report problems.
-quiet, -q be extra quiet
-verbose, -v be extra verbose
-debug, -d print debugging information
-emacs, -e produce logging information without adornments
-lib <path> specifies a path to search for jars and classes
-logfile <file> use given file for log
-l <file> ''
-logger <classname> the class which is to perform logging
-listener <classname> add an instance of class as a project listener
-noinput do not allow interactive input
-buildfile <file> use given buildfile
-file <file> ''
-f <file> ''
-D<property>=<value> use value for given property
-keep-going, -k execute all targets that do not depend
on failed target(s)
-propertyfile <name> load all properties from file with -D
properties taking precedence
-inputhandler <class> the class which will handle input requests
-find <file> (s)earch for buildfile towards the root of
-s <file> the filesystem and use it
-nice number A niceness value for the main thread:
1 (lowest) to 10 (highest); 5 is the default
-nouserlib Run ant without using the jar files from
${user.home}/.ant/lib
-noclasspath Run ant without using CLASSPATH
-autoproxy Java1.5+: use the OS proxy settings
-main <class> override Ant's normal entry point
2、用ant执行lint。
(1)写一个main.c文件。
int main()
{
int a = 0;
int b = a * 10;
//return 0;
}
{
int a = 0;
int b = a * 10;
//return 0;
}
(2)在命令行执行lint-nt main.c得到如下结果:
D:\Tools\apache-ant-1.8.0-bin\test_jelly\lint>lint-nt main.c
PC-lint for C/C++ (NT) Vers. 8.00w, Copyright Gimpel Software 1985-2007
--- Module: main.c (C)
_
}
main.c 7 Info 783: Line does not end with new-line
main.c 7 Warning 529: Symbol 'b' (line 5) not subsequently referenced
main.c 5 Info 830: Location cited in prior message
PC-lint for C/C++ (NT) Vers. 8.00w, Copyright Gimpel Software 1985-2007
--- Module: main.c (C)
_
}
main.c 7 Info 783: Line does not end with new-line
main.c 7 Warning 529: Symbol 'b' (line 5) not subsequently referenced
main.c 5 Info 830: Location cited in prior message
(3)写如下的build.xml
<project name="MyProject" default="dist" basedir=".">
<target name="dist">
<tstamp/>
<exec dir="." executable="lint-nt" os="${os.name}" failonerror="true">
<arg value="main.c"/>
</exec>
</target>
</project>
<project name="MyProject" default="dist" basedir=".">
<target name="dist">
<tstamp/>
<exec dir="." executable="lint-nt" os="${os.name}" failonerror="true">
<arg value="main.c"/>
</exec>
</target>
</project>
然后执行ant,得到如下结果(跟命令行执行lint是一样的)
D:\Tools\apache-ant-1.8.0-bin\test_jelly\lint>ant
Buildfile: D:\Tools\apache-ant-1.8.0-bin\test_jelly\lint\build.xml
dist:
[exec] PC-lint for C/C++ (NT) Vers. 8.00w, Copyright Gimpel Software 1985-2
007
[exec]
[exec] --- Module: main.c (C)
[exec] _
[exec] }
[exec]
[exec] main.c 7 Info 783: Line does not end with new-line
[exec] main.c 7 Warning 529: Symbol 'b' (line 5) not subsequently referen
ced
[exec] main.c 5 Info 830: Location cited in prior message
BUILD FAILED
D:\Tools\apache-ant-1.8.0-bin\test_jelly\lint\build.xml:6: exec returned: 3
Total time: 1 second
通过指定-v参数,可以得到更多运行过程信息:
D:\Tools\apache-ant-1.8.0-bin\test_jelly\lint>
ant -v
Apache Ant version 1.8.0 compiled on February 1 2010
Trying the default build file: build.xml
Buildfile: D:\Tools\apache-ant-1.8.0-bin\test_jelly\lint\build.xml
Detected Java version: 1.6 in: C:\Program Files\Java\jdk1.6.0_18\jre
Detected OS: Windows 7
parsing buildfile D:\Tools\apache-ant-1.8.0-bin\test_jelly\lint\build.xml with U
RI = file:/D:/Tools/apache-ant-1.8.0-bin/test_jelly/lint/build.xml
Project base dir set to: D:\Tools\apache-ant-1.8.0-bin\test_jelly\lint
Build sequence for target(s) `dist' is [dist]
Complete build sequence is [dist, ]
dist:
parsing buildfile jar:file:/D:/Tools/apache-ant-1.8.0-bin/lib/ant.jar!/org/apach
e/tools/ant/antlib.xml with URI = jar:file:/D:/Tools/apache-ant-1.8.0-bin/lib/an
t.jar!/org/apache/tools/ant/antlib.xml from a zip file
[exec] Current OS is Windows 7
[exec] Executing 'lint-nt' with arguments:
[exec] 'files.lnt'
[exec]
[exec] The ' characters around the executable and arguments are
[exec] not part of the command.
[exec] PC-lint for C/C++ (NT) Vers. 8.00w, Copyright Gimpel Software 1985-2
007
[exec]
[exec] --- Module: main.c (C)
[exec] _
[exec] }
[exec]
[exec] main.c 7 Info 783: Line does not end with new-line
[exec] main.c 7 Warning 529: Symbol 'b' (line 5) not subsequently referen
ced
[exec] main.c 5 Info 830: Location cited in prior message
BUILD FAILED
D:\Tools\apache-ant-1.8.0-bin\test_jelly\lint\build.xml:4: exec returned: 3
at org.apache.tools.ant.taskdefs.ExecTask.runExecute(ExecTask.java:650)
at org.apache.tools.ant.taskdefs.ExecTask.runExec(ExecTask.java:676)
at org.apache.tools.ant.taskdefs.ExecTask.execute(ExecTask.java:502)
at org.apache.tools.ant.UnknownElement.execute(UnknownElement.java:291)
at sun.reflect.NativeMethodAccessorImpl.invoke0(Native Method)
at sun.reflect.NativeMethodAccessorImpl.invoke(NativeMethodAccessorImpl.
java:39)
at sun.reflect.DelegatingMethodAccessorImpl.invoke(DelegatingMethodAcces
sorImpl.java:25)
at java.lang.reflect.Method.invoke(Method.java:597)
at org.apache.tools.ant.dispatch.DispatchUtils.execute(DispatchUtils.jav
a:106)
at org.apache.tools.ant.Task.perform(Task.java:348)
at org.apache.tools.ant.Target.execute(Target.java:390)
at org.apache.tools.ant.Target.performTasks(Target.java:411)
at org.apache.tools.ant.Project.executeSortedTargets(Project.java:1360)
at org.apache.tools.ant.Project.executeTarget(Project.java:1329)
at org.apache.tools.ant.helper.DefaultExecutor.executeTargets(DefaultExe
cutor.java:41)
at org.apache.tools.ant.Project.executeTargets(Project.java:1212)
at org.apache.tools.ant.Main.runBuild(Main.java:801)
at org.apache.tools.ant.Main.startAnt(Main.java:218)
at org.apache.tools.ant.launch.Launcher.run(Launcher.java:280)
at org.apache.tools.ant.launch.Launcher.main(Launcher.java:109)
Total time: 1 second
本文转sinojelly51CTO博客,原文链接:http://blog.51cto.com/sinojelly/286292
,如需转载请自行联系原作者