CMake是一个比make更高级的编译配置工具,它可以根据不同平台、不同的编译器,生成相应的Makefile或者vcproj项目。
通过编写CMakeLists.txt,可以控制生成的Makefile,从而控制编译过程。CMake自动生成的Makefile不仅可以通过make命令构建项目生成目标文件,还支持安装(make install)、测试安装的程序是否能正确执行(make test,或者ctest)、生成当前平台的安装包(make package)、生成源码包(make package_source)、产生Dashboard显示数据并上传等高级功能,只要在CMakeLists.txt中简单配置,就可以完成很多复杂的功能,包括写测试用例。
通过编写CMakeLists.txt,可以控制生成的Makefile,从而控制编译过程。CMake自动生成的Makefile不仅可以通过make命令构建项目生成目标文件,还支持安装(make install)、测试安装的程序是否能正确执行(make test,或者ctest)、生成当前平台的安装包(make package)、生成源码包(make package_source)、产生Dashboard显示数据并上传等高级功能,只要在CMakeLists.txt中简单配置,就可以完成很多复杂的功能,包括写测试用例。
如果有嵌套目录,子目录下可以有自己的CMakeLists.txt。
总之,CMake是一个非常强大的编译自动配置工具,支持各种平台,KDE也是用它编译的,感兴趣的可以试用一下。
准备活动:
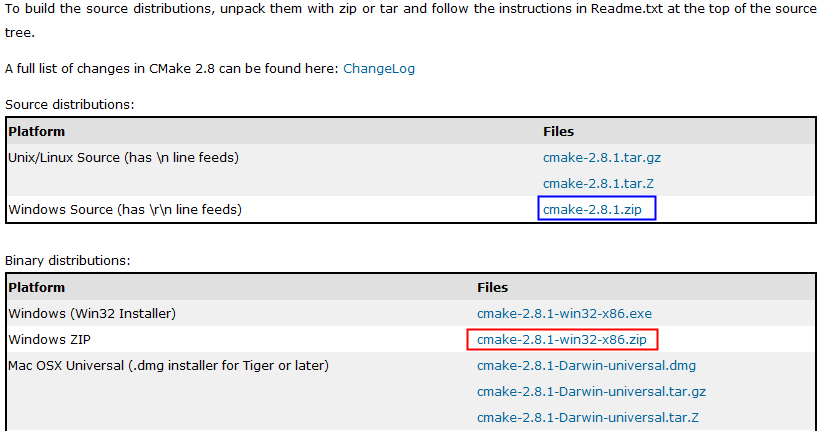
(1)安装cmake。
根据自己的需要下载相应的包即可,Windows下可以下载zip压缩的绿色版本,还可以下载源代码。
(2)运行cmake的方法。(GUI、命令行)
CMake使用步骤:
运行GUI的cmake界面:
cmake-2.8.1-win32-x86\bin\cmake-gui.exe
cmake-2.8.1-win32-x86\bin\cmake-gui.exe
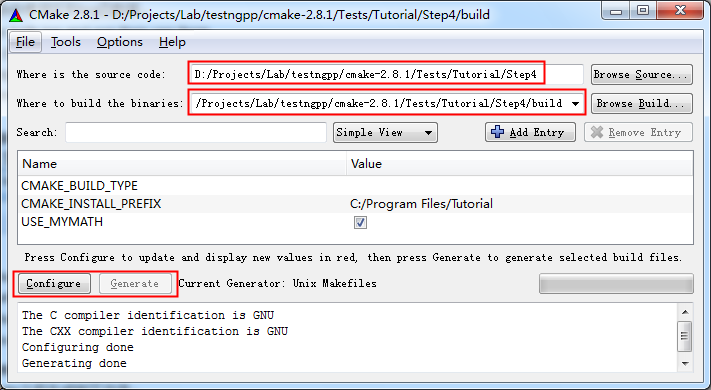
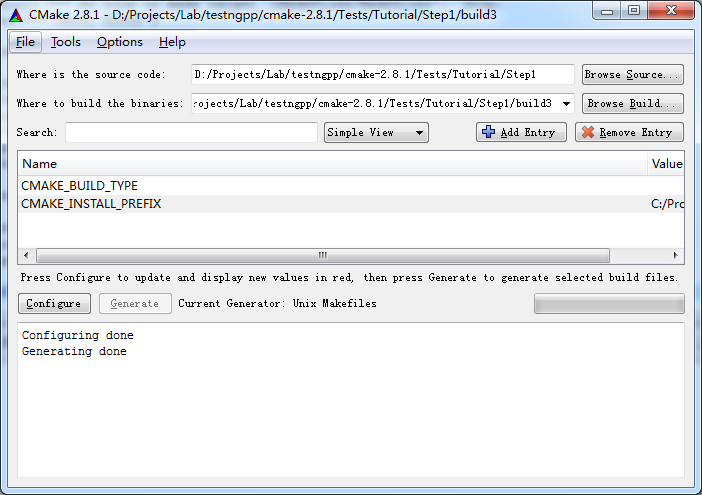
执行Configure:
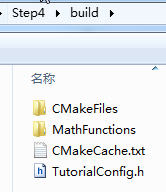
运行之后,生成了如下文件:
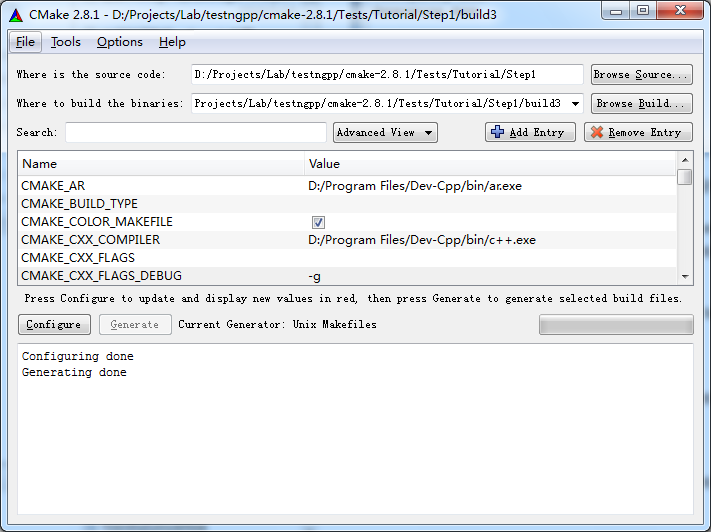
生成Makefile:
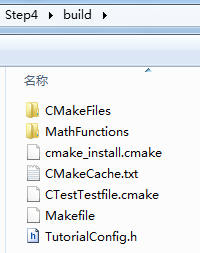
执行Generate之后生成如下文件:
运行make进行编译:
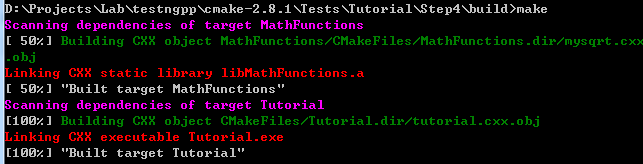
编译完成后,在build目录生成Tutorial.exe,运行Tutorial.exe 25就可以看到运行结果:

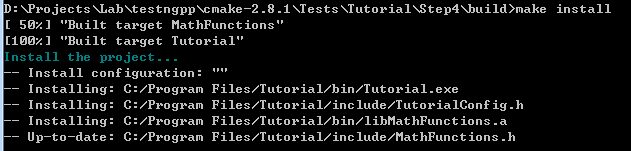
运行make install安装程序:
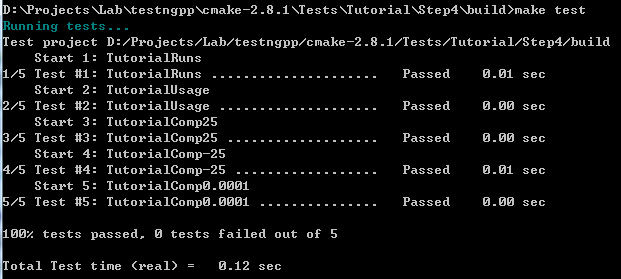
运行make test进行测试:
可以在源代码的Tests/Turorial目录中找到这个手册对应的代码。
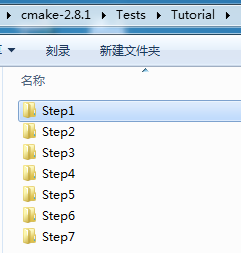
1、Step1。
(如果不知道如何使用cmake,以及如何使用编译产生的Turorial.exe,可先看下前面“CMake使用步骤”的说明,它以Step4为例详细介绍了使用过程,Step1的配置可能不够完全,比如无法运行make install,无法运行make test,但可以参考。)
简单的程序编译。
简单的程序编译。
(1)运行GUI的cmake,指定要编译的源代码路径和二进制文件路径(会自动创建)。
(2)点击Configure,配置成功后,再点击Generate。
配置需要选择合适的编译器,虽然我安装了VC2008,但没有配置成功;选择Unix Makefiles,配置成功,它自动找到了DevC++下的gcc.exe等编译器。
(3)在build3目录执行make,就能够编译生成Turorial.exe了。
D:\Projects\Lab\testngpp\cmake-2.8.1\Tests\Tutorial\Step1\build3> make
Linking CXX executable Tutorial.exe
[100%] Built target Tutorial
D:\Projects\Lab\testngpp\cmake-2.8.1\Tests\Tutorial\Step1\build3> make
Linking CXX executable Tutorial.exe
[100%] Built target Tutorial
可以运行一下Turorial.exe:
D:\Projects\Lab\testngpp\cmake-2.8.1\Tests\Tutorial\Step1\build3>Tutorial.exe
Tutorial.exe Version 1.0
Usage: Tutorial.exe number
D:\Projects\Lab\testngpp\cmake-2.8.1\Tests\Tutorial\Step1\build3>Tutorial.exe 4
The square root of 4 is 2
2、Step2
把子目录编译为库,并且链接到最终的可执行文件。
include_directories ("${PROJECT_SOURCE_DIR}/MathFunctions")
add_subdirectory (MathFunctions) # 使得子目录MathFunctions也能被编译
# add the executable
add_executable (Tutorial tutorial.cxx)
target_link_libraries (Tutorial MathFunctions)
产生makefile:
add_subdirectory (MathFunctions) # 使得子目录MathFunctions也能被编译
add_executable (Tutorial tutorial.cxx)
target_link_libraries (Tutorial MathFunctions)
产生makefile:
在GUI上点击Configure,之后Generate还是灰色,再次点击Configure,Generate就可以点击了。
编译:
在build目录运行make,即可开始编译,但是开始会报告sh.exe运行异常,应该是Tools下的UnxUtils的sh.exe与Win7不兼容,发现有如下make文件,估计是它导致的,于是把它重命名,不使用UnxUtils下的make,就OK乐。
D:\Tools\CMD\UnxUtils\usr\local\wbin\make.exe
编译过程:
D:\Projects\Lab\testngpp\cmake-2.8.1\Tests\Tutorial\Step2\build>make
[ 50%] Building CXX object MathFunctions/CMakeFiles/MathFunctions.dir/mysqrt.cxx
.obj
Linking CXX static library libMathFunctions.a
[ 50%] Built target MathFunctions
Linking CXX executable Tutorial.exe
[100%] Built target Tutorial
3、Step3
支持make install把程序安装到系统指定目录,并且运行一些测试检查它是否能够正常工作。
a、安装时使用的基础目录,由CMAKE_INSTALL_PREFIX指定。
b、可以通过一个很简单的用例检查程序是否运行起来,没有出现异常。(TurotialRuns只是一个用例名字)
add_test (TutorialRuns Tutorial 25)
c、macro方式进行多组数据的测试是非常简洁方便的。
#define a macro to simplify adding tests, then use it
macro (do_test arg result)
add_test (TutorialComp${arg} Tutorial ${arg})
set_tests_properties (TutorialComp${arg}
PROPERTIES PASS_REGULAR_EXPRESSION ${result})
endmacro (do_test)
macro (do_test arg result)
add_test (TutorialComp${arg} Tutorial ${arg})
set_tests_properties (TutorialComp${arg}
PROPERTIES PASS_REGULAR_EXPRESSION ${result})
endmacro (do_test)
# do a bunch of result based tests
do_test (25 "25 is 5")
do_test (-25 "-25 is 0")
执行make install:
D:\Projects\Lab\testngpp\cmake-2.8.1\Tests\Tutorial\Step3\build>make install
[ 50%] "Built target MathFunctions"
[100%] "Built target Tutorial"
Install the project...
-- Install configuration: ""
-- Installing: C:/Program Files/Tutorial/bin/Tutorial.exe
-- Installing: C:/Program Files/Tutorial/include/TutorialConfig.h
-- Installing: C:/Program Files/Tutorial/bin/libMathFunctions.a
-- Installing: C:/Program Files/Tutorial/include/MathFunctions.h
安装结果:
C:\Program Files\Tutorial>tree /f
C:.
├─bin
│ libMathFunctions.a
│ Tutorial.exe
│
└─include
MathFunctions.h
TutorialConfig.h
执行make test:
D:\Projects\Lab\testngpp\cmake-2.8.1\Tests\Tutorial\Step3\build>make test
Running tests...
Test project D:/Projects/Lab/testngpp/cmake-2.8.1/Tests/Tutorial/Step3/build
Start 1: TutorialRuns
1/5 Test #1: TutorialRuns ..................... Passed 0.01 sec
Start 2: TutorialComp25
2/5 Test #2: TutorialComp25 ................... Passed 0.01 sec
Start 3: TutorialNegative
3/5 Test #3: TutorialNegative ................. Passed 0.01 sec
Start 4: TutorialSmall
4/5 Test #4: TutorialSmall .................... Passed 0.00 sec
Start 5: TutorialUsage
5/5 Test #5: TutorialUsage .................... Passed 0.00 sec
100% tests passed, 0 tests failed out of 5
Total Test time (real) = 0.13 sec
修改一个测试用例,让它不过:
修改顶层CMakeLists.txt,然后重新Configure和Generate,然后make test即可看到结果。
D:\Projects\Lab\testngpp\cmake-2.8.1\Tests\Tutorial\Step3\build>make test
Running tests...
Test project D:/Projects/Lab/testngpp/cmake-2.8.1/Tests/Tutorial/Step3/build
Start 1: TutorialRuns
1/5 Test #1: TutorialRuns ..................... Passed 0.01 sec
Start 2: TutorialComp25
2/5 Test #2: TutorialComp25 ...................***Failed Required regular expre
ssion not found.Regex=[25 is 3
] 0.01 sec
Start 3: TutorialNegative
3/5 Test #3: TutorialNegative ................. Passed 0.01 sec
Start 4: TutorialSmall
4/5 Test #4: TutorialSmall .................... Passed 0.01 sec
Start 5: TutorialUsage
5/5 Test #5: TutorialUsage .................... Passed 0.01 sec
80% tests passed, 1 tests failed out of 5
Total Test time (real) = 0.13 sec
The following tests FAILED:
2 - TutorialComp25 (Failed)
Errors while running CTest
make: *** [test] Error 8
4、Step4
2 - TutorialComp25 (Failed)
Errors while running CTest
make: *** [test] Error 8
4、Step4
检查系统是否支持log和exp函数。(log和exp都是数学运算函数)
检查方法:
检查方法:
(1)顶层配置中使用CheckFunctionExists.cmake
# does this system provide the log and exp functions?
include (CheckFunctionExists.cmake)
check_function_exists (log HAVE_LOG)
check_function_exists (exp HAVE_EXP)
(2)修改.in文件,定义宏。(修改TutorialConfig.h.in,cmake执行中会把宏定义为合适的值,生成TurorialConfig.h,供编译时使用)
// does the platform provide exp and log functions?
#cmakedefine HAVE_LOG
#cmakedefine HAVE_EXP
(3)在代码中使用宏和log函数等。
// if we have both log and exp then use them
#if defined (HAVE_LOG) && defined (HAVE_EXP)
result = exp(log(x)*0.5);
#else // otherwise use an iterative approach
#if defined (HAVE_LOG) && defined (HAVE_EXP)
result = exp(log(x)*0.5);
#else // otherwise use an iterative approach
Step4的完整配置、生成Makefile、编译、运行、安装、测试过程,参见最前面的“CMake使用步骤”。
5、Step5
动态生成源文件,自动把源文件编译进系统中。
make的时候出错了:
D:\Projects\Lab\testngpp\cmake-2.8.1\Tests\Tutorial\Step5\build>make
Scanning dependencies of target MakeTable
[ 25%] Building CXX object MathFunctions/CMakeFiles/MakeTable.dir/MakeTable.cxx.
obj
Linking CXX executable MakeTable.exe
[ 25%] "Built target MakeTable"
[ 50%] Generating Table.h
'.' 不是内部或外部命令,也不是可运行的程序
或批处理文件。
make[2]: *** [MathFunctions/Table.h] Error 1
make[1]: *** [ MathFunctions/CMakeFiles/MathFunctions.dir/all] Error 2
make: *** [all] Error 2
问题分析:
首先看build/makefile文件,关于MakeTable有如下规则:
# Build rule for target.
MakeTable: cmake_check_build_system
$(MAKE) -f CMakeFiles/Makefile2 MakeTable
.PHONY : MakeTable
再看Makefile2文件,找到出错时正在编译的目标。
MakeTable: cmake_check_build_system
$(MAKE) -f CMakeFiles/Makefile2 MakeTable
.PHONY : MakeTable
再看Makefile2文件,找到出错时正在编译的目标。
# All Build rule for target.
MathFunctions/CMakeFiles/MakeTable.dir/all:
$(MAKE) -f MathFunctions/CMakeFiles/MakeTable.dir/build.make MathFunctions/CMakeFiles/MakeTable.dir/depend
$(MAKE) -f MathFunctions/CMakeFiles/MakeTable.dir/build.make MathFunctions/CMakeFiles/MakeTable.dir/build
$(CMAKE_COMMAND) -E cmake_progress_report D:/Projects/Lab/testngpp/cmake-2.8.1/Tests/Tutorial/Step5/build/CMakeFiles 1
@echo "Built target MakeTable"
.PHONY : MathFunctions/CMakeFiles/MakeTable.dir/all
Make规则的执行顺序是按照命令的先后顺序:
如果Makefile内容如下:
all:
echo "First line."
echo "Second line."
那么make结果:
D:\Users\Desktop>make
echo "First line."
First line.
echo "Second line."
Second line.
echo "First line."
echo "Second line."
那么make结果:
D:\Users\Desktop>make
echo "First line."
First line.
echo "Second line."
Second line.
由此,Built target MakeTable输出之后才失败的。
6、Step6
生成各种平台Windows/Ubuntu/etc.上的安装包,包括二进制安装包和源码安装包。
可以把依赖的系统库也打包。include (InstallRequiredSystemLibraries)
使用CPack。
由于Step1-7,后面一步的配置都包含了前面一步的配置,所以从Step5开始,就会遇到make的问题。
为了编译通过,可以修改MathFunctions目录下的CMakeLists.txt和mysqrt.cxx,去掉所有对Table.h 的依赖。
运行make package可以生成安装包:
第一次,因为没有安装nsis,提示如下问题:
D:\Projects\Lab\testngpp\cmake-2.8.1\Tests\Tutorial\Step6\build>make package
[ 50%] "Built target MathFunctions"
[100%] "Built target Tutorial"
Run CPack packaging tool...
CPack Error: Cannot find NSIS registry value. This is usually caused by NSIS not
being installed. Please install NSIS from http://nsis.sourceforge.net
CPack Error: Cannot initialize the generator NSIS
make: *** [package] Error 1
安装NSIS之后,运行成功:
D:\Projects\Lab\testngpp\cmake-2.8.1\Tests\Tutorial\Step6\build>make package
[ 50%] "Built target MathFunctions"
[100%] "Built target Tutorial"
Run CPack packaging tool...
CPack: Create package using NSIS
CPack: Install projects
CPack: - Run preinstall target for: Tutorial
CPack: - Install project: Tutorial
CPack: Compress package
CPack: Finalize package
CPack: Package D:/Projects/Lab/testngpp/cmake-2.8.1/Tests/Tutorial/Step6/build/T
utorial-1.0.1-win32.exe generated.
生成了如下的Windows安装包文件:

安装完成后,还可以很方便的卸载它:

运行make package_source可以产生源代码包。(我的电脑上提示找不到合适的zip程序)
D:\Projects\Lab\testngpp\cmake-2.8.1\Tests\Tutorial\Step6\build>make package_sou
rce
Run CPack packaging tool for source...
CPack Error: Cannot find a suitable ZIP program
CPack Error: Cannot initialize the generator ZIP
make: *** [package_source] Error 1
D:\Projects\Lab\testngpp\cmake-2.8.1\Tests\Tutorial\Step6\build>make package_sou
rce
Run CPack packaging tool for source...
CPack Error: Cannot find a suitable ZIP program
CPack Error: Cannot initialize the generator ZIP
make: *** [package_source] Error 1
7、Step7
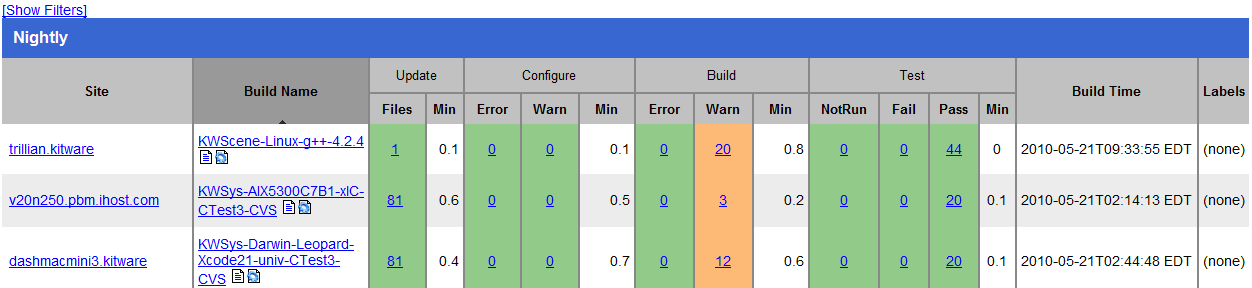
dashboard上显示的项目名称通过如下方式设置:

需要先把cmake\bin目录加入path中,然后执行ctest -D Experimental。这里遇到了一个错误。
D:\Projects\Lab\testngpp\cmake-2.8.1\Tests\Tutorial\Step7\build>ctest -D Experim
ental
Site: JELLY-PC2
Build name: Win32-make
Create new tag: 20100521-1833 - Experimental
Configure project
Each . represents 1024 bytes of output
. Size of output: 0K
Build project
Each symbol represents 1024 bytes of output.
'!' represents an error and '*' a warning.
. Size of output: 0K
0 Compiler errors
0 Compiler warnings
Test project D:/Projects/Lab/testngpp/cmake-2.8.1/Tests/Tutorial/Step7/build
Start 1: TutorialRuns
1/9 Test #1: TutorialRuns ..................... Passed 0.01 sec
Start 2: TutorialUsage
2/9 Test #2: TutorialUsage .................... Passed 0.01 sec
Start 3: TutorialComp4
3/9 Test #3: TutorialComp4 .................... Passed 0.01 sec
Start 4: TutorialComp9
4/9 Test #4: TutorialComp9 .................... Passed 0.01 sec
Start 5: TutorialComp5
5/9 Test #5: TutorialComp5 .................... Passed 0.01 sec
Start 6: TutorialComp7
6/9 Test #6: TutorialComp7 .................... Passed 0.01 sec
Start 7: TutorialComp25
7/9 Test #7: TutorialComp25 ................... Passed 0.01 sec
Start 8: TutorialComp-25
8/9 Test #8: TutorialComp-25 .................. Passed 0.01 sec
Start 9: TutorialComp0.0001
9/9 Test #9: TutorialComp0.0001 ............... Passed 0.01 sec
100% tests passed, 0 tests failed out of 9
Total Test time (real) = 0.19 sec
Performing coverage
Cannot find any coverage files. Ignoring Coverage request.
Submit files (using http)
Using HTTP submit method
Drop site:http://
Error when uploading file: D:/Projects/Lab/testngpp/cmake-2.8.1/Tests/Tutoria
l/Step7/build/Testing/20100521-1833/Build.xml
Error message was: couldn't connect to host
Problems when submitting via HTTP
Errors while running CTest
ental
Site: JELLY-PC2
Build name: Win32-make
Create new tag: 20100521-1833 - Experimental
Configure project
Each . represents 1024 bytes of output
. Size of output: 0K
Build project
Each symbol represents 1024 bytes of output.
'!' represents an error and '*' a warning.
. Size of output: 0K
0 Compiler errors
0 Compiler warnings
Test project D:/Projects/Lab/testngpp/cmake-2.8.1/Tests/Tutorial/Step7/build
Start 1: TutorialRuns
1/9 Test #1: TutorialRuns ..................... Passed 0.01 sec
Start 2: TutorialUsage
2/9 Test #2: TutorialUsage .................... Passed 0.01 sec
Start 3: TutorialComp4
3/9 Test #3: TutorialComp4 .................... Passed 0.01 sec
Start 4: TutorialComp9
4/9 Test #4: TutorialComp9 .................... Passed 0.01 sec
Start 5: TutorialComp5
5/9 Test #5: TutorialComp5 .................... Passed 0.01 sec
Start 6: TutorialComp7
6/9 Test #6: TutorialComp7 .................... Passed 0.01 sec
Start 7: TutorialComp25
7/9 Test #7: TutorialComp25 ................... Passed 0.01 sec
Start 8: TutorialComp-25
8/9 Test #8: TutorialComp-25 .................. Passed 0.01 sec
Start 9: TutorialComp0.0001
9/9 Test #9: TutorialComp0.0001 ............... Passed 0.01 sec
Performing coverage
Cannot find any coverage files. Ignoring Coverage request.
Submit files (using http)
Using HTTP submit method
Drop site:http://
Error when uploading file: D:/Projects/Lab/testngpp/cmake-2.8.1/Tests/Tutoria
l/Step7/build/Testing/20100521-1833/Build.xml
Error message was: couldn't connect to host
Problems when submitting via HTTP
Errors while running CTest
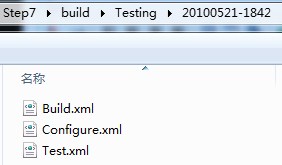
产生了如下一些文件:
本文转sinojelly51CTO博客,原文链接:http://blog.51cto.com/sinojelly/319173
,如需转载请自行联系原作者
