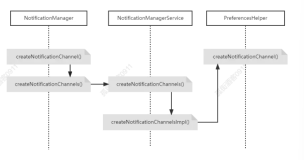
Notification通知消息:
|
1
2
3
4
5
6
7
8
9
10
11
12
13
14
15
16
17
18
19
20
21
22
23
24
25
26
27
28
29
30
31
32
33
34
35
36
37
38
39
40
41
42
43
44
45
46
47
48
49
50
51
52
53
54
55
56
57
58
59
60
61
62
63
64
65
66
67
68
69
70
71
72
73
74
75
76
77
78
79
80
|
public
class
MainActivity
extends
Activity
implements
OnClickListener
{
NotificationManager notificationMgr =
null
;
@Override
protected
void
onCreate(Bundle savedInstanceState)
{
super
.onCreate(savedInstanceState);
setContentView(R.layout.activity_main);
notificationMgr = (NotificationManager) getSystemService(Context.NOTIFICATION_SERVICE);
findViewById(R.id.button1).setOnClickListener(
this
);
findViewById(R.id.button2).setOnClickListener(
this
);
}
@Override
public
void
onClick(View v)
{
switch
(v.getId())
{
case
R.id.button1:
btn1Click();
break
;
case
R.id.button2:
btn2Click();
break
;
default
:
break
;
}
}
private
void
btn2Click()
{
notificationMgr.cancel(
123
);
//手动取消,括号内为通知消息的id
}
private
void
btn3Click()
{
/* 1.创建通知对象
* new Notification(icon, tickerText, when)
* (1)icon设置通知栏的图标
* (2)tickerText设置通知栏的通知消息标题
* (3)when设置什么时候发送通知,一般为即时发送,使用System.currentTimeMillis()
*
* 2.点击事件关联的Activity
* (1)getActivities(context, requestCode, intents, flags)
*
* 3.设置标题和内容
* notify.setLatestEventInfo(context, contentTitle, contentText, contentIntent)
* (1)context:Activity类继承了context,MainActivity继承Activity类
* (2)contentTitle, contentText: 设置通知标题、通知内容
*
* 4.发送通知
* (1)通过通知管理器发送通知
* (2)创建管理器对象都是用getSystemService()得到,对象是object类,所以需要强转类型
* (3)管理器发送通知notificationMgr.notify(id, notification),id指通知消息的id号
*/
//1.创建通知对象
Notification notifyname =
new
Notification(R.drawable.ic_launcher,
"通知消息1"
,System.currentTimeMillis());
//设置取消类型
notifyname.flags = Notification.FLAG_AUTO_CANCEL;
//设置为自动取消,用户点击通知后自动取消
notifyname.flags = Notification.FLAG_ONGOING_EVENT;
//设置为无法取消
//2.点击事件关联的Activity
Intent intent =
new
Intent(
this
, SecondActivity.
class
);
PendingIntent contentIntent = PendingIntent.getActivity(
this
,
0
, intent,
0
);
//3.设置标题和内容
notifyname.setLatestEventInfo(
this
,
"通知标题1"
,
"通知内容1"
, contentIntent);
//4.发送通知
NotificationManager notificationMgr = (NotificationManager) getSystemService(Context.NOTIFICATION_SERVICE);
notificationMgr.notify(
123
, notifyname);
}
@Override
public
boolean
onCreateOptionsMenu(Menu menu)
{
getMenuInflater().inflate(R.menu.activity_main, menu);
return
true
;
}
}
|
自定义通知界面:
|
1
2
3
4
5
6
7
8
9
10
11
12
13
14
15
16
17
18
19
20
21
22
23
24
25
26
27
28
29
30
31
32
33
34
35
36
37
38
39
40
41
42
43
44
45
46
|
//点击发送下载通知并更新通知进度条
private
void
clickNotify()
//remoteView(远程控件)才可在通知布局里用
{
sendNotify();
for
(
int
i =
0
; i <
10
; i++)
{
updateNotify(i);
}
finishNotify();
}
//发送通知
private
void
sendNotify()
{
mNotify =
new
Notification(R.drawable.ic_launcher,
"准备升级"
, System.currentTimeMillis());
//mNotify.sound = Uri.fromFile(file);//自定义的声音
mNotify.flags |= Notification.DEFAULT_LIGHTS;
//或等于,在原来设置的基础增加设置。默认的灯亮。
mNotify.flags |= Notification.DEFAULT_SOUND;
//默认的声音
mNotify.flags |= Notification.DEFAULT_VIBRATE;
//默认的震动
Intent intent =
new
Intent();
mNotify.contentIntent = PendingIntent.getActivity(
this
,
0
, intent ,
0
);
//设置跳转
mNotify.contentView =
new
RemoteViews(getPackageName(), R.layout.notify_layout);
//自定义布局
mNotifyMgr = (NotificationManager) getSystemService(Context.NOTIFICATION_SERVICE);
mNotifyMgr.notify(
1234
, mNotify);
}
//更新通知
private
void
updateNotify(
int
i)
{
//mNotify.contentView.setBitmap(viewId, methodName, value);设置图片
mNotify.contentView.setTextColor(R.id.textView1, Color.BLUE);
//设置文字颜色等
mNotify.contentView.setTextViewText(R.id.textView1,
"进度"
+i);
mNotify.contentView.setProgressBar(R.id.progressBar1,
10
, i,
false
);
//最后一项指:是否为无止境的
mNotifyMgr.notify(
1234
, mNotify);
}
//下载完成
private
void
finishNotify()
{
Intent intent =
new
Intent(
this
,NextActivity.
class
);
mNotify.contentIntent = PendingIntent.getActivity(
this
,
0
, intent ,
0
);
//设置跳转
mNotify.contentView.setProgressBar(R.id.progressBar1,
10
,
10
,
false
);
//最后一项指:是否为无止境的
mNotifyMgr.notify(
1234
, mNotify);
}
|
监听通知清除处理:
|
1
2
3
4
5
6
7
8
9
10
11
12
13
14
15
16
17
18
19
20
21
22
23
24
25
26
27
28
29
30
31
32
33
34
35
36
37
38
39
40
41
42
43
44
45
46
|
private
int
NOTIFY_ID =
0
;
private
final
static
int
NOTIFY_REQUEST_CODE =
0
;
private
final
static
String TYPE_NOTIFY_DEL =
"type.notify.del"
;
/**
* 创建可监听被清除(手动清除)的通知消息。
* setDeleteIntent,这个方法在API Level 11(Android 3.0) 新增的.
* 注意不要设置setAutoCancel为true,否则监听器接收不到。
* 手动清除时才能监听到,点击时只是产生跳转。
* @param msg
* @param left
*/
private
void
showNotification()
{
// 创建通知消息对象
NotificationCompat.Builder builder =
new
NotificationCompat.Builder(mContext);
builder.setTicker(
"收到一条新的消息"
);
// 弹出的提示
builder.setContentTitle(
"通知标题"
);
// 通知消息的标题
builder.setContentText(
"通知内容"
);
// 通知消息的内容
builder.setSmallIcon(IMLib.getInstance().getDrawableId());
builder.setLargeIcon(BitmapFactory.decodeResource(mContext.getResources(), IMLib.getInstance().getDrawableId()));
builder.setDefaults(Notification.DEFAULT_ALL);
builder.setWhen(System.currentTimeMillis());
builder.setAutoCancel(
false
);
// 点击通知时隐式意图启动Activity
Intent intent =
new
Intent();
intent.setAction(Intent.ACTION_VIEW);
intent.addCategory(Intent.CATEGORY_DEFAULT);
String uri =
"imlib://"
+ mContext.getPackageName() +
"/conversation"
;
intent.setData(Uri.parse(uri));
PendingIntent contentIntent = PendingIntent.getActivity(mContext.getApplicationContext(), NOTIFY_REQUEST_CODE, intent,
0
);
builder.setContentIntent(contentIntent);
// 手动清除通知时发送广播
Intent intent_bro =
new
Intent();
intent_bro.setAction(IMService.BROADCAST_ACTION);
intent_bro.putExtra(IMService.TYPE, TYPE_NOTIFY_DEL);
PendingIntent intent_del = PendingIntent.getBroadcast(mContext, NOTIFY_REQUEST_CODE, intent_bro ,
0
);
builder.setDeleteIntent(intent_del);
//显示通知
manager = (NotificationManager) mContext.getSystemService(Context.NOTIFICATION_SERVICE);
manager.notify(NOTIFY_ID, builder.build());
}
|
再配合广播处理手动清除后的事件:
|
1
2
3
4
5
6
7
8
9
10
11
12
13
14
15
16
17
18
19
20
21
22
23
24
25
26
27
|
/**
* 消息处理广播
* @author zeng
*/
class
IMServiceBroadcastReceiver
extends
BroadcastReceiver
{
@Override
public
void
onReceive(Context context, Intent intent)
{
Log.e(
""
,
"通知广播"
);
if
(intent ==
null
|| context ==
null
)
{
return
;
}
String type = intent.getStringExtra(TYPE);
if
(type.equals(IMNotificationManager.TYPE_NOTIFY_DEL))
{
Log.e(
""
,
"通知被清除"
);
//清除通知
NotificationManager manager = IMNotificationManager.getInstance(getApplicationContext()).getNotificationManager();
// manager.cancel(IMNotificationManager.NOTIFY_ID);
manager.cancelAll();
//重置通知参数
IMNotificationManager.getInstance(getApplicationContext()).resetNotificationArgs();
}
}
|
另一种处理方法:
点击通知自动消除并发送广播,在接收广播处理时完成跳转事件。
|
1
2
3
4
5
6
7
8
9
10
11
12
13
14
15
16
17
18
19
20
21
22
23
24
25
26
27
28
29
30
31
32
33
34
35
36
37
38
39
|
/**
* 创建可监听被清除的通知消息。
* setDeleteIntent,这个方法在API Level 11(Android 3.0) 新增的.
* 注意不要设置setAutoCancel为true,否则监听器接收不到。
* @param msg
* @param left
*/
private
void
showNotificationMsg(Message msg,
int
left)
{
//获取通知消息的内容
String ntfStr = getNotificationContentText(msg, left);
// 创建通知消息对象
NotificationCompat.Builder builder =
new
NotificationCompat.Builder(mContext);
builder.setTicker(
"收到一条新的消息"
);
// 弹出的提示
builder.setContentTitle(
"通知标题"
);
// 通知消息的标题
builder.setContentText(ntfStr);
// 通知消息的内容
builder.setSmallIcon(IMLib.getInstance().getDrawableId());
builder.setLargeIcon(BitmapFactory.decodeResource(mContext.getResources(), IMLib.getInstance().getDrawableId()));
builder.setDefaults(Notification.DEFAULT_ALL);
builder.setWhen(System.currentTimeMillis());
builder.setAutoCancel(
true
);
// 点击通知时隐式意图启动Activity
String uri =
"imlib://"
+ mContext.getPackageName() +
"/conversation"
;
// 手动清除通知时发送广播
Intent intent_bro =
new
Intent();
intent_bro.setAction(IMService.BROADCAST_ACTION);
intent_bro.putExtra(IMService.TYPE, TYPE_NOTIFY_DEL);
intent_bro.putExtra(
"intent_action"
,
""
+Intent.ACTION_VIEW);
intent_bro.putExtra(
"intent_data"
,
""
+uri);
PendingIntent contentIntent = PendingIntent.getBroadcast(mContext, NOTIFY_REQUEST_CODE, intent_bro , PendingIntent.FLAG_UPDATE_CURRENT);
builder.setContentIntent(contentIntent);
//显示通知
instance.manager.notify(NOTIFY_ID, builder.build());
}
|
广播处理:
|
1
2
3
4
5
6
7
8
9
10
11
12
13
14
15
16
17
18
19
20
21
22
23
24
25
26
27
28
29
30
31
32
33
34
35
36
37
38
39
40
41
42
43
44
45
46
47
48
49
50
51
52
53
54
55
|
/**
* 消息处理广播
*
* @author zeng
*/
class
IMServiceBroadcastReceiver
extends
BroadcastReceiver
{
@Override
public
void
onReceive(Context context, Intent intent)
{
Log.e(
""
,
"通知广播"
);
if
(intent ==
null
|| context ==
null
)
{
return
;
}
String type = intent.getStringExtra(TYPE);
String intent_action = intent.getStringExtra(
"intent_action"
);
String intent_data = intent.getStringExtra(
"intent_data"
);
Log.e(
"intent_action"
,
""
+ intent_action);
Log.e(
"intent_data"
,
""
+ intent_data);
if
(type.equals(IMNotificationManager.TYPE_NOTIFY_DEL))
{
Intent intent_click =
null
;
if
(intent_action !=
null
)
{
intent_click =
new
Intent();
intent_click.setAction(intent_action);
}
if
(intent_click !=
null
)
{
intent_click.addCategory(Intent.CATEGORY_DEFAULT);
}
if
(intent_data !=
null
&& Uri.parse(intent_data) !=
null
)
{
intent_click.setData(Uri.parse(intent_data));
}
if
(intent_click !=
null
)
{
intent_click.addFlags(Intent.FLAG_ACTIVITY_NEW_TASK);
startActivity(intent_click);
}
// 重置通知参数
IMNotificationManager.getInstance(getApplicationContext()).resetNotificationArgs();
}
}
}
|
注:记得添加上intent_click.addFlags(Intent.FLAG_ACTIVITY_NEW_TASK);同时设置Activity的android:launchMode="singleTask"
Notification新旧版本用法区别:
Notification即通知,用于在通知栏显示提示信息。
在较新的版本中(API level > 11),Notification类中的一些方法被Android声明deprecated(弃用),其实基本上相当于全部弃用了,因为这个类本身方法就少得可怜。
Android官方声明弃用,一定有它的理由,虽然我也不知道是什么。奈何本人轻度强迫症患者,人家都建议你不要用了,那就不要老是恪守着N年前的东西了。
就像是以前,一说到标签页,大家基本上都会想到TabHost配合ActivityGroup,但Android后来提倡Fragment。
废话说多了,还是小结一下使用方法。下面按照创建一个通知的步骤一步一步来,同时给出新旧实现方法。
1、获取Notification管理器
NotificationManager noteMng = (NotificationManager)getSystemService(NOTIFICATION_SERVICE);
2、新建一个Notification,设置状态栏显示样式
private Notification note;
//API 11以下
note = new Notification(R.drawable.ico_launcher "显示于屏幕顶端状态栏的文本", System.currentTimeMillis());
//API 11及以上
Notification.Builder builder = new Notification.Builder(nowContext).setTicker("显示于屏幕顶端状态栏的文本")
.setSmallIcon(R.drawable.ic_laucher);
API 11以上版本中,状态栏显示的样式跟下拉通知栏中显示的样式,可以一起设置,就是通过Notification.Builder类来实现,这里的Builder只调用了两个方法来设置状态栏显示样式。
3、设置Notification标志位(非必要步骤)
//FLAG_ONGOING_EVENT表明有程序在运行,该Notification不可由用户清除
note.flags = Notification.FLAG_ONGOING_EVENT;
4、设置点击Notification后的触发事件
//通过Intent,使得点击Notification之后会启动新的Activity
Intent i = new Intent(nowContext, AnotherActivity.class);
//该标志位表示如果Intent要启动的Activity在栈顶,则无须创建新的实例
i.setFlags(Intent.FLAG_ACTIVITY_SINGLE_TOP);
pendingIntent = PendingIntent.getActivity(nowContext, 100, i, PendingIntent.FLAG_UPDATE_CURRENT);
5、设置Notification在通知栏里的样式
(1)系统默认样式
//API 11以下:
note.setLatestEventInfo(nowContext, "take me to your heart", "Micheal learn to rock", pendingIntent);
//API 16及以上,build()方法要求API 16及以上
//一会API 11以上,一会API16以上,我也很想知道Android的API是怎么设计的
note = builder.setContentIntent(pendingIntent).setContentTitle("title").setContentText("text").build();
(2)自定义样式:
自定义样式,就是让Notification在通知栏显示成自定义的xml布局
应当注意的是,Notification的自定义样式,只支持以下可视组件:
FrameLayout, LinearLayout, RelativeLayout
TextView, Button, AnalogClock, ImageView, ImageButton, Chronometer, ProgressBar
RemoteView view = new RemoteView(nowActivity.getPackageName(), R.layout.note_layout);
//API 11以下
note.contentView = view;
note.contentIntent = pendingIntent;
//API 16及以上,又是build()方法导致的,汗。。
note = builder.setContent(view).setContentIntent(pendingIntent).build();
这个步骤里有一个很值得注意的地方:pendingIntent被设置为note的contentIntent的值,就意味着点击了这个通知才会触发该Intent。
那么如果只是想让自定义布局里的某个按钮触发呢?比如说,弄了一个音乐播放器,Service负责播放音乐,Notification显示当前播放进度和一些简单的暂停按钮、上一首、下一首按钮,让用户不用再打开界面就可以通过Notification上的按钮操纵音乐播放。
假设说想让自定义布局里的一个id为R.id.button1的按钮来触发这个Intent,可以如下操作:
view.setOnClickPendingIntent(R.id.button1, pendingIntent);//在上面创建RemoteView实例后加上这句
然后注意,pendingIntent已经绑定到按钮上了,上面Notificatiion实例中,设置contentIntent的语句要去掉。
6、发布该通知,第一个参数为该notification的ID
noteMng.notify(10, note);
参考资料:Android技巧小结之新旧版本Notification
关于PendingIntent.FLAG_UPDATE_CURRENT使用:
对于相同action和category的intent对象,只更新他的extra值。