iBatis2是一个轻量级的数据持久化框架,它是一个半自动化的ORMapping工具,数据库的操作依赖程序员自己书写的SQL,因此可以最大限度发挥JDBC的性能。据测试,它的性能和JDBC是一个级别的,但代码比JDBC简单的多,据说相对JDBC节省了60%的代码量。
缺点是映射不灵活,有时候感觉很别扭。当领域对象关系复杂的时候,关联基本上行不通。
iBatis2整个框架的jar包就一个,337KB,相比Hibernate等其他框架非常的小巧可爱,并且有.net语言版本。
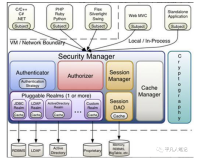
iBatis2的优缺点不是关心的重点,主要是在实际中扬长避短。下面是iBatis2的框架图:

和Hibernate的SessionFactory类似,iBatis2有SqlMapClientBuilder一个类,通过配置文件SqlMapConfig.xml类构建,这个是线程安全的类,并且是单例模式,从它里面可以获取SqlMapClient,SqlMapClient相当于Hibernate的session,用来执行预定义的SQL语句。
因此SqlMapClientBuilder、SqlMapConfig.xml、SqlMapClient将是学习iBatis2的核心。以后会逐渐展开,下面是从变成角度来构建SqlMapClientBuilder。
String resource ="SqlMapConfig.xml";
Reader reader = Resources.getResourceAsReader(resource);
SqlMapClient sqlMap = SqlMapClientBuilder.buildSqlMapClient(reader);
Reader reader = Resources.getResourceAsReader(resource);
SqlMapClient sqlMap = SqlMapClientBuilder.buildSqlMapClient(reader);
由于SqlMapClientBuilder的构建是相当耗时的,因此一般都是在程序启动的时候构建一次,并反复使用。
SqlMapClient 是线程不安全的,每次用的时候,需要从SqlMapClientBuilder去申请一个。它相当于一个数据库连接。
下面给出一个我学习的例子,也是iBatis中自带的一个例子,但是这个例子无法正常运行,主要是数据库、驱动还有模糊的配置概念导致。下面详细讲述如何规范的把这个例子跑起来:
环境:
MySQL5、Java5、iBatis2.3
一、下载iBatis:
[url]http://ibatis.apache.org/javadownloads.cgi[/url];
下载MySQL5和MySQL5的JDBC驱动: [url]http://dev.mysql.com/downloads/mysql/5.0.html[/url], [url]http://dev.mysql.com/downloads/connector/j/5.1.html[/url]
下载SQLyog Enterprise 6.5,这是MySQL的客户端工具, [url]http://www.fixdown.com/china/Programming/109.htm[/url]
下载MySQL5和MySQL5的JDBC驱动: [url]http://dev.mysql.com/downloads/mysql/5.0.html[/url], [url]http://dev.mysql.com/downloads/connector/j/5.1.html[/url]
下载SQLyog Enterprise 6.5,这是MySQL的客户端工具, [url]http://www.fixdown.com/china/Programming/109.htm[/url]
二、安装MySQL5,下载MySQL5,解压缩到某一目录下,然后修改my-small.ini文件如下:

然后安装并启动MySQL5服务

安装MySQL的客户端工具,SQLyog Enterprise 6.5

三、在Idea8中创建一个Java工程ibatis_stu
引入两个必须的包,如下图:

数据库链接配置文件 jdbc.properties:
jdbc.driver=com.mysql.jdbc.Driver
jdbc.url=jdbc:mysql: //localhost:3306/ibatisdb
jdbc.username=root
jdbc.password=leizhimin
jdbc.url=jdbc:mysql: //localhost:3306/ibatisdb
jdbc.username=root
jdbc.password=leizhimin
构件要操作表:
create
table ACCOUNT(
ACC_ID bigint not null AUTO_INCREMENT,
ACC_FIRST_NAME varchar(20) default NULL,
ACC_LAST_NAME varchar(30) default NULL,
ACC_EMAIL varchar(30) default NULL,
PRIMARY KEY(ACC_ID)
) ENGINE=MyISAM DEFAULT CHARSET=gbk COMMENT= 'IBATIS简单测试'
ACC_ID bigint not null AUTO_INCREMENT,
ACC_FIRST_NAME varchar(20) default NULL,
ACC_LAST_NAME varchar(30) default NULL,
ACC_EMAIL varchar(30) default NULL,
PRIMARY KEY(ACC_ID)
) ENGINE=MyISAM DEFAULT CHARSET=gbk COMMENT= 'IBATIS简单测试'
iBaits的配置文件SqlMapConfig.xml,(为了使用一些高级特性,增加了命名空间等配置,同时导入了jdbc.properties来协助配置)
<?
xml
version
="1.0"
encoding
="UTF-8"
?>
<!DOCTYPE sqlMapConfig
PUBLIC "-//ibatis.apache.org//DTD SQL Map Config 2.0//EN"
"http://ibatis.apache.org/dtd/sql-map-config-2.dtd">
< sqlMapConfig >
< properties resource ="jdbc.properties" />
< settings
cacheModelsEnabled ="true"
errorTracingEnabled ="true"
enhancementEnabled ="true"
lazyLoadingEnabled ="true"
maxRequests ="32"
maxSessions ="10"
maxTransactions ="5"
useStatementNamespaces ="true" />
<!-- Configure a built-in transaction manager. If you're using an
app server, you probably want to use its transaction manager
and a managed datasource -->
< transactionManager type ="JDBC" commitRequired ="false" >
< dataSource type ="SIMPLE" >
< property name ="JDBC.Driver" value ="${jdbc.driver}" />
< property name ="JDBC.ConnectionURL" value ="${jdbc.url}" />
< property name ="JDBC.Username" value ="${jdbc.username}" />
< property name ="JDBC.Password" value ="${jdbc.password}" />
</ dataSource >
</ transactionManager >
<!-- List the SQL Map XML files. They can be loaded from the
classpath, as they are here (com.domain.data...) -->
< sqlMap resource ="com/lavasoft/ibatissut/simple/domain/entity/Account.xml" />
<!-- List more here...-->
</ sqlMapConfig >
嵌入的Account的表与实体映射代码:
<?
xml
version
="1.0"
encoding
="UTF-8"
?>
<!DOCTYPE sqlMap
PUBLIC "-//ibatis.apache.org//DTD SQL Map 2.0//EN"
"http://ibatis.apache.org/dtd/sql-map-2.dtd">
< sqlMap namespace ="Account" >
<!-- Use type aliases to avoid typing the full classname every time. -->
< typeAlias alias ="Account" type ="com.lavasoft.ibatissut.simple.domain.entity.Account" />
<!-- Result maps describe the mapping between the columns returned
from a query, and the class properties. A result map isn't
necessary if the columns (or aliases) match to the properties
exactly. -->
< resultMap id ="AccountResult" class ="Account" >
< result property ="id" column ="ACC_ID" />
< result property ="firstName" column ="ACC_FIRST_NAME" />
< result property ="lastName" column ="ACC_LAST_NAME" />
< result property ="emailAddress" column ="ACC_EMAIL" />
</ resultMap >
<!-- Select with no parameters using the result map for Account class. -->
< select id ="selectAllAccounts" resultMap ="AccountResult" >
select * from ACCOUNT
</ select >
<!-- A simpler select example without the result map. Note the
aliases to match the properties of the target result class. -->
< select id ="selectAccountById" parameterClass ="int" resultClass ="Account" >
select
ACC_ID as id,
ACC_FIRST_NAME as firstName,
ACC_LAST_NAME as lastName,
ACC_EMAIL as emailAddress
from ACCOUNT
where ACC_ID = #id#
</ select >
<!-- Insert example, using the Account parameter class -->
< insert id ="insertAccount" parameterClass ="Account" >
insert into account(ACC_ID,ACC_FIRST_NAME,ACC_LAST_NAME,ACC_EMAIL) values(NULL, #firstName#, #lastName#, #emailAddress#)
</ insert >
<!-- Update example, using the Account parameter class -->
< update id ="updateAccount" parameterClass ="Account" >
update ACCOUNT set
ACC_FIRST_NAME = #firstName#,
ACC_LAST_NAME = #lastName#,
ACC_EMAIL = #emailAddress#
where
ACC_ID = #id#
</ update >
<!-- Delete example, using an integer as the parameter class -->
< delete id ="deleteAccountById" parameterClass ="int" >
delete from ACCOUNT where ACC_ID = #id#
</ delete >
</ sqlMap >
一个与表对应的实体Bean(为了输出重写了toString方法):
package com.lavasoft.ibatissut.simple.domain.entity;
/**
* Created by IntelliJ IDEA.<p>
* User: leizhimin<p>
* Date: 2008-8-16 9:57:03<p>
* 帐户
*/
public class Account {
private int id;
private String firstName;
private String lastName;
private String emailAddress;
public Account() {
}
public Account(String firstName, String lastName, String emailAddress) {
this.firstName = firstName;
this.lastName = lastName;
this.emailAddress = emailAddress;
}
public int getId() {
return id;
}
public void setId( int id) {
this.id = id;
}
public String getFirstName() {
return firstName;
}
public void setFirstName(String firstName) {
this.firstName = firstName;
}
public String getLastName() {
return lastName;
}
public void setLastName(String lastName) {
this.lastName = lastName;
}
public String getEmailAddress() {
return emailAddress;
}
public void setEmailAddress(String emailAddress) {
this.emailAddress = emailAddress;
}
@Override
public String toString() {
return "Account{" +
"id=" + id +
", firstName='" + firstName + '\'' +
", lastName='" + lastName + '\'' +
", emailAddress='" + emailAddress + '\'' +
'}';
}
}
核心测试代码(尊重iBatis的原版风格,就窝下蛋,写个main方法就开始跑了。。):
package com.lavasoft.ibatissut.simple;
import com.ibatis.sqlmap.client.SqlMapClient;
import com.ibatis.sqlmap.client.SqlMapClientBuilder;
import com.ibatis.common.resources.Resources;
import com.lavasoft.ibatissut.simple.domain.entity.Account;
import java.io.Reader;
import java.io.IOException;
import java.util.List;
import java.sql.SQLException;
/**
* Created by IntelliJ IDEA.<p>
* User: leizhimin<p>
* Date: 2008-8-16 9:59:10<p>
* 首先声明这不是最好的例子,但是从这个例子中可以很快的了解iBatis的工作原理,
* 如果需要更好的学习iBatis,可以参看iBatis实现的JPetStore-5.0.zip。
* [url]http://apache.mirror.phpchina.com/ibatis/binaries/ibatis.java/JPetStore-5.0.zip[/url]
*/
public class SimpleExample {
/**
* SqlMapClient的实例是线程安全的,因此仅需要一个实例即可,这里使用了一个静态单例模式。
*/
private static SqlMapClient sqlMapClient;
/**
* 将SqlMapClient的构件放到此不是好注意,应该放到一个单例模式的工具类中,需要的时候随时获取
*/
static {
try {
//读取SqlMapConfig的资源配置
Reader reader = Resources.getResourceAsReader( "SqlMapConfig.xml");
//构件一个SqlMapClient的实例
sqlMapClient = SqlMapClientBuilder.buildSqlMapClient(reader);
//关闭输入流
reader.close();
} catch (IOException e) {
throw new RuntimeException( "在构件SqlMapClient实例的时候发生了异常!" + e, e);
}
}
public static List selectAllAccounts() throws SQLException {
//返回所有的帐户
return sqlMapClient.queryForList( "Account.selectAllAccounts");
}
public static Account selectAccountById( int id) throws SQLException {
return (Account) sqlMapClient.queryForObject( "Account.selectAccountById", id);
}
public static void insertAccount(Account account) throws SQLException {
sqlMapClient.insert( "Account.insertAccount", account);
}
public static void updateAccount(Account account) throws SQLException {
sqlMapClient.update( "Account.updateAccount", account);
}
public static void deleteAccount( int id) throws SQLException {
sqlMapClient.delete( "Account.deleteAccount", id);
}
public static void main(String[] args) throws SQLException {
Account act = new Account( "1", "1", "1");
act.setId(23);
insertAccount(act);
List<Account> acclist= selectAllAccounts();
for(Account acc:acclist){
System.out.println(acc);
}
}
}
运行一把看看:
Account{id=1, firstName='45', lastName='45', emailAddress='4554'}
Account{id=2, firstName='234', lastName='234', emailAddress='23423'}
Account{id=3, firstName='1', lastName='1', emailAddress='1'}
Account{id=4, firstName='1', lastName='1', emailAddress='1'}
Account{id=5, firstName='1', lastName='1', emailAddress='1'}
Process finished with exit code 0
Account{id=2, firstName='234', lastName='234', emailAddress='23423'}
Account{id=3, firstName='1', lastName='1', emailAddress='1'}
Account{id=4, firstName='1', lastName='1', emailAddress='1'}
Account{id=5, firstName='1', lastName='1', emailAddress='1'}
Process finished with exit code 0
呵呵,终于看到效果了。
iBatis是个好东西,但是技巧性很强,只有完全掌握了iBatis的映射原理和技巧,用起来才不至于生硬繁琐重复。上面这个例子是iBatis发布包中唯一一个例子,而且使用的是一个大家都很陌生的数据库,并且没有执行的入口方法,缺乏SQL脚本,没有使用命名空间等等,这个粗糙的例子给很多第一次接触iBatis的人一个极坏的印象,和一些致命的误导。
iBatis应用中应该使用命名空间,不使用的话好像除了HelloWorld这样的简单例子外,找不到第二个。
本文转自 leizhimin 51CTO博客,原文链接:http://blog.51cto.com/lavasoft/83896,如需转载请自行联系原作者