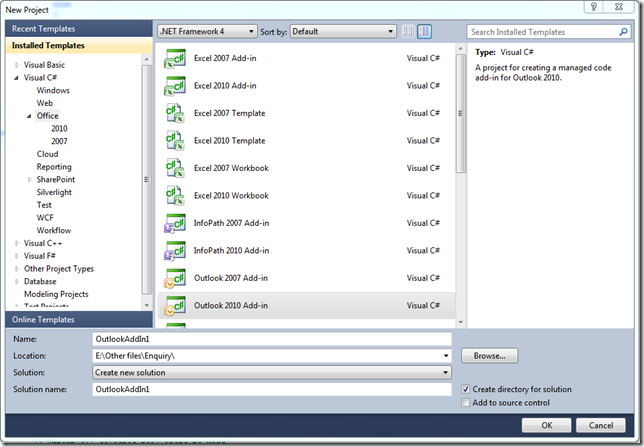
Visual Studio允许创建Office类型的工程,用于给Office产品创建外接程序以及自定义模板等。这是一个非常实用的功能,在早期版本的Office中我们只能通过VBA代码来实现一些自定义的功能,如文本的自动替换、宏录制功能等等。VBA的功能很有限,有些时候我们希望自定义程序能够完成更多的功能,比如在Office多个不同产品之间进行文档转换、调用系统API、远程过程调用及Web Service访问等。下面是在Visual Studio 2010中创建Office类型工程的对话框。
本例中我将向大家介绍如何通过Office外接程序将Outlook中的邮件导出到本地Word文档中。当然,你完全可以手动将Outlook中的邮件通过复制粘贴的方式拷贝到Word文档中,但是要想同时将大批的邮件导出到Word中恐怕就需要借助于程序来完成了。来看看我们如何实现这个小插件!
首先在Visual Studio中创建Outlook 2010 Add-in类型的工程,取名为OutlookToWord。这里需要申明一下我开发和测试的环境:Visual Studio 2010 + Office 2010。当然,在Visual Studio 2008和稍低版本的Office中同样也可以实现,只是工程类型和外接程序所支持的载体版本稍有区别。
工程创建成功后Visual Studio会自动为你生成一些文件和代码,我们只需要在代码中实现自定义的功能即可。我们希望程序通过一个按钮来实现邮件的导出,因此需要在Outlook的工具栏中创建一个自定义按钮。这个很简单,直接查MSDN,这里有非常详细的介绍,将代码拷到工程中,并做适当的修改。
http://msdn.microsoft.com/zh-CN/library/scff9c7c.aspx
2 using System.Collections.Generic;
3 using System.Linq;
4 using System.Text;
5 using System.Xml.Linq;
6 using Outlook = Microsoft.Office.Interop.Outlook;
7 using Office = Microsoft.Office.Core;
8
9 namespace OutlookToWord
10 {
11 public partial class ThisAddIn
12 {
13 private Office.CommandBar newToolBar;
14 private Office.CommandBarButton exportButton;
15 private Outlook.Explorers selectExplorers;
16
17 private void ThisAddIn_Startup( object sender, System.EventArgs e)
18 {
19 selectExplorers = this .Application.Explorers;
20 selectExplorers.NewExplorer += new Outlook.ExplorersEvents_NewExplorerEventHandler(newExplorer_Event);
21 AddToolbar();
22 }
23
24 private void newExplorer_Event(Outlook.Explorer new_Explorer)
25 {
26 ((Outlook._Explorer)new_Explorer).Activate();
27 newToolBar = null ;
28 AddToolbar();
29 }
30
31 private void AddToolbar()
32 {
33 if (newToolBar == null )
34 {
35 Office.CommandBars cmdBars = this .Application.ActiveExplorer().CommandBars;
36 newToolBar = cmdBars.Add( " NewToolBar " , Office.MsoBarPosition.msoBarTop, false , true );
37 }
38 try
39 {
40 Office.CommandBarButton btExportToWord = (Office.CommandBarButton)newToolBar.Controls.Add( 1 , missing, missing, missing, missing);
41 btExportToWord.Style = Office.MsoButtonStyle.msoButtonCaption;
42 btExportToWord.Caption = " Export to Word " ;
43 btExportToWord.Tag = " Export current mail to word " ;
44 if ( this .exportButton == null )
45 {
46 this .exportButton = btExportToWord;
47 exportButton.Click += new Office._CommandBarButtonEvents_ClickEventHandler(exportButton_Click);
48 }
49 newToolBar.Visible = true ;
50 }
51 catch (Exception ex)
52 {
53 MessageBox.Show(ex.Message);
54 }
55 }
56
57 void exportButton_Click(Office.CommandBarButton ctrl, ref bool cancel)
58 {
59 }
60
61 private void ThisAddIn_Shutdown( object sender, System.EventArgs e)
62 {
63 }
64
65 #region VSTO generated code
66
67 /// <summary>
68 /// Required method for Designer support - do not modify
69 /// the contents of this method with the code editor.
70 /// </summary>
71 private void InternalStartup()
72 {
73 this .Startup += new System.EventHandler(ThisAddIn_Startup);
74 this .Shutdown += new System.EventHandler(ThisAddIn_Shutdown);
75 }
76
77 #endregion
78 }
79 }
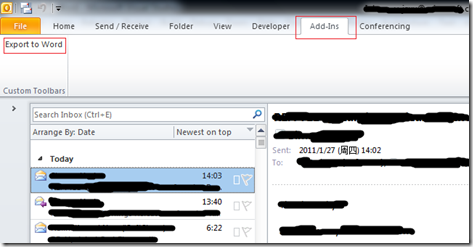
我们在Outlook工具栏中创建了一个Export to Word按钮。退出Outlook在Visual Studio中直接按F5运行查看效果。
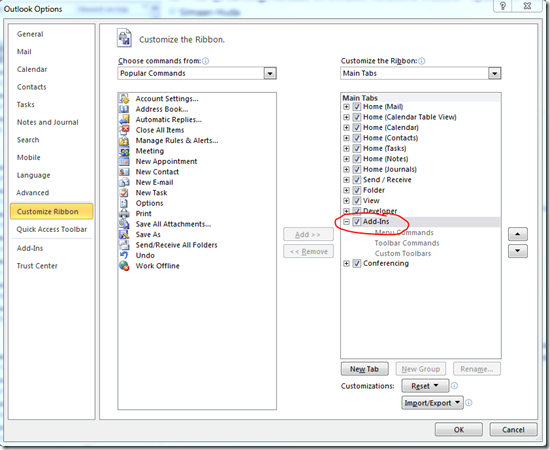
如果你的Outlook工具栏中没有Add-ins菜单,请点击File-Options-Customize Ribbon,在其中勾选Add-Ins来显示它。
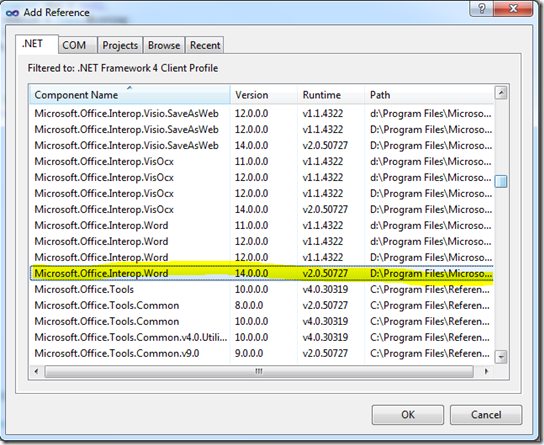
接下来的任务就是实现邮件的导出功能了。由于需要在程序中调用Word的部分功能,所以你需要在工程添加Word的相关引用,如下图。注意你本地可能包含多个Microsoft.Office.Interop.Word程序集的版本,选择最高版本的那个即可。
然后在代码中加入Word程序集的命名空间using Word = Microsoft.Office.Interop.Word。我们希望在导出邮件之前提示用户选择要导出文件的位置,因此程序中还需要一个文件夹选择对话框控件,在程序中给出定义。现在我们来看看导出功能的核心代码。
2 {
3 object sFileName;
4 string sPath = string .Empty;
5
6 // Get mail export path.
7 if (folderBrowserDialog.ShowDialog() == DialogResult.OK)
8 {
9 sPath = folderBrowserDialog.SelectedPath;
10
11 // If the selected path is a folder, add '\' at the end of the path string.
12 if (sPath != Path.GetPathRoot(sPath))
13 {
14 sPath += " \\ " ;
15 }
16 }
17 else
18 {
19 return ;
20 }
21
22 Word.Application app = new Word.Application();
23 Word.Document doc = null ;
24 object unknow = Type.Missing;
25 object format = Word.WdSaveFormat.wdFormatDocumentDefault;
26 Outlook.Explorer activeExplorer = this .Application.Explorers.Application.ActiveExplorer();
27
28 try
29 {
30 // Export all selected mail items to word.
31 foreach ( object selectedItem in activeExplorer.Selection)
32 {
33 Outlook.MailItem mailItem = selectedItem as Outlook.MailItem;
34 if (mailItem != null )
35 {
36 sFileName = CreateFileName(sPath, mailItem.Subject);
37 // doc = app.Documents.Add(ref unknow, ref unknow, ref unknow, ref unknow);
38 // doc.Content.Text = mailItem.Body;
39 // doc.Paragraphs.Last.Range.Text = mailItem.Body;
40
41 Outlook.Inspector inspector = mailItem.GetInspector;
42 doc = (Word.Document)inspector.WordEditor;
43 // mailItem.SaveAs(sFileName.ToString(), Outlook.OlSaveAsType.olDoc);
44
45 doc.SaveAs( ref sFileName, ref format, ref unknow, ref unknow, ref unknow,
46 ref unknow, ref unknow, ref unknow, ref unknow, ref unknow, ref unknow,
47 ref unknow, ref unknow, ref unknow, ref unknow, ref unknow);
48 // doc.Close(ref unknow, ref unknow, ref unknow);
49 }
50 }
51 }
52 catch (Exception ex)
53 {
54 MessageBox.Show(ex.Message, " Error " , MessageBoxButtons.OK, MessageBoxIcon.Error);
55 }
56 finally
57 {
58 if (app != null )
59 {
60 app.Quit( ref unknow, ref unknow, ref unknow);
61 }
62 }
63 }
有几个地方需要说明一下。首先我们要得到当前已选择的邮件列表,这个是通过this.Application.Explorers.Application.ActiveExplorer().Selection来得到的,ActiveExplorer()方法返回的是当前选中的邮箱视图,比如发件箱、草稿箱、收件箱等。Selection属性得到是其中所有被选中的邮件的集合,在Outlook中你可以同时选中多封邮件。程序通过foreach便利所有当前被选中的邮件,然后依次导出到Word文档中。邮件主题被用作Word文档的名称,这里有一个CreateFileName方法用来处理并生成最终的文件名,稍后给出这个方法的代码。对于如何保存Word文档的内容,这里有几个地方需要注意:
1. mailItem对象可以通过Body,HTMLBody,RTFBody来得到邮件的内容,但是其中的格式会有所区别。通过Body得到的是去掉所有样式之后的纯文本内容,HTMLBody得到的是转换之后的HTML格式的邮件内容,RTFBody则是包含富文本格式的二进制邮件内容。
2. 我们可以通过doc.Content.Text或doc.Paragraphs.Last.Range.Text来给Word文档填充内容,两者的效果是一样的。但是这两种方法只能接收字符串内容,也就是说如果邮件中包含特定格式的信息都会被自动过滤掉,如邮件中的表格、文字样式、图片、超链接等内容。
3. 通过mailItem.GetInspector将邮件的编辑器转换成Word文档可以将Outlook邮件中的所有内容无差异地保存到Word中。因为Outlook邮件编辑器使用的正是Word文档的编辑器,因此这个转换是有效的。
4. Word文档的创建、保存方法与其它在C#中操作Word相同。需要注意的是如果使用doc.Content.Text或doc.Paragraphs.Last.Range.Text方法填充Word文档内容,完毕之后一定要关闭Word文档。另外就是程序结束后要关掉Word进程,否则每次导出都会在内存中创建一个Word进程造成资源的浪费。
5. Word文档保存的格式选用wdFormatDocumentDefault,这个是Word文档保存的默认格式,如果选用其它格式,需要确保你所保存的内容能被选用的格式支持。
下面来看一下CreateFileName方法。这个方法是用来处理生成的Word文档的文件名的。程序中使用了邮件主题作为Word文件名,由于Windows文件名不支持部分特殊字符,因此我们需要在生成文件名的过程中将这些特殊字符过滤掉,同时为了确保所生成的Word不会被重复覆盖,需要对文件名作差异化处理——即如果文件存在则在后面增量增加一个数字,如新建文件1、新建文件2等。另外就是如果文件名过长只截取前100个字符。
2 {
3 // Remove unsupport charts for file name.
4 string sRst = sFileName.Replace( " \\ " , "" );
5 sRst = sRst.Replace( " / " , "" );
6 sRst = sRst.Replace( " : " , "" );
7 sRst = sRst.Replace( " * " , "" );
8 sRst = sRst.Replace( " ? " , "" );
9 sRst = sRst.Replace( " \ " \ "" , "" );
10 sRst = sRst.Replace( " < " , "" );
11 sRst = sRst.Replace( " > " , "" );
12 sRst = sRst.Replace( " | " , "" );
13
14 if (sRst.Length > 100 )
15 {
16 sRst = sRst.Substring( 0 , 100 );
17 }
18
19 // Make sure the file name is unique.
20 int i = 1 ;
21 if (File.Exists( string .Concat(sPath, sRst, " .docx " )))
22 {
23 while ( true )
24 {
25 if (File.Exists( string .Concat(sPath, sRst, i.ToString(), " .docx " )))
26 {
27 i ++ ;
28 }
29 else
30 {
31 sRst += i.ToString();
32 break ;
33 }
34 }
35 }
36
37 // Return *.docx file name.
38 return string .Concat(sPath, sRst, " .docx " );
39 }
下面给出完整的代码:
 OutlookToWord
本文转自Jaxu博客园博客,原文链接:http://www.cnblogs.com/jaxu/archive/2011/01/27/1946517.html,如需转载请自行联系原作者


