好久没有写博文了,这段时间相对空闲一点,把AE数据编辑实现总结下。
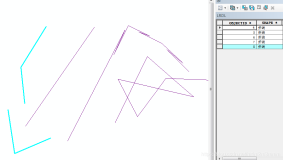
要编辑要素,首先要选中要素,按shift键进行多选,按esc键清空选择。
个人了解的选择高亮显示有两种方式,都是在public override void OnMouseDown(int Button, int Shift, int X, int Y)事件中处理实现:
1、 IFeatureSelection 这个要求明确选择的图层

IPoint pPoint = pActiveView.ScreenDisplay.DisplayTransformation.ToMapPoint(X, Y);
IEnvelope pEnvelope;
double tol = 20;
pEnvelope = pPoint.Envelope;
pEnvelope.Width = pEnvelope.Width + tol;
pEnvelope.Height = pEnvelope.Height + tol;
pEnvelope.CenterAt(pPoint);

ISpatialFilter pSpatialFilter;
pSpatialFilter = new SpatialFilterClass();
pSpatialFilter.Geometry = pEnvelope;
pSpatialFilter.SpatialRel = esriSpatialRelEnum.esriSpatialRelIntersects;
IFeatureSelection pFeatureSelection;
pFeatureSelection = ucDrawPanel.currentFeatureLayer as IFeatureSelection;
IFeature pFeature;
ucDrawPanel.unionFeature = new List<IFeature>();//实例化合并要素集
if (Shift == 1)
{
    if (ucDrawPanel.currentFeatureLayer.FeatureClass.ShapeType == esriGeometryType.esriGeometryPolyline)
    {
        pFeatureSelection.SelectFeatures(pSpatialFilter,
            esriSelectionResultEnum.esriSelectionResultAdd, true);
        ICursor pCursor;
        pFeatureSelection.SelectionSet.Search(null, false, out pCursor);
    }
}
else
{
    pActiveView.FocusMap.ClearSelection();
    pFeatureSelection.SelectFeatures(pSpatialFilter,
        esriSelectionResultEnum.esriSelectionResultNew, true);

    ICursor pCursor;
    pFeatureSelection.SelectionSet.Search(null, false, out pCursor);
}
pActiveView.PartialRefresh(esriViewDrawPhase.esriViewGeoSelection, ucDrawPanel.currentFeatureLayer, null);
//高亮显示出来
ISimpleFillSymbol iFillSymbol;
ISymbol iSymbol;
IRgbColor iRgbColor;
iFillSymbol = new SimpleFillSymbol();
iFillSymbol.Style = esriSimpleFillStyle.esriSFSSolid;
iRgbColor = new RgbColor();
iRgbColor.Green = 128;
iFillSymbol.Color = iRgbColor;
iSymbol = (ISymbol)iFillSymbol;
iSymbol.ROP2 = esriRasterOpCode.esriROPNotXOrPen;

IEnumFeature pEnumFeature = pActiveView.FocusMap.FeatureSelection as IEnumFeature;
pEnumFeature.Reset();
pFeature = pEnumFeature.Next();
//选中要素高亮显示
if (pFeature != null)
{
    IGeometry pGeometry = pFeature.Shape;
    ITopologicalOperator pTop = pGeometry as ITopologicalOperator;
    while (pFeature != null)
    {
        ucDrawPanel.unionFeature.Add(pFeature);

        pGeometry = pTop.Union(pFeature.Shape);
        pTop = pGeometry as ITopologicalOperator;
        pFeature = pEnumFeature.Next();
    }
    ucDrawPanel.currentFeature = ucDrawPanel.unionFeature[ucDrawPanel.unionFeature.Count - 1];
    _mapCtrl.FlashShape(pGeometry, 1, 500, iSymbol);
}
//清空选择要素
else
{
    pActiveView.FocusMap.ClearSelection();
    pActiveView.PartialRefresh(esriViewDrawPhase.esriViewGeoSelection, null, pActiveView.Extent);
}
2、 SelectByMap 基于整个地图,当然也可以先将图层的selectable属性动态设置下
if (Button == 1)
{
    //清空地图视图
    _mapCtrl.Map.ClearSelection();
    IGraphicsContainer pContainer = _mapCtrl.Map as IGraphicsContainer;
    pContainer.DeleteAllElements();
    _mapCtrl.ActiveView.Refresh();

    base.OnMouseDown(Button, Shift, X, Y);

    IActiveView pActiveView = _mapCtrl.ActiveView;
    IPoint pPoint = pActiveView.ScreenDisplay.DisplayTransformation.ToMapPoint(X, Y);
    IPoint TempPoint = pActiveView.ScreenDisplay.DisplayTransformation.ToMapPoint(X + 5, Y + 5);

    IEnvelope objEnvelope;
    double tol = Math.Abs(TempPoint.X - pPoint.X);
    objEnvelope = pPoint.Envelope;
    objEnvelope.Width = objEnvelope.Width + tol;
    objEnvelope.Height = objEnvelope.Height + tol;
    objEnvelope.CenterAt(pPoint);
    setSelectable(ucDrawPanel.currentLayerName);//只有当前编辑图层可选

    _mapCtrl.Map.SelectByShape((IGeometry)objEnvelope, null, true);//只选择一个要素
    pActiveView.PartialRefresh(esriViewDrawPhase.esriViewGeoSelection, null, _mapCtrl.ActiveView.Extent);

    ucDrawPanel.currentFeatureLayer = GetLayerByName(_mapCtrl, ucDrawPanel.currentLayerName);
    if (ucDrawPanel.currentFeatureLayer != null)
    {
        ucDrawPanel.currentFeature = GetFeatureBySelection(ucDrawPanel.currentFeatureLayer);
    }
    else
    {
        MessWin messWin = new MessWin();
        messWin.SetTitleAndMess("提示", @"获取选择要素出错!", false);
        return;
    }
}
PS:esc键退出,在OnKeyDown事件中实现
public override void OnKeyDown(int keyCode, int Shift)
{
    if (keyCode == (int)Keys.Escape)
    {
        IActiveView pActiveView = _mapCtrl.ActiveView;
        pActiveView.FocusMap.ClearSelection();
        pActiveView.PartialRefresh(esriViewDrawPhase.esriViewGeoSelection, null, pActiveView.Extent);
        _mapCtrl.CurrentTool = null;
    }
}
没有整理与归纳的知识,一文不值!高度概括与梳理的知识,才是自己真正的知识与技能。 永远不要让自己的自由、好奇、充满创造力的想法被现实的框架所束缚,让创造力自由成长吧! 多花时间,关心他(她)人,正如别人所关心你的。理想的腾飞与实现,没有别人的支持与帮助,是万万不能的。
本文转自wenglabs博客园博客,原文链接:http://www.cnblogs.com/arxive/p/6262991.html
,如需转载请自行联系原作者