有时为了保证一些操作要么都成功,要么都失败,这就需要事务来保证。
传统的jdbc事务如下:
设置Connection连接的自动提交为false,变成我们手动来控制commit时机。一旦操作一执行成功但是操作二执行失败,在捕获的异常中进行回滚操作(其实也可以不用手动回滚,当你没有手动执行con.commit()方法时,也会回滚)。
这种传统的使用事务的方法有很多的弊端。
弊端一:业务代码都要嵌套在try catch模板代码中
弊端二:接触了底层Connection的事务功能,当使用其他一些框架时,我们更多的不会直接与Connection打交道,如使用Hibernate时,就不容易获取Connection。
有了以上的两点缺陷,我们就要分别来解决他们。
首先针对弊端一:
(1)既然外层代码都是相似的try catch代码,我们最能想到的就是将这些代码封装成模板以便复用。如同JdbcTemplate对jdbc操作的模板代码的封装,这便引出了下文TransactionTemplate的模板代码。
(2)当然了,上述做法还不是很理想,如何才能将我们的业务逻辑和事务代码完全分离呢?这就需要使用AOP代理技术。我们只需要关系业务逻辑,通过AOP代理将事务逻辑植入业务逻辑中,这样就可以做到分离。这就需要将事务和AOP很好的结合起来。
然后针对弊端二:
既然不推荐和底层Connection打交道,那就需要一个统一的接口来完成事务的提交和回滚等功能,即接口PlatformTransactionManager,如果是使用jdbc则使用DataSourceTransactionManager来完成事务的提交和回滚,若果是使用hibernate则使用HibernateTransactionManager来完成事务的提交和回滚。
下面就来仔细看下源代码:
事务的定义接口为TransactionDefinition,类图如下:
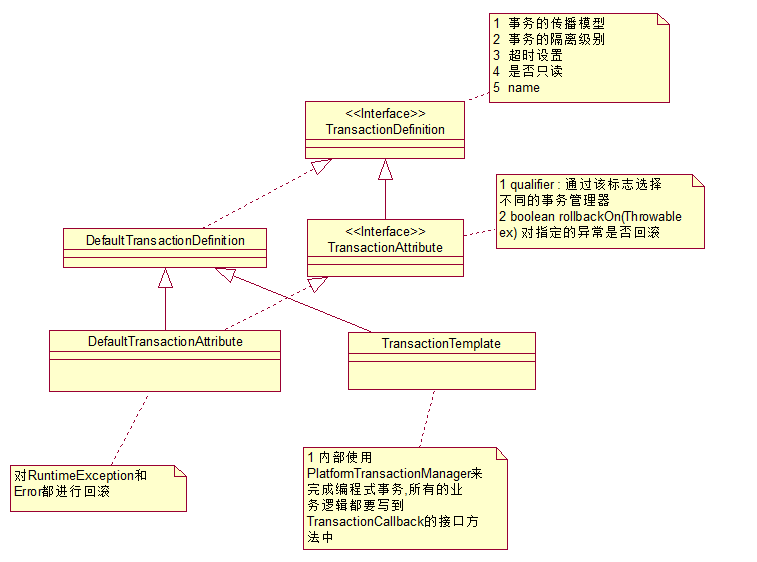
先看TransactionDefinition:
TransactionDefinition接口:事务的定义,两个重要属性,事务的传播属性和隔离级别,这里不再重点说明,可网上去查。
DefaultTransactionDefinition:就是对上述属性设置一些默认值,传播属性默认为:PROPAGATION_REQUIRED,隔离级别默认为:ISOLATION_DEFAULT,采用的是底层数据库采用的默认隔离级别。
TransactionAttribute接口:
DefaultTransactionAttribute:
以上的事务定义基本就没什么了。下面来看看上文针对弊端一采用的TransactionTemplate:
它内部含有一个重要的属性事务管理器PlatformTransactionManager,用它来执行事务的提交和回滚操作。
这样的模板代码,使得我们只需将我们的业务逻辑写到TransactionCallback接口方法中即可,案例如下:
这便是模板代码TransactionTemplate,虽然帮我们省略了一些相同的操作,但是每次数据库操作都要写到TransactionCallback中,与业务逻辑还不是分离的。这就引出AOP代理。
要将SpringAOP和事务结合起来,也有很多的表现形式,但原理都是一样的。
如下形式:
形式1:
这种方式就是直接针对某个对象创建代理对象,加入事务拦截器。
形式2:
这里就比较明显,tx:advice定义advice,对不同的方法名称,定义不同的事务属性,aop:config将上述通知和pointcut结合起来变成通知器。
这种方式将符合pointcut的对象都创建出代理对象,加入事务拦截器
形式3:
这种形式结合@Transactional来使用。
这种方式将标注有@Transactional的对象来创建出代理对象。
以上三种形式都是将某些对象创建出代理对象(创建代理对象的方式不同),并加入事务拦截器。我们先来看看这个事务拦截器是什么样的。
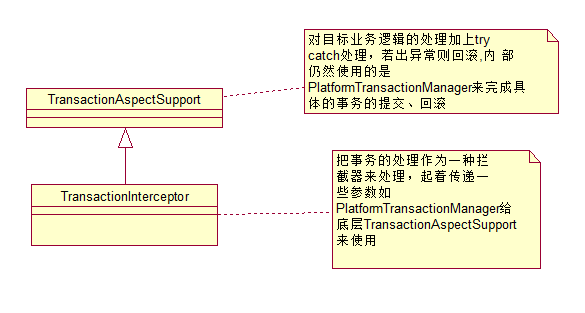
先来看下TransactionInterceptor:它继承了TransactionAspectSupport,实现了MethodInterceptor接口。执行AOP代理过程中,可以对目标业务逻辑加上各种各样的拦截器,每一个拦截器都是一个MethodInterceptor,每个MethodInterceptor都有接口方法public Object invoke(final MethodInvocation invocation),MethodInvocation更像是针对所拦截的方法的一个拦截器链条,通过它能够不断的执行该链条上的每个拦截器。
看下TransactionInterceptor:
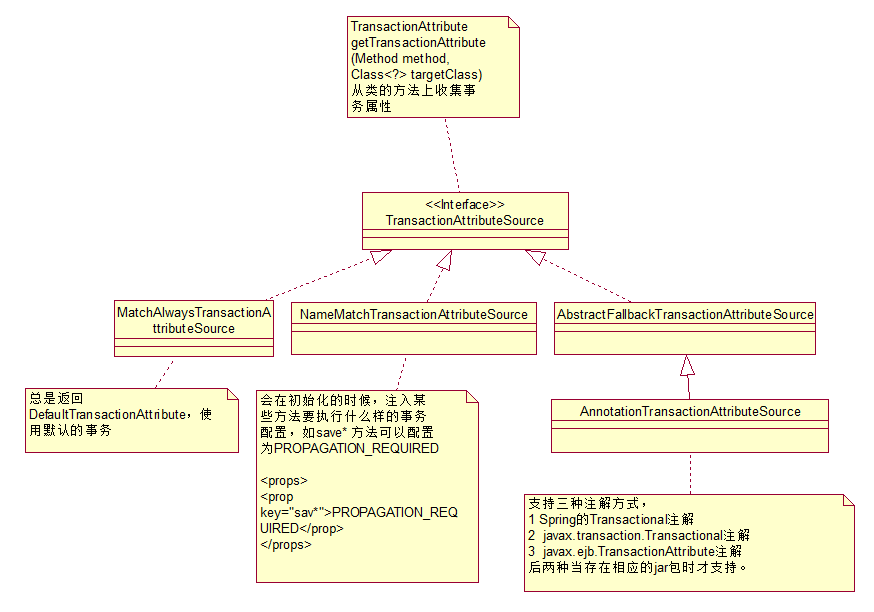
前面几个构造函数可以看到,TransactionInterceptor 基本不保留任何数据,只是起到数据传递作用,把真正的处理过程交给TransactionAspectSupport 去完成,而本身则净身更像一个拦截器,所以我们要去看TransactionAspectSupport,在看它的拦截逻辑之前,先介绍下一个重要接口TransactionAttributeSource:
接口方法主要是获取目标类的method方法的事务属性。
这样的获取方式有很多
(1)使用注解来标注事务属性,如@Transactional注解
(2)使用配置信息,如下
直接xml配置某些方法的事务属性。
类图如下:
然后回到拦截器核心逻辑中:
第一步:使用TransactionAttributeSource根据method和targetClass获取事务属性,上文已说过。
第二步:获取合适的事务处理器
首先如果该拦截器本身的事务拦截器不为空则直接使用,若为空则根据事务配置属性中的qualifier属性来匹配,如果没有再根据事务拦截器的transactionManagerBeanName来匹配,最后根据PlatformTransactionManager类型来匹配。
第三步:joinpointIdentification则为类名和方法名的结合,主要用与log信息。
第四步:根据事务管理器和事务属性创建事务。
这样的代码仍然很清晰,先创建事务,执行业务逻辑,提交事务,当抛出异常时回滚事务,这些操作都是由事务管理器PlatformTransactionManager来完成的。本文不再详细说明,下一篇文章重点来说事务管理器根据事务属性对事务的提交回滚等操作。
事务拦截器的大致流程我们知道了,然后就是通过AOP来使用事务拦截器,这些内容大部分都是AOP的知识了,详情见我的SpringAOP的文章http://lgbolgger.iteye.com/category/322988
这里再对上文的三种形式做源码分析:
形式1:使用TransactionProxyFactoryBean工厂bean
内容不再列出,到上文找。TransactionProxyFactoryBean的类图如下:

先从上面说起。
FactoryBean :工厂Bean
一旦一个bean实现了FactoryBean 接口,注册到Spring容器中,根据注册id获取的对象不是此工厂bean而是该工厂bean的getObject()方法返回的对象。
ProxyConfig:代理配置
AbstractSingletonProxyFactoryBean:创建单例的代理对象核心类,对子类只留出拦截器。
通过jdk代理或者cglib代理,加上拦截器,完成代理对象proxy的创建。
具体过程:
加入拦截器,同时createMainInterceptor()方法是抽象方法,留给子类来实现,最后通过ProxyFactory 来创建出代理对象,详情见http://lgbolgger.iteye.com/blog/2119810

形式2 使用aop:config结合tx:advice配置:
对容器中符合pointcut的bean都创建出代理对象,通知器为tx:advice创建的事务拦截器。
对于同理aop:config的处理看这篇文章http://lgbolgger.iteye.com/blog/2119810
下面说说对于tx:advice的处理过程:
对于xml配置中的每一个标签,都会有对应的解析器来完成解析工作,每个解析器都实现了BeanDefinitionParser接口,用于处理tx:advice的BeanDefinitionParser则为TxAdviceBeanDefinitionParser:
可以看到解析过程其实就是获取transactionManager和transactionAttributeSource,然后设置到TransactionInterceptor事务拦截器中。
所以tx:advice标签其实就是创建了一个TransactionInterceptor事务拦截器对象而已。其中transactionAttributeSource是直接对某些方法进行事务属性的xml配置,下面则是使用注解来配置某些方法的事务属性。
形式3:配合@Transactional来完成注解式事务
@Transactional注解仅仅起到方法的食物属性的收集,真正的处理程序则是<tx:annotation-driven>在执行,它对那些含有@Transactional注解的bean创建代理对象,自动加入TransactionInterceptor事务拦截器。我们来看下tx:annotation-driven的源码处理过程:
还是tx:annotation-driven标签对应的处理器BeanDefinitionParser为AnnotationDrivenBeanDefinitionParser:
如下:
首先tx:annotation-driven有一个model属性,有两个值 proxy和aspectj。
若为proxy:则代表使用SpringAOP框架进行代理。若为aspectj则由aspectj进行代码植入。前者不改变原有类的字节码,后者将拦截代码植入原有类的字节码中。主要讲SpringAOP的代理:
先来看一个实例:
再结合源代码,其实就是创建了一个BeanFactoryTransactionAttributeSourceAdvisor通知器,advice是TransactionInterceptor事务拦截器,pointcut是TransactionAttributeSourcePointcut,如下:
TransactionAttributeSourcePointcut使用的是匿名类,此时的TransactionAttributeSource 为AnnotationTransactionAttributeSource。此Pointcut的匹配方法为:
即根据类和方法是否能获取事务属性,使用AnnotationTransactionAttributeSource来获取,即判断类或者方法上是否有@Transactional等注解,若有该类注解则要对该对象创建出代理对象。
传统的jdbc事务如下:
|
1
2
3
4
5
6
7
8
9
10
11
12
13
14
15
16
17
18
19
20
21
22
23
24
25
|
@Test
public
void
testAdd(){
Connection con=
null
;
try
{
con=DriverManager.getConnection(url , username , password )
con.setAutoCommit(
false
);
//操作一
PreparedStatement ps = con.prepareStatement(
"insert into product(product_name,model) value('电脑','联想')"
);
ps.execute();
//操作二
ps = con.prepareStatement(
"insert into product(product_name,model) value('电脑','联想')"
);
ps.execute();
con.commit();
}
catch
(SQLException e) {
e.printStackTrace();
if
(con!=
null
){
try
{
con.rollback();
}
catch
(SQLException e1) {
e1.printStackTrace();
}
}
}
}
|
设置Connection连接的自动提交为false,变成我们手动来控制commit时机。一旦操作一执行成功但是操作二执行失败,在捕获的异常中进行回滚操作(其实也可以不用手动回滚,当你没有手动执行con.commit()方法时,也会回滚)。
这种传统的使用事务的方法有很多的弊端。
弊端一:业务代码都要嵌套在try catch模板代码中
弊端二:接触了底层Connection的事务功能,当使用其他一些框架时,我们更多的不会直接与Connection打交道,如使用Hibernate时,就不容易获取Connection。
有了以上的两点缺陷,我们就要分别来解决他们。
首先针对弊端一:
(1)既然外层代码都是相似的try catch代码,我们最能想到的就是将这些代码封装成模板以便复用。如同JdbcTemplate对jdbc操作的模板代码的封装,这便引出了下文TransactionTemplate的模板代码。
(2)当然了,上述做法还不是很理想,如何才能将我们的业务逻辑和事务代码完全分离呢?这就需要使用AOP代理技术。我们只需要关系业务逻辑,通过AOP代理将事务逻辑植入业务逻辑中,这样就可以做到分离。这就需要将事务和AOP很好的结合起来。
然后针对弊端二:
既然不推荐和底层Connection打交道,那就需要一个统一的接口来完成事务的提交和回滚等功能,即接口PlatformTransactionManager,如果是使用jdbc则使用DataSourceTransactionManager来完成事务的提交和回滚,若果是使用hibernate则使用HibernateTransactionManager来完成事务的提交和回滚。
下面就来仔细看下源代码:
事务的定义接口为TransactionDefinition,类图如下:
先看TransactionDefinition:
|
1
2
3
4
5
6
7
8
9
10
11
12
13
14
15
16
17
18
19
20
21
|
public
interface
TransactionDefinition {
int
PROPAGATION_REQUIRED =
0
;
int
PROPAGATION_SUPPORTS =
1
;
int
PROPAGATION_MANDATORY =
2
;
int
PROPAGATION_REQUIRES_NEW =
3
;
int
PROPAGATION_NOT_SUPPORTED =
4
;
int
PROPAGATION_NEVER =
5
;
int
PROPAGATION_NESTED =
6
;
int
ISOLATION_DEFAULT = -
1
;
int
ISOLATION_READ_UNCOMMITTED = Connection.TRANSACTION_READ_UNCOMMITTED;
int
ISOLATION_READ_COMMITTED = Connection.TRANSACTION_READ_COMMITTED;
int
ISOLATION_REPEATABLE_READ = Connection.TRANSACTION_REPEATABLE_READ;
int
ISOLATION_SERIALIZABLE = Connection.TRANSACTION_SERIALIZABLE;
int
TIMEOUT_DEFAULT = -
1
;
int
getPropagationBehavior();
int
getIsolationLevel();
int
getTimeout();
boolean
isReadOnly();
String getName();
}
|
TransactionDefinition接口:事务的定义,两个重要属性,事务的传播属性和隔离级别,这里不再重点说明,可网上去查。
DefaultTransactionDefinition:就是对上述属性设置一些默认值,传播属性默认为:PROPAGATION_REQUIRED,隔离级别默认为:ISOLATION_DEFAULT,采用的是底层数据库采用的默认隔离级别。
TransactionAttribute接口:
|
1
2
3
4
5
6
|
public
interface
TransactionAttribute
extends
TransactionDefinition {
//在选择事务管理器时用到
String getQualifier();
//指明对什么样的异常进行回滚
boolean
rollbackOn(Throwable ex);
}
|
DefaultTransactionAttribute:
|
1
2
3
4
|
//对RuntimeException 和Error都进行回滚
public
boolean
rollbackOn(Throwable ex) {
return
(ex
instanceof
RuntimeException || ex
instanceof
Error);
}
|
以上的事务定义基本就没什么了。下面来看看上文针对弊端一采用的TransactionTemplate:
|
1
2
3
4
5
6
7
8
9
10
11
12
13
14
15
16
17
18
19
20
21
22
23
24
25
26
27
28
29
30
31
32
33
34
|
public
class
TransactionTemplate
extends
DefaultTransactionDefinition
implements
TransactionOperations, InitializingBean {
private
PlatformTransactionManager transactionManager;
public
<T> T execute(TransactionCallback<T> action)
throws
TransactionException {
if
(
this
.transactionManager
instanceof
CallbackPreferringPlatformTransactionManager) {
return
((CallbackPreferringPlatformTransactionManager)
this
.transactionManager).execute(
this
, action);
}
else
{
TransactionStatus status =
this
.transactionManager.getTransaction(
this
);
T result;
try
{
result = action.doInTransaction(status);
}
catch
(RuntimeException ex) {
// Transactional code threw application exception -> rollback
rollbackOnException(status, ex);
throw
ex;
}
catch
(Error err) {
// Transactional code threw error -> rollback
rollbackOnException(status, err);
throw
err;
}
catch
(Exception ex) {
// Transactional code threw unexpected exception -> rollback
rollbackOnException(status, ex);
throw
new
UndeclaredThrowableException(ex,
"TransactionCallback threw undeclared checked exception"
);
}
this
.transactionManager.commit(status);
return
result;
}
}
|
它内部含有一个重要的属性事务管理器PlatformTransactionManager,用它来执行事务的提交和回滚操作。
这样的模板代码,使得我们只需将我们的业务逻辑写到TransactionCallback接口方法中即可,案例如下:
|
1
2
3
4
5
6
7
8
9
10
11
12
|
TransactionTemplate transactionTemplate=
new
TransactionTemplate();
transactionTemplate.setTransactionManager(platformTransactionManager);
transactionTemplate.execute(
new
TransactionCallback<String>() {
@Override
public
String doInTransaction(TransactionStatus status) {
//数据库操作1
//数据库操作2
return
"success"
;
}
});
|
这便是模板代码TransactionTemplate,虽然帮我们省略了一些相同的操作,但是每次数据库操作都要写到TransactionCallback中,与业务逻辑还不是分离的。这就引出AOP代理。
要将SpringAOP和事务结合起来,也有很多的表现形式,但原理都是一样的。
如下形式:
形式1:
|
1
2
3
4
5
6
7
8
9
10
11
12
13
|
<
bean
id
=
"proxy"
class
=
"org.springframework.transaction.interceptor.TransactionProxyFactoryBean"
>
<!-- 为事务代理工厂Bean注入事务管理器 -->
<
property
name
=
"transactionManager"
ref
=
"transactionManager"
/>
<!-- 要在哪个Bean上面创建事务代理对象 -->
<
property
name
=
"target"
ref
=
"productDao"
/>
<!-- 指定事务属性 -->
<
property
name
=
"transactionAttributes"
>
<
props
>
<
prop
key
=
"*"
>PROPAGATION_REQUIRED</
prop
>
</
props
>
</
property
>
</
bean
>
|
这种方式就是直接针对某个对象创建代理对象,加入事务拦截器。
形式2:
|
1
2
3
4
5
6
7
8
9
10
11
12
13
14
15
|
<
tx:advice
id
=
"txAdvice"
transaction-manager
=
"transactionManager"
>
<
tx:attributes
>
<
tx:method
name
=
"add*"
propagation
=
"REQUIRED"
/>
<
tx:method
name
=
"delete*"
propagation
=
"REQUIRED"
/>
<
tx:method
name
=
"update*"
propagation
=
"REQUIRED"
/>
<
tx:method
name
=
"add*"
propagation
=
"REQUIRED"
/>
</
tx:attributes
>
</
tx:advice
>
<
aop:config
>
<
aop:pointcut
id
=
"pointcut"
expression
=
"XXXX"
/>
<
aop:advisor
advice-ref
=
"txAdvice"
pointcut-ref
=
"pointcut"
/>
</
aop:config
>
|
这里就比较明显,tx:advice定义advice,对不同的方法名称,定义不同的事务属性,aop:config将上述通知和pointcut结合起来变成通知器。
这种方式将符合pointcut的对象都创建出代理对象,加入事务拦截器
形式3:
|
1
|
<
tx:annotation-driven
transaction-manager
=
"transactionManager"
/>
|
这种形式结合@Transactional来使用。
这种方式将标注有@Transactional的对象来创建出代理对象。
以上三种形式都是将某些对象创建出代理对象(创建代理对象的方式不同),并加入事务拦截器。我们先来看看这个事务拦截器是什么样的。
先来看下TransactionInterceptor:它继承了TransactionAspectSupport,实现了MethodInterceptor接口。执行AOP代理过程中,可以对目标业务逻辑加上各种各样的拦截器,每一个拦截器都是一个MethodInterceptor,每个MethodInterceptor都有接口方法public Object invoke(final MethodInvocation invocation),MethodInvocation更像是针对所拦截的方法的一个拦截器链条,通过它能够不断的执行该链条上的每个拦截器。
看下TransactionInterceptor:
|
1
2
3
4
5
6
7
8
9
10
11
12
13
14
15
16
17
18
19
20
21
22
23
|
public
class
TransactionInterceptor
extends
TransactionAspectSupport
implements
MethodInterceptor, Serializable {
public
TransactionInterceptor() {
}
public
TransactionInterceptor(PlatformTransactionManager ptm, Properties attributes) {
setTransactionManager(ptm);
setTransactionAttributes(attributes);
}
public
TransactionInterceptor(PlatformTransactionManager ptm, TransactionAttributeSource tas) {
setTransactionManager(ptm);
setTransactionAttributeSource(tas);
}
@Override
public
Object invoke(
final
MethodInvocation invocation)
throws
Throwable {
Class<?> targetClass = (invocation.getThis() !=
null
? AopUtils.getTargetClass(invocation.getThis()) :
null
);
return
invokeWithinTransaction(invocation.getMethod(), targetClass,
new
InvocationCallback() {
@Override
public
Object proceedWithInvocation()
throws
Throwable {
return
invocation.proceed();
}
});
}
//略
}
|
前面几个构造函数可以看到,TransactionInterceptor 基本不保留任何数据,只是起到数据传递作用,把真正的处理过程交给TransactionAspectSupport 去完成,而本身则净身更像一个拦截器,所以我们要去看TransactionAspectSupport,在看它的拦截逻辑之前,先介绍下一个重要接口TransactionAttributeSource:
|
1
2
3
|
public
interface
TransactionAttributeSource {
TransactionAttribute getTransactionAttribute(Method method, Class<?> targetClass);
}
|
接口方法主要是获取目标类的method方法的事务属性。
这样的获取方式有很多
(1)使用注解来标注事务属性,如@Transactional注解
(2)使用配置信息,如下
|
1
2
3
4
5
6
|
<tx:attributes>
<tx:method name=
"add*"
propagation=
"REQUIRED"
/>
<tx:method name=
"delete*"
propagation=
"REQUIRED"
/>
<tx:method name=
"update*"
propagation=
"REQUIRED"
/>
<tx:method name=
"add*"
propagation=
"REQUIRED"
/>
</tx:attributes>
|
直接xml配置某些方法的事务属性。
类图如下:
然后回到拦截器核心逻辑中:
|
1
2
3
4
5
6
7
8
9
10
11
12
13
14
15
16
17
18
19
20
21
22
23
24
25
26
27
28
29
30
31
32
33
34
35
36
37
38
39
40
41
42
43
44
45
46
47
48
49
50
51
52
53
54
55
56
57
58
59
60
61
62
63
64
65
66
67
68
69
70
71
72
73
74
|
protected
Object invokeWithinTransaction(Method method, Class<?> targetClass,
final
InvocationCallback invocation)
throws
Throwable {
// If the transaction attribute is null, the method is non-transactional.
final
TransactionAttribute txAttr = getTransactionAttributeSource().getTransactionAttribute(method, targetClass);
final
PlatformTransactionManager tm = determineTransactionManager(txAttr);
final
String joinpointIdentification = methodIdentification(method, targetClass);
if
(txAttr ==
null
|| !(tm
instanceof
CallbackPreferringPlatformTransactionManager)) {
// Standard transaction demarcation with getTransaction and commit/rollback calls.
TransactionInfo txInfo = createTransactionIfNecessary(tm, txAttr, joinpointIdentification);
Object retVal =
null
;
try
{
// This is an around advice: Invoke the next interceptor in the chain.
// This will normally result in a target object being invoked.
retVal = invocation.proceedWithInvocation();
}
catch
(Throwable ex) {
// target invocation exception
completeTransactionAfterThrowing(txInfo, ex);
throw
ex;
}
finally
{
cleanupTransactionInfo(txInfo);
}
commitTransactionAfterReturning(txInfo);
return
retVal;
}
else
{
// It's a CallbackPreferringPlatformTransactionManager: pass a TransactionCallback in.
try
{
Object result = ((CallbackPreferringPlatformTransactionManager) tm).execute(txAttr,
new
TransactionCallback<Object>() {
@Override
public
Object doInTransaction(TransactionStatus status) {
TransactionInfo txInfo = prepareTransactionInfo(tm, txAttr, joinpointIdentification, status);
try
{
return
invocation.proceedWithInvocation();
}
catch
(Throwable ex) {
if
(txAttr.rollbackOn(ex)) {
// A RuntimeException: will lead to a rollback.
if
(ex
instanceof
RuntimeException) {
throw
(RuntimeException) ex;
}
else
{
throw
new
ThrowableHolderException(ex);
}
}
else
{
// A normal return value: will lead to a commit.
return
new
ThrowableHolder(ex);
}
}
finally
{
cleanupTransactionInfo(txInfo);
}
}
});
// Check result: It might indicate a Throwable to rethrow.
if
(result
instanceof
ThrowableHolder) {
throw
((ThrowableHolder) result).getThrowable();
}
else
{
return
result;
}
}
catch
(ThrowableHolderException ex) {
throw
ex.getCause();
}
}
}
|
第一步:使用TransactionAttributeSource根据method和targetClass获取事务属性,上文已说过。
第二步:获取合适的事务处理器
|
1
2
3
4
5
6
7
8
9
10
11
12
13
14
15
|
protected
PlatformTransactionManager determineTransactionManager(TransactionAttribute txAttr) {
if
(
this
.transactionManager !=
null
||
this
.beanFactory ==
null
|| txAttr ==
null
) {
return
this
.transactionManager;
}
String qualifier = txAttr.getQualifier();
if
(StringUtils.hasLength(qualifier)) {
return
BeanFactoryAnnotationUtils.qualifiedBeanOfType(
this
.beanFactory, PlatformTransactionManager.
class
, qualifier);
}
else
if
(
this
.transactionManagerBeanName !=
null
) {
return
this
.beanFactory.getBean(
this
.transactionManagerBeanName, PlatformTransactionManager.
class
);
}
else
{
return
this
.beanFactory.getBean(PlatformTransactionManager.
class
);
}
}
|
首先如果该拦截器本身的事务拦截器不为空则直接使用,若为空则根据事务配置属性中的qualifier属性来匹配,如果没有再根据事务拦截器的transactionManagerBeanName来匹配,最后根据PlatformTransactionManager类型来匹配。
第三步:joinpointIdentification则为类名和方法名的结合,主要用与log信息。
第四步:根据事务管理器和事务属性创建事务。
|
1
2
3
4
5
6
7
8
9
10
11
12
13
14
15
16
17
|
TransactionInfo txInfo = createTransactionIfNecessary(tm, txAttr, joinpointIdentification);
Object retVal =
null
;
try
{
// This is an around advice: Invoke the next interceptor in the chain.
// This will normally result in a target object being invoked.
retVal = invocation.proceedWithInvocation();
}
catch
(Throwable ex) {
// target invocation exception
completeTransactionAfterThrowing(txInfo, ex);
throw
ex;
}
finally
{
cleanupTransactionInfo(txInfo);
}
commitTransactionAfterReturning(txInfo);
return
retVal;
|
这样的代码仍然很清晰,先创建事务,执行业务逻辑,提交事务,当抛出异常时回滚事务,这些操作都是由事务管理器PlatformTransactionManager来完成的。本文不再详细说明,下一篇文章重点来说事务管理器根据事务属性对事务的提交回滚等操作。
事务拦截器的大致流程我们知道了,然后就是通过AOP来使用事务拦截器,这些内容大部分都是AOP的知识了,详情见我的SpringAOP的文章http://lgbolgger.iteye.com/category/322988
这里再对上文的三种形式做源码分析:
形式1:使用TransactionProxyFactoryBean工厂bean
内容不再列出,到上文找。TransactionProxyFactoryBean的类图如下:
先从上面说起。
FactoryBean :工厂Bean
|
1
2
3
4
5
|
public
interface
FactoryBean<T> {
T getObject()
throws
Exception;
Class<?> getObjectType();
boolean
isSingleton();
}
|
一旦一个bean实现了FactoryBean 接口,注册到Spring容器中,根据注册id获取的对象不是此工厂bean而是该工厂bean的getObject()方法返回的对象。
ProxyConfig:代理配置
|
1
2
3
4
5
6
7
|
public
class
ProxyConfig
implements
Serializable {
private
boolean
proxyTargetClass =
false
;
private
boolean
optimize =
false
;
boolean
opaque =
false
;
boolean
exposeProxy =
false
;
private
boolean
frozen =
false
;
}
|
AbstractSingletonProxyFactoryBean:创建单例的代理对象核心类,对子类只留出拦截器。
|
1
2
3
4
5
6
7
8
9
10
11
|
public
abstract
class
AbstractSingletonProxyFactoryBean
extends
ProxyConfig
implements
FactoryBean<Object>, BeanClassLoaderAware, InitializingBean {
private
Object target;
private
Class<?>[] proxyInterfaces;
private
Object[] preInterceptors;
private
Object[] postInterceptors;
/** Default is global AdvisorAdapterRegistry */
private
AdvisorAdapterRegistry advisorAdapterRegistry = GlobalAdvisorAdapterRegistry.getInstance();
private
transient
ClassLoader proxyClassLoader;
private
Object proxy;
}
|
通过jdk代理或者cglib代理,加上拦截器,完成代理对象proxy的创建。
具体过程:
|
1
2
3
4
5
6
7
8
9
10
11
12
13
14
15
16
17
18
19
20
21
22
23
24
25
26
27
28
29
30
31
32
33
34
35
36
37
38
39
40
41
42
43
44
|
public
void
afterPropertiesSet() {
if
(
this
.target ==
null
) {
throw
new
IllegalArgumentException(
"Property 'target' is required"
);
}
if
(
this
.target
instanceof
String) {
throw
new
IllegalArgumentException(
"'target' needs to be a bean reference, not a bean name as value"
);
}
if
(
this
.proxyClassLoader ==
null
) {
this
.proxyClassLoader = ClassUtils.getDefaultClassLoader();
}
ProxyFactory proxyFactory =
new
ProxyFactory();
if
(
this
.preInterceptors !=
null
) {
for
(Object interceptor :
this
.preInterceptors) {
proxyFactory.addAdvisor(
this
.advisorAdapterRegistry.wrap(interceptor));
}
}
// Add the main interceptor (typically an Advisor).
proxyFactory.addAdvisor(
this
.advisorAdapterRegistry.wrap(createMainInterceptor()));
if
(
this
.postInterceptors !=
null
) {
for
(Object interceptor :
this
.postInterceptors) {
proxyFactory.addAdvisor(
this
.advisorAdapterRegistry.wrap(interceptor));
}
}
proxyFactory.copyFrom(
this
);
TargetSource targetSource = createTargetSource(
this
.target);
proxyFactory.setTargetSource(targetSource);
if
(
this
.proxyInterfaces !=
null
) {
proxyFactory.setInterfaces(
this
.proxyInterfaces);
}
else
if
(!isProxyTargetClass()) {
// Rely on AOP infrastructure to tell us what interfaces to proxy.
proxyFactory.setInterfaces(
ClassUtils.getAllInterfacesForClass(targetSource.getTargetClass(),
this
.proxyClassLoader));
}
this
.proxy = proxyFactory.getProxy(
this
.proxyClassLoader);
}
|
加入拦截器,同时createMainInterceptor()方法是抽象方法,留给子类来实现,最后通过ProxyFactory 来创建出代理对象,详情见http://lgbolgger.iteye.com/blog/2119810
形式2 使用aop:config结合tx:advice配置:
对容器中符合pointcut的bean都创建出代理对象,通知器为tx:advice创建的事务拦截器。
对于同理aop:config的处理看这篇文章http://lgbolgger.iteye.com/blog/2119810
下面说说对于tx:advice的处理过程:
对于xml配置中的每一个标签,都会有对应的解析器来完成解析工作,每个解析器都实现了BeanDefinitionParser接口,用于处理tx:advice的BeanDefinitionParser则为TxAdviceBeanDefinitionParser:
|
1
2
3
4
5
6
7
8
9
10
11
12
13
14
15
16
17
18
19
20
21
22
23
24
25
26
27
|
//此次解析要创建的对象类型为TransactionInterceptor即事务拦截器
@Override
protected
Class getBeanClass(Element element) {
return
TransactionInterceptor.
class
;
}
//该方法就是解析并设置上述要创建的对象的参数
@Override
protected
void
doParse(Element element, ParserContext parserContext, BeanDefinitionBuilder builder) {
builder.addPropertyReference(
"transactionManager"
, TxNamespaceHandler.getTransactionManagerName(element));
List txAttributes = DomUtils.getChildElementsByTagName(element, ATTRIBUTES);
if
(txAttributes.size() >
1
) {
parserContext.getReaderContext().error(
"Element <attributes> is allowed at most once inside element <advice>"
, element);
}
else
if
(txAttributes.size() ==
1
) {
// Using attributes source.
Element attributeSourceElement = (Element) txAttributes.get(
0
);
RootBeanDefinition attributeSourceDefinition = parseAttributeSource(attributeSourceElement, parserContext);
builder.addPropertyValue(
"transactionAttributeSource"
, attributeSourceDefinition);
}
else
{
// Assume annotations source.
builder.addPropertyValue(
"transactionAttributeSource"
,
new
RootBeanDefinition(AnnotationTransactionAttributeSource.
class
));
}
}
|
可以看到解析过程其实就是获取transactionManager和transactionAttributeSource,然后设置到TransactionInterceptor事务拦截器中。
所以tx:advice标签其实就是创建了一个TransactionInterceptor事务拦截器对象而已。其中transactionAttributeSource是直接对某些方法进行事务属性的xml配置,下面则是使用注解来配置某些方法的事务属性。
形式3:配合@Transactional来完成注解式事务
@Transactional注解仅仅起到方法的食物属性的收集,真正的处理程序则是<tx:annotation-driven>在执行,它对那些含有@Transactional注解的bean创建代理对象,自动加入TransactionInterceptor事务拦截器。我们来看下tx:annotation-driven的源码处理过程:
还是tx:annotation-driven标签对应的处理器BeanDefinitionParser为AnnotationDrivenBeanDefinitionParser:
如下:
|
1
2
3
4
5
6
7
8
9
10
11
12
13
14
15
16
17
18
19
20
21
22
23
24
25
26
27
28
29
30
31
32
33
34
35
36
37
38
39
40
41
42
43
44
45
46
47
48
49
50
51
52
53
54
55
56
57
58
59
|
@Override
public
BeanDefinition parse(Element element, ParserContext parserContext) {
String mode = element.getAttribute(
"mode"
);
if
(
"aspectj"
.equals(mode)) {
// mode="aspectj"
registerTransactionAspect(element, parserContext);
}
else
{
// mode="proxy"
AopAutoProxyConfigurer.configureAutoProxyCreator(element, parserContext);
}
return
null
;
}
/**
* Inner class to just introduce an AOP framework dependency when actually in proxy mode.
*/
private
static
class
AopAutoProxyConfigurer {
public
static
void
configureAutoProxyCreator(Element element, ParserContext parserContext) {
AopNamespaceUtils.registerAutoProxyCreatorIfNecessary(parserContext, element);
String txAdvisorBeanName = TransactionManagementConfigUtils.TRANSACTION_ADVISOR_BEAN_NAME;
if
(!parserContext.getRegistry().containsBeanDefinition(txAdvisorBeanName)) {
Object eleSource = parserContext.extractSource(element);
// Create the TransactionAttributeSource definition.
RootBeanDefinition sourceDef =
new
RootBeanDefinition(
"org.springframework.transaction.annotation.AnnotationTransactionAttributeSource"
);
sourceDef.setSource(eleSource);
sourceDef.setRole(BeanDefinition.ROLE_INFRASTRUCTURE);
String sourceName = parserContext.getReaderContext().registerWithGeneratedName(sourceDef);
// Create the TransactionInterceptor definition.
RootBeanDefinition interceptorDef =
new
RootBeanDefinition(TransactionInterceptor.
class
);
interceptorDef.setSource(eleSource);
interceptorDef.setRole(BeanDefinition.ROLE_INFRASTRUCTURE);
registerTransactionManager(element, interceptorDef);
interceptorDef.getPropertyValues().add(
"transactionAttributeSource"
,
new
RuntimeBeanReference(sourceName));
String interceptorName = parserContext.getReaderContext().registerWithGeneratedName(interceptorDef);
// Create the TransactionAttributeSourceAdvisor definition.
RootBeanDefinition advisorDef =
new
RootBeanDefinition(BeanFactoryTransactionAttributeSourceAdvisor.
class
);
advisorDef.setSource(eleSource);
advisorDef.setRole(BeanDefinition.ROLE_INFRASTRUCTURE);
advisorDef.getPropertyValues().add(
"transactionAttributeSource"
,
new
RuntimeBeanReference(sourceName));
advisorDef.getPropertyValues().add(
"adviceBeanName"
, interceptorName);
if
(element.hasAttribute(
"order"
)) {
advisorDef.getPropertyValues().add(
"order"
, element.getAttribute(
"order"
));
}
parserContext.getRegistry().registerBeanDefinition(txAdvisorBeanName, advisorDef);
CompositeComponentDefinition compositeDef =
new
CompositeComponentDefinition(element.getTagName(), eleSource);
compositeDef.addNestedComponent(
new
BeanComponentDefinition(sourceDef, sourceName));
compositeDef.addNestedComponent(
new
BeanComponentDefinition(interceptorDef, interceptorName));
compositeDef.addNestedComponent(
new
BeanComponentDefinition(advisorDef, txAdvisorBeanName));
parserContext.registerComponent(compositeDef);
}
}
}
|
首先tx:annotation-driven有一个model属性,有两个值 proxy和aspectj。
若为proxy:则代表使用SpringAOP框架进行代理。若为aspectj则由aspectj进行代码植入。前者不改变原有类的字节码,后者将拦截代码植入原有类的字节码中。主要讲SpringAOP的代理:
先来看一个实例:
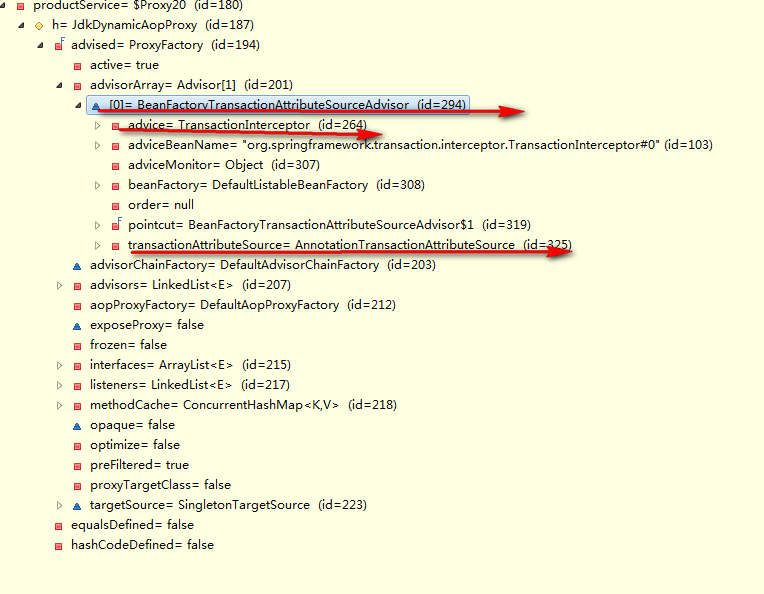
再结合源代码,其实就是创建了一个BeanFactoryTransactionAttributeSourceAdvisor通知器,advice是TransactionInterceptor事务拦截器,pointcut是TransactionAttributeSourcePointcut,如下:
|
1
2
3
4
5
6
7
8
9
10
11
12
|
public
class
BeanFactoryTransactionAttributeSourceAdvisor
extends
AbstractBeanFactoryPointcutAdvisor {
private
TransactionAttributeSource transactionAttributeSource;
private
final
TransactionAttributeSourcePointcut pointcut =
new
TransactionAttributeSourcePointcut() {
@Override
protected
TransactionAttributeSource getTransactionAttributeSource() {
return
transactionAttributeSource;
}
};
//略
}
|
TransactionAttributeSourcePointcut使用的是匿名类,此时的TransactionAttributeSource 为AnnotationTransactionAttributeSource。此Pointcut的匹配方法为:
|
1
2
3
4
5
6
7
8
|
abstract
class
TransactionAttributeSourcePointcut
extends
StaticMethodMatcherPointcut
implements
Serializable {
@Override
public
boolean
matches(Method method, Class<?> targetClass) {
TransactionAttributeSource tas = getTransactionAttributeSource();
return
(tas ==
null
|| tas.getTransactionAttribute(method, targetClass) !=
null
);
}
}
|
即根据类和方法是否能获取事务属性,使用AnnotationTransactionAttributeSource来获取,即判断类或者方法上是否有@Transactional等注解,若有该类注解则要对该对象创建出代理对象。