转自:http://blog.csdn.net/elaine_bao/article/details/53046542
版权声明:本文为博主原创文章,转载请注明。
1. 综述
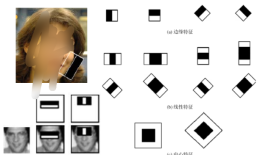
首先给出实验结果。训练得到的基于hog的人脸检测器如图左,可以看出这是一个主要针对正脸的人脸检测器。对几张测试图片的人脸检测效果如图右: 
以下给出完整的人脸检测器训练代码(详细代码解读请看第2部分):
/*faceDetectorTrain.cpp
function:借助dlib训练自己的人脸检测器(参考dlib/examples/fhog_object_detector_ex)
date:2016/11/5
author:Elaine_Bao
*/

#include <dlib/svm_threaded.h>
#include <dlib/gui_widgets.h>
#include <dlib/image_processing.h>
#include <dlib/data_io.h> #include <iostream> #include <fstream> using namespace std; using namespace dlib; // ---------------------------------------------------------------------------------------- int main(int argc, char** argv) { try { //一、preprocessing //1. 载入训练集,测试集 const std::string faces_directory = "faces"; dlib::array<array2d<unsigned char> > images_train, images_test; std::vector<std::vector<rectangle> > face_boxes_train, face_boxes_test; load_image_dataset(images_train, face_boxes_train, faces_directory + "/training.xml"); load_image_dataset(images_test, face_boxes_test, faces_directory + "/testing.xml"); //2.图片上采样 upsample_image_dataset<pyramid_down<2> >(images_train, face_boxes_train); upsample_image_dataset<pyramid_down<2> >(images_test, face_boxes_test); //3.训练图片做镜像处理,扩充训练集 add_image_left_right_flips(images_train, face_boxes_train); //二、training //1.定义scanner类型,用于扫描图片并提取特征(HOG) typedef scan_fhog_pyramid<pyramid_down<6> > image_scanner_type; image_scanner_type scanner; //2. 设置scanner扫描窗口大小 scanner.set_detection_window_size(80, 80); //3.定义trainer类型(SVM),用于训练人脸检测器 structural_object_detection_trainer<image_scanner_type> trainer(scanner); // Set this to the number of processing cores on your machine. trainer.set_num_threads(4); // 设置SVM的参数C,C越大表示更好地去拟合训练集,当然也有可能造成过拟合。通过尝试不同C在测试集上的效果得到最佳值 trainer.set_c(1); trainer.be_verbose(); //设置训练结束条件,"risk gap"<0.01时训练结束,值越小表示SVM优化问题越精确,训练时间也会越久。 //通常取0.1-0.01.在verbose模式下每一轮的risk gap都会打印出来。 trainer.set_epsilon(0.01); //4.训练,生成object_detector object_detector<image_scanner_type> detector = trainer.train(images_train, face_boxes_train); //三、测试 // 输出precision, recall, average precision. cout << "training results: " << test_object_detection_function(detector, images_train, face_boxes_train) << endl; cout << "testing results: " << test_object_detection_function(detector, images_test, face_boxes_test) << endl; //显示hog image_window hogwin(draw_fhog(detector), "Learned fHOG detector"); // 显示测试集的人脸检测结果 image_window win; for (unsigned long i = 0; i < images_test.size(); ++i) { // Run the detector and get the face detections. std::vector<rectangle> dets = detector(images_test[i]); win.clear_overlay(); win.set_image(images_test[i]); win.add_overlay(dets, rgb_pixel(255, 0, 0)); cout << "Hit enter to process the next image..." << endl; cin.get(); } //四、模型存储 serialize("face_detector.svm") << detector; // you can recall it using the deserialize() function. object_detector<image_scanner_type> detector2; deserialize("face_detector.svm") >> detector2; } catch (exception& e) { cout << "\nexception thrown!" << endl; cout << e.what() << endl; } }
2. 代码解读 step by step
2.1 预处理阶段
2.1.1 载入训练集、测试集
const std::string faces_directory = "faces";
dlib::array<array2d<unsigned char> > images_train, images_test; std::vector<std::vector<rectangle> > face_boxes_train, face_boxes_test; load_image_dataset(images_train, face_boxes_train, faces_directory + "/training.xml"); load_image_dataset(images_test, face_boxes_test, faces_directory + "/testing.xml");
训练集和测试集图片存储在”faces”文件夹下,另外该文件夹下还需包含training.xml,testing.xml,包含图片中人脸bounding box的位置。组织形式为:

2.1.2 图片上采样
upsample_image_dataset<pyramid_down<2> >(images_train, face_boxes_train);
upsample_image_dataset<pyramid_down<2> >(images_test, face_boxes_test);
即图片放大两倍,这样有助于检测较小的人脸。
上述函数在对图片进行上采样的同时,也相应地调整了人脸bounding box的位置。
2.1.3 镜像图片
add_image_left_right_flips(images_train, face_boxes_train);- 1
- 1
对训练所用图片做镜像处理,扩充训练集的训练样本。
2.2 训练阶段
2.2.1 定义scanner,用于扫描图片并提取特征
typedef scan_fhog_pyramid<pyramid_down<6>> image_scanner_type;
image_scanner_type scanner;
class scan_fhog_pyramid定义来自于scan_fhog_pyramid.h,原型如下:
template <typename Pyramid_type, typename Feature_extractor_type = default_fhog_feature_extractor>
class scan_fhog_pyramid{...}- 1
- 2
- 1
- 2
类模板中参数1表示图像金字塔的类型,本文使用的是pyramid_down<6>,表示图像金字塔进行下采样的比率为5/6,即对原图像不断缩小5/6,构成多级金字塔。什么时候停止下采样呢?当图像的大小<扫描窗口大小的时候。
参数2表示特征提取器,默认情况下使用fhog.h中的extract_fhog_feature()提取特征,函数原型为:
void extract_fhog_features(
        const image_type& img,
        array2d<matrix<T,31,1>,mm>& hog,
        int cell_size = 8, int filter_rows_padding = 1, int filter_cols_padding = 1 );
此函数提取的HOG特征来自于Felzenszwalb版本的HOG [1] (简称fhog),它是对每个8*8像素大小的cell提取31维的fhog算子,然后保存到上述hog array中供后续计算使用。
31维fhog如何得到?如下图(此图来自于http://blog.csdn.net/qq_14845119/article/details/52625426)。
31D fhog=18D+9D+4D。
(1) 18D来自于对cell做18个bin的梯度方向直方图,即将360°划分为18个bin,然后令cell中的每个像素根据其梯度方向加权投影到直方图相应的bin中,这样就得到了18维有符号的fhog梯度。
(2) 9D来自于对cell做9个bin的梯度方向直方图,此时是将180°划分为9个bin,则得到无符号的9维fhog梯度。
(3) 最后的4D是来自于当前cell和其对角线临域的4个领域cell的归一化操作。具体地,取block=2*2 cell,则得到无符号fhog梯度4*9维,将其看成矩阵做按行按列累加可得到1D特征,4个领域则可得到4个block,共4维特征。
最终,每个cell的31维fhog特征就来自于上述三部分的串联。

2.2.2 设置scanner扫描窗口大小
scanner.set_detection_window_size(80, 80);- 1
- 1
设置扫描窗口大小为80*80,即扫描窗口是固定大小的,通过放缩图像(图像金字塔)以达到在不同尺度上检测人脸的目的。
由于在预处理中图像放大了2倍,则图像中最小能检测到的人脸大小为40*40。
2.2.3 定义trainer,用于训练人脸检测器
structural_object_detection_trainer<image_scanner_type> trainer(scanner);
// 设置训练参数
trainer.set_num_threads(4);
// 设置SVM的参数C,C越大表示更好地去拟合训练集,当然也有可能造成过拟合。通过尝试不同C在测试集上的效果得到最佳值
trainer.set_c(1); trainer.be_verbose(); //设置训练结束条件,"risk gap"<0.01时训练结束,值越小表示SVM优化问题越精确,训练时间也会越久。 //通常取0.1-0.01.在verbose模式下每一轮的risk gap都会打印出来。 trainer.set_epsilon(0.01);
structural_object_detection_trainer定义来自于structural_object_detection_trainer.h,通过scanner来初始化trainer。
2.2.4 训练,生成人脸检测器
object_detector<image_scanner_type> detector = trainer.train(images_train, face_boxes_train);- 1
- 1
train()的函数原型在structural_object_detection_trainer.h有4个,这里用的是其中一个,即输入参数为图片和图片中人脸的正确位置,输出一个object_detector。
注意这种情况下除了已经标出的人脸位置为正样本以外,图片的其他位置随机取负样本,因此在标注训练图片的人脸时,应确保所有人脸都已标注出来。如果出现不太确定是不是人脸的图片,应调用另一个版本的train()函数并设置ignore区域。
关于train()的内部实现,其实就是训练一个SVM模型,当模型loss<之前所设的epsilon的时候,输出训练好的模型到object_detector。
2.2.5 测试
// 显示测试集的人脸检测结果
image_window win;
for (unsigned long i = 0; i < images_test.size(); ++i) { // Run the detector and get the face detections. std::vector<rectangle> dets = detector(images_test[i]); win.clear_overlay(); win.set_image(images_test[i]); win.add_overlay(dets, rgb_pixel(255, 0, 0)); cout << "Hit enter to process the next image..." << endl; cin.get(); }
detector()函数直接返回图片中所有检测到的人脸的bounding box信息。
2.3 tips
2.3.1 模型的存储
通过serialize()可以实现对模型的保存,而deserialize()可以将磁盘中保存的模型取出来用。
serialize("face_detector.svm") << detector;

// Then you can recall it using the deserialize() function.
object_detector<image_scanner_type> detector2;
deserialize("face_detector.svm") >> detector2;- 1
- 2
- 3
- 4
- 5
- 1
- 2
- 3
- 4
- 5
2.3.2 多个detector联合使用
在文章开篇的时候提到上述人脸检测器比较适用于正脸的检测,对于侧脸的检测效果并不好。那么我们可以单独训练侧脸的人脸检测器,然后多个detector联合使用。
std::vector<object_detector<image_scanner_type> > my_detectors;
my_detectors.push_back(detector);
std::vector<rectangle> dets = evaluate_detectors(my_detectors, images_train[0]);- 1
- 2
- 3
- 1
- 2
- 3
串联所有人脸检测器一起使用的好处是,全图的fhog特征只需要提取一遍即可。
例如,在dlib自带的人脸检测器中就用了5个HOG-based detector,分别用于检测front looking, left looking, right looking, front looking but rotated left, and a front looking but rotated right one. 下面是这五个detector的训练参数log:
/*
The front detector:
    trained on mirrored set of labeled_faces_in_the_wild/frontal_faces.xml upsampled each image by 2:1 used pyramid_down<6> loss per missed target: 1 epsilon: 0.05 padding: 0 detection window size: 80 80 C: 700 nuclear norm regularizer: 9 cell_size: 8 num filters: 78 num images: 4748 Train detector (precision,recall,AP): 0.999793 0.895517 0.895368 singular value threshold: 0.15 The left detector: trained on labeled_faces_in_the_wild/left_faces.xml upsampled each image by 2:1 used pyramid_down<6> loss per missed target: 2 epsilon: 0.05 padding: 0 detection window size: 80 80 C: 250 nuclear norm regularizer: 8 cell_size: 8 num filters: 63 num images: 493 Train detector (precision,recall,AP): 0.991803 0.86019 0.859486 singular value threshold: 0.15 The right detector: trained left-right flip of labeled_faces_in_the_wild/left_faces.xml upsampled each image by 2:1 used pyramid_down<6> loss per missed target: 2 epsilon: 0.05 padding: 0 detection window size: 80 80 C: 250 nuclear norm regularizer: 8 cell_size: 8 num filters: 66 num images: 493 Train detector (precision,recall,AP): 0.991781 0.85782 0.857341 singular value threshold: 0.19 The front-rotate-left detector: trained on mirrored set of labeled_faces_in_the_wild/frontal_faces.xml upsampled each image by 2:1 used pyramid_down<6> rotated left 27 degrees loss per missed target: 1 epsilon: 0.05 padding: 0 detection window size: 80 80 C: 700 nuclear norm regularizer: 9 cell_size: 8 num images: 4748 singular value threshold: 0.12 The front-rotate-right detector: trained on mirrored set of labeled_faces_in_the_wild/frontal_faces.xml upsampled each image by 2:1 used pyramid_down<6> rotated right 27 degrees loss per missed target: 1 epsilon: 0.05 padding: 0 detection window size: 80 80 C: 700 nuclear norm regularizer: 9 cell_size: 8 num filters: 89 num images: 4748 Train detector (precision,recall,AP): 1 0.897369 0.897369 singular value threshold: 0.15 */
[1] Object Detection with Discriminatively Trained Part Based Models by P. Felzenszwalb, R. Girshick, D. McAllester, D. Ramanan, IEEE Transactions on Pattern Analysis and Machine Intelligence, Vol. 32, No. 9, Sep. 2010。