转自:http://blog.csdn.net/transformer_han/article/details/6450200
需求
硬件需求:一台Ubuntu或者debian电脑(虚拟机),能通过网络访问到。
软件需求:git-core, gitosis, openssh-server, openssh-client, Apache2(Gitweb)
安装配置git服务器
a@server:~$ sudo useradd -m git
a@server:~$ sudo mkdir /home/repo
a@server:~$ sudo chown git:git /home/repo
a@server:~$ sudo chmod 700 /home/repo
安装配置gitosis
a@server:~$ git config –global user.name “myname”
a@server:~$ git config –global user.email “myname@server“
a@server:~$ sudo apt-get install python-setuptools
a@server:~$ cd /tmp
a@server:/tmp$ git clone git://eagain.net/gitosis.git
a@server:/tmp$ cd gitosis
a@server:/tmp/gitosis$ sudo python setup.py install
a@server:/tmp/gitosis$ su git
$ ln -s /home/repo /home/git/repositories
$ exit
usr@pc1:~$ ssh-keygen -t rsa
将公钥拷贝到服务器的/tmp下:
usr@pc1:~$ scp .ssh/id_rsa.pubgit@<server>:/tmp
a@server:/tmp/gitosis$ sudo -H -u git gitosis-init < /tmp/id_rsa.pub
Initialized empty Git repository in /home/repo/gitosis-admin.git/
Reinitialized existing Git repository in /home/repo/gitosis-admin.git/
a@server:/home/git$ sudo passwd root
a@server:/home/git$ su
root@server:/home/git# cd repositories
root@server:/home/git/repositories# cd gitosis-admin.git/
root@server:/home/git/repositories/gitosis-admin.git#sudo chmod 755 /home/repo/gitosis-admin.git/hooks/post-update
root@server:/home/git/repositories/gitosis-admin.git# exit
在服务器上新建一个测试项目仓库
我建了一个叫“teamwork”的仓库。
切换到Git用户:
a@ubuntu:/home/git$ su - git
$ cd /home/prj_git
$ mkdir teamwork.git
$ cd teamwork.git
$ git init --bare
$ exit
管理gitosis的配置文件
刚刚提到,gitosis本身的配置也是通过git来实现的。在你自己的开发机里,把gitosis-admin.git这个仓库clone下来,就可以以管理员的身份修改配置了。
usr@pc1:~/work$ git clonegit@<server>:gitosis-admin.git
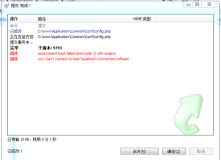
fatal: The remote end hung up unexpectedly
root@server:/home/a/work/gitosis-admin# cp /path/to/.ssh/id_rsa.pub ./keydir/b.pub
root@server:/home/a/work/gitosis-admin# exit
[gitosis][group hello]
writable = teamwork
members = a@server b[group hello_ro]
readonly = teamwork
members = lz
team组有a,b两个成员,该组对teamwork仓库有读写权限;
team_ro组有lz一个成员,对teamwork仓库有只读权限。
加入新文件、提交并push到git服务器:
usr@pc1:~/work/gitosis-admin$ git add .
usr@pc1:~/work/gitosis-admin$ git commit -am “add teamweok prj and users”
usr@pc1:~/work/gitosis-admin$ git push origin master
初始化测试项目
usr@pc1:~/work$ cd teamwork-ori/
usr@pc1:~/work/teamwork-ori$ git init
usr@pc1:~/work/teamwork-ori$ git commit -am “initial version”
usr@pc1:~/work/teamwork-ori$ git push origin master
usr@pc1:~/work/teamwork-ori$ su b
$ cd /home/b
$ git clone git@<server>:teamwork.git
$ vim hello
$ git add .
$ git commit -am “b add”
$ exit
添加已有git项目
首先需要从你的工作仓库中得到一个纯仓库, 比如你的工作目录为~/kernel, 你想导出纯仓库到你的优盘里,然后拷贝到gitserver上去。
$ git clone –bare ~/kernel /media/udisk
然后就拿着优盘,交给gitserver的管理员,让他拷贝到/home/repo/下,同时需要配置 gitosis相关配置文件哦,这个就不用再说了吧。比如:下载ALSA库:
git clone git://android.git.kernel.org/platform/external/alsa-lib.git
git clone git://android.git.kernel.org/platform/external/alsa-utils.git
git clone –bare alsa-lib alsa-lib.git
git clone –bare alsa-utils alsa-utils.git
配置gitweb
1. 安装gitweb
sudo apt-get install gitweb
2. 安装apache2
sudo apt-get install apache2
3. 配置gitweb
(1)默认没有 css 加载,把 gitweb 要用的静态文件连接到 DocumentRoot 下:
cd /var/ www/
sudo ln -s / usr/ share/ gitweb/* .
(注意后面的点)
(2)修改配置:
sudo vi /etc/ gitweb.conf
将 $projectroot 改为gitosis-admin.git所在目录: /home/git/repositories
(3)修改 /home/git/repositories权限,默认情况下,gitosis将repositories权限设置为不可读的
sudo chmod 777 -R /home/git/repositories
11.编辑apache2配置文件,建立web站点 (默认情况下可以忽略此步骤)
(1) 编辑apache2配置文件
ubuntu中默认的web目录是/var/www,默认的cgi目录是 /usr/lib/cgi-bin/,安装完成gitweb后,gitweb的gitweb.cgi会自动放置
到该目录下。如果你的cgi路径不是默认的/usr/lib/cgi-bin/,需要将gitweb安装在/usr/lib/cgi-bin中的gitweb.cgi复制到原来配置
的cgi-bin路径,并修改apache的配置文件/etc/apache2/apache.conf:
SetEnv GITWEB_CONFIG /etc/gitweb.conf
gitweb.conf配置文件形如:(可自行修改,这里不做详细介绍)
<Directory "/srv/www/cgi-bin/gitweb">
Options FollowSymlinks ExecCGI
Allow from all
AllowOverride all
Order allow,deny
<Files gitweb.cgi>
SetHandler cgi-script
</Files>
RewriteEngine on
RewriteCond %{REQUEST_FILENAME} !-f
RewriteCond %{REQUEST_FILENAME} !-d
RewriteRule ^.* /gitweb.cgi/$0 [L,PT]
</Directory>
(2)重新启动apache:sudo /etc/init.d/apache2 restart,访问http://localhost/cgi-bin/gitweb.cgi
<以下未经测试>
a2dissite gitserver 禁用
a2ensite gitserver 使能
/etc/init.d/apache2 restart 重启
git clone git://git.kernel.org/pub/scm/git/git.git
cd git
make GITWEB_PROJECTROOT=”/home/repo” prefix=/usr gitweb/gitweb.cgi
cd gitweb
cp -av git* /home/repo/
<VirtualHost 172.20.146.39:80>
ServerName 172.20.146.39
DocumentRoot /home/repo
ScriptAlias /cgi-bin/ /home/repo
<Directory /home/repo>
Options ExecCGI +FollowSymLinks +SymLinksIfOwnerMatch
AllowOverride All
order allow,deny
Allow from all
AddHandler cgi-script cgi
DirectoryIndex gitweb.cgi
</Directory>
</VirtualHost>
chmod a+r repo
chmod a+x repo
6./etc/init.d/apache2 restart
git clone http://192.168.1.1/alsa-lib.git
git clone http://192.168.1.1/alsa-utils.git
git访问方式:
git clone git@192.168.1.1:alsa-lib.git
Web网页浏览:
http://192.168.1.1
1.windows文件命名不区分大小 写,而linux支持。这样android源码下载时会出现一下问题。大约有15个文件存在这个问题。
2.库的描述文件在.git文件夹的description文件中。编辑该文件,在gitweb页中就会有 description。
3.gitosis库hooks下的post- update不是由post-update.sample重命名过来的,它们不一样。post-update可以更新工作目录,保持与库一致。没有它配置 文件是不会更新的。
4.(1)git@hello:/home/git$ git add .
error: readlink(“external/openssl/apps/md4.c”): No such file or directory
error: unable to index file external/openssl/apps/md4.c
fatal: adding files failed
(2)root@/external/openssl# git init
Initialized empty Git repository in /external/openssl/.git/
root@/external/openssl# git add .
error: readlink(“apps/md4.c”): No such file or directory
error: unable to index file apps/md4.c
fatal: adding files failed
(3)root@android-2.1_r2$ rm -Rf .repo
root@android-2.1_r2$ find . -name “.git” | xargs rm -Rf
架设git服务器--使用git-daemon 架设基于git 协议服务器:
git是一个不错的版本管理的工具。现在自己在搞一个简单的应用程序开发,想使用git来进行管理。在Google了配置文档后,还是受了N多的挫折。某些文档质量不高,浪费了好多时间......
好,切入正题:
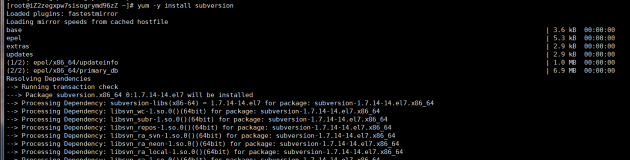
安装必要的git工具
#apt-get install git git-core
安装好了以后,进行设置
1. 创建一个git目录
#mkdir /git
#cd /git/
#mkdir myproject
2. 创建一个空的git仓库
#git-init-db
3. 创建工程的文件
# echo "My test project" > test.txt
* 此步很重要,如果要在远程clone这个project, 这个project必须是非空的,否则会失败。
4. 使用git命令添加并提交新的文件
#git-add test.txt
#git-commit -m "Init"
至此,本地的git 仓库就创建好了。想要在远程clone这个project,还需要使用git-daemon
5. 安装git-daemon-run. git-daemon-run实际是一个脚本管理工具,用来启动git-daemon.
#apt-get install git-daemon
6. 配置git-daemon-run
#vi /etc/sv/git-daemon/run
可以看到
#!/bin/sh
exec 2>&1
echo 'git-daemon starting.'
exec chpst -m64000000 /
git-daemon --verbose --base-path=/var/cache /var/cache/git
将最后一句的git-daemon修改为
git-daemon --verbose --export-all --base-path=/git/
* 这里,我加上了一个--export-all.看下man手册就可以知道,使用该选项后,在git仓库中就不必创建git-daemon-export-ok文件。如果不使用该选项,则在第4步还需要创建该文件,即
#touch git-daemon-export-ok
7.重启系统
由于小弟还不知道如何使用git-daemon-run工具重启git-daemon,干脆重启下系统
8. 从client导出server(192.168.35.69)上的myproject
git-clone git://192.168.35.69/myproject
=============================================
branch 操作:
在本地:
git branch test
git checkout test // git branch branch1 branch2
git push original test