Context基本概念
Context是什么?
1) Context是一个抽象类,其通用实现在ContextImpl类中。
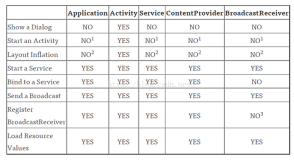
2) Context:是一个访问application环境全局信息的接口,通过它可以访问application的资源和相关的类,其主要功能如下:
- 启动Activity
- 启动和停止Service
- 发送广播消息(Intent)
- 注册广播消息(Intent)接收者
- 可以访问APK中各种资源(如Resources和AssetManager等)
- 可以访问Package的相关信息
- APK的各种权限管理
从以上分析可以看出,Context就是一个对APK包无所不知的大管家,大家需要什么,直接问它就可以了。
Context与View的关系
View与Context(或Activity)的关系类似于明星与经纪人的关系,所以创建View时,必须明确指定其Context(即经纪人或大管家),否则View就成不了明星。
Context家族关系

Context关键函数

public abstract class Context {

    // 获取应用程序包的AssetManager实例
    public abstract AssetManager getAssets();

    // 获取应用程序包的Resources实例
    public abstract Resources getResources();

    // 获取PackageManager实例,以查看全局package信息
    public abstract PackageManager getPackageManager();

    // 获取应用程序包的ContentResolver实例
    public abstract ContentResolver getContentResolver();

    // 它返回当前进程的主线程的Looper,此线程分发调用给应用组件(activities, services等)
    public abstract Looper getMainLooper();

    // 返回当前进程的单实例全局Application对象的Context
    public abstract Context getApplicationContext();

    // 从string表中获取本地化的、格式化的字符序列
    public final CharSequence getText(int resId) {
        return getResources().getText(resId);
    }

    // 从string表中获取本地化的字符串
    public final String getString(int resId) {
        return getResources().getString(resId);
    }

    public final String getString(int resId, Object... formatArgs) {
        return getResources().getString(resId, formatArgs);
    }

    // 返回一个可用于获取包中类信息的class loader
    public abstract ClassLoader getClassLoader();

    // 返回应用程序包名
    public abstract String getPackageName();

    // 返回应用程序信息
    public abstract ApplicationInfo getApplicationInfo();

    // 根据文件名获取SharedPreferences
    public abstract SharedPreferences getSharedPreferences(String name,
            int mode);

    // 其根目录为: Environment.getExternalStorageDirectory()
    /*
     * @param type The type of files directory to return.  May be null for
     * the root of the files directory or one of
     * the following Environment constants for a subdirectory:
     * {@link android.os.Environment#DIRECTORY_MUSIC},
     * {@link android.os.Environment#DIRECTORY_PODCASTS},
     * {@link android.os.Environment#DIRECTORY_RINGTONES},
     * {@link android.os.Environment#DIRECTORY_ALARMS},
     * {@link android.os.Environment#DIRECTORY_NOTIFICATIONS},
     * {@link android.os.Environment#DIRECTORY_PICTURES}, or
     * {@link android.os.Environment#DIRECTORY_MOVIES}.
    */
    public abstract File getExternalFilesDir(String type);

    // 返回应用程序obb文件路径
    public abstract File getObbDir();

    // 启动一个新的activity
    public abstract void startActivity(Intent intent);

    // 启动一个新的activity
    public void startActivityAsUser(Intent intent, UserHandle user) {
        throw new RuntimeException("Not implemented. Must override in a subclass.");
    }

    // 启动一个新的activity
    // intent: 将被启动的activity的描述信息
    // options: 描述activity将如何被启动
    public abstract void startActivity(Intent intent, Bundle options);

    // 启动多个新的activity
    public abstract void startActivities(Intent[] intents);

    // 启动多个新的activity
    public abstract void startActivities(Intent[] intents, Bundle options);

    // 广播一个intent给所有感兴趣的接收者,异步机制
    public abstract void sendBroadcast(Intent intent);

    // 广播一个intent给所有感兴趣的接收者,异步机制
    public abstract void sendBroadcast(Intent intent,String receiverPermission);

    public abstract void sendOrderedBroadcast(Intent intent,String receiverPermission);

    public abstract void sendOrderedBroadcast(Intent intent,
            String receiverPermission, BroadcastReceiver resultReceiver,
            Handler scheduler, int initialCode, String initialData,
            Bundle initialExtras);

    public abstract void sendBroadcastAsUser(Intent intent, UserHandle user);

    public abstract void sendBroadcastAsUser(Intent intent, UserHandle user,
            String receiverPermission);

    // 注册一个BroadcastReceiver,且它将在主activity线程中运行
    public abstract Intent registerReceiver(BroadcastReceiver receiver,
                                            IntentFilter filter);

    public abstract Intent registerReceiver(BroadcastReceiver receiver,
            IntentFilter filter, String broadcastPermission, Handler scheduler);

    public abstract void unregisterReceiver(BroadcastReceiver receiver);

    // 请求启动一个application service
    public abstract ComponentName startService(Intent service);

    // 请求停止一个application service
    public abstract boolean stopService(Intent service);

    // 连接一个应用服务,它定义了application和service间的依赖关系
    public abstract boolean bindService(Intent service, ServiceConnection conn,
            int flags);

    // 断开一个应用服务,当服务重新开始时,将不再接收到调用,
    // 且服务允许随时停止
    public abstract void unbindService(ServiceConnection conn);


    // 返回系统级service句柄
    /*
     * @see #WINDOW_SERVICE
     * @see android.view.WindowManager
     * @see #LAYOUT_INFLATER_SERVICE
     * @see android.view.LayoutInflater
     * @see #ACTIVITY_SERVICE
     * @see android.app.ActivityManager
     * @see #POWER_SERVICE
     * @see android.os.PowerManager
     * @see #ALARM_SERVICE
     * @see android.app.AlarmManager
     * @see #NOTIFICATION_SERVICE
     * @see android.app.NotificationManager
     * @see #KEYGUARD_SERVICE
     * @see android.app.KeyguardManager
     * @see #LOCATION_SERVICE
     * @see android.location.LocationManager
     * @see #SEARCH_SERVICE
     * @see android.app.SearchManager
     * @see #SENSOR_SERVICE
     * @see android.hardware.SensorManager
     * @see #STORAGE_SERVICE
     * @see android.os.storage.StorageManager
     * @see #VIBRATOR_SERVICE
     * @see android.os.Vibrator
     * @see #CONNECTIVITY_SERVICE
     * @see android.net.ConnectivityManager
     * @see #WIFI_SERVICE
     * @see android.net.wifi.WifiManager
     * @see #AUDIO_SERVICE
     * @see android.media.AudioManager
     * @see #MEDIA_ROUTER_SERVICE
     * @see android.media.MediaRouter
     * @see #TELEPHONY_SERVICE
     * @see android.telephony.TelephonyManager
     * @see #INPUT_METHOD_SERVICE
     * @see android.view.inputmethod.InputMethodManager
     * @see #UI_MODE_SERVICE
     * @see android.app.UiModeManager
     * @see #DOWNLOAD_SERVICE
     * @see android.app.DownloadManager
     */
    public abstract Object getSystemService(String name);

    public abstract int checkPermission(String permission, int pid, int uid);

    // 返回一个新的与application name对应的Context对象
    public abstract Context createPackageContext(String packageName,
            int flags) throws PackageManager.NameNotFoundException;

    // 返回基于当前Context对象的新对象,其资源与display相匹配
    public abstract Context createDisplayContext(Display display);
 }
ContextImpl关键成员和函数
/**
 * Common implementation of Context API, which provides the base
 * context object for Activity and other application components.
 */
class ContextImpl extends Context {
    private final static String TAG = "ContextImpl";
    private final static boolean DEBUG = false;

    private static final HashMap<String, SharedPreferencesImpl> sSharedPrefs =
            new HashMap<String, SharedPreferencesImpl>();

    /*package*/ LoadedApk mPackageInfo; // 关键数据成员
    private String mBasePackageName;
    private Resources mResources;
    /*package*/ ActivityThread mMainThread; // 主线程

    @Override
    public AssetManager getAssets() {
        return getResources().getAssets();
    }

    @Override
    public Looper getMainLooper() {
        return mMainThread.getLooper();
    }

    @Override
    public Object getSystemService(String name) {
        ServiceFetcher fetcher = SYSTEM_SERVICE_MAP.get(name);
        return fetcher == null ? null : fetcher.getService(this);
    }

    @Override
    public void startActivity(Intent intent, Bundle options) {
        warnIfCallingFromSystemProcess();
        if ((intent.getFlags()&Intent.FLAG_ACTIVITY_NEW_TASK) == 0) {
            throw new AndroidRuntimeException(
                    "Calling startActivity() from outside of an Activity "
                    + " context requires the FLAG_ACTIVITY_NEW_TASK flag."
                    + " Is this really what you want?");
        }
        mMainThread.getInstrumentation().execStartActivity(
            getOuterContext(), mMainThread.getApplicationThread(), null,
            (Activity)null, intent, -1, options);
    }
}
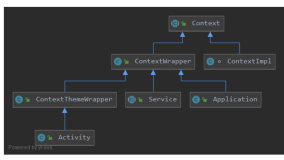
ContextWrapper
它只是对Context类的一种封装,它的构造函数包含了一个真正的Context引用,即ContextImpl对象。
/**
 * Proxying implementation of Context that simply delegates all of its calls to
 * another Context.  Can be subclassed to modify behavior without changing
 * the original Context.
 */
public class ContextWrapper extends Context {
    Context mBase; //该属性指向一个ContextIml实例

    public ContextWrapper(Context base) {
        mBase = base;
    }

    /**
     * Set the base context for this ContextWrapper.  All calls will then be
     * delegated to the base context.  Throws
     * IllegalStateException if a base context has already been set.
     *
     * @param base The new base context for this wrapper.
     * 创建Application、Service、Activity,会调用该方法给mBase属性赋值
     */
    protected void attachBaseContext(Context base) {
        if (mBase != null) {
            throw new IllegalStateException("Base context already set");
        }
        mBase = base;
    }

    @Override
    public Looper getMainLooper() {
        return mBase.getMainLooper();
    }

    @Override
    public Object getSystemService(String name) {
        return mBase.getSystemService(name);
    }

    @Override
    public void startActivity(Intent intent) {
        mBase.startActivity(intent);
    }
}
ContextThemeWrapper
该类内部包含了主题(Theme)相关的接口,即android:theme属性指定的。只有Activity需要主题,Service不需要主题,所以Service直接继承于ContextWrapper类。
/**
 * A ContextWrapper that allows you to modify the theme from what is in the
 * wrapped context.
 */
public class ContextThemeWrapper extends ContextWrapper {
    private Context mBase;
    private int mThemeResource;
    private Resources.Theme mTheme;
    private LayoutInflater mInflater;
    private Configuration mOverrideConfiguration;
    private Resources mResources;

    public ContextThemeWrapper() {
        super(null);
    }

    public ContextThemeWrapper(Context base, int themeres) {
        super(base);
        mBase = base;
        mThemeResource = themeres;
    }

    @Override protected void attachBaseContext(Context newBase) {
        super.attachBaseContext(newBase);
        mBase = newBase;
    }

    @Override public void setTheme(int resid) {
        mThemeResource = resid;
        initializeTheme();
    }

    @Override public Resources.Theme getTheme() {
        if (mTheme != null) {
            return mTheme;
        }

        mThemeResource = Resources.selectDefaultTheme(mThemeResource,
                getApplicationInfo().targetSdkVersion);
        initializeTheme();

        return mTheme;
    }
}
何时创建Context
应用程序在以下几种情况下创建Context实例:
1) 创建Application 对象时, 而且整个App共一个Application对象
2) 创建Service对象时
3) 创建Activity对象时
因此应用程序App共有的Context数目公式为:
总Context实例个数 = Service个数 + Activity个数 + 1(Application对应的Context实例)
ActivityThread消息处理函数与本节相关的内容如下:
public void handleMessage(Message msg) {
            if (DEBUG_MESSAGES) Slog.v(TAG, ">>> handling: " + codeToString(msg.what));
            switch (msg.what) {
                case LAUNCH_ACTIVITY: { // 创建Activity对象
                    Trace.traceBegin(Trace.TRACE_TAG_ACTIVITY_MANAGER, "activityStart");
                    ActivityClientRecord r = (ActivityClientRecord)msg.obj;

                    r.packageInfo = getPackageInfoNoCheck(
                            r.activityInfo.applicationInfo, r.compatInfo);
                    handleLaunchActivity(r, null);
                    Trace.traceEnd(Trace.TRACE_TAG_ACTIVITY_MANAGER);
                } break;

                case BIND_APPLICATION: // 创建Application对象
                    Trace.traceBegin(Trace.TRACE_TAG_ACTIVITY_MANAGER, "bindApplication");
                    AppBindData data = (AppBindData)msg.obj;
                    handleBindApplication(data);
                    Trace.traceEnd(Trace.TRACE_TAG_ACTIVITY_MANAGER);
                    break;

                case CREATE_SERVICE: // 创建Service对象
                    Trace.traceBegin(Trace.TRACE_TAG_ACTIVITY_MANAGER, "serviceCreate");
                    handleCreateService((CreateServiceData)msg.obj);
                    Trace.traceEnd(Trace.TRACE_TAG_ACTIVITY_MANAGER);
                    break;

                case BIND_SERVICE:  // Bind Service对象
                    Trace.traceBegin(Trace.TRACE_TAG_ACTIVITY_MANAGER, "serviceBind");
                    handleBindService((BindServiceData)msg.obj);
                    Trace.traceEnd(Trace.TRACE_TAG_ACTIVITY_MANAGER);
                    break;
            }
        }
创建Application对象时创建Context实例
每个应用程序在第一次启动时,都会首先创建一个Application对象。从startActivity流程可知,创建Application的时机在handleBindApplication()方法中,该函数位于 ActivityThread.java类中 ,相关代码如下:
// ActivityThread.java
   private void handleBindApplication(AppBindData data) {
      try {
            // If the app is being launched for full backup or restore, bring it up in
            // a restricted environment with the base application class.
            Application app = data.info.makeApplication(data.restrictedBackupMode, null);
            mInitialApplication = app;
            ...
        } finally {
            StrictMode.setThreadPolicy(savedPolicy);
        }
   }

   // LoadedApk.java
   public Application makeApplication(boolean forceDefaultAppClass,
            Instrumentation instrumentation) {
        if (mApplication != null) {
            return mApplication;
        }

        Application app = null;

        String appClass = mApplicationInfo.className;
        if (forceDefaultAppClass || (appClass == null)) {
            appClass = "android.app.Application";
        }

        try {
            java.lang.ClassLoader cl = getClassLoader();
            ContextImpl appContext = new ContextImpl(); // 创建ContextImpl实例
            appContext.init(this, null, mActivityThread);
            app = mActivityThread.mInstrumentation.newApplication(
                    cl, appClass, appContext);
            appContext.setOuterContext(app); // 将Application实例传递给Context实例
        } catch (Exception e) {
            ...
        }
        mActivityThread.mAllApplications.add(app);
        mApplication = app;

        return app;
    }
创建Activity对象时创建Context实例
通过startActivity()或startActivityForResult()请求启动一个Activity时,如果系统检测需要新建一个Activity对象时,就会回调handleLaunchActivity()方法,该方法继而调用performLaunchActivity()方法,去创建一个Activity实例,并且回调onCreate(),onStart()方法等,函数都位于 ActivityThread.java类 ,相关代码如下:
private void handleLaunchActivity(ActivityClientRecord r, Intent customIntent) {
        ...
        Activity a = performLaunchActivity(r, customIntent); // 到下一步

        if (a != null) {
            r.createdConfig = new Configuration(mConfiguration);
            Bundle oldState = r.state;
            handleResumeActivity(r.token, false, r.isForward,
                    !r.activity.mFinished && !r.startsNotResumed);
            ...
        }
        ...
     }

    private Activity performLaunchActivity(ActivityClientRecord r, Intent customIntent) {
        ...
        Activity activity = null;
        try {
            java.lang.ClassLoader cl = r.packageInfo.getClassLoader();
            activity = mInstrumentation.newActivity(
                    cl, component.getClassName(), r.intent);
            StrictMode.incrementExpectedActivityCount(activity.getClass());
            r.intent.setExtrasClassLoader(cl);
            if (r.state != null) {
                r.state.setClassLoader(cl);
            }
        } catch (Exception e) {
            ...
        }

        try {
            Application app = r.packageInfo.makeApplication(false, mInstrumentation);

            if (activity != null) {
                Context appContext = createBaseContextForActivity(r, activity); // 创建Context
                CharSequence title = r.activityInfo.loadLabel(appContext.getPackageManager());
                Configuration config = new Configuration(mCompatConfiguration);
                if (DEBUG_CONFIGURATION) Slog.v(TAG, "Launching activity "
                        + r.activityInfo.name + " with config " + config);
                activity.attach(appContext, this, getInstrumentation(), r.token,
                        r.ident, app, r.intent, r.activityInfo, title, r.parent,
                        r.embeddedID, r.lastNonConfigurationInstances, config);

                if (customIntent != null) {
                    activity.mIntent = customIntent;
                }
                r.lastNonConfigurationInstances = null;
                activity.mStartedActivity = false;
                int theme = r.activityInfo.getThemeResource();
                if (theme != 0) {
                    activity.setTheme(theme);
                }


            mActivities.put(r.token, r);

        } catch (SuperNotCalledException e) {
            ...

        } catch (Exception e) {
            ...
        }

        return activity;
    }
private Context createBaseContextForActivity(ActivityClientRecord r,
            final Activity activity) {
        ContextImpl appContext = new ContextImpl();  // 创建ContextImpl实例
        appContext.init(r.packageInfo, r.token, this);
        appContext.setOuterContext(activity);

        // For debugging purposes, if the activity's package name contains the value of
        // the "debug.use-second-display" system property as a substring, then show
        // its content on a secondary display if there is one.
        Context baseContext = appContext;
        String pkgName = SystemProperties.get("debug.second-display.pkg");
        if (pkgName != null && !pkgName.isEmpty()
                && r.packageInfo.mPackageName.contains(pkgName)) {
            DisplayManagerGlobal dm = DisplayManagerGlobal.getInstance();
            for (int displayId : dm.getDisplayIds()) {
                if (displayId != Display.DEFAULT_DISPLAY) {
                    Display display = dm.getRealDisplay(displayId);
                    baseContext = appContext.createDisplayContext(display);
                    break;
                }
            }
        }
        return baseContext;
    }
创建Service对象时创建Context实例
通过startService或者bindService时,如果系统检测到需要新创建一个Service实例,就会回调handleCreateService()方法,完成相关数据操作。handleCreateService()函数位于 ActivityThread.java类,如下:
private void handleCreateService(CreateServiceData data) {
        // If we are getting ready to gc after going to the background, well
        // we are back active so skip it.
        unscheduleGcIdler();

        LoadedApk packageInfo = getPackageInfoNoCheck(
                data.info.applicationInfo, data.compatInfo);
        Service service = null;
        try {
            java.lang.ClassLoader cl = packageInfo.getClassLoader();
            service = (Service) cl.loadClass(data.info.name).newInstance();
        } catch (Exception e) {
            if (!mInstrumentation.onException(service, e)) {
                throw new RuntimeException(
                    "Unable to instantiate service " + data.info.name
                    + ": " + e.toString(), e);
            }
        }

        try {
            if (localLOGV) Slog.v(TAG, "Creating service " + data.info.name);

            ContextImpl context = new ContextImpl(); // 创建ContextImpl实例
            context.init(packageInfo, null, this);

            Application app = packageInfo.makeApplication(false, mInstrumentation);
            context.setOuterContext(service);
            service.attach(context, this, data.info.name, data.token, app,
                    ActivityManagerNative.getDefault());
            service.onCreate();
            mServices.put(data.token, service);
            try {
                ActivityManagerNative.getDefault().serviceDoneExecuting(
                        data.token, 0, 0, 0);
            } catch (RemoteException e) {
                // nothing to do.
            }
        } catch (Exception e) {
            if (!mInstrumentation.onException(service, e)) {
                throw new RuntimeException(
                    "Unable to create service " + data.info.name
                    + ": " + e.toString(), e);
            }
        }
    }
小结
通过对ContextImp的分析可知,其方法的大多数操作都是直接调用其属性mPackageInfo(该属性类型为PackageInfo)的相关方法而来。这说明ContextImp是一种轻量级类,而PackageInfo才是真正重量级的类。而一个App里的所有ContextImpl实例,都对应同一个packageInfo对象。
我是天王盖地虎的分割线
本文转自我爱物联网博客园博客,原文链接:http://www.cnblogs.com/yydcdut/p/3886648.html,如需转载请自行联系原作者