一、目录结构
ci_demo
├─myapp 应用主目录
│ ├─autoload.php 自定义的自动加载文件(可选)
│ ├─myapp.php应用入口文件,拷贝index.php得到,注意修改$application_folder = 'myapp';
│ ├─cache 缓存目录
│ ├─config 配置目录,包括autoload,database,routes等
│ ├─controllers 控制器目录,可以分为api和web部分(命名自定义),也可以不分
│ │ ├─api api相关的控制器类
│ │ └─web
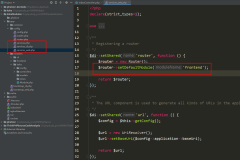
│ ├─core 如果在config.php里配置`$config['subclass_prefix'] = 'BASE_'`,则对应的类文件在此,如Base_Controller.php
│ ├─helpers 自定义帮助类
│ ├─hooks 自定义钩子类
│ ├─language
│ ├─libraries 自定义类库
│ ├─logs
│ ├─models 模型类,文件名小写
│ ├─third_party
│ └─views 视图类,可以包含子文件夹,建议与控制器类文件夹对应
│ └─user
├─common 公共文件目录,包括静态文件、自定义类库
│ ├─css
│ ├─images
│ ├─img
│ │ └─report
│ ├─js
│ └─lib 第三方类库可以放这里
└─system CI框架核心文件
├─core
│ └─compat
├─database
│ └─drivers
│ ├─cubrid
│ ├─ibase
│ ├─mssql
│ ├─mysql
│ ├─mysqli
│ ├─oci8
│ ├─odbc
│ ├─pdo
│ ├─postgre
│ ├─sqlite
│ ├─sqlite3
│ └─sqlsrv
├─fonts
├─helpers
├─language
└─libraries
多个app可以建立多个目录,可以有多个入口文件。
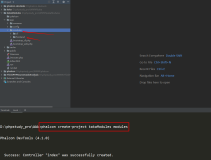
CI3.0支持composer,在最外层可以有vendor目录。二、控制器
位于application/controllers:
命名规则
1.文件名必须是大写字母开头
2.类名必须以大写字母开头
3.文件名与类名名称一致
4.url里类名可以是小写
例如User.php,类名是User。
示例
myapp/controllers/Welcome.php
<?php
defined('BASEPATH') OR exit('No direct script access allowed');

class Welcome extends CI_Controller {
    public function index()
    {
        $this->load->view('welcome_message');
    }
}application/controllers下可以有子目录(可以嵌套多层,不建议)。例如:
application/controllers/api/。访问的时候记得在url里拼上
api。
http://localhost/ci/myapp.php/Welcome
http://localhost/ci/myapp.php/api/Test
框架自动将url中类的名称首字母大写(
core/CodeIgniter.php 406行):
$class = ucfirst($RTR->class);require_once(APPPATH.'controllers/'.$RTR->directory.$class.'.php');所以,这样的url也是可以的:
http://localhost/ci/myapp.php/welcome
http://localhost/ci/myapp.php/api/test
父控制器
默认的,父控制器是CI_Controller。建议重新新建个父控制器,例如BASE_Controller,继承自CI_Controller。
常用函数
site_url('stu/index') 不能传参数,例如生成:http://localhost/dada/admin-ci/index.php/stu/index
base_url() 获取应用所在根目录url地址,例如http://localhost/dada/admin-ci/,去掉了入口文件
config_item('item_key') 获取配置值。建议使用配置类访问这些信息:
$this->config->load('filename');
$this->config->item('item name');
更多函数:
current_url() 当前url
redirect() 重定向
log_message() 打印日志注意:
site_url()依赖url类,需要在autoload.php自动加载下:$autoload['helper'] = array('url');
默认控制器
打开 application/config/routes.php 文件来设置默认控制器:
$route['default_controller'] = 'Blog';_remap()
如果控制器里存在这个方法,URI里的方法(METHOD)就会被替换成_remap方法,但同时接收URI里的方法参数,供后续使用。
if (method_exists($class, '_remap'))
{
    $params = array($method, array_slice($URI->rsegments, 2));
    $method = '_remap';
}_remap会废除掉由 URI 片段来决定哪个方法被调用的规则,允许你重新定义调用方法的规则(方法的路由规则)。
那么我们就可以在根控制器里(例如BASE_Controller)使用这个_remap()方法,进行数据的统一收集、输出。
示例:core/BASE_Controller.php
class Web_Controller extends CI_Controller{

    public function _remap($method, $params = array()){
            if (!method_exists($this, $method)) {
                $this->showError('您访问的页面不存在!');
            }

            //重新接收URI里待访问的方法
            $data = call_user_func_array(array($this, $method), $params);
    }
}API_Controller里的
_remap方法,实现了统一接收参数,统一返回json数据。
class API_Controller extends CI_Controller{

    public function _remap($method, $params = array())
    {
        try {
            if (!method_exists($this, $method)) {
                throw new HException(ErrorInfo::$err_bad_request);
            }

            $data = call_user_func_array(array($this, $method), $params);

            $succ_info = ErrorInfo::$succ;
            $result['ecd'] = $succ_info['code'];
            $result['msg'] = $succ_info['msg'];
            $result['locate'] = $this->_locate;

            $result['result'] = $data;
        } catch (HException $e) {
            $result['ecd'] = $e->getCode();
            $result['msg'] = $e->getMessage();
            $result['locate'] = $this->_locate;
            $result['result'] = $e->getData();
        } catch (Exception $e) {
            $result['ecd'] = $e->getCode();
            $result['msg'] = $e->getMessage();
            $result['locate'] = $this->_locate;
            $result['result'] = '';
        }

        if (!empty($e) || $this->_debug) {
            //   var_dump($e);
        }

        if (is_object($result['result'])) {
            $result['result'] = obj2arr($result['result']);
        }

        if (empty($result['result'])) {
            unset($result['result']);
        }

        echo json_encode($result);

        exit;
    }
}
自动加载的父类
默认子类的前缀是CI_,那么会自动加载application/core/CI_Controller.php(core/CodeIgniter.php 369行):
if (file_exists(APPPATH.'core/'.$CFG->config['subclass_prefix'].'Controller.php'))
    {
        require_once APPPATH.'core/'.$CFG->config['subclass_prefix'].'Controller.php';
    }

    // Add
    if (file_exists(BASEPATH.'core/'.$CFG->config['subclass_prefix'].'Controller.php'))
    {
        require_once BASEPATH.'core/'.$CFG->config['subclass_prefix'].'Controller.php';
    }
    // End
通过 URI 分段向你的方法传递参数
如果你的 URI 多于两个段,多余的段将作为参数传递到你的方法中。
例如,假设你的 URI 是这样:
example.com/index.php/products/shoes/sandals/123<?php
class Products extends CI_Controller {
public function shoes($sandals, $id)
{
echo $sandals;
echo $id;
}
}三、路由
pathinfo模式
支持http://52fhy.com/test.php/stu/one1/4 支持纯值的方式
支持http://52fhy.com/test.php/stu/one?uid=2
不支持http://52fhy.com/test.php/stu/one/uid/2 不支持参数是键值对的形式
路由配置参见config/routes.php
简单路由示例
$route['default_controller'] = 'Test/index'; //默认访问的方法

$route['act_1'] = 'Activity/one'; //前面为自定义的url,后面为实际url
四、配置
入口文件也配置部分参数,例如改应用路径。
常用配置文件:
config.php需要改入库文件名
autoload.php自动加载配置
database.php配置数据库
routes.php路由配置文件
memcached.php缓存配置
当然可以自己新建配置文件。
小技巧:
在config.php里配置
$config['subclass_prefix'] = 'BASE_';
那么应用里core里以BASE_开头的类会被自动加载,且controllers或者models里面的类必须继承自core里的类。
config.php常见配置:
//自定义core类前缀
$config['subclass_prefix'] = 'BASE_';

//url正则配置,如果不正确,改成如下:
$config['permitted_uri_chars'] = 'a-z 0-9~%.:_\-,';

//cookie配置
$config['cookie_prefix'] = "";
$config['cookie_domain'] = "";
$config['cookie_path'] = "/";
$config['cookie_secure'] = FALSE;

$config['global_xss_filtering'] = FALSE;//使用session库
$autoload['libraries'] = array('session');
//自动加载helper类
$autoload['helper'] = array('url', 'file', 'string', 'date');五、模型
所在目录
默认是在APPPATH/models。在core/Loader/php里:
 /**
 * List of paths to load libraries from
 *
 * @var    array
 */
protected $_ci_library_paths = array(APPPATH, BASEPATH);

/**
 * List of paths to load models from
 *
 * @var    array
 */
protected $_ci_model_paths = array(API_MODEL, ADMIN_MODEL, APPPATH);

/**
 * List of paths to load helpers from
 *
 * @var    array
 */
protected $_ci_helper_paths = array(APPPATH, BASEPATH);按照上面的定义,可以自定义。在一个大项目包含多个子项目时,一般model是通用的,那么最好一个公共的位置,例如:common/models。
命名规则
默认的规则是:
文件名全部小写,例如user_model.php,类名首字母大写:User_model
载入模型:$this->load->model('User_model');第二个参数是别名
使用模型:$data = $this->User_model->getAll();
如果想使用驼峰命名规则:(推荐)
例如:UserModel.php
$this->UserModel->getById();
则需要对system/core/Loader.php里的model()方法进行修改:屏蔽掉
$model = ucfirst(strtolower($model));就可以保持类名和文件名大小写一致了。下面的示例假设Modle都已经更改为驼峰命名了。
如何使用模型
方式一:控制器直接使用
示例:myapp/controllers/Welcome.php
public function t() {
    //载入模型
    $this->load->database();

    //获取articles表里的所有数据并以数组形式返回
    return $this->db->get('articles')->result_array();
}默认如果未全局加载database类,需要$this->load->database();
如果您需要一个在整个项目中都起作用的特定模型,您可以让CI在初始化时自动装载它。实现的方法是打开 application/config/autoload.php 文件,然后在自动装载数组中添加上这个模型。
$autoload['libraries'] = array('database');方式二:间接使用模型文件
上面访问数据是最简单的了,不需要建立任何模型文件。但这种方法不推荐使用,不符合MVC模式。
现在我们通过建立模型文件,在控制器里间接使用。
1、建立模型
示例:myapp/models/UserModel.php
class UserModel extends CI_Model{

    function get_last_user()
    {
        $query = $this->db->get('user', 10); //user表
        return $query->result();
    }
}在控制器里加载并使用:
$this->load->model('UserModel');
$this->UserModel->get_last_user();
方式三:优化模型
但感觉还是不方便。原因:
1、到处在使用$this->db不方便维护;
2、不推荐直接继承CI_Model。
下面我们进行优化:
1、重写自己的父Model
core/Model.php
可以看到,模型的基类是CI_Model,建议重新建立个父类Model继承CI_Model。
这里我们建立了API_Model继承CI_Model。并添加一些公用的方法。
示例:
class API_Model extends CI_Model
{
    protected $table;

    protected static $db = null;
    protected static $db_name = null;

    protected $_create_time = true;
    protected $_update_time = true;
    protected $_id = true;

    public function add($data)
    {
        if($this->_create_time){
            $data['create_time'] = now();
        }

        if($this->_update_time){
            $data['update_time'] = now();
        }

        $db = $this->getDBHanlder();
        $db->insert($this->table, $data);

        $id = $db->insert_id();

        if ($id && $this->_id) {
            return $this->getById($id);
        }

        return (object)$data;

    }

    public function updateById($id, $data)
    {
        $db = $this->getDBHanlder(Enum_DB_Name::MASTER);
        return $db->where(array('id' => $id))->update($this->table, $data);
    }

    public function updateByParams($where, $data)
    {
        $db = $this->getDBHanlder(Enum_DB_Name::MASTER);

        $this->bulidWhere($where, $db);

        return $db->update($this->table, $data);
    }

    public function deleteByParams($where)
    {
        $db = $this->getDBHanlder(Enum_DB_Name::MASTER);

        $this->bulidWhere($where, $db);

        return $db->delete($this->table);
    }

    public function getById($id)
    {
        if (empty($id)) return array();
        return $this->getDBHanlder(Enum_DB_Name::SLAVE)->get_where($this->table, array('id' => $id))->row();
    }

    /**
     * @param array $where
     * @param array $order($orderby, $direction = '')
    */
    public function getByParams($where = array(), $orders = array(), $offset = NULL , $limit = NULL)
    {
        $db = $this->getDBHanlder(Enum_DB_Name::SLAVE);

        $this->bulidWhere($where, $db);

        if($orders) $db->order_by($orders[0], $orders[1]);

        return $db->get($this->table, $limit, $offset)->row();
    }

    /**
     * @param array $where
     * @param array $order($orderby, $direction = '')
     */
    public function listByParams($where = array(), $orders = array(), $offset = NULL , $limit = NULL)
    {
        $db = $this->getDBHanlder(Enum_DB_Name::SLAVE);

        $this->bulidWhere($where, $db);

        if($orders) $db->order_by($orders[0], $orders[1]);

        return $db->get($this->table, $limit, $offset)->result();
    }

    public function getCountByParams($where = array())
    {
        $db = $this->getDBHanlder(Enum_DB_Name::SLAVE);

        $this->bulidWhere($where, $db);

        return $db->count_all_results($this->table);
    }

    /**
     * Execute the query, return row object

     * @param   string  $sql
     * @param   array   $binds = FALSE      An array of binding data
     * @param   bool    $return_object = FALSE
     * @return  mixed
     */
    public function query($sql, $binds = FALSE, $return_array = FALSE){

        if($return_array){
            return $this->getDBHanlder(Enum_DB_Name::SLAVE)
            ->query($sql, $binds)
            ->row_array();
        }else{
            return $this->getDBHanlder(Enum_DB_Name::SLAVE)
            ->query($sql, $binds)
            ->row();
        }
    }

    /**
     * Execute the query, return rows object

     * @param   string  $sql
     * @param   array   $binds = FALSE      An array of binding data
     * @param   bool    $return_object = FALSE
     * @return  mixed
     */
    public function querys($sql, $binds = FALSE, $return_array = FALSE){
        if($return_array){
            return $this->getDBHanlder(Enum_DB_Name::SLAVE)
            ->query($sql, $binds)
            ->result_array();
        }else{
            return $this->getDBHanlder(Enum_DB_Name::SLAVE)
            ->query($sql, $binds)
            ->result();
        }
    }

    /**
    * 获取数据库对象
    */
    public function getDBHanlder($db_name = Enum_DB_Name::MASTER)
    {
        if(is_null(self::$db)
            ){
            self::$db = $this->load->database($db_name, true);
        }

        return self::$db;
    }

    /**
    * 解析where
    * 支持:普通键值对参数、k__in, k__nin查询
    */
    protected function bulidWhere($where, &$db) {
        if($where){
            foreach($where as $k=>$v){
                if(strpos($k, '__')){
                    $temp = explode('__', $k);
                    if($temp[1] == 'in'){
                        $db->where_in($temp[0] ,$v);
                    }

                    if($temp[1] == 'nin'){
                        $db->where_not_in($temp[0] ,$v);
                    }

                    if($temp[1] == 'like'){
                        $db->like($temp[0] ,$v, 'both');
                    }

                    if($temp[1] == 'llike'){
                        $db->like($temp[0] ,$v, 'before');
                    }

                    if($temp[1] == 'rlike'){
                        $db->like($temp[0] ,$v, 'after');
                    }

                    unset($where[$k]);
                }
            }

            $db->where($where);
        }
    }
}
其中:
abstract class Enum_DB_Name
{
    const MASTER = 'master';
    const SLAVE = 'slave';
}
2、建立子模型
示例:myapp/models/UserModel.php
class UserModel extends API_Model{

    protected $table = 'user';

    function get_last_user(){
        $query = $this->listByParams(array(
            'flag' => 1
        ),array('id','desc'), 0 , 10);

        return $query;
    }

    function getUser($uid){
        $query = $this->getById($uid);

        return $query;
    }

    function updUser($uid, $data){
        $this->updateById($uid, $data);
    }

    function addUser($data){
        $this->add($data);
    }

    function delUser($uid){
        $this->deleteByParams(array('id' => $uid));
    }
}是不是发现使用的时候简单多了?不用总是写表名,不用总是$this->db。当然,上面的API_Model不是最终的,大家可以自行优化。
3、控制器里使用
与方式二相同。
数据库操作
下面提供了常见的数据库的CURD操作示例:
增  $this->db->insert('user', $data);
    $insert_id = $this->db->insert_id();

删  $this->db->delete('user', array('id' => $uid));

查  $this->db->get('user')->result_array();
    $this->db->get_where('user', array('id'=> $uid))->row_array();

    普通查询 :query() 函数以object(对象)的形式返回一个数据库结果集.
    $querys = $this->db->query('select * from user'); //返回结果集,与get()或者get_where()一致,等同于
        $querys = $this->db->get('user');


    $this->db->select();
    $this->db->select('id,name')->get('user'); //支持选择查询字段,可以连贯查询

    $data = $this
            ->where(array('uids !=' => $uid))
            ->where_in('flag', $flag_map)
            ->like('gps_geo', substr($geo, 0, 4), 'after')
            ->order_by('book_time', 'desc')
            ->limit(10, 0)
            ->get($this->table)
            ->result_array();

    $this->db->where();
    $querys = $this->db->select('id,name')->where('id !=', 1)->get('user');
    注意运算符,与ThinkPHP不一样。不管是数组还是键值对,条件都写在键里,使用!=,>=等

    更多:
    $this->db->or_where();本函数与上面的那个几乎完全相同,唯一的区别是本函数生成的子句是用 OR 来连接的:
    $this->db->where_in();生成一段 WHERE field IN ('item', 'item') 查询语句,如果合适的话,用 AND 连接起来。
    $this->db->or_where_in();
    $this->db->where_not_in();
    $this->db->or_where_not_in();
    $this->db->like('title', 'match');
    $this->db->or_like();
    $this->db->not_like();
    $this->db->or_not_like();
    $this->db->group_by();
    $this->db->distinct();
    $this->db->having();
    $this->db->order_by();
    $this->db->limit();


    $this->db->where()->count_all_results();
    获得某个特定的Active Record查询所返回的结果数量,与$this->db->count_all('stu');不同


        查询辅助函数:
        $this->db->insert_id() 新增字段Id
    $this->db->affected_rows() 当执行写入操作(insert,update等)的查询后,显示被影响的行数。
    $this->db->count_all('stu') 计算出指定表的总行数并返回。实际:SELECT COUNT(*) AS `numrows` FROM `stu`
    $this->db->last_query() 返回最后运行的查询语句

    结果集方法:
    num_rows()记录数统计
    row()单行数据,对象格式
    result()全部数据,对象格式
    row_array()单行数据,数组格式
    result_array()全部数据,数组格式


    封装查询
    $sql = "SELECT * FROM some_table WHERE id = ? AND status = ? AND author = ?";
    $this->db->query($sql, array(3, 'live', 'Rick'));


改  $this->db->update('user', $data, array('id' => $uid));
事务
自动事务
传统上, 事务需要实现大量工作, 他们要求你随时跟踪你的查询, 并根据查询的成功或失败来决定 提交 还是 回滚。这是特别麻烦的嵌套查询。相比之下, 我们实现了一种智能的事务系统, 它将自动地为你做这些事情(如果你选择手动管理你的事务, 这也是可以的, 但这确实没什么好处)。
要使用事务来运行你的查询, 你可以使用如下所述的 $this->db->trans_start() 和 $this->db->trans_complete() 函数:
$this->db->trans_start();
 $this->db->query('一条SQL查询...');
 $this->db->query('另一条查询...');
 $this->db->query('还有一条查询...');
 $this->db->trans_complete();
在 start/complete 函数之间, 你想运行多少条查询都可以, 根据任何给定查询的成功或失败, 它们将被提交或者回滚。
手动运行事务
$this->db->trans_begin();
try{
 $this->db->query('AN SQL QUERY...');
 $this->db->query('ANOTHER QUERY...');
 $this->db->query('AND YET ANOTHER QUERY...');
 $this->db->trans_commit();
}catch(Exception $e){
   $this->db->trans_rollback();
}
说明: 手动运行事务时, 请务必使用
$this->db->trans_begin()函数, 而不是$this->db->trans_start().
六、视图
使用方法:
$this->load->vars("list",$data);//不使用模板引擎,ci默认分配变量方式
$this->load->view("index"); //可以包含子目录
建议抽出页面的公共部分,例如header、footer。然后在页面直接引入就可以了。
<?php include_once VIEWPATH . '/header.php' ?>七、系统类库及函数调用
1. 载入类库
加载系统类库:
$this->load->library('className'); //使用system/libraries文件夹类库
$this->load->library(array('email', 'table')); //多个类库可以通过传递包含类库的数组一次加载

$this->className->func(); //直接调用加载类的方法

如果加载类库时指定了第二个参数,则:
$this->load->library('className', 'myClass');
$this->myClass->func();

加载自定义类库:
同样使用$this->load->library()加载。
一般位于application/libraries文件夹下。如果与系统类重名,将覆盖系统类(除了数据库类无法被扩展或替换,剩余其他类均可)。

命名规则:
文件名首字母大写. 例如:  Myclass.php
类声明首字母大写. 例如:  class Myclass
类的名字和文件名应相同.

可以扩展现有类:
新扩展的类所在的文件必须以 MY_ 为前缀(这个选项是可配置的).扩展的类必须继承父类.
2. 载入辅助函数
$this->load->helper('name');
$this->load->helper( array('helper1', 'helper2', 'helper3') ); //同时载入多个

辅助函数文件一般保存在 system/helpers 或 application/helpers 文件夹中。CodeIgniter 将会先在 application/helpers 寻找对应的辅助函数文件, 如果目录不存在或者目录下没有对应的辅助函数文件,CI 才会载入 system/helpers 下的辅助函数文件。与$this->load->library()载入规则相同。
3. 载入模型
$this->load->model('Model_name');

如果模型文件在子文件夹下,引用的时候要带上相对路径名,示例:
$this->load->model('blog/queries');

模型一旦被载入,你就能通过下面的方法使用它:
$this->Model_name->function();
4. 载入视图
$this->load->view('name');
$this->load->view('name',$data); //同时赋予数据
$buffer = $this->load->view('blogview', $data, true); //不输出而是返回数据
5. 载入配置文件
$this->config->load('filename');
$this->config->load('blog_settings', TRUE); //重复时合并

从配置文件中检索元素,使用下面的函数:
$this->config->item('itemName');

动态设置/改变一个现有的配置元素:
$this->config->set_item('item_name', 'item_value');

自动加载:
要自动加载配置,请打开文件 autoload.php,它在 application/config/autoload.php,然后按照文件中的提示增加你想要自动加载的配置文件。
八、其它
将Session数据存入数据库
由于Session数据数组是附带一个Session ID保存在用户cookie里的,你无法验证它,除非你把session数据存储在数据库中。在一些不需要或很少需要安全保护的应用中,session ID 或许并不需要。
但如果你的应用需要安全保护,验证是必须的。否则,用户可以通过篡改Cookies来恢复旧的Session。
当session 数据在数据库中可用时,每当从用户cookie中发现一个有效的session,一个数据库查询就会被执行以匹配它。如果 session ID 不相配,session 就会被销毁。Session ID永远不会更新,它们只会在一个新的会话创建时生成。
为了存储session,你必须先创建一个数据表。这是 session 类所需的基本结构(用于MySQL的):
CREATE TABLE IF NOT EXISTS  `ci_sessions` (
  session_id varchar(40) DEFAULT '0' NOT NULL,
  ip_address varchar(45) DEFAULT '0' NOT NULL,
  user_agent varchar(120) NOT NULL,
  last_activity int(10) unsigned DEFAULT 0 NOT NULL,
  user_data text DEFAULT '' NOT NULL,
  PRIMARY KEY (session_id),
  KEY `last_activity_idx` (`last_activity`)
);ci_sessions。可以更改:
myapp/config/config.php
//session
//开启seesion存储到数据库的时候需要配置
$config['sess_driver'] = 'database'; //开启database驱动
$config['sess_cookie_name'] = 'qy-sessions';
$config['sess_expiration'] = 60 * 60 * 24 * 365;
$config['sess_expire_on_close'] = FALSE;
$config['sess_encrypt_cookie'] = TRUE;
$config['sess_use_database'] = TRUE;
$config['sess_table_name'] = 'ci_sessions';
$config['sess_match_ip'] = FALSE;
$config['sess_match_useragent'] = FALSE;
$config['sess_time_to_update'] = 300;
这样就可以使用
$this->session操作session了,会存储到数据库。
//设置seesion
$this->session->set_userdata($array);

//获取session
$this->session->userdata('item');

//删除session
$this->session->unset_userdata('some_name');
CI框架中site_url()的原理
var_dump($_SERVER['HTTP_HOST']);
var_dump($_SERVER['SCRIPT_NAME']);
var_dump($_SERVER['SCRIPT_FILENAME']);
var_dump(basename($_SERVER['SCRIPT_FILENAME']));

string 'localhost' (length=9)
string '/dada/admin-ci/test.php' (length=23)
string 'D:/phpsetup/www/htdocs/dada/admin-ci/test.php' (length=45)
string 'test.php' (length=8)

$base_url = (is_https() ? 'https' : 'http').'://'.$_SERVER['HTTP_HOST']
    .substr($_SERVER['SCRIPT_NAME'], 0, strpos($_SERVER['SCRIPT_NAME'], basename($_SERVER['SCRIPT_FILENAME'])));
//http://localhost/dada/admin-ci/
区块注释
@deprecated 3.0.0 废弃方法zend编辑器识别超级类方法
在父级控制器里加上
/**
 * @property CI_Loader $load
 * @property CI_DB_query_builder $db
 * @property CI_Calendar $calendar
 * @property CI_Email $email
 * @property CI_Encrypt $encrypt
 * @property CI_Ftp $ftp
 * @property CI_Hooks $hooks
 * @property CI_Image_lib $image_lib
 * @property CI_Input $input
 * @property CI_Language $language
 * @property CI_Log $log
 * @property CI_Output $output
 * @property CI_Session $session
 * @property CI_Upload $upload
 * @property CI_URI $uri
 * @property CI_Config $config
 */
与ThinkPHP比较
1、限制少,编码自由;
2、适合写API;
3、视图较TP功能弱些,少了很多常量,模板标签基本没有;
4、控制器层少了很多方便的函数,如U(),$this->success(),少了很多常量,如CONTROLLER。实际开发可以自行定义。
5、模型操作比较麻烦,没有D()方法,全局使用$this->db,实例化比较麻烦;每次数据操作需要带表名(可优化);不能获取表名和主键ID
隐藏入口文件
nginx
需要在vhost文件里添加rewrite
location / {
      if (!-e $request_filename) {
                rewrite ^/(.*)$ /app.php?/$1 last;
                break;
          }
    }
为了多应用能正常访问,如果入口文件为app.php,那么
index app.php以及location ~ .*\.(php|php5)?$里
fastcgi_index app.php;get_instance()
获取CodeIgniter的一个实例,访问CodeIgniter的原始资源。这个函数返回一个超级对象,这样可以访问model等资源。
在控制器里,直接使用$this引用CI的这个超级对象。当你在自定义类中想使用CodeIgniter原始类时,你可以这样做:
首先,定义CodeIgniter对象赋给一个变量:
$CI =& get_instance();
一旦定义某个对象为一个变量,你就可以使用那个变量名 取代 $this:
$CI =& get_instance();

$CI->load->helper('url');
$CI->load->library('session');
$CI->config->item('base_url');
//etc.


function addUserFav($uid,$type,$iid){
    $ci = & get_instance();
    $ci->load->model('UserFavModel');
    $ci->UserFavModel->addFav($uid,$type,$iid);
}