做了三年多的JavaEE开发了,在平时的JavaEE开发中,为了能够用最快的速度开发项目,一般都会选择使用Struts2,SpringMVC,Spring,Hibernate,MyBatis这些开源框架来开发项目,而这些框架一般不是单独使用的,经常是Struts2+Spring3+Hibernate、SpringMVC+Spring+Hibernate、SpringMVC+Spring+Mybatis这几种组合中的一种,也就是多个框架配合起来使用。今天来总结一下如何使用Maven搭建Struts2+Spring3+Hibernate4的整合开发环境。
一、建立Maven工程
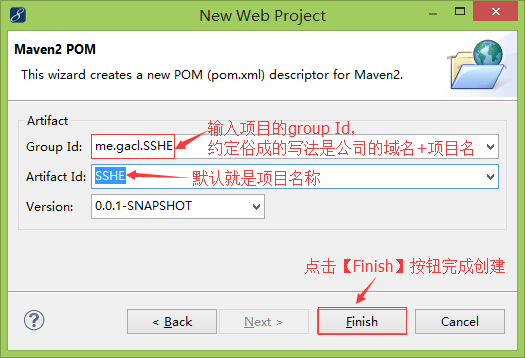
第一步:

第二步:
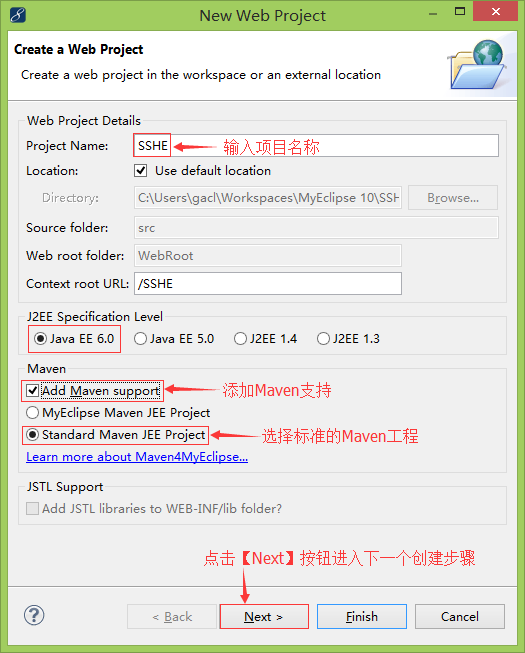
第三步:
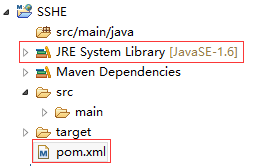
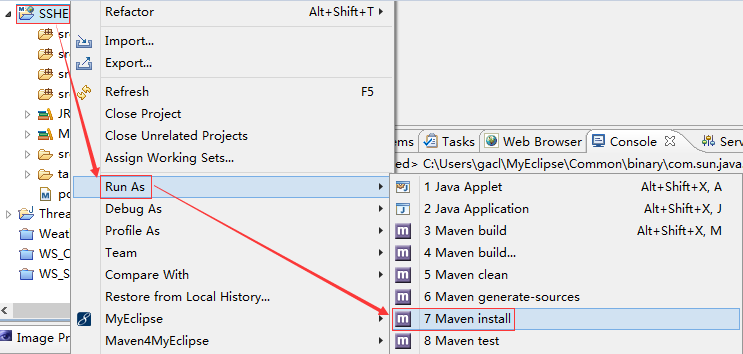
创建好的项目如下图所示:
第四步:

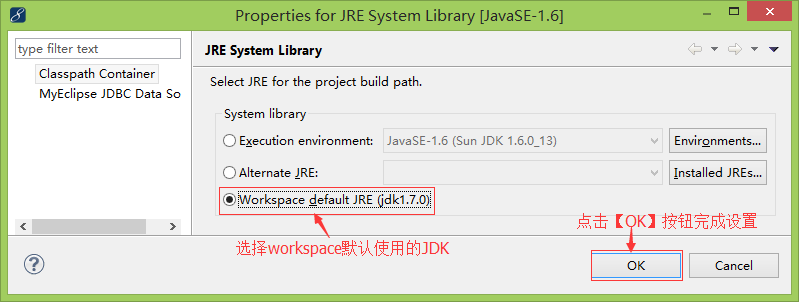
注意:这里的JDK要选择默认的,这样别人在使用的时候,如何JDk不一致的话也不会出错,如下图所示:
第五步:
创建Maven标准目录 src/main/java src/main/resources src/test/java src/test/resources

第六步:
发布项目:Maven install
清除编译过的项目:Maven clean
Maven install命令执行结果如下:
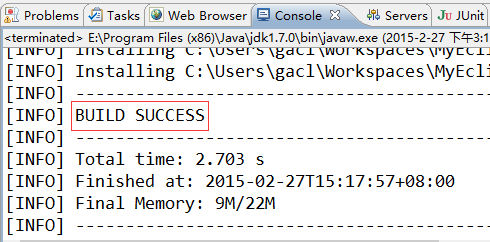
OK,Maven工程创建成功!
二、搭建Spring3开发环境
2.1、下载Spring3需要的jar包
1.spring-core
2.spring-context
3.spring-jdbc
4.spring-beans
5.spring-web
6.spring-expression
7.spring-orm
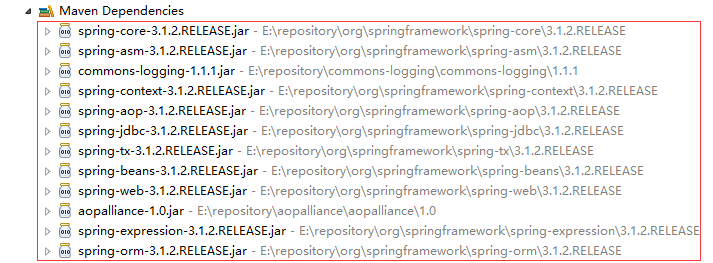
在pom.xml中编写Spring3需要的包,maven会自动下载这些包以及相关的依赖jar包。

 1 <!-- spring3 -->
 2         <dependency>  3 <groupId>org.springframework</groupId>  4 <artifactId>spring-core</artifactId>  5 <version>3.1.2.RELEASE</version>  6 </dependency>  7 <dependency>  8 <groupId>org.springframework</groupId>  9 <artifactId>spring-context</artifactId> 10 <version>3.1.2.RELEASE</version> 11 </dependency> 12 <dependency> 13 <groupId>org.springframework</groupId> 14 <artifactId>spring-jdbc</artifactId> 15 <version>3.1.2.RELEASE</version> 16 </dependency> 17 <dependency> 18 <groupId>org.springframework</groupId> 19 <artifactId>spring-beans</artifactId> 20 <version>3.1.2.RELEASE</version> 21 </dependency> 22 <dependency> 23 <groupId>org.springframework</groupId> 24 <artifactId>spring-web</artifactId> 25 <version>3.1.2.RELEASE</version> 26 </dependency> 27 <dependency> 28 <groupId>org.springframework</groupId> 29 <artifactId>spring-expression</artifactId> 30 <version>3.1.2.RELEASE</version> 31 </dependency> 32 <dependency> 33 <groupId>org.springframework</groupId> 34 <artifactId>spring-orm</artifactId> 35 <version>3.1.2.RELEASE</version> 36 </dependency>
2.2、编写Spring配置文件
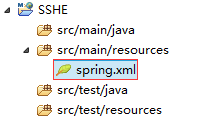
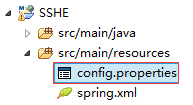
在src/main/resources目录下创建一个spring.xml文件,如下图所示:
spring.xml文件的内容如下:
 1 <?xml version="1.0" encoding="UTF-8"?>
 2 <beans xmlns="http://www.springframework.org/schema/beans"  3 xmlns:xsi="http://www.w3.org/2001/XMLSchema-instance"  4 xmlns:context="http://www.springframework.org/schema/context"  5 xsi:schemaLocation="http://www.springframework.org/schema/beans  6 http://www.springframework.org/schema/beans/spring-beans-3.0.xsd  7 http://www.springframework.org/schema/context  8 http://www.springframework.org/schema/context/spring-context-3.0.xsd  9 "> 10 11 <!-- 引入属性文件,config.properties位于src/main/resources目录下 --> 12 <context:property-placeholder location="classpath:config.properties" /> 13 14 <!-- 自动扫描dao和service包(自动注入) --> 15 <context:component-scan base-package="me.gacl.dao,me.gacl.service" /> 16 17 </beans>
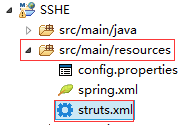
在src/main/resources目录下创建一个config.properties文件,如下图所示:
config.properties文件主要是用来编写一些系统的配置信息,例如数据库连接信息,config.properties文件中的内容暂时先不编写,等整合到Hibernate时再编写具体的数据库连接信息。
2.3、编写单元测试
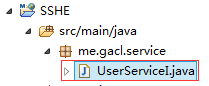
首先,在src/main/java中创建me.gacl.service包,在包中编写一个 UserServiceI 接口,如下图所示:
代码如下:
 1 package me.gacl.service;
 2
 3 /**  4  * 测试  5  * @author gacl  6  *  7 */  8 public interface UserServiceI {  9 10 /** 11  * 测试方法 12 */ 13 void test(); 14 }
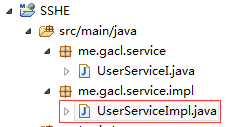
然后,在src/main/java中创建me.gacl.service.impl包,在包中编写UserServiceImpl实现类,如下图所示:
代码如下:
 1 package me.gacl.service.impl;
 2
 3 import org.springframework.stereotype.Service;  4  5 import me.gacl.service.UserServiceI;  6 //使用Spring提供的@Service注解将UserServiceImpl标注为一个Service  7 @Service("userService")  8 public class UserServiceImpl implements UserServiceI {  9 10  @Override 11 public void test() { 12 System.out.println("Hello World!"); 13  } 14 15 }
进行单元测试时需要使用到Junit,所以需要在pom.xml文件中添加Junit的jar包描述,如下:
1         <!-- Junit -->
2         <dependency> 3 <groupId>junit</groupId> 4 <artifactId>junit</artifactId> 5 <version>4.12</version> 6 <scope>test</scope> 7 </dependency>
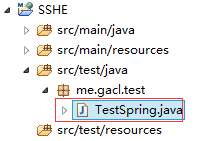
<scope>test</scope>这里的test表示测试时编译src/main/test文件夹中的文件,等发布的时候不编译。 最后,在src/main/test中创建me.gacl.test包,在包中编写 TestSpring类,如下图所示:
代码如下:
1 package me.gacl.test;
2
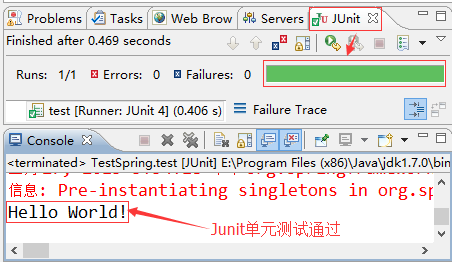
3 import me.gacl.service.UserServiceI; 4 5 import org.junit.Test; 6 import org.springframework.context.ApplicationContext; 7 import org.springframework.context.support.ClassPathXmlApplicationContext; 8 9 public class TestSpring { 10 11 @Test 12 public void test(){ 13 //通过spring.xml配置文件创建Spring的应用程序上下文环境 14 ApplicationContext ac = new ClassPathXmlApplicationContext("classpath:spring.xml"); 15 //从Spring的IOC容器中获取bean对象 16 UserServiceI userService = (UserServiceI) ac.getBean("userService"); 17 //执行测试方法 18 userService.test(); 19 } 20 }
JUnit Test运行,结果如图所示:
2.4、在web.xml中配置Spring监听器
1 <!-- Spring监听器 -->
2     <listener> 3 <listener-class>org.springframework.web.context.ContextLoaderListener</listener-class> 4 </listener> 5 <!-- Spring配置文件位置 --> 6 <context-param> 7 <param-name>contextConfigLocation</param-name> 8 <param-value>classpath:spring.xml</param-value> 9 </context-param>
在tomcat服务器中进行测试,先执行【Maven install】命令发布项目,然后将SSHE项目部署到tomcat服务器,最后启动tomcat服务器

tomcat服务器启动的过程中没有出现报错,输入地址:http://localhost:8080/SSHE/ 能够正常进行访问,就说明Spring3的开发环境搭建成功,如下图所示:
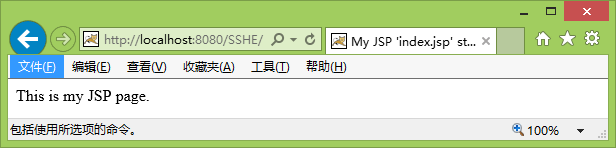
测试通过,Spring3开发环境搭建成功!
三、搭建Struts2开发环境并整合Spring3
3.1、下载Struts2需要的jar包
1.strtus2-core 2.struts2-spring-plugin(struts2和Spring整合时需要使用到的插件) 3.struts2-convention-plugin(使用了这个插件之后,就可以采用注解的方式配置Struts的Action,免去了在struts.xml中的繁琐配置项)
4.struts2-config-browser-plugin(config-browser-plugin插件不是必须的,但是使用了这个插件之后,就可以很方便的浏览项目中的所有action及其与 jsp view的映射)
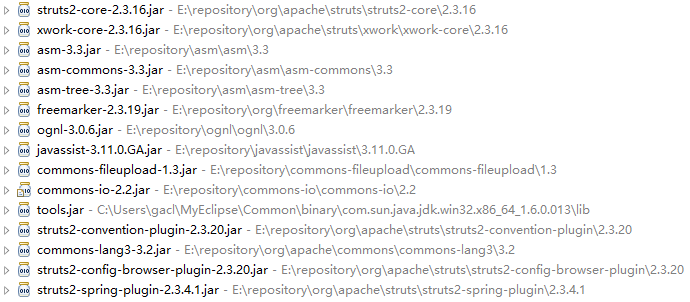
在pom.xml文件中编写Struts2所需要的jar包,Maven会自动下载这些包
 1 <!-- Struts2的核心包 -->
 2         <dependency>  3 <groupId>org.apache.struts</groupId>  4 <artifactId>struts2-core</artifactId>  5 <version>2.3.16</version>  6 <!--  7  这里的 exclusions 是排除包,因为 Struts2中有javassist,Hibernate中也有javassist,  8  所以如果要整合Hibernate,一定要排除掉Struts2中的javassist,否则就冲突了。  9  <exclusions> 10  <exclusion> 11  <groupId>javassist</groupId> 12  <artifactId>javassist</artifactId> 13  </exclusion> 14  </exclusions> 15 --> 16 </dependency> 17 <!-- convention-plugin插件,使用了这个插件之后,就可以采用注解的方式配置Action --> 18 <dependency> 19 <groupId>org.apache.struts</groupId> 20 <artifactId>struts2-convention-plugin</artifactId> 21 <version>2.3.20</version> 22 </dependency> 23 <!--config-browser-plugin插件,使用了这个插件之后,就可以很方便的浏览项目中的所有action及其与 jsp view的映射 --> 24 <dependency> 25 <groupId>org.apache.struts</groupId> 26 <artifactId>struts2-config-browser-plugin</artifactId> 27 <version>2.3.20</version> 28 </dependency> 29 <!-- Struts2和Spring整合插件 --> 30 <dependency> 31 <groupId>org.apache.struts</groupId> 32 <artifactId>struts2-spring-plugin</artifactId> 33 <version>2.3.4.1</version> 34 </dependency>
3.2、编写Struts.xml配置文件
在src/main/resources目录下创建一个struts.xml文件,如下图所示:
struts.xml文件中的内容如下:
 1 <?xml version="1.0" encoding="UTF-8"?>
 2 <!DOCTYPE struts PUBLIC "-//Apache Software Foundation//DTD Struts Configuration 2.3//EN" "http://struts.apache.org/dtds/struts-2.3.dtd">  3 <struts>  4  5 <!-- 指定由spring负责action对象的创建 -->  6 <constant name="struts.objectFactory" value="spring" />  7 <!-- 所有匹配*.action的请求都由struts2处理 -->  8 <constant name="struts.action.extension" value="action" />  9 <!-- 是否启用开发模式(开发时设置为true,发布到生产环境后设置为false) --> 10 <constant name="struts.devMode" value="true" /> 11 <!-- struts配置文件改动后,是否重新加载(开发时设置为true,发布到生产环境后设置为false) --> 12 <constant name="struts.configuration.xml.reload" value="true" /> 13 <!-- 设置浏览器是否缓存静态内容(开发时设置为false,发布到生产环境后设置为true) --> 14 <constant name="struts.serve.static.browserCache" value="false" /> 15 <!-- 请求参数的编码方式 --> 16 <constant name="struts.i18n.encoding" value="utf-8" /> 17 <!-- 每次HTTP请求系统都重新加载资源文件,有助于开发(开发时设置为true,发布到生产环境后设置为false) --> 18 <constant name="struts.i18n.reload" value="true" /> 19 <!-- 文件上传最大值 --> 20 <constant name="struts.multipart.maxSize" value="104857600" /> 21 <!-- 让struts2支持动态方法调用,使用叹号访问方法 --> 22 <constant name="struts.enable.DynamicMethodInvocation" value="true" /> 23 <!-- Action名称中是否还是用斜线 --> 24 <constant name="struts.enable.SlashesInActionNames" value="false" /> 25 <!-- 允许标签中使用表达式语法 --> 26 <constant name="struts.tag.altSyntax" value="true" /> 27 <!-- 对于WebLogic,Orion,OC4J此属性应该设置成true --> 28 <constant name="struts.dispatcher.parametersWorkaround" value="false" /> 29 30 <package name="basePackage" extends="struts-default"> 31 32 33 </package> 34 35 </struts>
3.3、在web.xml中配置Struts2的过滤器
 1 <!-- Struts2的核心过滤器配置 -->
 2     <filter>  3 <filter-name>struts2</filter-name>  4 <filter-class>org.apache.struts2.dispatcher.ng.filter.StrutsPrepareAndExecuteFilter</filter-class>  5 </filter>  6 <!-- Struts2过滤器拦截所有的.action请求 -->  7 <filter-mapping>  8 <filter-name>struts2</filter-name>  9 <url-pattern>*.action</url-pattern> 10 </filter-mapping>
3.4、编写测试
首先,在src/main/java中创建me.gacl.action包,在包中编写一个 TestAction类,如下图所示:

代码如下:
 1 package me.gacl.action;
 2
 3 import me.gacl.service.UserServiceI;  4  5 import org.apache.struts2.convention.annotation.Action;  6 import org.apache.struts2.convention.annotation.Namespace;  7 import org.apache.struts2.convention.annotation.ParentPackage;  8 import org.springframework.beans.factory.annotation.Autowired;  9 10 @ParentPackage("basePackage") 11 @Action(value="strust2Test")//使用convention-plugin插件提供的@Action注解将一个普通java类标注为一个可以处理用户请求的Action,Action的名字为struts2Test 12 @Namespace("/")//使用convention-plugin插件提供的@Namespace注解为这个Action指定一个命名空间 13 public class TestAction { 14 15 /** 16  * 注入userService 17 */ 18  @Autowired 19 private UserServiceI userService; 20 21 /** 22  * http://localhost:8080/SSHE/strust2Test!test.action 23  * MethodName: test 24  * Description: 25  * @author xudp 26 */ 27 public void test(){ 28 System.out.println("进入TestAction"); 29  userService.test(); 30  } 31 }
这里使用@Autowired注解将userService注入到UserAction中。
测试Struts2的开发环境是否搭建成功,先执行【Maven install】操作,然后部署到tomcat服务器,最后启动tomcat服务器运行,
输入访问地址:http://localhost:8080/SSHE/strust2Test!test.action,访问结果如下:
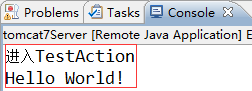
测试通过,Struts2的开发环境搭建并整合Spring成功!这里提一下遇到的问题,我执行完Maven install命令之后,重新发布到tomcat服务器运行,第一次运行时出现了找不到action的404错误,后来就先执行Maven clean,然后clean一下项目,再执行Maven install命令重新编译项目,然后再发布到tomcat服务器中运行,这次就可以正常访问到action了,使用Maven总是会遇到一些奇怪的问题,好在凭借着一些平时积累的解决问题的经验把问题解决了。
四、搭建Hibernate4开发环境并整合Spring3
4.1、下载Hibernate4需要的jar包
1.hibernate-core
在pom.xml文件中编写Hibernate4所需要的jar包,Maven会自动下载这些包。
1 <!-- hibernate4 -->
2         <dependency> 3 <groupId>org.hibernate</groupId> 4 <artifactId>hibernate-core</artifactId> 5 <version>4.1.7.Final</version> 6 </dependency>

注意:一定要排除掉Struts2中的javassist,否则就冲突了。
4.2、添加数据库驱动jar包
我们知道,Hibernate是用于和数据库交互的,应用系统所有的CRUD操作都要通过Hibernate来完成。既然要连接数据库,那么就要使用到相关的数据库驱动,所以需要加入数据库驱动的jar包,根据自身项目使用的数据库在pom.xml文件中编写相应的数据库驱动jar:
MySQL数据库驱动jar:
1 <!-- mysql驱动包 -->
2         <dependency> 3 <groupId>mysql</groupId> 4 <artifactId>mysql-connector-java</artifactId> 5 <version>5.1.34</version> 6 </dependency>
SQLServer数据库驱动jar:
1 <!-- SQLServer数据库驱动包 -->
2         <dependency> 3 <groupId>net.sourceforge.jtds</groupId> 4 <artifactId>jtds</artifactId> 5 <version>1.3.1</version> 6 </dependency>
这里要说一下使用Maven管理Oracle JDBC驱动的问题了,正常情况下,Maven在下载 oracle数据库驱动时会出错,如下图所示:
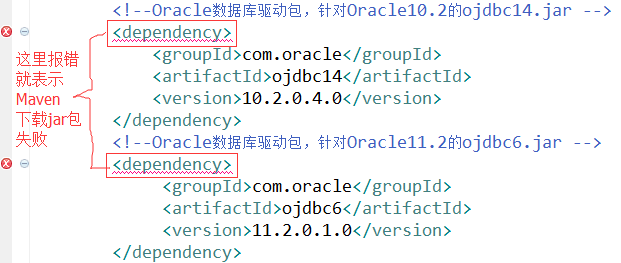
这是由于Oracle授权问题,Maven3不提供Oracle JDBC driver,为了在Maven项目中应用Oracle JDBC driver,必须手动添加到本地仓库。
解决办法:先从网上下载Oracle的驱动包,然后通过Maven命令放到本地库中去:
安装命令:
mvn install:install-file -Dfile={Path/to/your/ojdbc.jar} -DgroupId=com.oracle -DartifactId=ojdbc6 -Dversion=11.2.0.1.0 -Dpackaging=jar
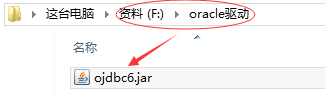
例如把位于F:\oracle驱动\ojdbc6.jar添加到本地仓库中
执行命令:
mvn install:install-file -Dfile=F:/oracle驱动/ojdbc6.jar -DgroupId=com.oracle -DartifactId=ojdbc6 -Dversion=11.2.0.1.0 -Dpackaging=jar
如下图所示: 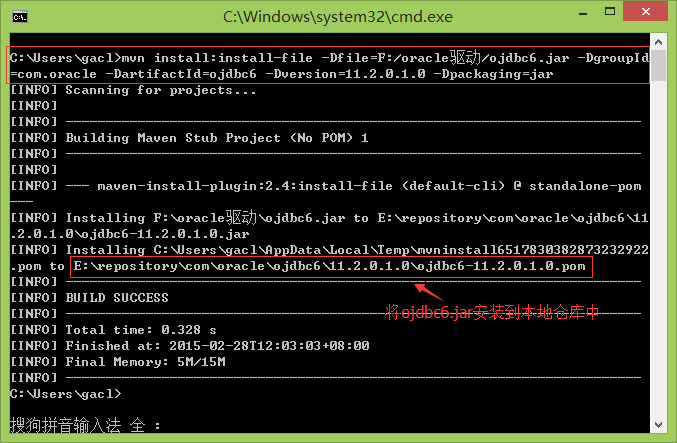
然后在pom.xml文件中编写ojdbc6.jar包的<dependency>信息,如下所示:
1 <!--Oracle数据库驱动包,针对Oracle11.2的ojdbc6.jar -->
2         <dependency> 3 <groupId>com.oracle</groupId> 4 <artifactId>ojdbc6</artifactId> 5 <version>11.2.0.1.0</version> 6 </dependency>
由于我们已经将ojdbc6.jar包加入到本地仓库中了,因此这次可以正常使用针对Oracle数据库的驱动包了。如下图所示:

4.3、添加数据库连接池jar包
在平时开发中,我们一般都会使用数据库连接池,应用系统初始化时,由数据库连接池向数据库申请一定数量的数据库连接,然后放到一个连接池中,当需要操作数据库时,就从数据库连接池中取出一个数据库连接,通过从连接池中获取到的数据库连接对象连接上数据库,然后进行CRUD操作,关于数据库连接池的选择,常用的有DBCP,C3P0和Druid,这里我们使用Druid作为我们的数据库连接池。这三种连接池各自有各自的特点,自己熟悉哪个就用哪个,萝卜白菜,各有所爱。
在pom.xml文件中编写Druid的jar包,Maven会自动下载,如下:
1 <!--Druid连接池包 -->
2         <dependency> 3 <groupId>com.alibaba</groupId> 4 <artifactId>druid</artifactId> 5 <version>1.0.12</version> 6 </dependency>
4.4、添加aspectjweaver包
使用Spring的aop时需要使用到aspectjweaver包,所以需要添加aspectjweaver包,在pom.xml文件中添加aspectjweaver的jar包,Maven会自动下载,如下:
1 <!--aspectjweaver包 -->
2         <dependency> 3 <groupId>org.aspectj</groupId> 4 <artifactId>aspectjweaver</artifactId> 5 <version>1.8.5</version> 6 </dependency>
4.5、编写连接数据库的配置信息
之前我们在src/main/resources目录下创建了一个config.properties文件,里面的内容是空的,现在我们就在这个config.properties文件中编写连接数据库需要使用到的相关信息,如下所示:
 1 #hibernate.dialect=org.hibernate.dialect.OracleDialect
 2 #driverClassName=oracle.jdbc.driver.OracleDriver
 3 #validationQuery=SELECT 1 FROM DUAL  4 #jdbc_url=jdbc:oracle:thin:@127.0.0.1:1521:orcl  5 #jdbc_username=gacl  6 #jdbc_password=xdp  7  8 hibernate.dialect=org.hibernate.dialect.MySQLDialect  9 driverClassName=com.mysql.jdbc.Driver 10 validationQuery=SELECT 1 11 jdbc_url=jdbc:mysql://localhost:3306/sshe?useUnicode=true&characterEncoding=UTF-8&zeroDateTimeBehavior=convertToNull 12 jdbc_username=root 13 jdbc_password=XDP 14 15 #hibernate.dialect=org.hibernate.dialect.SQLServerDialect 16 #driverClassName=net.sourceforge.jtds.jdbc.Driver 17 #validationQuery=SELECT 1 18 #jdbc_url=jdbc:jtds:sqlserver://127.0.0.1:1433/sshe 19 #jdbc_username=sa 20 #jdbc_password=123456 21 22 #jndiName=java:comp/env/dataSourceName 23 24 hibernate.hbm2ddl.auto=update 25 hibernate.show_sql=true 26 hibernate.format_sql=true
4.6、编写Hibernate与Spring整合的配置文件
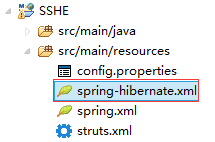
在src/main/resources目录下新建一个spring-hibernate.xml文件,如下图所示:
spring-hibernate.xml文件的内容如下:
  1 <?xml version="1.0" encoding="UTF-8"?>
  2 <beans xmlns="http://www.springframework.org/schema/beans" xmlns:xsi="http://www.w3.org/2001/XMLSchema-instance" xmlns:tx="http://www.springframework.org/schema/tx" xmlns:aop="http://www.springframework.org/schema/aop" xsi:schemaLocation="  3 http://www.springframework.org/schema/beans  4 http://www.springframework.org/schema/beans/spring-beans-3.0.xsd  5 http://www.springframework.org/schema/tx  6 http://www.springframework.org/schema/tx/spring-tx-3.0.xsd  7 http://www.springframework.org/schema/aop  8 http://www.springframework.org/schema/aop/spring-aop-3.0.xsd  9 ">  10  11 <!-- JNDI方式配置数据源 -->  12 <!--  13  <bean id="dataSource" class="org.springframework.jndi.JndiObjectFactoryBean">  14  <property name="jndiName" value="${jndiName}"></property>  15  </bean>  16 -->  17  18 <!-- 配置数据源 -->  19 <bean name="dataSource" class="com.alibaba.druid.pool.DruidDataSource" init-method="init" destroy-method="close">  20 <property name="url" value="${jdbc_url}" />  21 <property name="username" value="${jdbc_username}" />  22 <property name="password" value="${jdbc_password}" />  23  24 <!-- 初始化连接大小 -->  25 <property name="initialSize" value="0" />  26 <!-- 连接池最大使用连接数量 -->  27 <property name="maxActive" value="20" />  28 <!-- 连接池最大空闲 -->  29 <property name="maxIdle" value="20" />  30 <!-- 连接池最小空闲 -->  31 <property name="minIdle" value="0" />  32 <!-- 获取连接最大等待时间 -->  33 <property name="maxWait" value="60000" />  34  35 <!-- <property name="poolPreparedStatements" value="true" /> <property name="maxPoolPreparedStatementPerConnectionSize" value="33" /> -->  36  37 <property name="validationQuery" value="${validationQuery}" />  38 <property name="testOnBorrow" value="false" />  39 <property name="testOnReturn" value="false" />  40 <property name="testWhileIdle" value="true" />  41  42 <!-- 配置间隔多久才进行一次检测,检测需要关闭的空闲连接,单位是毫秒 -->  43 <property name="timeBetweenEvictionRunsMillis" value="60000" />  44 <!-- 配置一个连接在池中最小生存的时间,单位是毫秒 -->  45 <property name="minEvictableIdleTimeMillis" value="25200000" />  46  47 <!-- 打开removeAbandoned功能 -->  48 <property name="removeAbandoned" value="true" />  49 <!-- 1800秒,也就是30分钟 -->  50 <property name="removeAbandonedTimeout" value="1800" />  51 <!-- 关闭abanded连接时输出错误日志 -->  52