使用springboot的目的就是在项目开发中,快速出东西,因此springboot对于配置文件的格式支持是非常丰富的,最常见的配置文件后缀有如下四种:properties、xml、yml、yaml,比如我们在springboot项目根目录中配置了一个application.properties文件,则springboot项目启动的时候就会自动将该文件的内容解析并设置到环境中,这样后续需要使用该文件中配置的属性的时候,只需要使用@value即可。同理application.xml、application.yml、application.yaml文件也会自动被加载并最终设置到环境中。
上面我们提到了环境,那么环境到底是个什么玩意呢?在这里提前说一下:我们这里关注的是源码层面的事情。并非讲解api如何使用。
大家首先思考一下,springboot项目如何启动,这个到很简单,无外乎引入springboot依赖包,设置项目启动的main方法如下所示:
@EnableAutoConfiguration
public class Application {
private static Logger logger = LoggerFactory.getLogger(Application.class);
public static void main(String[] args) {
long startTime = System.currentTimeMillis();
SpringApplication.run(Application.class,args);
logger.info("程序启动花费时间为:" + (System.currentTimeMillis() - startTime) / 1000 + "秒");
}
}
上述的代码非常的简单,但是springboot做了非常多的事情,因为springboot代码体系非常庞大,所以后续的文章是我们讲解那些源码就直接看那些源码,把不需要了解的暂时放到一边。因此在这里暂时先关注环境的创建源码,我们快速定位到SpringApplication类中的public ConfigurableApplicationContext run(String... args)方法,该方法关于环境的准备代码如下所示:
...
ApplicationArguments applicationArguments = new DefaultApplicationArguments(
args);
ConfigurableEnvironment environment = prepareEnvironment(listeners,applicationArguments);
...
prepareEnvironment方法从名字就可以看出来是准备环境(Environment),prepareEnvironment代码如下:
private ConfigurableEnvironment prepareEnvironment(
SpringApplicationRunListeners listeners,
ApplicationArguments applicationArguments) {
//获取或者创建环境
ConfigurableEnvironment environment = getOrCreateEnvironment();
//配置环境的信息
configureEnvironment(environment, applicationArguments.getSourceArgs());
//通知所有的观察者,环境已经准备好了。
listeners.environmentPrepared(environment);
bindToSpringApplication(environment);
if (this.webApplicationType == WebApplicationType.NONE) {
environment = new EnvironmentConverter(getClassLoader())
.convertToStandardEnvironmentIfNecessary(environment);
}
ConfigurationPropertySources.attach(environment);
return environment;
}
接下来,我们一步步的分析。
1.1. 1.获取或者创建环境
getOrCreateEnvironment()方法如下所示:
if (this.environment != null) {
return this.environment;
}
if (this.webApplicationType == WebApplicationType.SERVLET) {
return new StandardServletEnvironment();
}
return new StandardEnvironment();
上述代码逻辑如下:
1.如果environment不为空则直接返回。
2.如果是web环境则直接实例化StandardServletEnvironment类。
3.如果不是web环境则直接实例化StandardEnvironment类。
1.2. WebApplicationType类型
Springboot2版本开始增加了WebApplicationType的类型,其定义如下:
public enum WebApplicationType {
/**
* 不需要再web容器的环境下运行,也就是普通的工程
*/
NONE,
/**
基于servlet的Web项目
*/
SERVLET,
/**
响应式web应用==reactive web Spring5版本的新特性
*/
REACTIVE
}
1.3. ConfigurableEnvironment类
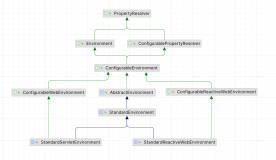
environment 为ConfigurableEnvironment类型。我们不妨看一下该类的层次图如下所示:

Environment接口是Spring对当前程序运行期间的环境的封装(spring)。主要提供了两大功能:profile和property(顶级接口PropertyResolver提供)。目前主要有StandardEnvironment、StandardServletEnvironment和MockEnvironment、StandardReactiveWebEnvironment4种实现,分别代表普通程序、Web程序、测试程序的环境、响应式web环境。通过上述的getOrCreateEnvironment方法处理逻辑也是可以总结出来的。
StandardReactiveWebEnvironment是Springboot2新引入的,之前的版本没有这个类。关于这一个后续的章节会单独的详细讲解。
2.环境的装载
在上面的代码中实例化了StandardServletEnvironment类(我自己的环境是web),实例化该类的时候肯定会实例化其父类AbstractEnvironment,AbstractEnvironment类的构造函数如下:
public AbstractEnvironment() {
customizePropertySources(this.propertySources);
}
需要注意一点,因为实例化的是StandardServletEnvironment类,jvm会自动触发其父类中的构造函数,但是当前程序的this指针依然是StandardServletEnvironment。
this.propertySources属性如下所示:
AbstractEnvironment.java
private final MutablePropertySources propertySources = new MutablePropertySources(this.logger);
我们继续跟踪customizePropertySources方法,如下所示:
AbstractEnvironment.java
protected void customizePropertySources(MutablePropertySources propertySources) {
}
好吧,customizePropertySources方法竟然是个空的实现,但是注意一点,当前程序this是StandardServletEnvironment实例,我们不妨看一下StandardServletEnvironment类中是否重写了该方法。果不其然,StandardServletEnvironment类重写了customizePropertySources方法,详细代码如下所示:
StandardServletEnvironment.java
protected void customizePropertySources(MutablePropertySources propertySources) {
//servletConfigInitParams
propertySources.addLast(new StubPropertySource(SERVLET_CONFIG_PROPERTY_SOURCE_NAME));
//servletContextInitParams
propertySources.addLast(new StubPropertySource(SERVLET_CONTEXT_PROPERTY_SOURCE_NAME));
//jndiProperties
if (JndiLocatorDelegate.isDefaultJndiEnvironmentAvailable()) {
propertySources.addLast(new JndiPropertySource(JNDI_PROPERTY_SOURCE_NAME));
}
super.customizePropertySources(propertySources);
}
上述的代码中,propertySources为AbstractEnvironment.java中的propertySources字段,因为他是个引用类型,所以可以拿到指针即可修改其值。
1.4. propertySources类
虽然我们暂时还不知道propertySources要干啥,但是我们还是先看明白PropertySources到底要干啥。PropertySources类可以参考springboot源码分析6-springboot之PropertySource类初探一文。
我们再次看一下customizePropertySources方法的实现:
首先添加servletConfigInitParams,然后添加servletContextInitParams,其次判断是否是jndi环境,如果是则添加jndiProperties,最后调用父类的customizePropertySources(propertySources)。
在跟进父类的customizePropertySources(propertySources)方法之前,我们总结一下MutablePropertySources类中propertySourceList已经存在的属性为servletConfigInitParams、servletContextInitParams、jndiProperties(如果存在)。
StandardEnvironment类为StandardServletEnvironment类的父类,该类的customizePropertySources方法如下:
protected void customizePropertySources(MutablePropertySources propertySources) {
propertySources.addLast(new MapPropertySource(SYSTEM_PROPERTIES_PROPERTY_SOURCE_NAME, getSystemProperties()));
propertySources.addLast(new SystemEnvironmentPropertySource(SYSTEM_ENVIRONMENT_PROPERTY_SOURCE_NAME, getSystemEnvironment()));
}
1、添加systemProperties
2、添加systemEnvironment。
上述的方法逻辑执行完毕之后,MutablePropertySources类中propertySourceList已经存在的属性为servletConfigInitParams、servletContextInitParams、jndiProperties(如果存在)、systemProperties、systemEnvironment。
经过一系列的跟踪getOrCreateEnvironment方法所做的事情已经分析完毕了。我们不妨继往下看。
3.配置环境信息
configureEnvironment(environment, applicationArguments.getSourceArgs())方法详细实现如下所示:
protected void configureEnvironment(ConfigurableEnvironment environment,
String[] args) {
configurePropertySources(environment, args);
configureProfiles(environment, args);
}
3.1配置属性源
configurePropertySources(environment, args)方法的核心实现如下:
protected void configurePropertySources(ConfigurableEnvironment environment,
String[] args) {
MutablePropertySources sources = environment.getPropertySources();
if (this.defaultProperties != null && !this.defaultProperties.isEmpty()) {
sources.addLast(
new MapPropertySource("defaultProperties", this.defaultProperties));
}
if (this.addCommandLineProperties && args.length > 0) {
String name = CommandLinePropertySource.COMMAND_LINE_PROPERTY_SOURCE_NAME;
if (sources.contains(name)) {
PropertySource<?> source = sources.get(name);
CompositePropertySource composite = new CompositePropertySource(name);
composite.addPropertySource(new SimpleCommandLinePropertySource(
name + "-" + args.hashCode(), args));
composite.addPropertySource(source);
sources.replace(name, composite);
}
else {
sources.addFirst(new SimpleCommandLinePropertySource(args));
}
}
}
1、如果defaultProperties不为空,则继续添加defaultProperties。思考一个问题defaultProperties怎么设置?
2、如果addCommandLineProperties为true并且有命令参数,分两步骤走:第一步存在commandLineArgs则继续设置属性;第二步commandLineArgs不存在则在头部添加commandLineArgs。
上述的代码执行完毕之后,MutablePropertySources类中propertySourceList已经存在的属性为commandLineArgs、servletConfigInitParams、servletContextInitParams、jndiProperties(如果存在)、systemProperties、systemEnvironment、defaultProperties(如果存在)。
3.2配置Profiles
这个后续我们用到了再来讲解。
本文我们暂时讲解到这里,后续的文章中,我们继续跟踪属性文件的加载规则以及加载过程。提前曝光一点:
commandLineArgs、servletConfigInitParams、servletContextInitParams、jndiProperties(如果存在)、systemProperties、systemEnvironment、defaultProperties(如果存在)中的属性优先级从前到后依次降低。在最前面的使用优先级最高。
比如commandLineArgs中存在一个属性a=1; systemProperties中存在一个属性a=2,则我们程序使用的时候a=1,因为越靠前的优先级越高。通过上述的优先级我们可以发现一个规律,命令行的优先级最高、其次是程序中的、然后是系统的环境变量以及属性、最后是默认的。
propertySources接口我们下一节课重点进行分析。
欢迎关注我的微信公众号,第一时间获得博客更新提醒,以及更多成体系的Java相关原创技术干货。
扫一扫下方二维码或者长按识别二维码,即可关注。