//
// YvanQRCodeViewController.m
// zBar
//
// Created by City--Online on 15/6/8.
// Copyright (c) 2015年 CYW. All rights reserved.
//
#import "YvanQRCodeViewController.h"
#import "ZBarSDK.h"
#define SCANVIEW_EdgeTop 40.0
#define SCANVIEW_EdgeLeft 50.0
#define TINTCOLOR_ALPHA 0.2 //浅色透明度
#define DARKCOLOR_ALPHA 0.5 //深色透明度
#define VIEW_WIDTH self.view.bounds.size.width
#define VIEW_HEIGHT self.view.bounds.size.height
@interface YvanQRCodeViewController ()<ZBarReaderViewDelegate>
{
UIView *_QrCodeline;
NSTimer *_timer;
//设置扫描画面
UIView *_scanView;
ZBarReaderView *_readerView;
}
@end
@implementation YvanQRCodeViewController
- (void)viewDidLoad {
[super viewDidLoad];
self.title = @"扫描二维码" ;
//初始化扫描界面
[ self setScanView ];
_readerView = [[ ZBarReaderView alloc ] init ];
_readerView.frame = CGRectMake ( 0 , 0 , VIEW_WIDTH , VIEW_HEIGHT );
_readerView.tracksSymbols = NO ;
_readerView.readerDelegate = self ;
[ _readerView addSubview : _scanView ];
//关闭闪光灯
_readerView.torchMode = 0 ;
[ self.view addSubview : _readerView ];
//扫描区域
//readerView.scanCrop =
[ _readerView start ];
[ self createTimer ];
}
#pragma mark -- ZBarReaderViewDelegate
-( void )readerView:( ZBarReaderView *)readerView didReadSymbols:( ZBarSymbolSet *)symbols fromImage:( UIImage *)image
{
const zbar_symbol_t *symbol = zbar_symbol_set_first_symbol (symbols. zbarSymbolSet );
NSString *symbolStr = [ NSString stringWithUTF8String : zbar_symbol_get_data (symbol)];
//判断是否包含 头'http:'
NSString *regex = @"http+:[^//s]*" ;
NSPredicate *predicate = [ NSPredicate predicateWithFormat : @"SELF MATCHES %@" ,regex];
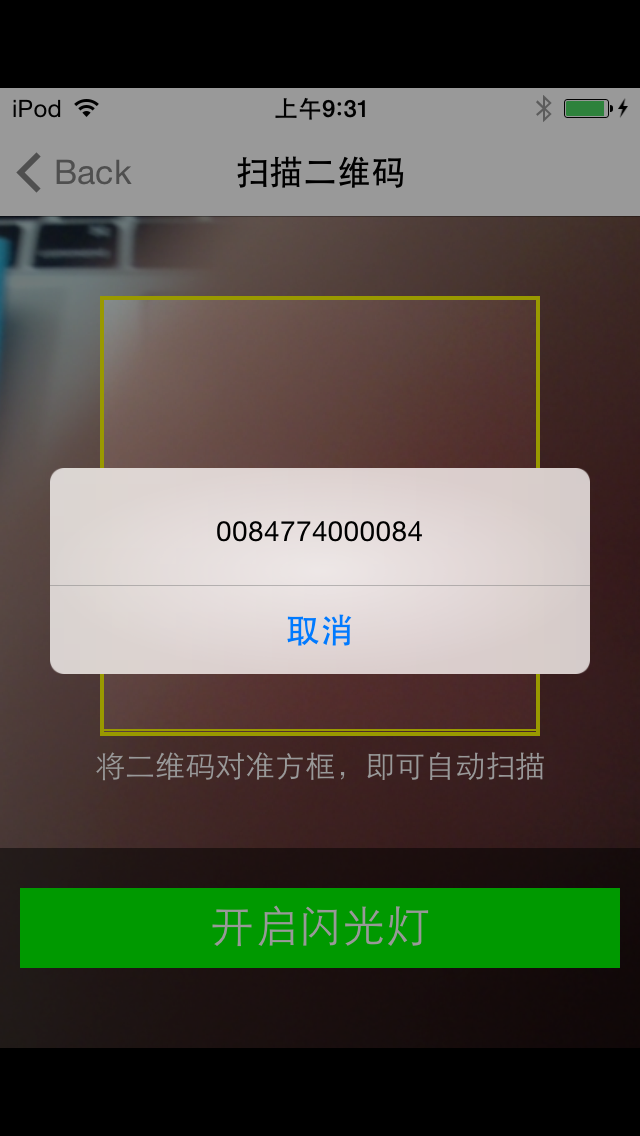
UIAlertView *alertView=[[ UIAlertView alloc ] initWithTitle : @"" message :symbolStr delegate : nil cancelButtonTitle : @"取消" otherButtonTitles : nil ];
[alertView show ];
//判断是否包含 头'ssid:'
NSString *ssid = @"ssid+:[^//s]*" ;
NSPredicate *ssidPre = [ NSPredicate predicateWithFormat : @"SELF MATCHES %@" ,ssid];
if ([predicate evaluateWithObject :symbolStr]) {
}
else if ([ssidPre evaluateWithObject :symbolStr]){
NSArray *arr = [symbolStr componentsSeparatedByString : @";" ];
NSArray * arrInfoHead = [[arr objectAtIndex : 0 ] componentsSeparatedByString : @":" ];
NSArray * arrInfoFoot = [[arr objectAtIndex : 1 ] componentsSeparatedByString : @":" ];
symbolStr = [ NSString stringWithFormat : @"ssid: %@ /n password:%@" ,
[arrInfoHead objectAtIndex : 1 ],[arrInfoFoot objectAtIndex : 1 ]];
UIPasteboard *pasteboard=[ UIPasteboard generalPasteboard ];
//然后,可以使用如下代码来把一个字符串放置到剪贴板上:
pasteboard.string = [arrInfoFoot objectAtIndex : 1 ];
}
}
- ( void )setScanView
{
_scanView =[[ UIView alloc ] initWithFrame : CGRectMake ( 0 , 0 , VIEW_WIDTH , VIEW_HEIGHT )];
_scanView . backgroundColor =[ UIColor clearColor ];
//最上部view
UIView * upView = [[ UIView alloc ] initWithFrame : CGRectMake ( 0 , 0 , VIEW_WIDTH , SCANVIEW_EdgeTop )];
upView. alpha = TINTCOLOR_ALPHA ;
upView. backgroundColor = [ UIColor blackColor ];
[ _scanView addSubview :upView];
//左侧的view
UIView *leftView = [[ UIView alloc ] initWithFrame : CGRectMake ( 0 , SCANVIEW_EdgeTop , SCANVIEW_EdgeLeft , VIEW_WIDTH - 2 * SCANVIEW_EdgeLeft )];
leftView. alpha = TINTCOLOR_ALPHA ;
leftView. backgroundColor = [ UIColor blackColor ];
[ _scanView addSubview :leftView];
/******************中间扫描区域****************************/
UIImageView *scanCropView=[[ UIImageView alloc ] initWithFrame : CGRectMake ( SCANVIEW_EdgeLeft , SCANVIEW_EdgeTop , VIEW_WIDTH - 2 * SCANVIEW_EdgeLeft , VIEW_WIDTH - 2 * SCANVIEW_EdgeLeft )];
//scanCropView.image=[UIImage imageNamed:@""];
scanCropView. layer . borderColor =[ UIColor yellowColor]. CGColor ;
scanCropView. layer . borderWidth = 2.0 ;
scanCropView. backgroundColor =[ UIColor clearColor ];
[ _scanView addSubview :scanCropView];
//右侧的view
UIView *rightView = [[ UIView alloc ] initWithFrame : CGRectMake ( VIEW_WIDTH - SCANVIEW_EdgeLeft , SCANVIEW_EdgeTop , SCANVIEW_EdgeLeft , VIEW_WIDTH - 2 * SCANVIEW_EdgeLeft )];
rightView. alpha = TINTCOLOR_ALPHA ;
rightView. backgroundColor = [ UIColor blackColor ];
[ _scanView addSubview :rightView];
//底部view
UIView *downView = [[ UIView alloc ] initWithFrame : CGRectMake ( 0 , VIEW_WIDTH - 2 * SCANVIEW_EdgeLeft + SCANVIEW_EdgeTop , VIEW_WIDTH , VIEW_HEIGHT -( VIEW_WIDTH - 2 * SCANVIEW_EdgeLeft + SCANVIEW_EdgeTop )- 64 )];
//downView.alpha = TINTCOLOR_ALPHA;
downView. backgroundColor = [[ UIColor blackColor ] colorWithAlphaComponent : TINTCOLOR_ALPHA ];
[ _scanView addSubview :downView];
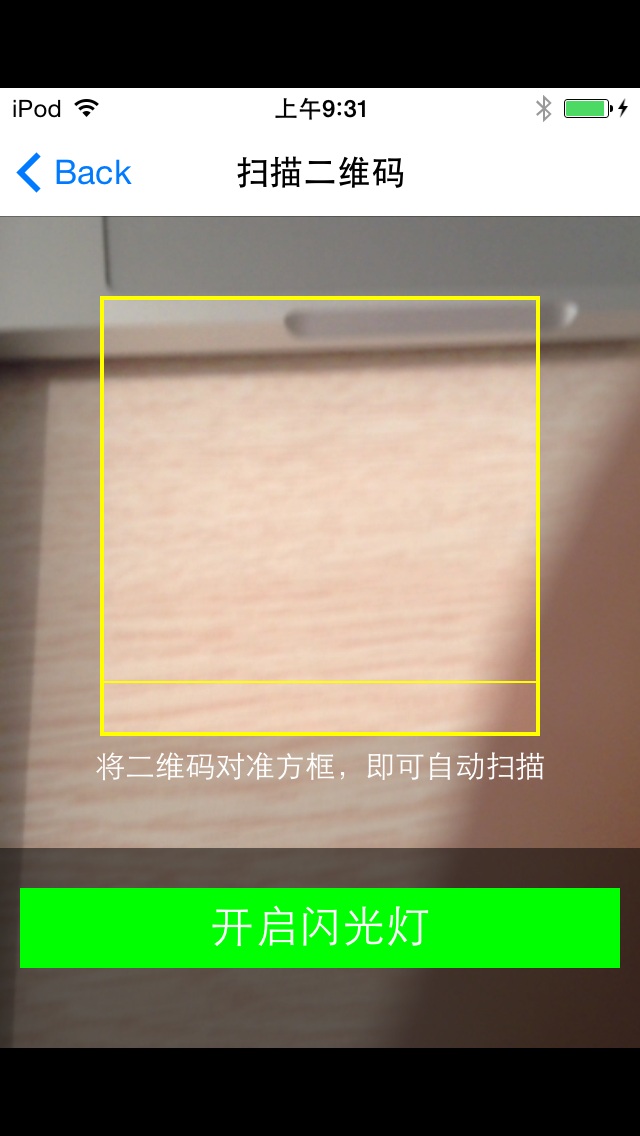
//用于说明的label
UILabel *labIntroudction= [[ UILabel alloc ] init ];
labIntroudction. backgroundColor = [ UIColor clearColor ];
labIntroudction. frame = CGRectMake ( 0 , 5 , VIEW_WIDTH , 20 );
labIntroudction. numberOfLines = 1 ;
labIntroudction. font =[ UIFont systemFontOfSize : 15.0 ];
labIntroudction. textAlignment = NSTextAlignmentCenter ;
labIntroudction. textColor =[ UIColor whiteColor ];
labIntroudction. text = @"将二维码对准方框,即可自动扫描" ;
[downView addSubview :labIntroudction];
UIView *darkView = [[ UIView alloc ] initWithFrame : CGRectMake ( 0 , downView. frame . size . height - 100.0 , VIEW_WIDTH , 100.0 )];
darkView. backgroundColor = [[ UIColor blackColor ] colorWithAlphaComponent : DARKCOLOR_ALPHA ];
[downView addSubview :darkView];
//用于开关灯操作的button
UIButton *openButton=[[ UIButton alloc ] initWithFrame : CGRectMake ( 10 , 20 , 300.0 , 40.0 )];
[openButton setTitle : @"开启闪光灯" forState: UIControlStateNormal ];
[openButton setTitleColor :[ UIColor whiteColor ] forState : UIControlStateNormal ];
openButton. titleLabel . textAlignment = NSTextAlignmentCenter ;
openButton. backgroundColor =[ UIColor greenColor ];
openButton. titleLabel . font =[ UIFont systemFontOfSize : 22.0 ];
[openButton addTarget : self action : @selector (openLight) forControlEvents : UIControlEventTouchUpInside ];
[darkView addSubview :openButton];
//画中间的基准线
_QrCodeline = [[ UIView alloc ] initWithFrame : CGRectMake ( SCANVIEW_EdgeLeft , SCANVIEW_EdgeTop , VIEW_WIDTH - 2 * SCANVIEW_EdgeLeft , 2 )];
_QrCodeline . backgroundColor = [ UIColor yellowColor];
[ _scanView addSubview : _QrCodeline ];
}
- ( void )openLight
{
if ( _readerView.torchMode == 0 ) {
_readerView.torchMode = 1 ;
} else
{
_readerView.torchMode = 0 ;
}
}
- ( void )viewWillDisappear:( BOOL )animated
{
[ super viewWillDisappear :animated];
if ( _readerView . torchMode == 1 ) {
_readerView . torchMode = 0 ;
}
[ self stopTimer ];
[ _readerView stop ];
}
//二维码的横线移动
- ( void )moveUpAndDownLine
{
CGFloat Y= _QrCodeline.frame.origin.y ;
//CGRectMake(SCANVIEW_EdgeLeft, SCANVIEW_EdgeTop, VIEW_WIDTH-2*SCANVIEW_EdgeLeft, 1)]
if (VIEW_WIDTH- 2 *SCANVIEW_EdgeLeft+SCANVIEW_EdgeTop==Y){
[UIView beginAnimations: @"asa" context: nil ];
[UIView setAnimationDuration: 1 ];
_QrCodeline.frame=CGRectMake(SCANVIEW_EdgeLeft, SCANVIEW_EdgeTop, VIEW_WIDTH- 2 *SCANVIEW_EdgeLeft, 1 );
[UIView commitAnimations];
} else if (SCANVIEW_EdgeTop==Y){
[UIView beginAnimations: @"asa" context: nil ];
[UIView setAnimationDuration: 1 ];
_QrCodeline.frame=CGRectMake(SCANVIEW_EdgeLeft, VIEW_WIDTH- 2 *SCANVIEW_EdgeLeft+SCANVIEW_EdgeTop, VIEW_WIDTH- 2 *SCANVIEW_EdgeLeft, 1 );
[UIView commitAnimations];
}
}
- ( void )createTimer
{
//创建一个时间计数
_timer=[NSTimer scheduledTimerWithTimeInterval: 1.0 target: self selector: @selector (moveUpAndDownLine) userInfo: nil repeats: YES ];
}
- ( void )stopTimer
{
if ([_timer isValid] == YES ) {
[_timer invalidate];
_timer = nil ;
}
}
// 是否支持转屏
- (BOOL)shouldAutorotate
{
return YES;
}
// 支持的屏幕方向,此处可直接返回 UIInterfaceOrientationMask 类型
// 也可以返回多个 UIInterfaceOrientationMask 取或运算后的值
- (NSUInteger)supportedInterfaceOrientations
{
return UIInterfaceOrientationMaskPortrait;
}
- (void)didReceiveMemoryWarning {
[super didReceiveMemoryWarning];
// Dispose of any resources that can be recreated.
}
/*
#pragma mark - Navigation
// In a storyboard-based application, you will often want to do a little preparation before navigation
- (void)prepareForSegue:(UIStoryboardSegue *)segue sender:(id)sender {
// Get the new view controller using [segue destinationViewController].
// Pass the selected object to the new view controller.
}
*/
@end