1、UserNotifications
通知是 App 用来和用户交流的一种方式,特别是当 App 并没有在前台运行的时候。通知,正如它的名称所强调的,被用作向用户‘通知’一个事件,或者仅仅向用户提示一条重要信息。总而言之,通知在提示类型的 App 当中非常有用,甚至在一些别的类型的 App 当中也是如此。比如,当用户进入一个指定区域(这是 iOS8 的新特性),一个下载任务完成,或者当朋友给你发送一条信息的时候,一条通知就可以被显示出来。无论如何,通知的目的就是获得用户的关注,然后他们就能处理通知了。
-
从 iOS8 开始,本质上来说有两种推送通知 Local Notifications(本地推送) 和 Remote Notifications(远程推送)。
- 本地推送通知(Local Notifications):由开发者定义,App 触发,触发的时间是被事先安排好的。
- 地点通知(Location Notifications),iOS8 引入,但是他们只会在用户一个特定的地理或者 iBeacon 区域时,才会被触发,虽然我们看不到什么细节。
- 远程推送通知(Remote Notifications):这种情况下,通知可以被分成两个类别。
- 推送通知(The push notifications),被服务器初始化,然后通过 APNS,最终到达用户设备。
- 静默通知(The silent notifications),其实也是推送通知,但是他们并没有被展示给用户,而是立即被 App 处理以发起某项任务,最后当一切都完成时,一个本地通知被显示以提示用户。
- 本地推送通知(Local Notifications):由开发者定义,App 触发,触发的时间是被事先安排好的。
iOS 10 中将之前繁杂的推送通知统一成 UserNotifications.framework 来集中管理和使用通知功能,还增加一些实用的功能——撤回单条通知、更新已展示通知、中途修改通知内容、在通知中显示多媒体资源、自定义 UI 等功能,功能着实强大。
-
在用户日常生活中会有很多种情形需要通知,比如:新闻提醒、定时吃药、定期体检、到达某个地方提醒用户等等,这些功能在 UserNotifications 中都提供了相应的接口。
-
Local Notifications(本地推送)
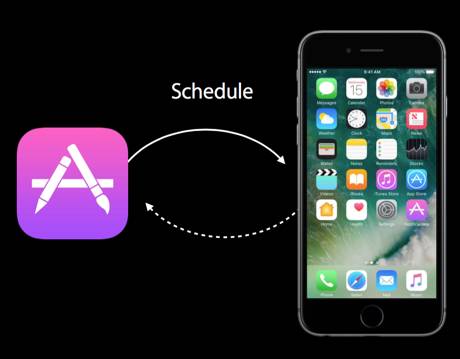
- App 本地创建通知,加入到系统的 Schedule(计划表)里,如果触发器条件达成时会推送相应的消息内容。
-
Remote Notifications(远程推送)

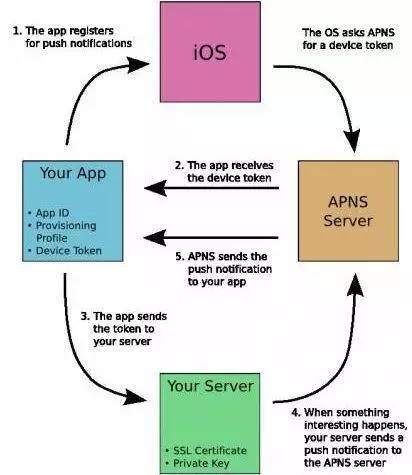
图中,Provider 是指某个 iPhone 软件的 Push 服务器。APNS 是 Apple Push Notification Service(Apple Push 服务器)的缩写,是苹果的服务器。
-
上图可以分为三个阶段:
- 第一阶段:APNS Pusher 应用程序把要发送的消息、目的 iPhone 的标识打包,发给 APNS。
- 第二阶段:APNS 在自身的已注册 Push 服务的 iPhone 列表中,查找有相应标识的 iPhone,并把消息发到 iPhone。
- 第三阶段:iPhone 把发来的消息传递给相应的应用程序, 并且按照设定弹出 Push 通知。
-
远程推送创建流程
-
从上图我们可以看到:
- 首先是应用程序注册消息推送。
- iOS 跟 APNS Server 要 deviceToken。应用程序接受 deviceToken。
- 应用程序将 deviceToken 发送给 Push 服务器端程序。
- Push 服务器端程序向 APNS 发送推送消息。
- APNS 将推送消息发送给 iPhone 应用程序。
-
2、本地推送
-
本地推送主要流程:
- 1 申请本地推送
- 2 创建一个触发器(trigger)
- 3 创建推送的内容(UNMutableNotificationContent)
- 4 创建推送请求(UNNotificationRequest)
- 5 推送请求添加到推送管理中心(UNUserNotificationCenter)中
2.1 申请本地推送
-
1、导入头文件,且要遵守协议。这里需要注意,包含头文件我们最好写成这种形式,防止低版本找不到头文件出现问题。
// 包含头文件 #ifdef NSFoundationVersionNumber_iOS_9_x_Max #import <UserNotifications/UserNotifications.h> #endif // 遵守协议 <UNUserNotificationCenterDelegate> -
2、在
application:didFinishLaunchingWithOptions:中申请通知权限。- (BOOL)application:(UIApplication *)application didFinishLaunchingWithOptions:(NSDictionary *)launchOptions { UNUserNotificationCenter *center = [UNUserNotificationCenter currentNotificationCenter]; // 设置代理,必须写代理,不然无法监听通知的接收与点击事件 center.delegate = self; // 判断是否已申请通知权限 [center getNotificationSettingsWithCompletionHandler:^(UNNotificationSettings * _Nonnull settings) { if (settings.authorizationStatus == UNAuthorizationStatusNotDetermined || settings.authorizationStatus == UNAuthorizationStatusDenied) { // 申请通知权限 [center requestAuthorizationWithOptions:(UNAuthorizationOptionBadge | UNAuthorizationOptionSound | UNAuthorizationOptionAlert ) completionHandler:^(BOOL granted, NSError * _Nullable error) { if (!error && granted) { // 用户点击允许 NSLog(@"注册成功"); } else { // 用户点击不允许 NSLog(@"注册失败"); } }]; } }]; return YES; }-
上面需要注意:
    1. 必须写代理,不然无法监听通知的接收与点击事件
        center.delegate = self;

    2. 之前注册推送服务,用户点击了同意还是不同意,以及用户之后又做了怎样的更改我们都无从得知,现在 apple 开放了这个 API,我们可以直接获取到用户的设定信息了。
       注意 UNNotificationSettings 是只读对象哦,不能直接修改!只能通过以下方式获取

        [center getNotificationSettingsWithCompletionHandler:^(UNNotificationSettings * _Nonnull settings) {
            NSLog(@"%@",settings);
        }];
-
2.2 接收处理推送消息
-
iOS 10 系统更新时,苹果给了我们 2 个代理方法来处理通知的接收和点击事件。
@protocol UNUserNotificationCenterDelegate @optional // The method will be called on the delegate only if the application is in the foreground. If the method is not implemented or the handler is not called in a timely manner then the notification will not be presented. The application can choose to have the notification presented as a sound, badge, alert and/or in the notification list. This decision should be based on whether the information in the notification is otherwise visible to the user. - (void)userNotificationCenter:(UNUserNotificationCenter *)center willPresentNotification:(UNNotification *)notification withCompletionHandler:(void (^)(UNNotificationPresentationOptions options))completionHandler __IOS_AVAILABLE(10.0) __TVOS_AVAILABLE(10.0) __WATCHOS_AVAILABLE(3.0); // The method will be called on the delegate when the user responded to the notification by opening the application, dismissing the notification or choosing a UNNotificationAction. The delegate must be set before the application returns from applicationDidFinishLaunching:. - (void)userNotificationCenter:(UNUserNotificationCenter *)center didReceiveNotificationResponse:(UNNotificationResponse *)response withCompletionHandler:(void(^)())completionHandler __IOS_AVAILABLE(10.0) __WATCHOS_AVAILABLE(3.0) __TVOS_PROHIBITED; @end -
此外,苹果把本地通知跟远程通知合二为一。区分本地通知跟远程通知的类是 UNPushNotificationTrigger.h 类中,UNPushNotificationTrigger 的类型是新增加的,通过它,我们可以得到一些通知的触发条件 ,解释如下:
- UNPushNotificationTrigger :(远程通知)远程推送的通知类型。
- UNTimeIntervalNotificationTrigger :(本地通知)一定时间之后,重复或者不重复推送通知。我们可以设置 timeInterval(时间间隔)和 repeats(是否重复)。
- UNCalendarNotificationTrigger :(本地通知)一定日期之后,重复或者不重复推送通知 例如,你每天 8 点推送一个通知,只要 dateComponents 为 8,如果你想每天 8 点都推送这个通知,只要 repeats 为 YES 就可以了。
- UNLocationNotificationTrigger :(本地通知)地理位置的一种通知,当用户进入或离开一个地理区域来通知。
-
需要注意的
1. 下面这个代理方法,只会是 app 处于前台状态下才会走,后台模式下是不会走这里的。 - (void)userNotificationCenter:(UNUserNotificationCenter *)center willPresentNotification:(UNNotification *)notification withCompletionHandler:(void (^)(UNNotificationPresentationOptions))completionHandler 2. 下面这个代理方法,用户点击消息时会触发,点击 Action 按钮时也会触发。点击消息时默认会打开 App。 - (void)userNotificationCenter:(UNUserNotificationCenter *)center didReceiveNotificationResponse:(UNNotificationResponse *)response withCompletionHandler:(void (^)())completionHandler 3. 不管前台后台状态下,推送消息的横幅都可以展示出来。后台状态不用说,前台时需要在前台代理方法中设置,选择是否提醒用户。 completionHandler(UNNotificationPresentationOptionBadge | UNNotificationPresentationOptionSound | UNNotificationPresentationOptionAlert); 4. 点击代理最后需要执行:completionHandler(); 不然会报错。 2016-09-27 14:42:16.353978 UserNotificationsDemo[1765:800117] Warning: UNUserNotificationCenter delegate received call to -userNotificationCenter:didReceiveNotificationResponse:withCompletionHandler: but the completion handler was never called. -
接收处理本地和远程推送消息
// AppDelegate.m // UNUserNotificationCenterDelegate 协议方法,App 处于前台接收通知 - (void)userNotificationCenter:(UNUserNotificationCenter *)center willPresentNotification:(UNNotification *)notification withCompletionHandler:(void (^)(UNNotificationPresentationOptions))completionHandler{ // 收到推送的请求 UNNotificationRequest *request = notification.request; // 收到推送的内容 UNNotificationContent *content = request.content; // 收到用户的基本信息 NSDictionary *userInfo = content.userInfo; // 收到推送消息的角标 NSNumber *badge = content.badge; // 收到推送消息 body NSString *body = content.body; // 推送消息的声音 UNNotificationSound *sound = content.sound; // 推送消息的副标题 NSString *subtitle = content.subtitle; // 推送消息的标题 NSString *title = content.title; if ([notification.request.trigger isKindOfClass:[UNPushNotificationTrigger class]]) { // 收到远程推送消息 NSLog(@"收到远程推送消息: %@", userInfo); } else { // 收到本地推送消息 NSLog(@"收到本地推送消息: %@", userInfo); } // 需要执行这个方法,选择是否提醒用户,有 Badge、Sound、Alert 三种类型可以设置 completionHandler(UNNotificationPresentationOptionBadge | UNNotificationPresentationOptionSound | UNNotificationPresentationOptionAlert); } -
处理推送消息点击事件
    // AppDelegate.m

    // UNUserNotificationCenterDelegate 协议方法
    - (void)userNotificationCenter:(UNUserNotificationCenter *)center
            didReceiveNotificationResponse:(UNNotificationResponse *)response
                     withCompletionHandler:(void (^)())completionHandler{

        // 收到推送的请求
        UNNotificationRequest *request = response.notification.request;

        // 收到推送的内容
        UNNotificationContent *content = request.content;

        // 收到用户的基本信息
        NSDictionary *userInfo = content.userInfo;

        // 收到推送消息的角标
        NSNumber *badge = content.badge;

        // 收到推送消息 body
        NSString *body = content.body;

        // 推送消息的声音
        UNNotificationSound *sound = content.sound;

        // 推送消息的副标题
        NSString *subtitle = content.subtitle;

        // 推送消息的标题
        NSString *title = content.title;

        if ([response.notification.request.trigger isKindOfClass:[UNPushNotificationTrigger class]]) {

            // 远程推送消息
            NSLog(@"点击远程推送消息: %@", userInfo);

        } else {

            // 本地推送消息
            NSLog(@"点击本地推送消息: %@", userInfo);
        }

        // 系统要求执行这个方法
        completionHandler();
    }
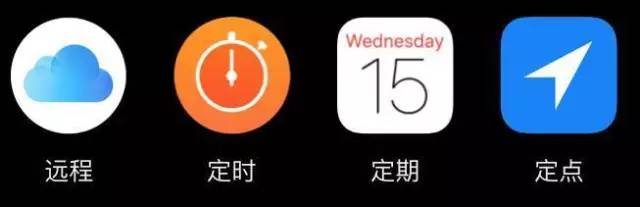
2.3 创建触发器
新功能 trigger 可以在特定条件触发,有三类:UNTimeIntervalNotificationTrigger、UNCalendarNotificationTrigger、UNLocationNotificationTrigger
-
1、UNTimeIntervalNotificationTrigger:定时推送。
-
一段时间后触发。
    // timeInterval:单位为秒(s)  repeats:是否循环提醒

    // 50s 后提醒
    UNTimeIntervalNotificationTrigger *trigger1 = [UNTimeIntervalNotificationTrigger triggerWithTimeInterval:50
                                                                                                     repeats:NO];
-
-
2、UNCalendarNotificationTrigger:定期推送。
-
时间点信息用 NSDateComponents。
    // 在每周一的 14 点 3 分提醒
    NSDateComponents *components = [[NSDateComponents alloc] init];
    components.weekday = 2;
    components.hour = 16;
    components.minute = 3;

    // components 日期
    UNCalendarNotificationTrigger *calendarTrigger = [UNCalendarNotificationTrigger triggerWithDateMatchingComponents:components
                                                                                                              repeats:YES];
-
-
3、UNLocationNotificationTrigger:定点推送。
-
地区信息使用 CLRegion 的子类 CLCircularRegion,可以配置 region 属性 notifyOnEntry 和 notifyOnExit,是在进入地区、从地区出来或者两者都要的时候进行通知。
    // 首先得导入 #import <CoreLocation/CoreLocation.h> 。

    // 创建位置信息
    CLLocationCoordinate2D center1 = CLLocationCoordinate2DMake(39.788857, 116.5559392);
    CLCircularRegion *region = [[CLCircularRegion alloc] initWithCenter:center1 radius:500 identifier:@"经海五路"];
    region.notifyOnEntry = YES;
    region.notifyOnExit = YES;

    // region 位置信息 repeats 是否重复 (CLRegion 可以是地理位置信息)
    UNLocationNotificationTrigger *locationTrigger = [UNLocationNotificationTrigger triggerWithRegion:region
                                                                                              repeats:YES];
-
2.4 创建推送的内容
- UNNotificationContent:属性 readOnly
-
UNMutableNotificationContent:属性有 title、subtitle、body、badge、sound、lauchImageName、userInfo、attachments、categoryIdentifier、threadIdentifier
本地消息内容 内容限制大小 展示 title NSString 限制在一行,多出部分省略号 subtitle NSString 限制在一行,多出部分省略号 body NSString 通知栏出现时,限制在两行,多出部分省略号;预览时,全部展示 -
注意点: body 中 printf 风格的转义字符,比如说要包含 %,需要写成 %% 才会显示, 同样
    UNMutableNotificationContent *content = [[UNMutableNotificationContent alloc] init];

    content.title = @"本地推送通知 - title";
    content.subtitle = @"本地推送通知 - subtitle";
    content.body = @"本地推送通知 - body,本地推送通知本地推送通知本地推送通知本地推送通知本地推送通知";
    content.badge = @666;                                                       // 推送消息的角标
    content.sound = [UNNotificationSound defaultSound];                         // 提醒声音
    content.userInfo = @{@"key1":@"userInfoValue1", @"key2":@"userInfoValue2"}; // 收到用户的基本信息
    content.categoryIdentifier = @"Dely_locationCategory";                      // 用于添加 Action 的标识
-
2.5 完整的本地推送创建
-
申请本地推送
// 包含头文件 #ifdef NSFoundationVersionNumber_iOS_9_x_Max #import <UserNotifications/UserNotifications.h> #endif // 遵守协议 <UNUserNotificationCenterDelegate> - (BOOL)application:(UIApplication *)application didFinishLaunchingWithOptions:(NSDictionary *)launchOptions { UNUserNotificationCenter *center = [UNUserNotificationCenter currentNotificationCenter]; // 设置代理,必须写代理,不然无法监听通知的接收与点击事件 center.delegate = self; // 判断是否已申请通知权限 [center getNotificationSettingsWithCompletionHandler:^(UNNotificationSettings * _Nonnull settings) { if (settings.authorizationStatus == UNAuthorizationStatusNotDetermined || settings.authorizationStatus == UNAuthorizationStatusDenied) { // 申请通知权限 [center requestAuthorizationWithOptions:(UNAuthorizationOptionBadge | UNAuthorizationOptionSound | UNAuthorizationOptionAlert ) completionHandler:^(BOOL granted, NSError * _Nullable error) { if (!error && granted) { // 用户点击允许 NSLog(@"注册成功"); } else { // 用户点击不允许 NSLog(@"注册失败"); } }]; } }]; return YES; } -
接收处理本地推送消息
// AppDelegate.m // UNUserNotificationCenterDelegate 协议方法,App 处于前台接收通知 - (void)userNotificationCenter:(UNUserNotificationCenter *)center willPresentNotification:(UNNotification *)notification withCompletionHandler:(void (^)(UNNotificationPresentationOptions))completionHandler{ // 收到推送的请求 UNNotificationRequest *request = notification.request; // 收到推送的内容 UNNotificationContent *content = request.content; // 收到用户的基本信息 NSDictionary *userInfo = content.userInfo; // 收到推送消息的角标 NSNumber *badge = content.badge; // 收到推送消息 body NSString *body = content.body; // 推送消息的声音 UNNotificationSound *sound = content.sound; // 推送消息的副标题 NSString *subtitle = content.subtitle; // 推送消息的标题 NSString *title = content.title; if ([notification.request.trigger isKindOfClass:[UNPushNotificationTrigger class]]) { // 收到远程推送消息 NSLog(@"收到远程推送消息: %@", userInfo); } else { // 收到本地推送消息 NSLog(@"收到本地推送消息: body:%@,title:%@, subtitle:%@, badge:%@,sound:%@, userInfo:%@", body, title, subtitle, badge, sound, userInfo); } // 需要执行这个方法,选择是否提醒用户,有 Badge、Sound、Alert 三种类型可以设置 completionHandler(UNNotificationPresentationOptionBadge | UNNotificationPresentationOptionSound | UNNotificationPresentationOptionAlert); } -
处理推送消息点击事件
// AppDelegate.m // UNUserNotificationCenterDelegate 协议方法 - (void)userNotificationCenter:(UNUserNotificationCenter *)center didReceiveNotificationResponse:(UNNotificationResponse *)response withCompletionHandler:(void (^)())completionHandler{ // 收到推送的请求 UNNotificationRequest *request = response.notification.request; // 收到推送的内容 UNNotificationContent *content = request.content; // 收到用户的基本信息 NSDictionary *userInfo = content.userInfo; // 收到推送消息的角标 NSNumber *badge = content.badge; // 收到推送消息 body NSString *body = content.body; // 推送消息的声音 UNNotificationSound *sound = content.sound; // 推送消息的副标题 NSString *subtitle = content.subtitle; // 推送消息的标题 NSString *title = content.title; if ([response.notification.request.trigger isKindOfClass:[UNPushNotificationTrigger class]]) { // 远程推送消息 NSLog(@"点击远程推送消息: %@", userInfo); } else { // 本地推送消息 NSLog(@"点击本地推送消息: body:%@,title:%@, subtitle:%@, badge:%@,sound:%@, userInfo:%@", body, title, subtitle, badge, sound, userInfo); } // 系统要求执行这个方法 completionHandler(); } -
iOS10 创建发送本地通知
// 添加头文件 #import <UserNotifications/UserNotifications.h>-
创建定时推送通知
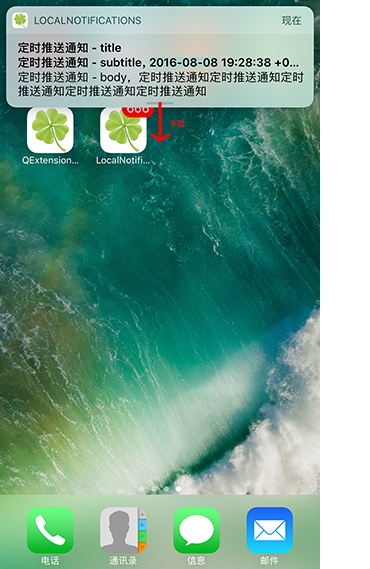
- (void)createLocalizedUserNotification1 { // 设置触发条件 UNTimeIntervalNotificationTrigger *timeTrigger = [UNTimeIntervalNotificationTrigger triggerWithTimeInterval:10.0f repeats:NO]; // 创建通知内容 UNMutableNotificationContent *content = [[UNMutableNotificationContent alloc] init]; content.title = @"定时推送通知 - title"; content.subtitle = [NSString stringWithFormat:@"定时推送通知 - subtitle,%@", [NSDate date]]; content.body = @"定时推送通知 - body,定时推送通知定时推送通知定时推送通知定时推送通知定时推送通知"; content.badge = @666; // 推送消息的角标 content.sound = [UNNotificationSound defaultSound]; content.userInfo = @{@"key1":@"userInfoValue1", @"key2":@"userInfoValue2"}; // 收到用户的基本信息 content.categoryIdentifier = @"Dely_locationCategory"; // 用于添加 Action 的标识 // 创建通知标示 NSString *requestIdentifier = @"Dely.note"; // 创建通知请求 UNNotificationRequest *request = [UNNotificationRequest requestWithIdentifier:requestIdentifier content:content trigger:timeTrigger]; UNUserNotificationCenter *center = [UNUserNotificationCenter currentNotificationCenter]; // 将通知请求添加到用户通知中心 [center addNotificationRequest:request withCompletionHandler:^(NSError * _Nullable error) { if (!error) { NSLog(@"本地推送已添加成功 1 %@", requestIdentifier); } }]; } -
创建定期推送通知
- (void)createLocalizedUserNotification2 { // 创建日期组建 NSDateComponents *components = [[NSDateComponents alloc] init]; components.weekday = 4; components.hour = 5; components.minute = 48; // 设置触发条件 UNCalendarNotificationTrigger *calendarTrigger = [UNCalendarNotificationTrigger triggerWithDateMatchingComponents:components repeats:YES]; // 创建通知内容 UNMutableNotificationContent *content = [[UNMutableNotificationContent alloc] init]; content.title = @"定期推送通知 - title"; content.subtitle = [NSString stringWithFormat:@"定期推送通知 - subtitle,%@", [NSDate date]]; content.body = @"定期推送通知 - body,定期推送通知定期推送通知定期推送通知定期推送通知定期推送通知"; content.badge = @2; // 推送消息的角标 content.sound = [UNNotificationSound defaultSound]; content.userInfo = @{@"key1":@"userInfoValue1", @"key2":@"userInfoValue2"}; // 收到用户的基本信息 content.categoryIdentifier = @"Date_locationCategory"; // 用于添加 Action 的标识 // 创建通知标示 NSString *requestIdentifier = @"Date.note"; // 创建通知请求 UNNotificationRequest *request = [UNNotificationRequest requestWithIdentifier:requestIdentifier content:content trigger:calendarTrigger]; UNUserNotificationCenter *center = [UNUserNotificationCenter currentNotificationCenter]; // 将通知请求添加到用户通知中心 [center addNotificationRequest:request withCompletionHandler:^(NSError * _Nullable error) { if (!error) { NSLog(@"推送已添加成功 2 %@", requestIdentifier); } }]; } -
创建定点推送通知
    // 添加头文件
    #import <CoreLocation/CoreLocation.h>
- (void)createLocalizedUserNotification3 { // 创建位置信息 CLLocationCoordinate2D center1 = CLLocationCoordinate2DMake(39.788857, 116.5559392); CLCircularRegion *region = [[CLCircularRegion alloc] initWithCenter:center1 radius:500 identifier:@"经海五路"]; region.notifyOnEntry = YES; region.notifyOnExit = YES; // 设置触发条件 UNLocationNotificationTrigger *locationTrigger = [UNLocationNotificationTrigger triggerWithRegion:region repeats:YES]; // 创建通知内容 UNMutableNotificationContent *content = [[UNMutableNotificationContent alloc] init]; content.title = @"定点推送通知 - title"; content.subtitle = [NSString stringWithFormat:@"定点推送通知 - subtitle,%@", [NSDate date]]; content.body = @"定点推送通知 - body,定点推送通知定点推送通知定点推送通知定点推送通知定点推送通知"; content.badge = @1; // 推送消息的角标 content.sound = [UNNotificationSound defaultSound]; content.userInfo = @{@"key1":@"userInfoValue1", @"key2":@"userInfoValue2"}; // 收到用户的基本信息 content.categoryIdentifier = @"Address_locationCategory"; // 用于添加 Action 的标识 // 创建通知标示 NSString *requestIdentifier = @"Address.note"; // 创建通知请求 UNNotificationRequest *request = [UNNotificationRequest requestWithIdentifier:requestIdentifier content:content trigger:locationTrigger]; UNUserNotificationCenter* center = [UNUserNotificationCenter currentNotificationCenter]; // 将通知请求添加到用户通知中心 [center addNotificationRequest:request withCompletionHandler:^(NSError * _Nullable error) { if (!error) { NSLog(@"推送已添加成功 3 %@", requestIdentifier); } }]; } -
运行结果如下
-
3、远程推送
-
远程推送主要流程:
- 1 应用程序注册消息推送
- 2 iOS 跟 APNS Server 要 deviceToken。应用程序接受 deviceToken
- 3 应用程序将 deviceToken 发送给 Push 服务器端程序
- 4 Push 服务器端程序向 APNS 发送推送消息
- 5 APNS 将推送消息发送给 iPhone 应用程序
3.1 申请注册远程推送
-
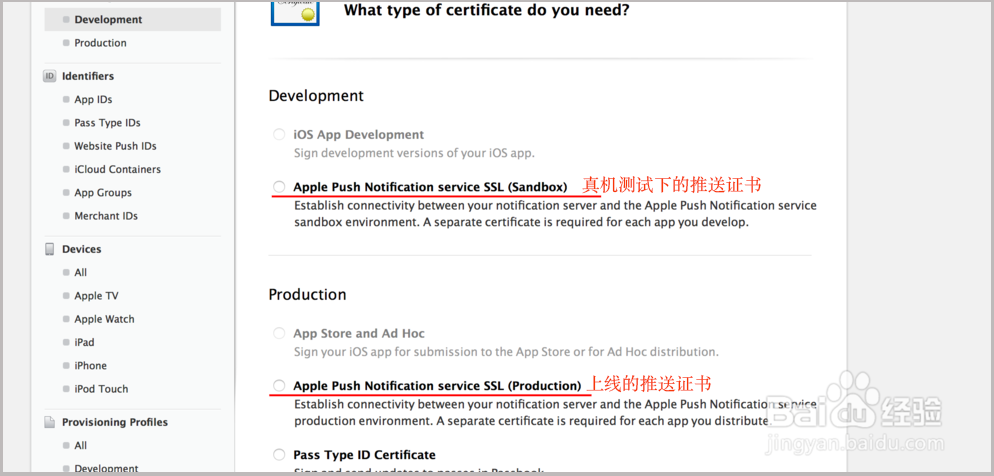
1、在苹果开发者中心,创建推送证书。
-
2、在 TARGETS => Capabilities 中打开 Push Notifications 开关。
-
在 Xcode7 中这里的开关不打开,推送也是可以正常使用的,但是在 Xcode8 中,这里的开关必须要打开,不然会报错。打开后会自动在项目里生成 .entitlements 文件。
    Error Domain=NSCocoaErrorDomain Code=3000 "未找到应用程序的“aps-environment”的授权字符串"
    UserInfo={NSLocalizedDescription=未找到应用程序的“aps-environment”的授权字符串}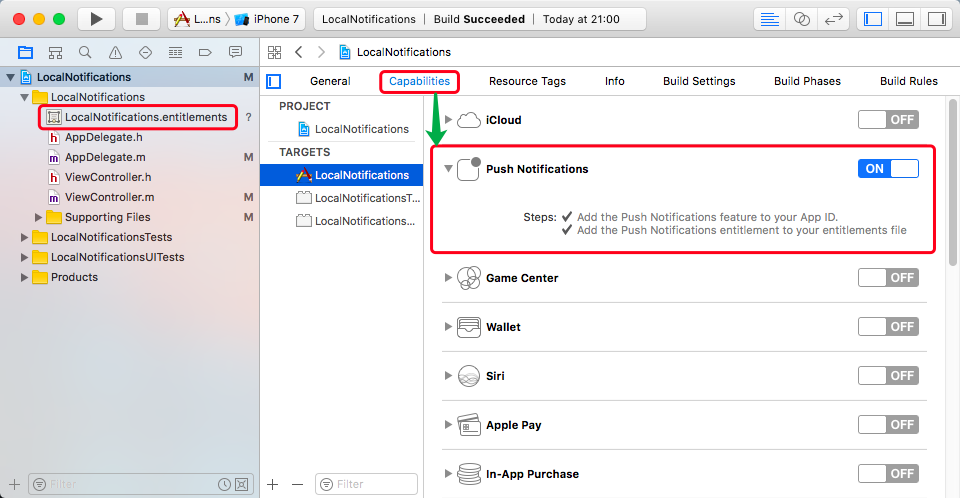
-
-
3、导入头文件,且要遵守协议。这里需要注意,包含头文件我们最好写成这种形式,防止低版本找不到头文件出现问题。
// 包含头文件 #ifdef NSFoundationVersionNumber_iOS_9_x_Max #import <UserNotifications/UserNotifications.h> #endif // 遵守协议 <UNUserNotificationCenterDelegate> -
4、在
application:didFinishLaunchingWithOptions:中申请注册通知。- (BOOL)application:(UIApplication *)application didFinishLaunchingWithOptions:(NSDictionary *)launchOptions { UNUserNotificationCenter *center = [UNUserNotificationCenter currentNotificationCenter]; // 设置代理,必须写代理,不然无法监听通知的接收与点击事件 center.delegate = self; // 判断是否已申请通知权限 [center getNotificationSettingsWithCompletionHandler:^(UNNotificationSettings * _Nonnull settings) { if (settings.authorizationStatus == UNAuthorizationStatusNotDetermined || settings.authorizationStatus == UNAuthorizationStatusDenied) { // 申请通知权限 [center requestAuthorizationWithOptions:(UNAuthorizationOptionBadge | UNAuthorizationOptionSound | UNAuthorizationOptionAlert ) completionHandler:^(BOOL granted, NSError * _Nullable error) { if (!error && granted) { // 用户点击允许 NSLog(@"注册成功"); } else { // 用户点击不允许 NSLog(@"注册失败"); } }]; } }]; // 判断是否已注册远程推送 if (application.isRegisteredForRemoteNotifications == NO) { // 注册远程推送,获取 device token [application registerForRemoteNotifications]; } return YES; } -
5、获取到 device Token 处理。
    // 获取 Device Token 成功
    - (void)application:(UIApplication *)application didRegisterForRemoteNotificationsWithDeviceToken:(NSData *)deviceToken{

        // 解析 NSData 获取字符串
        // 直接使用下面方法转换为 string,会得到一个 nil
        // 错误写法
        // NSString *string = [[NSString alloc] initWithData:deviceToken encoding:NSUTF8StringEncoding];

        // 正确写法
        NSString *deviceString = [[deviceToken description] stringByTrimmingCharactersInSet:[NSCharacterSet characterSetWithCharactersInString:@"<>"]];
        deviceString = [deviceString stringByReplacingOccurrencesOfString:@" " withString:@""];

        NSLog(@"获取 deviceToken 成功:%@", deviceString);
    }

    // 获取 Device Token 失败
    - (void)application:(UIApplication *)application didFailToRegisterForRemoteNotificationsWithError:(NSError *)error{

        NSLog(@"获取 deviceToken 失败:%@", error.description);
    }
3.2 处理远程推送消息
-
1、接收处理远程推送消息
// AppDelegate.m // UNUserNotificationCenterDelegate 协议方法,App 处于前台接收通知 - (void)userNotificationCenter:(UNUserNotificationCenter *)center willPresentNotification:(UNNotification *)notification withCompletionHandler:(void (^)(UNNotificationPresentationOptions))completionHandler{ // 收到推送的请求 UNNotificationRequest *request = notification.request; // 收到推送的内容 UNNotificationContent *content = request.content; // 推送消息的声音 UNNotificationSound *sound = content.sound; // 收到推送消息的角标 NSNumber *badge = content.badge; // 推送消息的标题 NSString *title = content.title; // 推送消息的副标题 NSString *subtitle = content.subtitle; // 收到推送消息 body NSString *body = content.body; // 收到用户的基本信息 NSDictionary *userInfo = content.userInfo; // 判断收到的通知类型 if ([notification.request.trigger isKindOfClass:[UNPushNotificationTrigger class]]) { // 收到远程推送消息 NSLog(@"收到远程推送消息: body:%@,title:%@, subtitle:%@, badge:%@,sound:%@, userInfo:%@", body, title, subtitle, badge, sound, userInfo); } else { // 收到本地推送消息 NSLog(@"收到本地推送消息: %@", userInfo); } // 需要执行这个方法,选择是否提醒用户,有 Badge、Sound、Alert 三种类型可以设置 completionHandler(UNNotificationPresentationOptionBadge | UNNotificationPresentationOptionSound | UNNotificationPresentationOptionAlert ); } -
2、处理推送消息点击事件
    // AppDelegate.m

    // UNUserNotificationCenterDelegate 协议方法
    - (void)userNotificationCenter:(UNUserNotificationCenter *)center
    didReceiveNotificationResponse:(UNNotificationResponse *)response
             withCompletionHandler:(void (^)())completionHandler{

        // 收到推送的请求
        UNNotificationRequest *request = response.notification.request;

        // 收到推送的内容
        UNNotificationContent *content = request.content;

        // 收到用户的基本信息
        NSDictionary *userInfo = content.userInfo;

        // 收到推送消息的角标
        NSNumber *badge = content.badge;

        // 收到推送消息 body
        NSString *body = content.body;

        // 推送消息的声音
        UNNotificationSound *sound = content.sound;

        // 推送消息的副标题
        NSString *subtitle = content.subtitle;

        // 推送消息的标题
        NSString *title = content.title;

        if ([response.notification.request.trigger isKindOfClass:[UNPushNotificationTrigger class]]) {

            // 远程推送消息
            NSLog(@"点击远程推送消息: body:%@,title:%@, subtitle:%@, badge:%@,sound:%@,userInfo:%@",
                  body, title, subtitle, badge, sound, userInfo);
        } else {

            // 本地推送消息
            NSLog(@"点击本地推送消息: %@", userInfo);
        }

        // 系统要求执行这个方法
        completionHandler();
    }
3.3 推送模拟
-
1、现在我们需要一个推送服务器给 APNS 发送信息。花钱买一个 APNS pusher 来模拟远程推送服务,当然可以不花钱也可以用到,例如 NWPusher、KnuffApp。
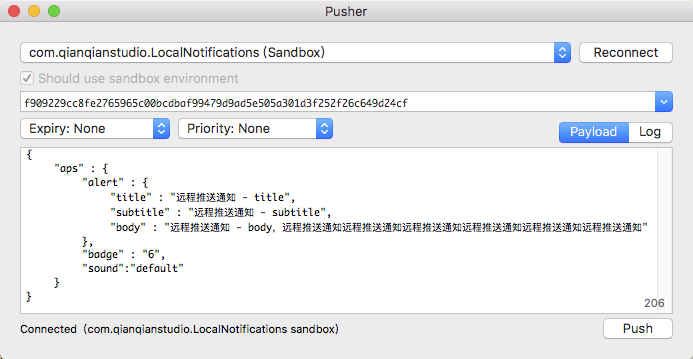
-
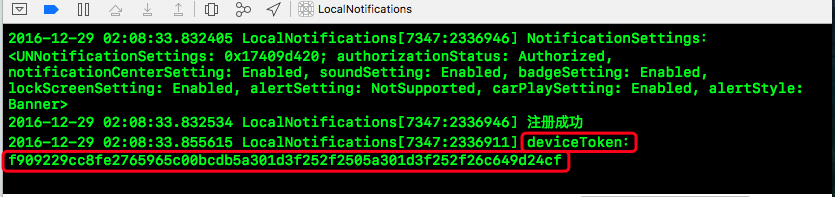
2、运行工程则会拿到设备的 Device Token,后面会用到,模拟器上无法获取到 Device Token,只有真机上才能获取到。
-
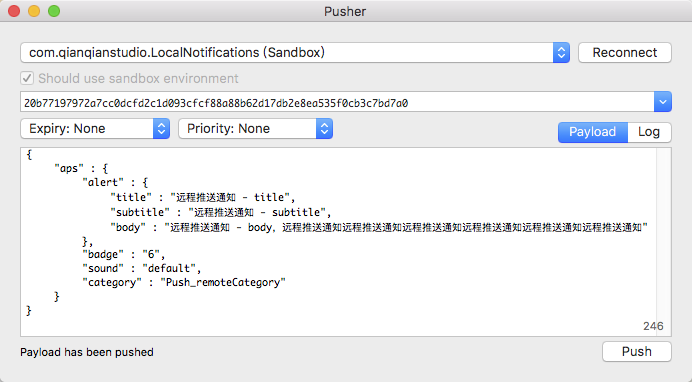
3、把刚刚获取的 device token 填到相应位置,同时配置好 push 证书(.p12 格式)。添加 aps 内容,然后点击 push 就 OK 了。
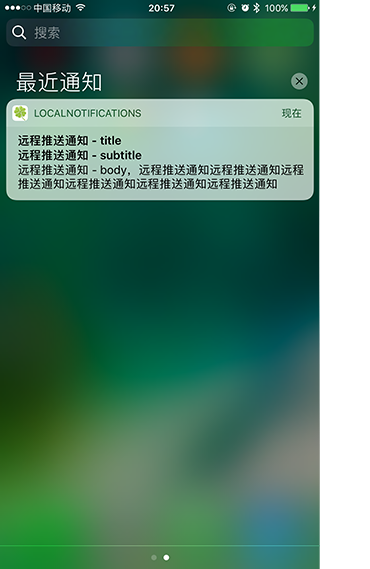
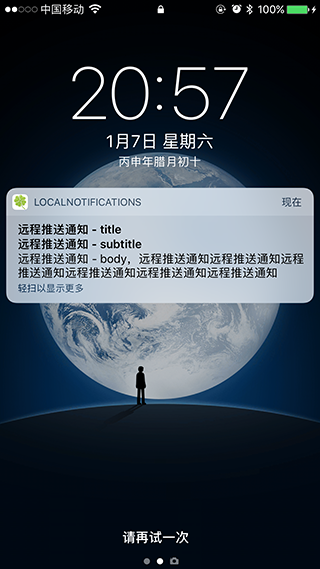
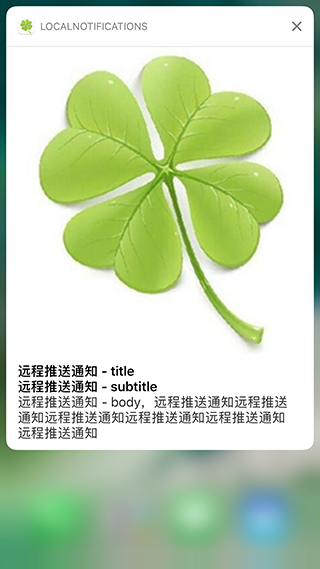
{ "aps" : { "alert" : { "title" : "远程推送通知 - title", "subtitle" : "远程推送通知 - subtitle", "body" : "远程推送通知 - body,远程推送通知远程推送通知远程推送通知远程推送通知远程推送通知远程推送通知" }, "badge" : "6", "sound" : "default" } } -
4、稍纵即逝你就收到了远程消息了。
4、推送消息的更新
-
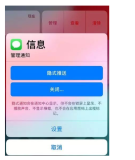
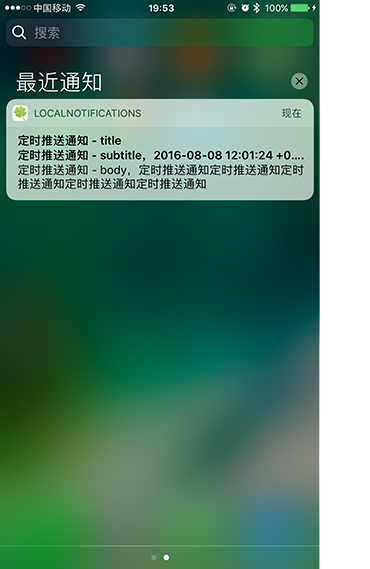
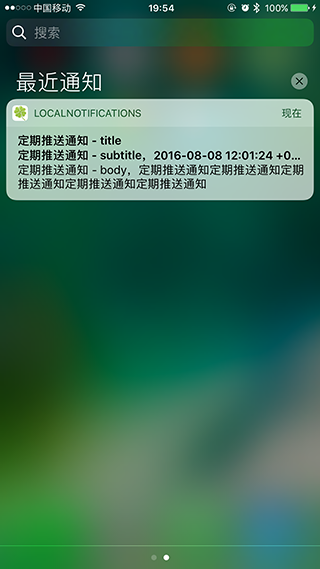
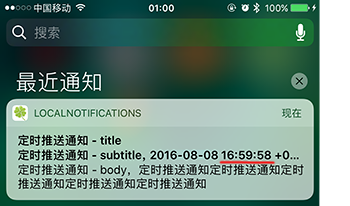
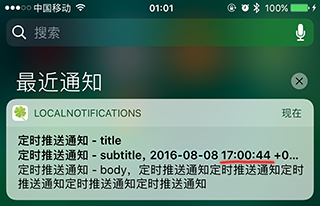
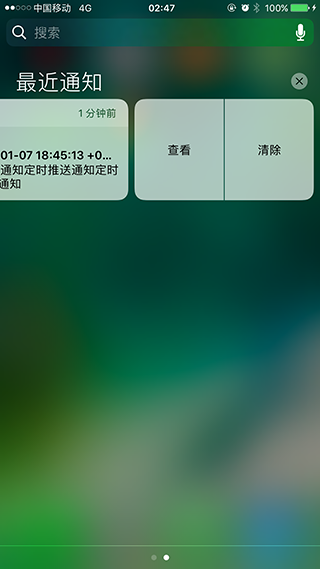
1、Local Notification (本地推送)需要通过更新 request。相同的 requestIdentifier,重新添加到推送 center 就可以了,说白了就是重新创建 local Notification request(只要保证 requestIdentifier 就 ok 了),应用场景如图
-
Local Notification 更新前后
-
-
2、Remote Notification (远程推送)更新需要通过新的字段 apps-collapse-id 来作为唯一标示,前面用的 APNS pusher 暂不支持这个字段,不过 GitHub 上有很多这样的工具,这样 remote 也可以更新推送消息。
5、推送消息的查找和删除
-
推送消息的查找和删除
    // 获取未送达的所有消息列表
    - (void)getPendingNotificationRequestsWithCompletionHandler:(void(^)(NSArray<UNNotificationRequest *> *requests))completionHandler;

    // 删除所有未送达的特定 id 的消息
    - (void)removePendingNotificationRequestsWithIdentifiers:(NSArray<NSString *> *)identifiers;

    // 删除所有未送达的消息
    - (void)removeAllPendingNotificationRequests;

    // 获取已送达的所有消息列表
    - (void)getDeliveredNotificationsWithCompletionHandler:(void(^)(NSArray<UNNotification *> *notifications))completionHandler;

    // 删除所有已送达的特定 id 的消息
    - (void)removeDeliveredNotificationsWithIdentifiers:(NSArray<NSString *> *)identifiers;

    // 删除所有已送达的消息
    - (void)removeAllDeliveredNotifications;

    // 如:

    UNUserNotificationCenter *center = [UNUserNotificationCenter currentNotificationCenter];

    // 删除设备已收到的所有消息推送
    [center removeAllDeliveredNotifications];
6、通知操作 Action
-
早在 iOS8 和 iOS9 下,notification 增加了一些新的特性:
- iOS8 增加了下拉时的 Action 按钮,像微信一样;
- iOS9 增加了像信息一样的可以下拉直接输入;
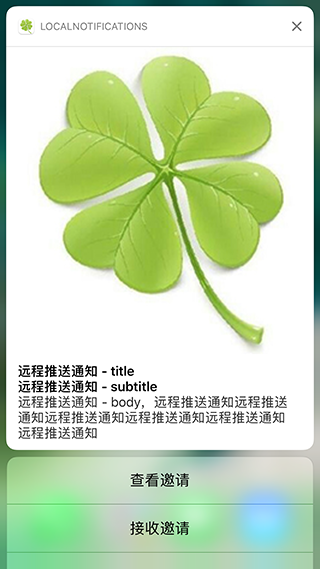
iOS10 中,可以允许推送添加交互操作 action,这些 action 可以使得 App 在前台或后台执行一些逻辑代码。如:推出键盘进行快捷回复,该功能以往只在 iMessage 中可行。在 iOS 10 中,这叫 category,是对推送功能的一个拓展,其实是独立出来的不要和创建 push 混为一谈,它只是一个扩展功能,可加可不加的。可以通过 3D-Touch 或下拉消息触发,如果你的手机不支持 3D-Touch 也没关系,左滑点击出现的 "查看" 选项来触发。
6.1 添加 Action
-
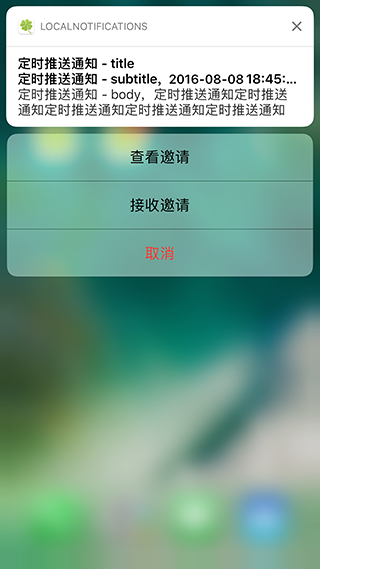
1、创建 Action
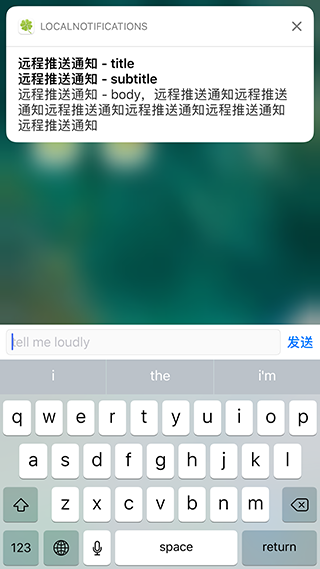
// 按钮 Action UNNotificationAction *lookAction = [UNNotificationAction actionWithIdentifier:@"action.look" title:@"查看邀请" options:UNNotificationActionOptionForeground]; UNNotificationAction *joinAction = [UNNotificationAction actionWithIdentifier:@"action.join" title:@"接收邀请" options:UNNotificationActionOptionAuthenticationRequired]; UNNotificationAction *cancelAction = [UNNotificationAction actionWithIdentifier:@"action.cancel" title:@"取消" options:UNNotificationActionOptionDestructive]; // 输入 Action UNTextInputNotificationAction *inputAction = [UNTextInputNotificationAction actionWithIdentifier:@"action.input" title:@"输入" options:UNNotificationActionOptionForeground textInputButtonTitle:@"发送" textInputPlaceholder:@"tell me loudly"];-
注意点
    UNNotificationActionOptions 是一个枚举类型,是用来标识 Action 触发的行为方式,分别是:

        // 被执行前需要解锁屏幕。Whether this action should require unlocking before being performed.
        UNNotificationActionOptionAuthenticationRequired = (1 << 0),

        // 被用于取消按钮。Whether this action should be indicated as destructive.
        UNNotificationActionOptionDestructive = (1 << 1),

        // 会使应用程序进入到前台状态,即打开应用程序。Whether this action should cause the application to launch in the foreground.
        UNNotificationActionOptionForeground = (1 << 2),
-
-
2、创建 category
UNNotificationCategory *category = [UNNotificationCategory categoryWithIdentifier:@"Dely_locationCategory" actions:@[lookAction, joinAction, cancelAction] intentIdentifiers:@[] options:UNNotificationCategoryOptionCustomDismissAction];-
注意点
    + (instancetype)categoryWithIdentifier:(NSString *)identifier actions:(NSArray *)actions
                                                        intentIdentifiers:(NSArray *)intentIdentifiers
                                                                  options:(UNNotificationCategoryOptions)options;

    方法中:
        identifier :标识符,是这个 category 的唯一标识,用来区分多个 category, 这个 id 不管是本地推送,还是远程推送,一定要有并且要保持一致。
        actions :是你创建 action 的操作数组
        intentIdentifiers :意图标识符,可在 <Intents/INIntentIdentifiers.h> 中查看,主要是针对电话、carplay 等开放的 API
        options :通知选项,枚举类型,也是为了支持 carplay
-
-
3、把 category 添加到通知中心
UNUserNotificationCenter *center = [UNUserNotificationCenter currentNotificationCenter]; [center setNotificationCategories:[NSSet setWithObject:category]]; -
4、处理 Action 点击事件
- 所有的(不管远程或者本地)Push 点击都会走到下面的代理方法,只要在此方法中判断点击的按钮做相应的处理即可。
    // UNUserNotificationCenterDelegate 协议方法,处理推送消息点击事件
    - (void)userNotificationCenter:(UNUserNotificationCenter *)center
                                didReceiveNotificationResponse:(UNNotificationResponse *)response
                                         withCompletionHandler:(void(^)())completionHandler
                                __IOS_AVAILABLE(10.0) __WATCHOS_AVAILABLE(3.0) __TVOS_PROHIBITED;
6.2 完整 Action 创建添加
-
1、创建 Action
-
创建按钮 Action
// 创建按钮 Action UNNotificationAction *lookAction = [UNNotificationAction actionWithIdentifier:@"action.look" title:@"查看邀请" options:UNNotificationActionOptionForeground]; UNNotificationAction *joinAction = [UNNotificationAction actionWithIdentifier:@"action.join" title:@"接收邀请" options:UNNotificationActionOptionAuthenticationRequired]; UNNotificationAction *cancelAction = [UNNotificationAction actionWithIdentifier:@"action.cancel" title:@"取消" options:UNNotificationActionOptionDestructive]; // 注册 category UNNotificationCategory *category = [UNNotificationCategory categoryWithIdentifier:@"Dely_locationCategory" actions:@[lookAction, joinAction, cancelAction] intentIdentifiers:@[] options:UNNotificationCategoryOptionCustomDismissAction]; // 将 category 添加到通知中心 UNUserNotificationCenter *center = [UNUserNotificationCenter currentNotificationCenter]; [center setNotificationCategories:[NSSet setWithObject:category]]; -
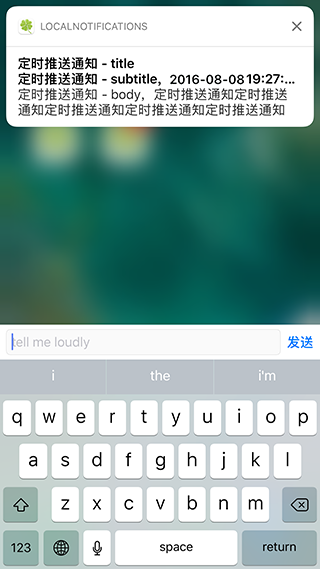
创建输入 Action
    // 创建输入 Action
    UNTextInputNotificationAction *inputAction = [UNTextInputNotificationAction actionWithIdentifier:@"action.input"
                                                                                               title:@"输入"
                                                                                             options:UNNotificationActionOptionForeground
                                                                                textInputButtonTitle:@"发送"
                                                                                textInputPlaceholder:@"tell me loudly"];

    // 注册 category
    UNNotificationCategory *category = [UNNotificationCategory categoryWithIdentifier:@"Dely_locationCategory"
                                                                              actions:@[inputAction]
                                                                    intentIdentifiers:@[]
                                                                              options:UNNotificationCategoryOptionCustomDismissAction];

    // 将 category 添加到通知中心
    UNUserNotificationCenter *center = [UNUserNotificationCenter currentNotificationCenter];
    [center setNotificationCategories:[NSSet setWithObject:category]];
-
-
2、添加 Action
-
本地推送或远程推送中在 Appdelegate 方法如下位置添加创建 Action 的代码。其中
[self addNotificationAction];方法是单独创建 Action 的代码。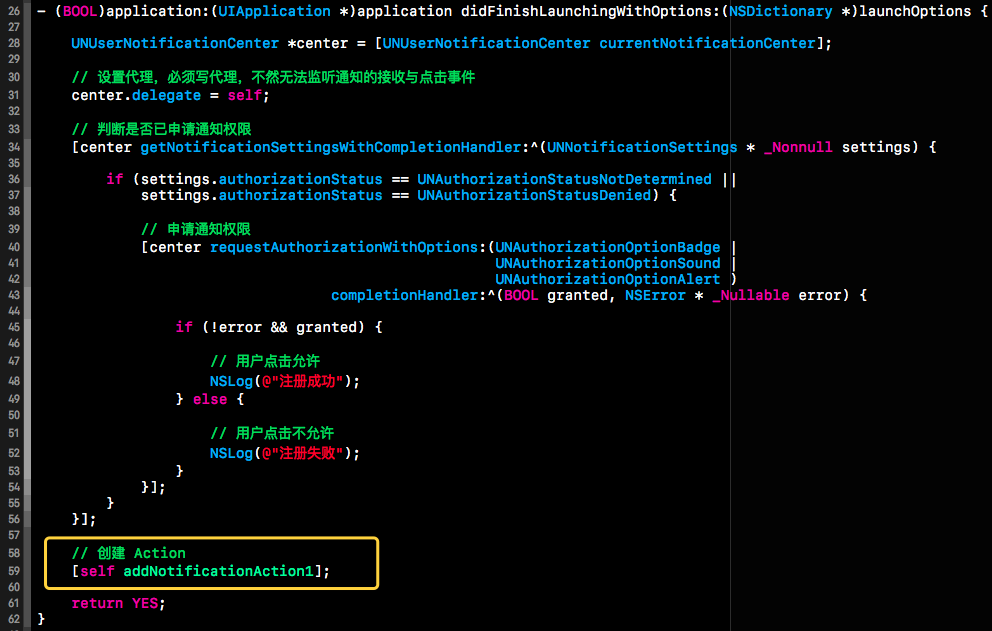
-
远程推送的推送代码中一定要保证里面包含 category 键值对,且值一定要与代码中的创建 category 时的 Identifier 一致。
    {
        "aps" : {
            "alert" : {
                "title" : "远程推送通知 - title",
                "subtitle" : "远程推送通知 - subtitle",
                "body" : "远程推送通知 - body,远程推送通知远程推送通知远程推送通知远程推送通知远程推送通知远程推送通知"
            },
            "badge" : "6",
            "sound" : "default",
            "category" : "Push_remoteCategory"
        }
    }
-
-
3、处理 Action 点击事件
// UNUserNotificationCenterDelegate 协议方法,处理推送消息点击事件 - (void)userNotificationCenter:(UNUserNotificationCenter *)center didReceiveNotificationResponse:(UNNotificationResponse *)response withCompletionHandler:(void(^)())completionHandler { // 获取 Action 的 id NSString *actionID = response.actionIdentifier; // 输入 Action if ([response isKindOfClass:[UNTextInputNotificationResponse class]]) { NSString *inputText = [(UNTextInputNotificationResponse *)response userText]; NSLog(@"actionID = %@\n inputText = %@", actionID, inputText); } // 点击 Action if ([actionID isEqualToString:@"action.join"]) { NSLog(@"actionID = %@\n", actionID); } else if ([actionID isEqualToString:@"action.look"]) { NSLog(@"actionID = %@\n", actionID); } } -
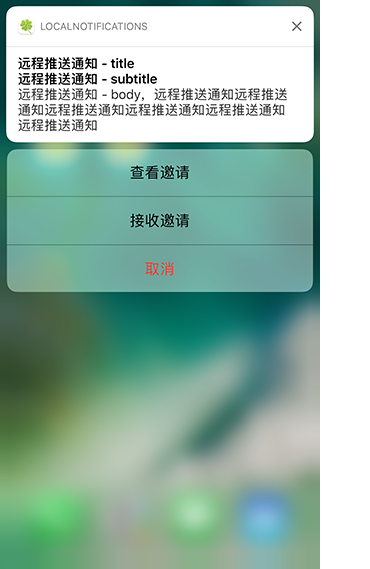
效果
-
显示 Action 按钮
-
本地推送通知
-
远程推送通知
-
7、富文本推送和自定义推送界面
本地推送和远程推送同时都可支持附带 Media Attachments(媒体附件)。不过远程通知需要实现通知服务扩展 UNNotificationServiceExtension,在 service extension 里面去下载附件(Attachments),但是需要注意,service extension 会限制下载的时间(30s),并且下载的文件大小也会同样被限制。这里毕竟是一个推送,而不是把所有的内容都推送给用户。所以你应该去推送一些缩小比例之后的版本。比如图片,推送里面附带缩略图,当用户打开 app 之后,再去下载完整的高清图。视频就附带视频的关键帧或者开头的几秒,当用户打开 app 之后再去下载完整视频。
-
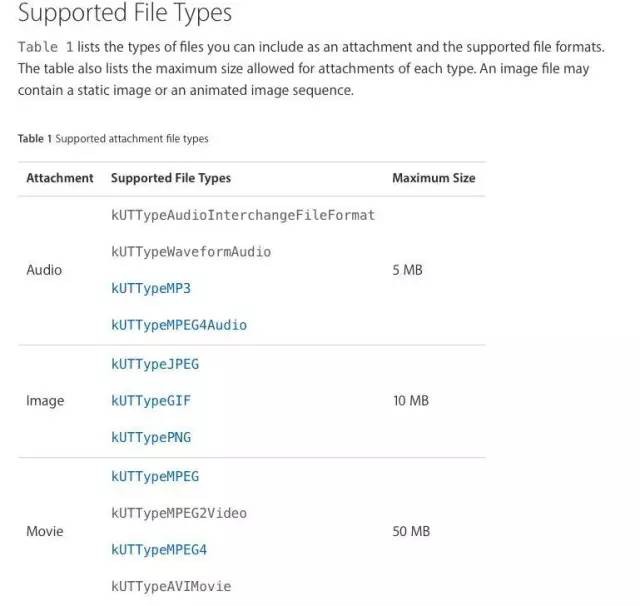
附件支持图片,音频,视频,附件支持的类型及大小
系统会在通知注册前校验附件,如果附件出问题,通知注册失败;校验成功后,附件会转入 attachment data store;如果附件是在 app bundle,则是会被 copy 来取代 move
media attachments 可以利用 3d touch 进行预览和操作。-
attachment data store 的位置?利用代码测试获取在磁盘上的图片文件作为 attachment,会发现注册完通知后,图片文件被移除,在 app 的沙盒中找不到该文件在哪里;想要获取已存在的附件内容,文档中提及可以通过 UNUserNotificationCenter 中方法,但目前文档中这 2 个方法还是灰的,见苹果开发者文档
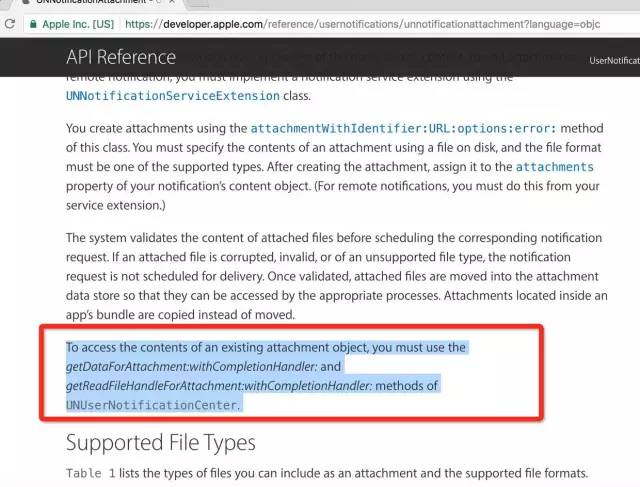
    // 就是这两个方法
    getDataForAttachment:withCompletionHandler:
    getReadFileHandleForAttachment:withCompletionHandler:
7.1 富文本推送的创建
-
1、准备工作
- 附件限定 https 协议,所以我们现在找一个支持 https 的图床用来测试,具体附件格式可以查看苹果开发文档。
-
2、添加新的 Targe –> Notification Service
-
先在 Xcode 打开你的工程,File –> New –> Targe 然后添加这个 Notification Service:
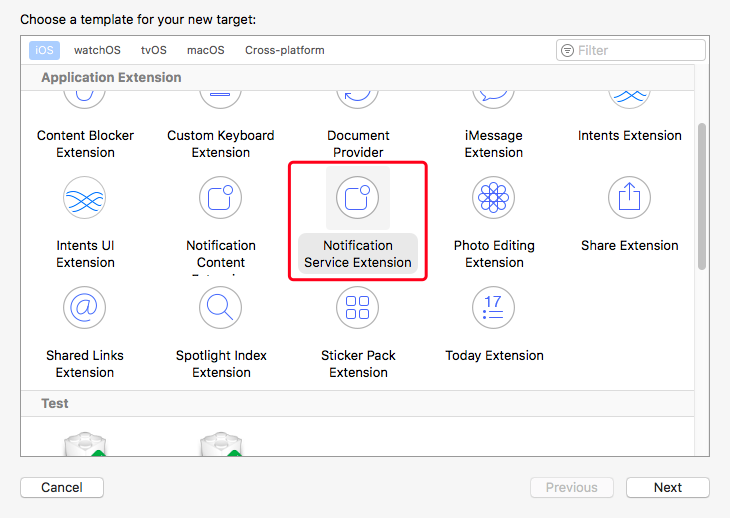
-
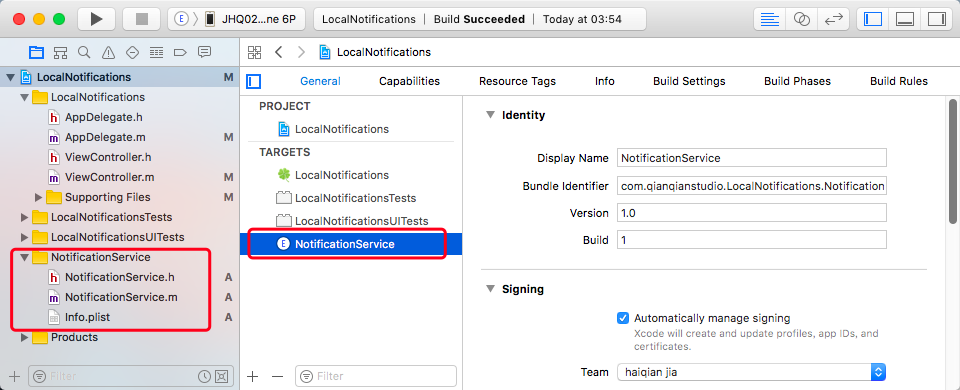
这样在你工程里能看到下面目录,然后会自动创建一个 UNNotificationServiceExtension 的子类 NotificationService,通过完善这个子类,来实现你的需求。
-
点开 NotificationService.m 会看到 2 个方法:
- (void)didReceiveNotificationRequest:(UNNotificationRequest *)request withContentHandler:(void (^)(UNNotificationContent * _Nonnull))contentHandler { self.contentHandler = contentHandler; self.bestAttemptContent = [request.content mutableCopy]; // Modify the notification content here... self.bestAttemptContent.title = [NSString stringWithFormat:@"%@ [modified]", self.bestAttemptContent.title]; self.contentHandler(self.bestAttemptContent); } - (void)serviceExtensionTimeWillExpire { // Called just before the extension will be terminated by the system. // Use this as an opportunity to deliver your "best attempt" at modified content, // otherwise the original push payload will be used. self.contentHandler(self.bestAttemptContent); }- didReceiveNotificationRequest :让你可以在后台处理接收到的推送,传递最终的内容给 contentHandler。
- serviceExtensionTimeWillExpire :在你获得的一小段运行代码的时间即将结束的时候,如果仍然没有成功的传入内容,会走到这个方法,可以在这里传肯定不会出错的内容,或者他会默认传递原始的推送内容。
-
-
3、设置下载附件
-
主要的思路就是在这里把附件下载下来,然后才能展示渲染,下面是下载保存的相关方法:
    - (void)didReceiveNotificationRequest:(UNNotificationRequest *)request
                       withContentHandler:(void (^)(UNNotificationContent * _Nonnull))contentHandler {

        self.contentHandler = contentHandler;
        self.bestAttemptContent = [request.content mutableCopy];

        // 下载图片,放到本地
        NSString *fileURL = [request.content.userInfo objectForKey:@"image"];
        NSData * data = [NSData dataWithContentsOfURL:[NSURL URLWithString:fileURL]]; // 需要 https 连接
        UIImage *imageFromUrl = [UIImage imageWithData:data];

        // 获取 documents 目录
        NSString *path = NSSearchPathForDirectoriesInDomains(NSDocumentDirectory, NSUserDomainMask, YES).firstObject;

        // 将所下载的图片保存到本地
        NSString *localPath = [self saveImage:imageFromUrl withFileName:@"MyImage" ofType:@"png" inDirectory:path];

        if (localPath && ![localPath isEqualToString:@""]) {

            UNNotificationAttachment * attachment = [UNNotificationAttachment attachmentWithIdentifier:@"photo"
                                                    URL:[NSURL URLWithString:[@"file://" stringByAppendingString:localPath]]
                                                options:nil
                                                  error:nil];

            if (attachment) {
                self.bestAttemptContent.attachments = @[attachment];
            }
        }

        self.contentHandler(self.bestAttemptContent);
    }

    // 将所下载的图片保存到本地
    - (NSString *) saveImage:(UIImage *)image
                withFileName:(NSString *)imageName
                      ofType:(NSString *)extension
                 inDirectory:(NSString *)directoryPath {

        NSString *urlStr = @"";

        if ([[extension lowercaseString] isEqualToString:@"png"]){

            urlStr = [directoryPath stringByAppendingPathComponent:[NSString stringWithFormat:@"%@.%@", imageName, @"png"]];
            [UIImagePNGRepresentation(image) writeToFile:urlStr options:NSAtomicWrite error:nil];

        } else if ([[extension lowercaseString] isEqualToString:@"jpg"] || [[extension lowercaseString] isEqualToString:@"jpeg"]){

            urlStr = [directoryPath stringByAppendingPathComponent:[NSString stringWithFormat:@"%@.%@", imageName, @"jpg"]];
            [UIImageJPEGRepresentation(image, 1.0) writeToFile:urlStr options:NSAtomicWrite error:nil];

        } else{
            NSLog(@"extension error");
        }

        return urlStr;
    }

    - (void)serviceExtensionTimeWillExpire {

        // Called just before the extension will be terminated by the system.
        // Use this as an opportunity to deliver your "best attempt" at modified content,
        // otherwise the original push payload will be used.
        self.contentHandler(self.bestAttemptContent);
    }
-
-
4、添加新的 Targe –> Notification Content
-
先在 Xcode 打开你的工程,File –> New –> Targe 然后添加这个 Notification Content:
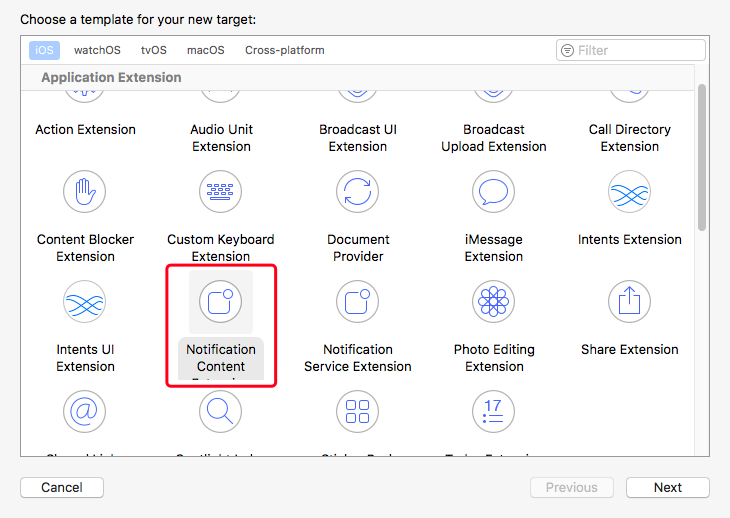
-
这样你在工程里同样看到下面的目录
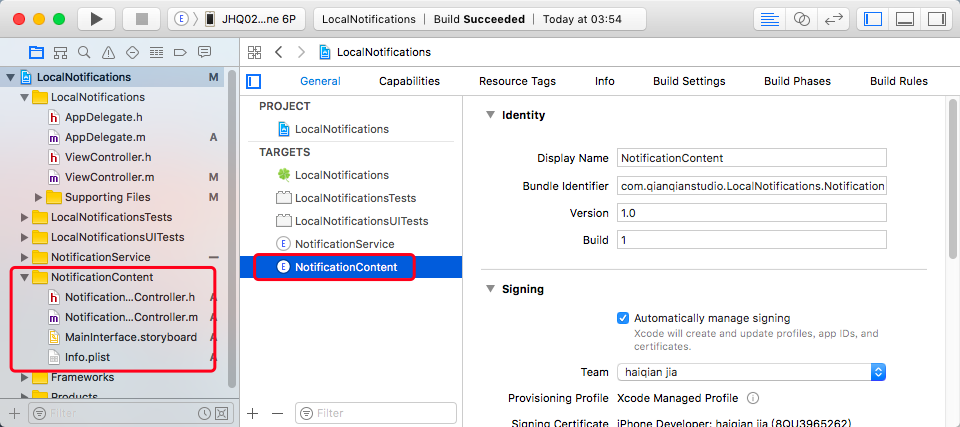
-
点开 NotificationViewController.m 会看到 2 个方法:
- (void)viewDidLoad; - (void)didReceiveNotification:(UNNotification *)notification;- 前者渲染 UI,后者获取通知信息,更新 UI 控件中的数据。
-
-
5、自定义 UI 界面,展示推送内容
-
在 MainInterface.storyboard 中自定你的 UI 页面,可以随意发挥,但是这个 UI 见面只能用于展示,并不能响应点击或者手势事件,点击或者手势事件只能通过 category 来实现,下面自己添加 view 和约束。
-
然后把 view 拉到 NotificationViewController.m 文件中,代码如下
#import "NotificationViewController.h" #import <UserNotifications/UserNotifications.h> #import <UserNotificationsUI/UserNotificationsUI.h> @interface NotificationViewController () <UNNotificationContentExtension> @property IBOutlet UILabel *label; @property (weak, nonatomic) IBOutlet UIImageView *imageView; @end @implementation NotificationViewController - (void)viewDidLoad { [super viewDidLoad]; // Do any required interface initialization here. } - (void)didReceiveNotification:(UNNotification *)notification { self.label.text = notification.request.content.body; UNNotificationContent *content = notification.request.content; UNNotificationAttachment *attachment = content.attachments.firstObject; if (attachment.URL.startAccessingSecurityScopedResource) { self.imageView.image = [UIImage imageWithContentsOfFile:attachment.URL.path]; } } @end -
有人要有疑问了,可不可以不用 storyboard 来自定义界面?当然可以了!只需要在 Notifications Content 的 info.plist 中把 NSExtensionMainStoryboard 替换为 NSExtensionPrincipalClass,并且 value 对应你的类名!然后在 viewDidLoad 里用纯代码布局就可以了。
-
-
6、创建远程富文本推送
-
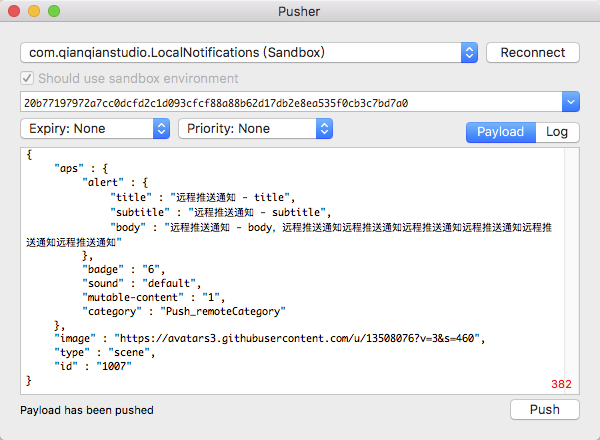
apes 如下
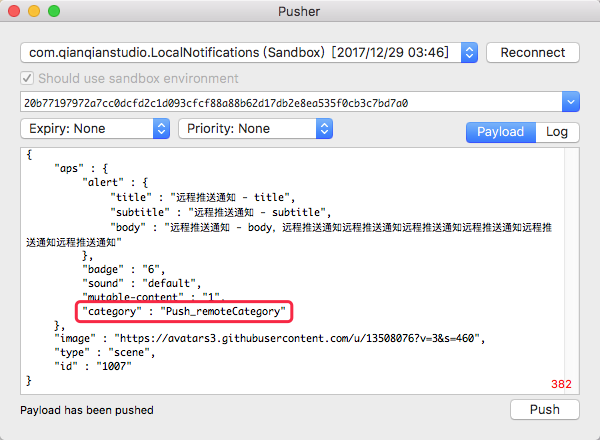
{ "aps" : { "alert" : { "title" : "远程推送通知 - title", "subtitle" : "远程推送通知 - subtitle", "body" : "远程推送通知 - body,远程推送通知远程推送通知远程推送通知远程推送通知远程推送通知远程推送通知" }, "badge" : "6", "sound" : "default", "mutable-content" : "1", "category" : "Push_remoteCategory" }, "image" : "https://avatars3.githubusercontent.com/u/13508076?v=3&s=460", "type" : "scene", "id" : "1007" }- 注意:mutable-content 这个键值为 1,这意味着此条推送可以被 Service Extension 进行更改,也就是说要用 Service Extension 需要加上这个键值为 1。
-
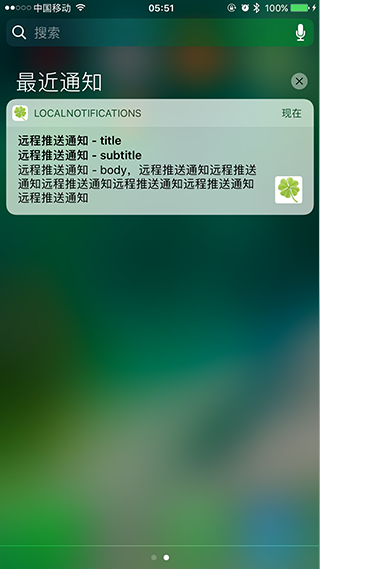
完成上面的工作的时候基本上可以了!然后运行工程,上面的 json 数据放到 APNS Pusher 里面点击 Push:
-
稍等片刻应该能收到消息,长按或者右滑查看
-
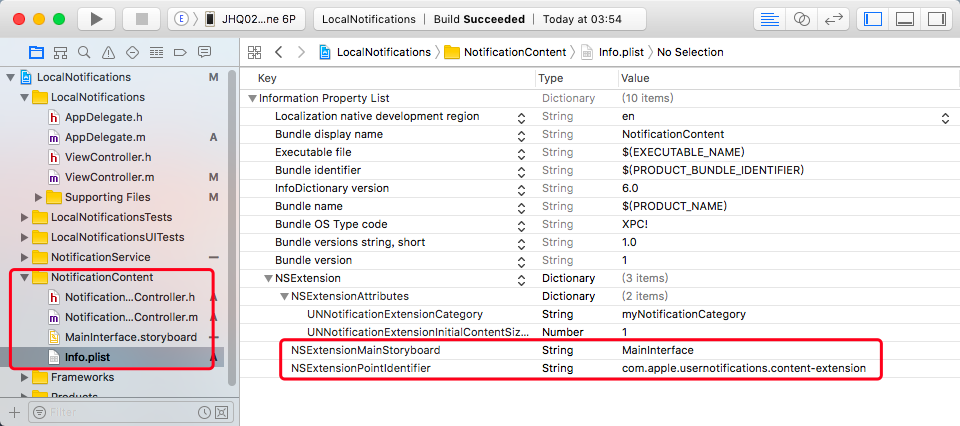
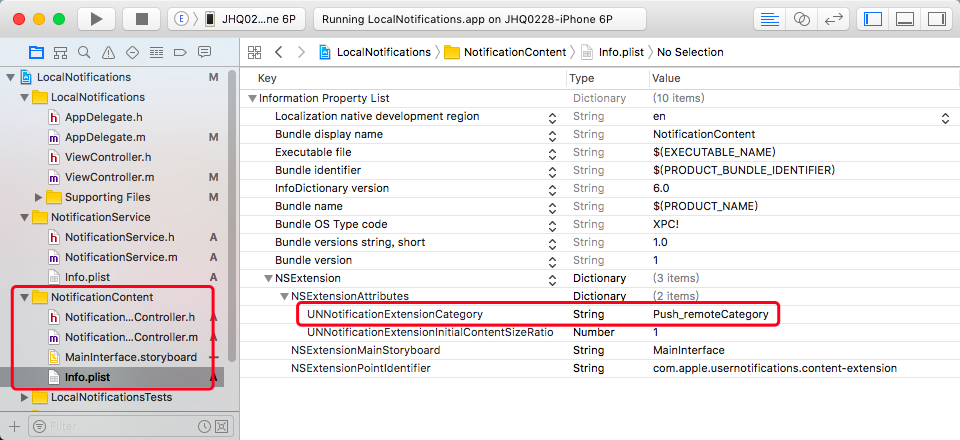
注意:如果你添加了 category,需要在 Notification content 的 info.plist 添加一个键值对 UNNotificationExtensionCategory 的 value 值和 category Action 的 category 值保持一致就行。
-
同时在推送 json 中添加 category 键值对也要和上面两个地方保持一致
-
就变成了下面
-
-
7、创建本地富文本推送
上面介绍了远程需要 Service Extension 的远程推送,iOS10 附件通知(图片、gif、音频、视频)。不过对图片和视频的大小做了一些限制(图片不能超过 10M,视频不能超过 50M),而且附件资源必须存在本地,如果是远程推送的网络资源需要提前下载到本地。
-
如果是本地的就简单了只需要在 Service Extension 的 NotificationService.m 的如下方法中拿到资源添加到 Notification Content,在 Notification Content 的控制器取到资源自己来做需求处理和展示。
- (void)didReceiveNotificationRequest:(UNNotificationRequest *)request withContentHandler:(void (^)(UNNotificationContent * _Nonnull))contentHandler { self.contentHandler = contentHandler; self.bestAttemptContent = [request.content mutableCopy]; // 资源路径 NSURL *pictureURL = [[NSBundle mainBundle] URLForResource:@"13508076" withExtension:@"png"]; // 创建附件资源 // * identifier 资源标识符 // * URL 资源路径 // * options 资源可选操作 比如隐藏缩略图之类的 // * error 异常处理 UNNotificationAttachment *attachment = [UNNotificationAttachment attachmentWithIdentifier:@"picture.attachment" URL:pictureURL options:nil error:nil]; // 将附件资源添加到 UNMutableNotificationContent 中 if (attachment) { self.bestAttemptContent.attachments = @[attachment]; } self.contentHandler(self.bestAttemptContent); } -
下如果你想把 default 隐藏掉,只需要在 Notification Content 的 info.plist 中添加一个键值 UNNotificationExtensionDefaultContentHidden 设置为 YES 就可以了:
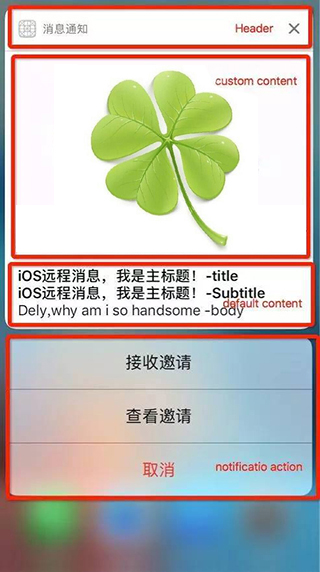
7.2 UNNotificationContentExtension
-
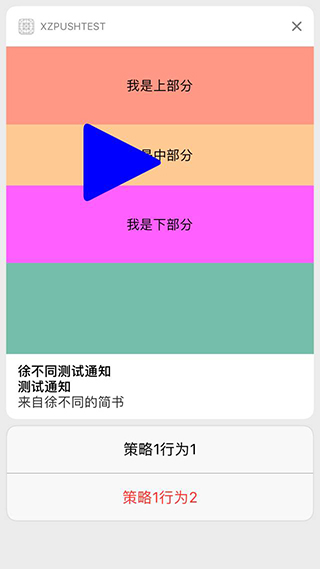
简单来说,UNNotificationContentExtension 这个类,也是 iOS10 推送的新特性,官方文档用这么一句话,简单的解释了一下,Presents a custom interface for a delivered local or remote notification.(当你收到远程或者本地通知的时候,弹出一个自定义界面)。效果如下图所示,在自定义 View 的区域,你可以放上个视频,放上个日历,放上个显示地理位置的 Label,总而言之,我们可以自定义 View。
7.2.1 如何新建一个 UNNotificationContentExtension
-
先在 Xcode 打开你的工程,File –> New –> Targe 然后添加这个 Notification Content:
-
这样你在工程里同样看到下面的目录
-
点开 NotificationViewController.m 会看到 2 个方法:
- (void)viewDidLoad; - (void)didReceiveNotification:(UNNotification *)notification;- 前者渲染 UI,后者获取通知信息,更新 UI 控件中的数据。
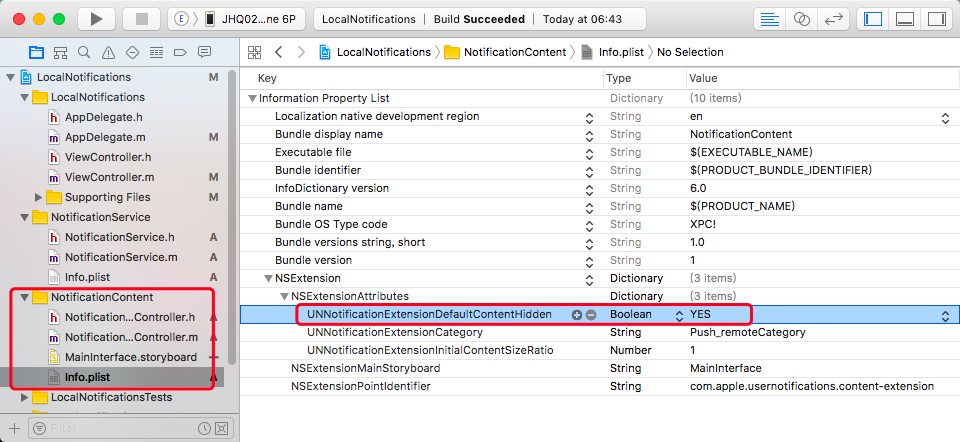
7.2.2 Info.plist 文件
-
在这个 NSExtensionAttributes 的字典下面,我们有三个属性可以添加
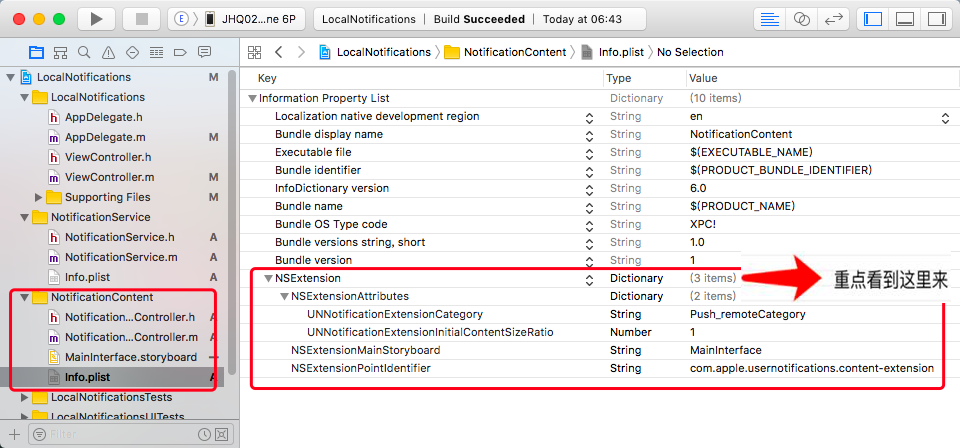
-
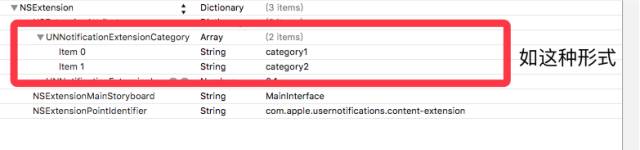
1、UNNotificationExtensionCategory 必须要有,系统已经创建好
解释:对应这个 key 的值,可以是一个字符串,也可以是一个数组,每一个字符串都是一个 identifier,这个 identifier 对应着每一个 UNMutableNotificationContent 的 categoryIdentifier 的属性。
简单来说,就是在收到通知的时候,我们可以让服务器把这个通知的 categoryIdentifier 带上,作用是,我们可以根据视频,音乐,图片,来分别自定义我们的通知内容。不同的分类标识符,也会在我们讲到 UNNotificationAction 的时候,帮助我们区分是什么类型的通知,方便我们对不同类型的通知做出不同的操作行为。上面的截图中,我是一个字符串的形式。下图为数组形式:
-
使用的时候,我们参照如下代码:
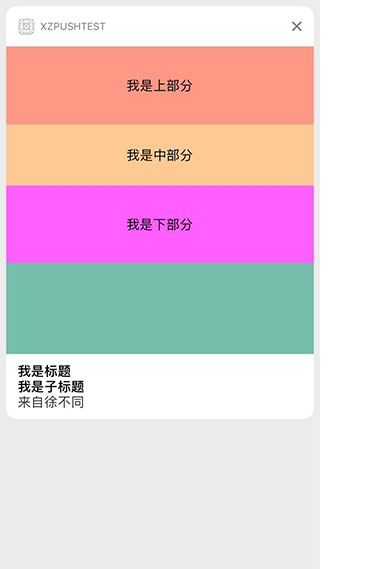
// 这个方法是 UNNotificationServiceExtension 类里面的方法。 - (void)didReceiveNotificationRequest:(UNNotificationRequest *)request withContentHandler:(void (^)(UNNotificationContent * _Nonnull))contentHandler { self.contentHandler = contentHandler; // copy 发来的通知,开始做一些处理 self.bestAttemptContent = [request.content mutableCopy]; // Modify the notification content here... self.bestAttemptContent.title = [NSString stringWithFormat:@"%@ [modified]", self.bestAttemptContent.title]; // 重写一些东西 self.bestAttemptContent.title = @"我是标题"; self.bestAttemptContent.subtitle = @"我是子标题"; self.bestAttemptContent.body = @"来自不同"; // 附件 NSDictionary *dict = self.bestAttemptContent.userInfo; NSDictionary *notiDict = dict[@"aps"]; NSString *imgUrl = [NSString stringWithFormat:@"%@",notiDict[@"imageAbsoluteString"]]; !!!!! 这里是重点!!!!!!!!!!!! // 在这里写死了 category1,其实在收到系统推送时,每一个推送内容最好带上一个 catagory,跟服务器约定好了, // 这样方便我们根据 categoryIdentifier 来自定义不同类型的视图,以及 action self.bestAttemptContent.categoryIdentifier = @"category1"; }- 这里设置 categoryIdentifier,最好让服务器的推送内容带上这个,然后我们好更加的定制化,不建议本地写死。
-
2、UNNotificationExtensionInitialContentSizeRatio 必须要有,系统已经创建好
解释:这个值的类型是一个浮点类型,代表的是高度与宽度的比值。系统会使用这个比值,作为初始化 view 的大小。举个简单的例子来说,如果该值为 1,则该视图为正方形。如果为 0.5,则代表高度是宽度的一半。
注意这个值只是初始化的一个值,在这个扩展添加后,可以重写 frame,展示的时候,在我们还没打开这个视图预览时,背景是个类似图片占位的灰色,那个灰色的高度宽度之比,就是通过这个值来设定。
-
3、UNNotificationExtensionDefaultContentHidden 可选
- 解释:这个值是一个 BOOL 值,当为 YES 时,会隐藏上方原本推送的内容视图,只会显示我们自定义的视图。(因为在自定义视图的时候,我们可以取得推送内容,然后按照我们想要的布局,展示出来)如果为 NO 时(默认为 NO),推送视图就会既有我们的自定义视图,也会有系统原本的推送内容视图(这里附件是不会显示的,只会显示 body 里面的文字)。
4、至于 NSExtensionMainStoryboard 以及 NSExtensionPointIdentifier,系统默认生成,大家直接用就好,如果需要更改的,只能更改使用的 storyboard 的名字。
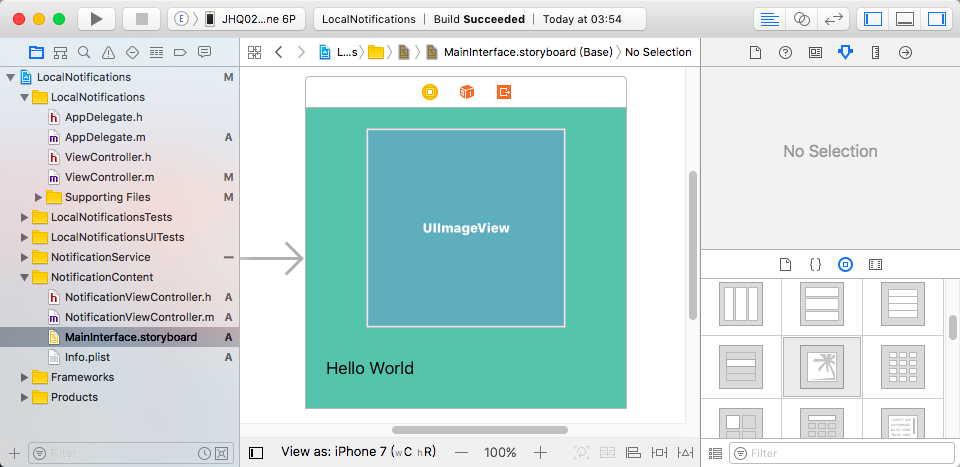
7.2.3 MainInterface.storyboard 文件
- 这个就是个简单的 storyboard 文件,内部有一个 View,这个 View 就是在上面的图层中的自定义 View 视图了。它与 NotificationViewController 所绑定。
7.2.4 NotificationViewController 文件
这是是系统帮我们默认创建了一个控制器,继承 UIViewController,其实就是一个控制器啦。
-
遵守 UNNotificationContentExtension 的协议,我们需要用到一下的方法
// 这个方法是说,只要你收到通知,并且保证 categoryIdentifier 的设置,跟 info.plist 里面设置的一样,你就会调用这个方法。 // 注意:一个会话的多个通知,每个通知收到时,都可以调用这个方法。 - (void)didReceiveNotification:(UNNotification *)notification;-
使用如下
- (void)didReceiveNotification:(UNNotification *)notification { // 这个方法,可以给自己的控件赋值,调整 frame 等等,在这里打印出来了通知的内容。 NSDictionary *dict = notification.request.content.userInfo; // 这里可以把打印的所有东西拿出来 NSLog(@"%@",dict); /**************************** 打印的信息是 ************ aps = { alert = "This is some fancy message."; badge = 1; from = "大家好"; imageAbsoluteString = "http://upload.univs.cn/2012/0104/1325645511371.jpg"; "mutable-content" = 1; sound = default; }; } *******************************************/ } -
说到这里,简单的 UNNotificationContentExtension 已经说完了。在 UNNotificationContentExtension.h 中,有着这么一个枚举
typedef NS_ENUM(NSUInteger, UNNotificationContentExtensionMediaPlayPauseButtonType) { // 没有播放按钮 UNNotificationContentExtensionMediaPlayPauseButtonTypeNone, // 有播放按钮,点击播放之后,按钮依旧存在,类似音乐播放的开关 UNNotificationContentExtensionMediaPlayPauseButtonTypeDefault, // 有播放按钮,点击后,播放按钮消失,再次点击暂停播放后,按钮恢复 UNNotificationContentExtensionMediaPlayPauseButtonTypeOverlay, } -
看到这么枚举,大家一定纳闷怎么使用啊。请看下面的几个属性
// 设置播放按钮的属性 @property (nonatomic, readonly, assign) UNNotificationContentExtensionMediaPlayPauseButtonType mediaPlayPauseButtonType; // 设置播放按钮的frame @property (nonatomic, readonly, assign) CGRect mediaPlayPauseButtonFrame; // 设置播放按钮的颜色 @property (nonatomic, readonly, copy) UIColor *mediaPlayPauseButtonTintColor; // 开始跟暂停播放 - (void)mediaPlay; - (void)mediaPause; -
还有以下的类,这个类虽然也有开始播放跟结束播放的方法,不过要注意,这个是属于 NSExtensionContext 的,而上面我们讲的方法是 UNNotificationContentExtension 协议方法里的。大家要注意。
    @interface NSExtensionContext (UNNotificationContentExtension)

    // 控制播放
    - (void)mediaPlayingStarted

    // 控制暂停
    - (void)mediaPlayingPaused
    @end
看到这些属性,想要知道如何使用,请看下面的步骤:
- 分析:首先这些属性都是 readonly 的,所以直接用 self.属性去修改肯定是报错的,所以我们能用的就只有 get 方法了。
-
其次:根据 button 的类型,我们可以联想到,如果 button 没有,这个播放开始暂停的方法也没用了。如果有 button,自然我们就有了播放的操作,联想别的 UI 空间,我们得出了一定要重写它的 frame,来确定他的位置。设置颜色,来设置它的显示颜色。设置 button 的类型,让他显示出来。
    // 返回默认样式的 button
    - (UNNotificationContentExtensionMediaPlayPauseButtonType)mediaPlayPauseButtonType {
        return UNNotificationContentExtensionMediaPlayPauseButtonTypeDefault;
    }

    // 返回 button 的 frame
    - (CGRect)mediaPlayPauseButtonFrame {
        return CGRectMake(100, 100, 100, 100);
    }

    // 返回 button 的颜色
    - (UIColor *)mediaPlayPauseButtonTintColor {
        return [UIColor blueColor];
    }
-
-
通过上面的代码,我们的 button 已经可以显示出来了。如下图(请忽略下面的策略等按钮)
-
具体位置,大家可以通过重写 frame 来确定 button 的位置。当我们点击这个蓝色 button 的时候,便可以执行一些播放暂停操作了,如下
- (void)mediaPlay{ NSLog(@"mediaPlay, 开始播放"); } - (void)mediaPause{ NSLog(@"mediaPause,暂停播放"); } -
说道这里,还少说一个地方,那就是 NSExtensionContext 类的播放暂停事件我们需要什么时候调用呢?可以这么使用,如下
- (void)mediaPlay{ NSLog(@"mediaPlay, 开始播放"); // 点击播放按钮后,4s 后暂停播放 dispatch_after(dispatch_time(DISPATCH_TIME_NOW, (int64_t)(4.0 * NSEC_PER_SEC)), dispatch_get_main_queue(), ^{ [self.extensionContext mediaPlayingPaused]; }); } - (void)mediaPause{ NSLog(@"mediaPause,暂停播放"); // 点击暂停按钮,10s后开始播放 dispatch_after(dispatch_time(DISPATCH_TIME_NOW, (int64_t)(10.0 * NSEC_PER_SEC)), dispatch_get_main_queue(), ^{ [self.extensionContext mediaPlayingStarted]; }); } -
这里需要说几个注意点
- 1 在这个控制器中,我们可以直接电泳
self.extensionContext,来调用它的播放暂停方法。 - 2 调用这个播放暂停方法,并不会重新调用
- (void)mediaPlay{}或者- (void)mediaPause{},只能单纯的调用。
- (void)mediaPlayingStarted { NSLog(@"主动调用开始的方法"); } - (void)mediaPlayingPaused { NSLog(@"主动调用暂停的方法"); } - 1 在这个控制器中,我们可以直接电泳
-
参考资料:
8、友盟 推送 集成
U-Push 基于友盟统计的精准推送方案。帮助开发者建立与用户直接沟通的渠道,将 APP 的内容更新或者活动通知主动推送给终端用户,让用户第一时间获取到相关信息,有效提升用户活跃度和忠诚度。
U-Push 集成文档
U-Push iOS 证书配置指南
U-Push API 说明
U-Push SDK 下载