前言
Docker 是一个开源的应用容器引擎,让开发者可以打包他们的应用以及依赖包到一个可移植的容器中,然后发布到任何流行的Linux机器上,也可以实现虚拟化,容器是完全使用沙箱机制,相互之间不会有任何接口。
Docker采用 C/S架构 Docker daemon 作为服务端接受来自客户的请求,并处理这些请求(创建、运行、分发容器)。 客户端和服务端既可以运行在一个机器上,也可通过 socket 或者RESTful API 来进行通信。
Docker daemon 一般在宿主主机后台运行,等待接收来自客户端的消息。 Docker 客户端则为用户提供一系列可执行命令,用户用这些命令实现跟 Docker daemon 交互。
安装
前提条件 Docker 要求 Ubuntu 系统的内核版本高于 3.10 ,查看本页面的前提条件来验证你的 Ubuntu 版本是否支持 Docker。
通过 uname -r 命令查看你当前的内核版本
# uname -r
4.4.0-93-generic
使用脚本安装 Docker
1、获取最新版本的 Docker 安装包
# wget -qO- https://get.docker.com/ | sh
# Executing docker install script, commit: 11aa13e
+ sh -c apt-get update -qq >/dev/null
+ sh -c apt-get install -y -qq apt-transport-https ca-certificates curl software-properties-common >/dev/null
+ sh -c curl -fsSL "https://download.docker.com/linux/ubuntu/gpg" | apt-key add -qq - >/dev/null
+ sh -c echo "deb [arch=amd64] https://download.docker.com/linux/ubuntu trusty edge" > /etc/apt/sources.list.d/docker.list
+ [ ubuntu = debian ]
+ sh -c apt-get update -qq >/dev/null
+ sh -c apt-get install -y -qq --no-install-recommends docker-ce >/dev/null
+ sh -c docker version
Client:
 Version:      17.11.0-ce
 API version:  1.34
 Go version:   go1.8.3
 Git commit:   1caf76c
 Built:        Mon Nov 20 18:36:37 2017
 OS/Arch:      linux/amd64

Server:
 Version:      17.11.0-ce
 API version:  1.34 (minimum version 1.12)
 Go version:   go1.8.3
 Git commit:   1caf76c
 Built:        Mon Nov 20 18:35:10 2017
 OS/Arch:      linux/amd64
 Experimental: false
If you would like to use Docker as a non-root user, you should now consider
adding your user to the "docker" group with something like:

  sudo usermod -aG docker your-user

Remember that you will have to log out and back in for this to take effect!

WARNING: Adding a user to the "docker" group will grant the ability to run
         containers which can be used to obtain root privileges on the
         docker host.
         Refer to https://docs.docker.com/engine/security/security/#docker-daemon-attack-surface
         for more information.
安装完成后有个提示:
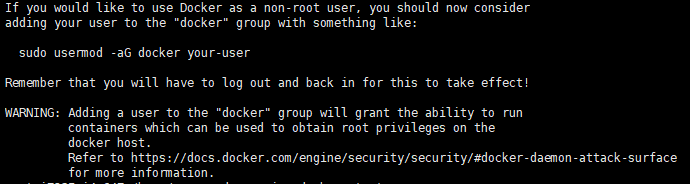
当要以非root用户可以直接运行docker时,需要执行 sudo usermod -aG docker runoob 命令,然后重新登陆,否则会报错
2、启动docker 后台服务
sudo service docker start
start: Job is already running: docker
3、用Hello World校验Docker的安装
用Docker运行Hello World镜像,命令如下:
# docker run hello-world
Unable to find image 'hello-world:latest' locally
latest: Pulling from library/hello-world
ca4f61b1923c: Pull complete
Digest: sha256:be0cd392e45be79ffeffa6b05338b98ebb16c87b255f48e297ec7f98e123905c
Status: Downloaded newer image for hello-world:latest

Hello from Docker!
This message shows that your installation appears to be working correctly.

To generate this message, Docker took the following steps:
 1. The Docker client contacted the Docker daemon.
 2. The Docker daemon pulled the "hello-world" image from the Docker Hub.
    (amd64)
 3. The Docker daemon created a new container from that image which runs the
    executable that produces the output you are currently reading.
 4. The Docker daemon streamed that output to the Docker client, which sent it
    to your terminal.

To try something more ambitious, you can run an Ubuntu container with:
 $ docker run -it ubuntu bash

Share images, automate workflows, and more with a free Docker ID:
 https://cloud.docker.com/

For more examples and ideas, visit:
 https://docs.docker.com/engine/userguide/
可见,Docker注册服务器从Docker Hub获取到最新的Hello World镜像,下载到了本地。可以再次运行Hello World镜像。
# docker run hello-world

Hello from Docker!
This message shows that your installation appears to be working correctly.

To generate this message, Docker took the following steps:
 1. The Docker client contacted the Docker daemon.
 2. The Docker daemon pulled the "hello-world" image from the Docker Hub.
    (amd64)
 3. The Docker daemon created a new container from that image which runs the
    executable that produces the output you are currently reading.
 4. The Docker daemon streamed that output to the Docker client, which sent it
    to your terminal.

To try something more ambitious, you can run an Ubuntu container with:
 $ docker run -it ubuntu bash

Share images, automate workflows, and more with a free Docker ID:
 https://cloud.docker.com/

For more examples and ideas, visit:
 https://docs.docker.com/engine/userguide/
二、使用
1、Docker Hello World
Docker 允许你在容器内运行应用程序, 使用 docker run 命令来在容器内运行一个应用程序
root@aliyunTinywan:~# docker run ubuntu:15.10 /bin/echo "Hello world"
Unable to find image 'ubuntu:15.10' locally
15.10: Pulling from library/ubuntu
7dcf5a444392: Pull complete
759aa75f3cee: Pull complete
3fa871dc8a2b: Pull complete
224c42ae46e7: Pull complete
Digest: sha256:02521a2d079595241c6793b2044f02eecf294034f31d6e235ac4b2b54ffc41f3
Status: Downloaded newer image for ubuntu:15.10
Hello world
Docker首先从本地主机上查找镜像是否存在,如果不存在,Docker 就会从镜像仓库 Docker Hub 下载公共镜像。这里发现镜像ubuntu:15.10 不存在,正在从镜像仓库下载
参数解析:
-
docker: Docker 的二进制执行文件。
-
run:与前面的 docker 组合来运行一个容器。
-
ubuntu:15.10:指定要运行的镜像,Docker首先从本地主机上查找镜像是否存在,如果不存在,Docker 就会从镜像仓库 Docker Hub 下载公共镜像。
-
/bin/echo "Hello world": 在启动的容器里执行的命令
root@aliyunTinywan:~# docker run ubuntu:15.10 /bin/echo "Hello world"
Hello world
以上命令完整的意思可以解释为:Docker 以 ubuntu15.10 镜像创建一个新容器,然后在容器里执行 bin/echo "Hello world",然后输出结果。
2、运行交互式的容器
通过docker的两个参数 -i -t,让docker运行的容器实现"对话"的能力
root@aliyunTinywan:~# docker run -i -t ubuntu:15.10 /bin/bash
root@aliyunTinywan:/#
参数解析:
-
-t:在新容器内指定一个伪终端或终端。
-
-i:允许你对容器内的标准输入 (STDIN) 进行交互。
此时我们已进入一个 ubuntu15.10系统的容器,尝试在容器中运行命令 cat /proc/version 和 ls 分别查看当前系统的版本信息和当前目录下的文件列表
root@aliyunTinywan:/# cat /proc/version
Linux version 4.4.0-93-generic (buildd@lcy01-28) (gcc version 4.8.4 (Ubuntu 4.8.4-2ubuntu1~14.04.3) ) #116~14.04.1-Ubuntu SMP Mon Aug 14 16:07:05 UTC 2017
root@aliyunTinywan:/# cat /etc/issue
Ubuntu 15.10 \n \l
root@aliyunTinywan:/# ls
bin  boot  dev  etc  home  lib  lib64  media  mnt  opt  proc  root  run  sbin  srv  sys  tmp  usr  var
可以通过运行exit命令或者使用CTRL+D来退出容器,查看当前真实的服务器系统版本
root@18c5f2d5476b:/# exit
exit
root@iZ235mi4a64Z:~# cat /etc/issue
Ubuntu 14.04.5 LTS \n \l
3、启动容器(后台模式)
使用以下命令创建一个以进程方式运行的容器
root@iZ235mi4a64Z:~# docker run -d ubuntu:15.10 /bin/sh -c "while true; do echo hello world; sleep 1; done"
6ddd469230b5402251c4fd3214b63f6a6af7d9e2711f8944a9d74b36346bbd5a
在输出中,我们没有看到期望的"hello world",而是一串长字符 2b1b7a428627c51ab8810d541d759f072b4fc75487eed05812646b8534a2fe63 这个长字符串叫做容器ID,对每个容器来说都是唯一的,我们可以通过容器ID来查看对应的容器发生了什么。
首先,我们需要确认容器有在运行,可以通过 docker ps 来查看
root@iZ235mi4a64Z:~# docker ps
CONTAINER ID        IMAGE               COMMAND                  CREATED              STATUS              PORTS               NAMES
6ddd469230b5        ubuntu:15.10        "/bin/sh -c 'while t…"   About a minute ago   Up About a minute                       romantic_visvesvaraya
CONTAINER ID:容器ID
NAMES:自动分配的容器名称
在容器内使用docker logs命令,查看容器内的标准输出
(1)使用ID
root@iZ235mi4a64Z:~# docker logs 6ddd469230b5
hello world
hello world
hello world
...
(2)使用NAMES
root@iZ235mi4a64Z:~# docker logs romantic_visvesvaraya
hello world
hello world
...
发现结果是一样的,输出了同样的结果
4、停止容器
使用 docker stop 命令来停止容器,让然啦,要指定停止的容器对象啦,不然会这样子
root@iZ235mi4a64Z:~# docker stop
"docker stop" requires at least 1 argument.
See 'docker stop --help'.

Usage:  docker stop [OPTIONS] CONTAINER [CONTAINER...] [flags]

Stop one or more running containers
指定一个容器
root@iZ235mi4a64Z:~# docker stop 6ddd469230b5
6ddd469230b5
通过 docker ps 查看,容器已经停止工作
root@iZ235mi4a64Z:~# docker ps
CONTAINER ID        IMAGE               COMMAND             CREATED             STATUS              PORTS               NAMES
也可以用下面的NAMES命令来停止
docker stop romantic_visvesvaraya