接着上一篇Views的笔记
在视图里导入命名空间(Importing Namespaces into a View)
Razor视图通过一套常用的命名空间编译,这为我们省去了在使用常用类时指定必要的命名空间的麻烦。如果需要使用我们自己定义的类就必须引入命名空间或者是使用类的完整名称(包含了命名空间),如下所示:

 View Code
@{
    ViewBag.Title = "Index";
}

Here is some data: @DynamicData.Infrastructure.MyUtility.GetUsefulData()
上面的例子使用了MyUtility类,里面有一个GetUsefulData方法。MyUtility.cs如下所示:
View Code
namespace Views.Infrastructure
{
public static class MyUtility
    {
public static string GetUsefulData()
        {
return "This is some useful data";
        }
    }
}
上面是使用的完整类名,也可以使用@using引入命名空间,如下所示:
View Code
@using Views.Infrastructure;
@{
    ViewBag.Title = "Index";
}
Here is some data:@MyUtility.GetUsefulData()
当视图被编译时,我们指定的命名空间会通过using语句导入,这样我们就可以在视图里面直接引用类名。
在Web.config里面添加命名空间
上面在视图里导入命名空间后,我们也只能在当前的视图里面使用该命名空间下的类,如果我们想只写一次导入命名空间的using语句并能够在当前项目里所有的视图里面使用,可以采取在Web.config里添加的方式,如下所示:
View Code
  <system.web.webPages.razor>
    <host factoryType="System.Web.Mvc.MvcWebRazorHostFactory, System.Web.Mvc, Version=3.0.0.0, Culture=neutral, PublicKeyToken=31BF3856AD364E35" />
    <pages pageBaseType="System.Web.Mvc.WebViewPage">
      <namespaces>
        <add namespace="System.Web.Mvc" />
        <add namespace="System.Web.Mvc.Ajax" />
        <add namespace="System.Web.Mvc.Html" />
        <add namespace="System.Web.Routing" />
        <add namespace="Views.Infrastructure"/><!--自定义的命名空间-->
      </namespaces>
    </pages>
  </system.web.webPages.razor>
注意这里的Web.config是在Views文件夹里面的,不是根目录下的Web.config。
理解Razor HTML字符串编码
XSS(跨站点脚本)是攻击网站的一种方式,Razor会帮助我们将来自@标签的输出进行编码,从而防止XSS攻击。这也意味着在HTML里面具有特殊意义的符号会被等同的编码替换。例如"<"会被替换为lt;为了举例说明,现在将MyUtility进行修改:
View Code
namespace Views.Infrastructure
{
public static class MyUtility
    {
public static string GetUsefulData()
        {
return "<form>Enter your password:<input type=text><input type=submit value=\"Log In\"/></form>";
        }
    }
}
上面只是一个简单的例子,真正的攻击非常巧妙而且不会改变页面。可以运行程序显示如下:

默认情况是会对输出进行编码,如果我们不想编码输出,可以返回一个MvcHtmlString的实例,如下:
View Code
namespace Views.Infrastructure
{
public static class MyUtility
    {
public static MvcHtmlString GetUsefulData()
        {
return new MvcHtmlString("<form>Enter your password:<input type=text><input type=submit value=\"Log In\"/></form>");
        }
    }
}
运行程序可以看到效果。
使用动态类型视图(Using Dynamically Typed Views)
当创建一个强类型的视图时,创建的类是从System.Web.Mvc.WebViewPage<T>派生的,T就是视图模型类的类型。例如:
@model string
@{
    ViewBag.Title = "Index";
}
...
//编译为如下的类
public class _Page_Views_Home_Index_cshtml : System.Web.Mvc.WebViewPage<string> {...}
如果我们没有指定具体的类型,那就创建了一个动态类型的视图,也就是T是dynamic类型的。我们仍然能够传递视图模型对象给View,但却是被当作动态类型的,这意味着处理该视图模型对象类似处理ViewBag了,在动态类型视图里面,同样能够调用视图模型对象的任何成员,只不过要到运行时才会被检查。使用动态类型的好处是可以传递不同的视图模型类型(View Model Types)到视图。缺点是如果我们传递一个不属于该对象的成员时,当调用该视图就会会抛异常,但在编译的时候是发现不了这个错误的。这里不推荐随便使用动态类型。
使用HTML辅助方法(Using HTML Helpers)
MVC框架里面提供了一序列的HTML辅助方法来帮助我们生成HTML标签,从而提高我们的开发效率。
创建内嵌的HTML辅助方法
这是最直接的使用方式,如下:
View Code
//HomeController代码
    public class HomeController : Controller
    {
        public ActionResult Index()
        {
            string message = "Hello World";
            return View((object)message);
        }

        public ViewResult Calculate()
        {
            ViewBag.X = 10;
            ViewBag.Y = 20;
            return View();
        }

        public ActionResult InlineHelper()
        {
            ViewBag.Days = new[] { "Monday", "Tuesday", "Wednesday", "etc" };
            ViewBag.Fruites = new[] { "Apples", "Mango", "Banana" };
            return View();
        }
    }
//添加对应的视图,如下
@{
    ViewBag.Title = "InlineHelper";
}
@helper CreateList(string[] items)
    {
    <ul>
        @foreach (string item in items)
        {
            <li>@item</li>
        }
    </ul>
}
<h4>
    InlineHelper</h4>
Days of week:<p />
@CreateList(ViewBag.Days)
<p />
Fruite I like:<p />
@CreateList(ViewBag.Fruites)
内嵌的helpers有方法名和参数,这类似于通常的C#方法。在上面的例子中,我们定义了一个CreateList的helper。
创建一个扩展的helper方法(Creating an External Helper Method)
内嵌helper方法非常方便,但是只能在当前的视图里面使用,如果想在其他的视图里面也使用的话,可以创建一个扩展的HTML helper方法,如下:
View Code
using System.Web.Mvc;

namespace Views.Infrastructure.HtmlHelpers
{
    public static class CustomHtmlHelpers
    {
        public static MvcHtmlString List(this HtmlHelper html, string[] listItems)
        {
            TagBuilder tag = new TagBuilder("ul");
            foreach (string item in listItems)
            {
                TagBuilder itemTag = new TagBuilder("li");
                itemTag.SetInnerText(item);
                tag.InnerHtml += itemTag.ToString();
            }
            return new MvcHtmlString(tag.ToString());
        }
    }
}
第一个参数是扩展的HTML helper方法,是HtmlHelper对象。
在一个Helper方法里面创建HTML标签的最简单的方式就是使用TagBuilder类,它让我们不需要处理特别的字符就能够很方便的创建HTML。
TagBuilder类是System.Web.WebPages程序集的一部分,但是使用了CLR的一个功能: type forwarding(暂且称为类型转递吧,如果你有更好的解释,记得留言给我,谢谢),这个功能让我们能够将程序集的某一个类型指向其他的程序集,而不用重新编译就可以在其他的程序集里面使用原来程序集的类型。所以这里也是作为System.Web.Mvc程序集的一部分,因为TagBuilder从System.Web.WebPages通过类型转递指向了System.Web.Mvc,这也是为什么这里只需要引用System.Web.Mvc这个命名空间就行了。
下面是关于TagBuilder类的一些属性:
InnerHtml:设置HTML元素的内容,是不会被编码的。
SetInnerText(string):设置HTML元素的文本内容,这里的string是被编码过的。
AddCssClass(string):添加css样式
MergeAttribute(string,string,bool):添加特性,第一个参数是属性的名字,第二个是值,bool类型表示是否替换已经存在的同名属性。
HTML Helper方法的结果是一个MvcHtmlString对象,该对象包含的内容直接写到了对客户端的响应流里面,记住:MvcHtmlString的内容是没有经过编码就直接传递给了Response,这也就意味着我们必须自己编码可能导致XSS攻击的数据。这里可以采取TagBuilder.SetInnerText方法,它会对字符串进行编码,或者是显示使用HtmlHelper对象的Encode方法进行编码。
接着在HomeController里面添加一个action方法,并添加对应的视图,如下:
View Code
//HomeController
public ActionResult ExternalHelper()
{
      ViewBag.Days = new[] { "Monday", "Tuesday", "Wednesday", "etc" };
      ViewBag.Fruits = new[] { "Apples", "Mango", "Banana" };
      return View();
}

//对应的View
@using Views.Infrastructure.HtmlHelpers;
@{
    ViewBag.Title = "ExternalHelper";
}
<h2>
    ExternalHelper</h2>
Day of the week:<p />
@Html.List((string[])ViewBag.Days)
<p />
Fruite I like:<p />
@Html.List((string[])ViewBag.Fruits)
@Html.List(new string[] { "<form>Enter your password:<input type=text><input type=submit value=\"Log In\"/></form>" })
使用内置的HTML Helper方法(Using the Built-in HTML Helpers)
MVC框架包含了一些经过挑选的HTML helper方法,这些方法可以帮助创建HTML片段或执行通常的任务。
创建表单
两个非常有用的方法就是 Html.BeginForm和Html.EndForm,它们帮助创建表单标签并生成一个基于路由机制的action的属性。如:@{Html.BeginForm("Index","Home");} @{Html.EndForm();},这些helper方法需要在Razor代码块里面被调用,这会使得代码看起不雅。一个更加优雅的方式是使用using语句,如:@using (Html.BeginForm("Index", "Home")) {...}
这种方式非常巧妙,因为BeginForm方法创建了一个MvcForm类的实例,这个类实现了IDisposable接口。这意味着当程序跳出using语句块时,.NET框架会对MvcForm对象调用Dispose方法,并输出closing Form标签。BeginForm有很多重载的版本,不同的表单允许我们指定怎样创建HTML表单元素的action属性。
创建表单与回发到同一URL:BeginForm默认的重载版本是不带参数的并生成一个指向当前action的URL,也就是这个action来处理当前的回发请求。这是MVC程序里面常见的模式,Get和Post请求使用同一个URL来处理。Get请求展示HTML表单,Post请求验证并处理提交过来的数据。如下:
View Code
public class SomeController : Controller
{
   public ViewResult MyAction() {
       /* 展示表单*/
   }

   [HttpPost]
   public ActionResult MyAction(MyModel incomingData) {
       /* 处理Post请求 */
   }
}
使用Input Helpers(Using Input Helpers)
当HTML表单里添加了Input元素后,表单才有意义。下面是一些基本的HTML Helpers用来创建Input元素,如下:
View Code
Html.CheckBox("myCheckbox", false)
输出:
<input id="myCheckbox" name="myCheckbox" type="checkbox" value="true" />
<input name="myCheckbox" type="hidden" value="false" />

Html.Hidden("myHidden", "val")
输出:
<input id="myHidden" name="myHidden" type="hidden" value="val" />

Html.RadioButton("myRadiobutton", "val", true)
输出:
<input checked="checked" id="myRadiobutton" name="myRadiobutton"
type="radio" value="val" />

Html.Password("myPassword", "val")
输出:  <input id="myPassword" name="myPassword" type="password" value="val" />

Html.TextArea("myTextarea", "val", 5, 20, null)
输出:
<textarea cols="20" id="myTextarea" name="myTextarea" rows="5"> val</textarea>

Html.TextBox("myTextbox", "val")
输出:
<input id="myTextbox" name="myTextbox" type="text" value="val" />
注:checkbox方法呈现了两个input元素,一个是checkbox,一个是hidden元素,它们的name相同。有两个input元素的原因是浏览器不会提交没有被选中的checkbox的值。使用一个hidden控件确保在这种请求发生时MVC框架也能够获取hidden的值。
如果我们想指定一个值,可以使用标准的Razor句法,像这样:@Html.CheckBox("myCheckBox", Model),一个更加有趣的重载版本是只获取一个参数,这个参数被用来搜索视图数据,ViewBag以及视图模型。举个例子:如果调用@Html.TextBox("DataValue"),MVC框架视图寻找跟该键值DataValue一致的数据项,搜索的路径如下:
• ViewBag.DataValue • ViewData["DataValue"] • @Model.DataValue
第一个被搜到的值被用来设置创建的HTML元素的value属性值,如果我们指定一个像DataValue.First.Name,那搜索会变得更加复杂,会检查如下的值是否移植:
View Code
•  ViewBag.DataValue.First.Name
•  ViewBag.DataValue["First"].Name
•  ViewBag.DataValue["First.Name"]
•  ViewBag.DataValue["First"]["Name"]
•  ViewData["DataValue.First.Name"]
•  ViewData["DataValue"].First.Name
•  ViewData["DataValue.First"].Name
如上所示,有很的排列的,一旦第一个值找到,搜索就会终止。这里我们或许会担心程序的性能,记住一点通常情况下,只有非常少的项在ViewBag或ViewData里面,所以搜索并不会花费很长时间。input helper方法会自动编码数据防止XSS。
使用强类型的Input Helper方法(Using Strongly Typed Input Helpers)
针对上面每一个基本input方法都有一个对应的强类型的Helper方法。如下所示:
View Code
Html.CheckBoxFor(x => x.IsApproved)
输出:
<input id="IsApproved" name="IsApproved" type="checkbox" value="true" />
<input name="IsApproved" type="hidden" value="false" />

Html.HiddenFor(x => x.SomeProperty)
输出:<input id="SomeProperty" name="SomeProperty" type="hidden" value="value" />

Html.RadioButtonFor(x => x.IsApproved, "val")
输出:<input id="IsApproved" name="IsApproved" type="radio" value="val" />

Html.PasswordFor(x => x.Password)
输出:<input id="Password" name="Password" type="password" />

Html.TextAreaFor(x => x.Bio, 5, 20, new{})
输出:<textarea cols="20" id="Bio" name="Bio" rows="5">
Bio value</textarea>

Html.TextBoxFor(x => x.Name)
输出:<input id="Name" name="Name" type="text" value="Name value" />
这里会用到Lambda表达式,传递给表达式的值是视图模型对象,并且能够查询到用来设置value值的字段或属性。
添加Attributes到HTML:大多数helper方法具有一个让我们可以添加任意的属性到以创建的HTML元素,我们可以使用动态类型来表述属性及其关联的值,像这样:
@Html.TextBox("MyTextBox", "MyValue",new { @class = "my-ccs-class", mycustomattribute = "my-value" })
创建Select元素(Creating Select Elements)
下面展示了可以用来创建Select元素的HTML helper方法:
View Code
Html.DropDownList("myList", new SelectList(new [] {"A", "B"}), "Choose")
输出:
<select id="myList" name="myList">
<option value="">Choose</option>
<option>A</option>
<option>B</option>
</select>

Html.DropDownListFor(x => x.Gender, new SelectList(new [] {"M", "F"}))
输出:
<select id="Gender" name="Gender">
<option>M</option>
<option>F</option>
</select>

Html.ListBox("myList", new MultiSelectList(new [] {"A", "B"}))
输出:
<select id="myList" multiple="multiple" name="myList">
<option>A</option>
<option>B</option>
</select>

Html.ListBoxFor(x => x.Vals, new MultiSelectList(new [] {"A", "B"}))
输出:
<select id="Vals" multiple="multiple" name="Vals">
<option>A</option>
<option>B</option>
</select>
Select helper方法获取SelectList或MultiSelectList参数,这两个参数不同的是MultiSelectList具有让我们能够指定一个或多个被选中项的构造器。这两个类都是操作对象的枚举序列。假设有这样一个类Region:public class Region{public int RegionID{get;set;} public string RegionName{get;set;}},action方法在视图放置了一个SelectList对象,如下:
View Code
List<Region> regionsData = new List<Region> {
    new Region { RegionID = 7, RegionName = "Northern" },
    new Region { RegionID = 3, RegionName = "Central" },
    new Region { RegionID = 5, RegionName = "Southern" },
};
ViewData["region"] = new SelectList(regionsData,  // 数据项
                                       "RegionID",   // 值字段
                                       "RegionName", // 文本字段
                                       3);           // 选中值
这里的 <%: Html.DropDownList("region", "Choose")  %> 将呈现如下HTML:
<select id="region" name="region">
<option value="">Choose</option>
<option value="7">Northern</option>
<option selected="selected" value="3">Central</option>
<option value="5">Southern</option>
</select>
正如我们所看到的,RegionID和RegionName的属性值使用在select元素包含的option的inner文本和value值。
创建链接和URL(Creating Links and URL)
这里介绍的HTML helper方法让我们使用路由系统的输出URL生成功能(前面的章节有介绍)呈现HTML链接和原始的URL。这些helper方法的输出依赖于我们程序的路由配置。
下面是一些有关的方法展示:
View Code
Url.Content("~/my/content.pdf")
输出:  /my/content.pdf

Html.ActionLink("Hi", "About", "Home")
输出:  <a href="/Home/About">Hi</a>

Html.ActionLink("Hi", "About", "Home", "https","www.example.com", "anchor", new{}, null)
输出:  <a href="https://www.example.com/Home/About#anchor">Hi</a>

Url.Action("About", "Home")
输出:  /Home/About

Url.RouteUrl(new { controller = "c", action = "a" })
输出:  /c/a

Html.RouteLink("Hi", new { controller = "c", action = "a" }, null)
输出:  <a href="/c/a">Hi</a>

Html.RouteLink("Hi", "myNamedRoute", new {})
输出:  <a href="/url/for/named/route">Hi</a>
使用WebGrid Helper(Using the WebGrid Helper)
该方法生成以网格形式展示数据项的HTML元素,使用了HTML table元素。下面通过示例说明:
在HomeController里面添加一个action Grid如下:
View Code
        public ActionResult Grid()
        {
            IEnumerable<Product> productList = new List<Product> {
                            new Product {Name = "Kayak", Category = "Watersports", Price = 275m},
                new Product {Name = "Lifejacket", Category = "Watersports", Price = 48.95m},
                new Product {Name = "Soccer ball", Category = "Football", Price = 19.50m},
                new Product {Name = "Corner flags", Category = "Football", Price = 34.95m},
                new Product {Name = "Stadium", Category = "Football", Price = 79500m},
                new Product {Name = "Thinking cap", Category = "Chess", Price = 16m}
            };

            ViewBag.WebGrid = new WebGrid(source: productList, rowsPerPage: 4);
            return View(productList);
        }
对应的视图代码如下:
View Code
@model IEnumerable<Views.Models.Product>
@{
    var grid = new WebGrid(source: Model, rowsPerPage: 4);
}
@grid.GetHtml(tableStyle: "grid",
headerStyle: "header",
rowStyle: "row",
footerStyle: "footer",
alternatingRowStyle: "altRow",
columns: grid.Columns(
grid.Column("Name", "Item", style: "textCol"),
grid.Column("Price", style: "numberCol",
format: @<text>$@string.Format("{0:F2}", item.Price)</text>)
))
我们在两个部分使用WebGrid helper方法,第一个部分包含在Razor代码块里面并且定义WebGrid对象。设置source参数值为视图模型(Product对象),这些是展示在grid里的项。我们将定义和使用grid分为两个步骤,定义里面另一个参数提供了rowPerPage,WebGrid支持分页。
有非常多的构造器参数来让我们指定grid的生成行为,下面是一些参数的描述:
Source:数据源(默认为null) columnNames:定义被用作列数据源的项(默认为null) rowsPerPage:指定每页多少行(默认为10) canPage:启用/禁用分页(默认true)
canSort:启用/禁用排序(默认true)
第二个部分使用WebGrid helper方法生成HTML,这里是通过调用GetHtml方法实现。传递给这个方法参数让我们可以控制HTML的呈现。
WebGrid.GetHtml方法的参数列表如下:
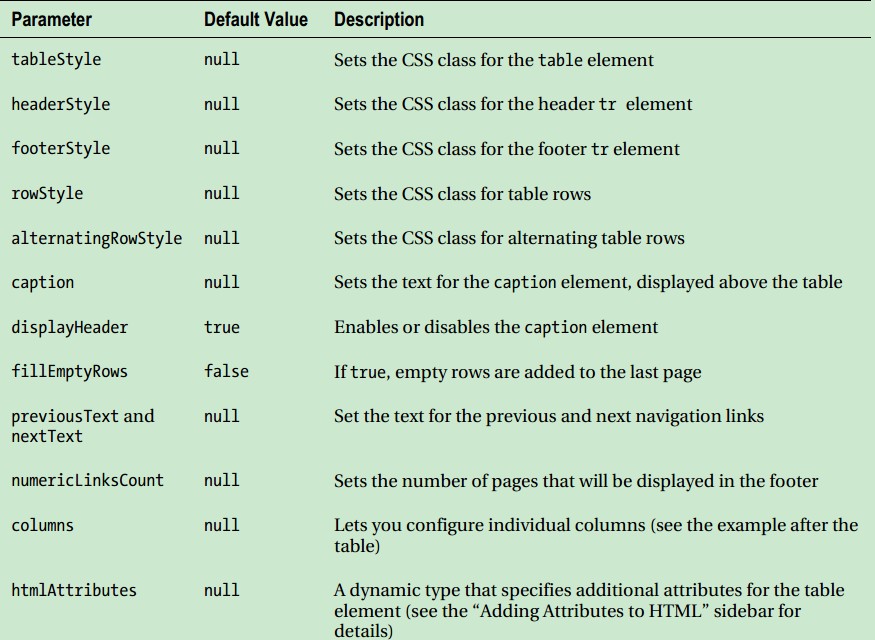
列的参数给我们提供一种配置个性化列的方式。运行下程序可以试试效果,很明显能够知道每点击一次header列,会重新加载所有数据,如果需要考虑性能这里可以使用缓存。
如果我们不喜欢在视图里面定义WebGrid helper方法,感觉这应该是在action方法里面完成的,感觉没错,我们可以在action里面定义,如:
View Code
//action方法
public ActionResult Grid()
{
    IEnumerable<Product> productList = new List<Product> {
        new Product {Name = "Kayak", Category = "Watersports", Price = 275m},
        new Product {Name = "Lifejacket", Category = "Watersports", Price = 48.95m},
        new Product {Name = "Soccer ball", Category = "Football", Price = 19.50m},
        new Product {Name = "Corner flags", Category = "Football", Price = 34.95m},
        new Product {Name = "Stadium", Category = "Football", Price = 79500m},
        new Product {Name = "Thinking cap", Category = "Chess", Price = 16m}
    };

    ViewBag.WebGrid = new WebGrid(source: productList, rowsPerPage: 4);

    return View(productList);
}
//视图只需要将第一部分换成如下所示:
@model IEnumerable<DynamicData.Models.Product>

@{ var grid = (WebGrid)ViewBag.WebGrid;}

@grid.GetHtml(
    tableStyle: "grid",
    headerStyle: "header",
    rowStyle: "row",
    footerStyle: "footer",
    alternatingRowStyle: "altRow",
    columns: grid.Columns (
        grid.Column("Name", "Item", style:"textCol"),
        grid.Column("Price", style: "numberCol",
            format: @<text>$@string.Format("{0:F2}", item.Price) </text>)
    ))
使用图表helper方法(Using the Chart Helper)
MVC里面的Chart Helper提供非常多的功能来展示图表,这里仅仅是简要介绍,详询MSDN的相关内容。添加一个action方法,如下:
View Code
        public void Chart()
        {
            IEnumerable<Product> productList = new List<Product> {
                            new Product {Name = "Kayak", Category = "Watersports", Price = 275m},
                new Product {Name = "Lifejacket", Category = "Watersports", Price = 48.95m},
                new Product {Name = "Soccer ball", Category = "Football", Price = 19.50m},
                new Product {Name = "Corner flags", Category = "Football", Price = 34.95m},
                new Product {Name = "Stadium", Category = "Football", Price = 150m},
                new Product {Name = "Thinking cap", Category = "Chess", Price = 16m}
            };
            Chart chart = new Chart(400, 200, @"<Chart BackColor=""Gray"" BackSecondaryColor=""WhiteSmoke""
                        BackGradientStyle=""DiagonalRight"" AntiAliasing=""All""
                        BorderlineDashStyle = ""Solid"" BorderlineColor = ""Gray"">
                        <BorderSkin SkinStyle = ""Emboss"" />
                        <ChartAreas>
                            <ChartArea Name=""Default"" _Template_=""All"" BackColor=""Wheat""
                                BackSecondaryColor=""White"" BorderColor=""64, 64, 64, 64""
                                BorderDashStyle=""Solid"" ShadowColor=""Transparent"">
                        </ChartArea>
                    </ChartAreas>
                </Chart>");

            chart.AddSeries(chartType: "Column", yValues: productList.Select(e => e.Price).ToArray(),
                xValue: productList.Select(e => e.Name).ToArray());
            chart.Write();
        }
里面一个非常重要的方法是Chart.Write,它会将生成的图表作为图片直接响应输出。,最简单的在web页面里面包含图表的方式就是使用部分视图。
还有一些其他的内置Helper方法如下:
Crypto(提供常用的加密散列功能) WebMail(通过SMTP发邮件) Json(处理Json数据) ServerInfo(获取关于服务器的信息) WebImage(加载及简单的处理图片)
使用片段(Using Sections)
Razor引擎支持的分片的概念,让我们能够在一个布局里面提供内容区域。Razor分片功能能够更好的控制在视图的那部分插入布局以及在放置在哪个位置。如下:
View Code
//SectionIndex视图代码
@{
    ViewBag.Title = "SectionIndex";
}
@section Header{
    @foreach (string str in new[] { "Home", "List", "Edit" })
    {
        <div style="float: left; padding: 5px;">
            @Html.ActionLink(str, str)
        </div>
    }
    <div style="clear: both">
    </div>
}
@section Body{
    <h4>
        This is the body section</h4>
}
@section Footer{
    <h4>
        This is the footer</h4>
}

//_Layout.cshtml代码
<!DOCTYPE html>
<html>
<head>
    <title>@ViewBag.Title</title>
    <link href="@Url.Content("~/Content/Site.css")" rel="stylesheet" type="text/css" />
    <script src="@Url.Content("~/Scripts/jquery-1.4.4.min.js")" type="text/javascript"></script>
</head>

<body>

    @RenderSection("Header")

    <h4>This is the layout between the header and the body</h4>

    @RenderSection("Body")

    <h4>This is the layout between the body and the footer</h4>

    @RenderSection("Footer")

    @*@RenderBody()*@

</body>
</html>
@RenderSection("Footer",false)这个重载版本表示Footer Section是可选的,当我们定义了Footer Section时则显示出来,如果没有定义也不会抛异常。
使用部分视图和强类型的部分视图
通过示例下说明:
View Code
//在Views/Shared下创建一个部分视图
@{
    Layout = null;
}

<p>This is my partial view</p>
//创建PartialDemo视图如下
@{
    ViewBag.Title = "PartialDemo";
}
<p>This is the method rendered by the action method</p>
@Html.Partial("MyPartial")
//@Html.Partial("MyStronglyTypedPartial", new [] {"Apples", //"Mangoes", "Oranges"})

//在Shared下创建一个强类型的部分视图
@model IEnumerable<string>

<p>This is my strongly-typed partial view</p>
<ul>
@foreach (string val in Model) {
<li>@val</li>
}
</ul>
注:Razor视图引擎用同样的方式寻找部分视图,这意味着我们可以指定了控制器的部分视图并且可以重载在Shared文件夹下的同名部分视图,这可能有点怪,但是一种最常用的部分视图使用方式就是在layout里面呈现内容。
使用子Action(Using Child Actions)
Child actions是在一个视图内被调用的Action方法,这可以让我们在多个页面重用控制器逻辑并包含与正在运行的主要action不相关的数据。我在SportsStore项目使用过这个技术,当时用作每个页面的导航菜单。
创建一个Child action如下:
View Code
[ChildActionOnly]
public ActionResult Time(DateTime time)
{
     return View(time);
}
//添加对应的视图
@model DateTime
@{
    Layout = null;
}
<p>
    The time is: @Model.ToShortTimeString()</p>
//在视图里面使用Child Action
@{
    ViewBag.Title = "Child Action Demonstration";
}
<p>
    This is the method rendered by the action method</p>
@Html.Action("Time", new { time = DateTime.Now })
<p>
    This is the method rendered by the action method again</p>
好了,关于是视图的笔记到这里就做完了,后面是关于Model的内容。
晚安!
