使用UICollectionView

使用UICollectionView的流程:
1. 设定一个UICollectionViewFlowLayout
2. 使用这个设定的UICollectionViewFlowLayout来初始化UICollectionView
3. 设置代理对象
4. 继承UICollectionViewCell设定重用的cell
源码:
LargeUICollectionViewFlowLayout.h + LargeUICollectionViewFlowLayout.m
#import <UIKit/UIKit.h>

@interface LargeUICollectionViewFlowLayout : UICollectionViewFlowLayout

@end
#import "LargeUICollectionViewFlowLayout.h"
@implementation LargeUICollectionViewFlowLayout
- (instancetype)init
{
self = [super init];
if (self)
{
self.itemSize = CGSizeMake(70, 70);
self.sectionInset = UIEdgeInsetsMake(0, 0, 0, 0);
self.minimumInteritemSpacing = 40.0f;
self.minimumLineSpacing = 5.0f;
}
return self;
}
@endShowCollectionViewCell.h + ShowCollectionViewCell.m
#import <UIKit/UIKit.h>

@interface ShowCollectionViewCell : UICollectionViewCell

@end
#import "ShowCollectionViewCell.h"
@implementation ShowCollectionViewCell
- (id)initWithFrame:(CGRect)frame
{
self = [super initWithFrame:frame];
if (self)
{
self.backgroundColor = [UIColor redColor];
}
return self;
}
@endRootViewController.h + RootViewController.m
#import <UIKit/UIKit.h>

@interface RootViewController : UIViewController

@end
#import "RootViewController.h"
#import "ShowCollectionViewCell.h"
#import "LargeUICollectionViewFlowLayout.h"
static NSString *identify = @"ItemIdentifier";
@interface RootViewController ()<UICollectionViewDelegate, UICollectionViewDataSource>
@property (nonatomic, strong) UICollectionView *collectionView;
@end
@implementation RootViewController
- (void)viewDidLoad
{
[super viewDidLoad];
// 初始化UICollectionView并指定一个UICollectionViewFlowLayout
self.collectionView = \
[[UICollectionView alloc] initWithFrame:self.view.bounds
collectionViewLayout:[LargeUICollectionViewFlowLayout new]];
// 给UICollectionViewCell注册重用标示(collectionView会自动给我们创建重用的cell对象)
[self.collectionView registerClass:[ShowCollectionViewCell class]
forCellWithReuseIdentifier:@"ItemIdentifier"];
// 设置代理对象
self.collectionView.delegate = self;
self.collectionView.dataSource = self;
// 将UICollectionView添加进父视图
[self.view addSubview:_collectionView];
}
-(NSInteger)collectionView:(UICollectionView *)collectionView
numberOfItemsInSection:(NSInteger)section
{
return 100;
}
-(UICollectionViewCell *)collectionView:(UICollectionView *)collectionView
cellForItemAtIndexPath:(NSIndexPath *)indexPath
{
ShowCollectionViewCell *cell = \
[collectionView dequeueReusableCellWithReuseIdentifier:@"ItemIdentifier"
forIndexPath:indexPath];
return cell;
}
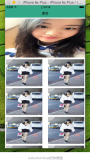
@end运行后效果如下:

很重要的参数如下所示:


在ShowCollectionViewCell.m中执行打印操作:

打印信息如下:
2014-05-19 16:52:58.873 UICollectionView[3077:60b] {{0, 0}, {70, 70}} A
2014-05-19 16:52:58.875 UICollectionView[3077:60b] {{125, 0}, {70, 70}} B
2014-05-19 16:52:58.875 UICollectionView[3077:60b] {{250, 0}, {70, 70}} C
2014-05-19 16:52:58.875 UICollectionView[3077:60b] {{0, 75}, {70, 70}} D
2014-05-19 16:52:58.876 UICollectionView[3077:60b] {{125, 75}, {70, 70}}
2014-05-19 16:52:58.876 UICollectionView[3077:60b] {{250, 75}, {70, 70}}
2014-05-19 16:52:58.876 UICollectionView[3077:60b] {{0, 150}, {70, 70}}
2014-05-19 16:52:58.877 UICollectionView[3077:60b] {{125, 150}, {70, 70}}
2014-05-19 16:52:58.877 UICollectionView[3077:60b] {{250, 150}, {70, 70}}
2014-05-19 16:52:58.877 UICollectionView[3077:60b] {{0, 225}, {70, 70}}
2014-05-19 16:52:58.878 UICollectionView[3077:60b] {{125, 225}, {70, 70}}
2014-05-19 16:52:58.878 UICollectionView[3077:60b] {{250, 225}, {70, 70}}
2014-05-19 16:52:58.878 UICollectionView[3077:60b] {{0, 300}, {70, 70}}
2014-05-19 16:52:58.879 UICollectionView[3077:60b] {{125, 300}, {70, 70}}
2014-05-19 16:52:58.879 UICollectionView[3077:60b] {{250, 300}, {70, 70}}
2014-05-19 16:52:58.879 UICollectionView[3077:60b] {{0, 375}, {70, 70}}
2014-05-19 16:52:58.880 UICollectionView[3077:60b] {{125, 375}, {70, 70}}
2014-05-19 16:52:58.901 UICollectionView[3077:60b] {{250, 375}, {70, 70}}
2014-05-19 16:52:58.901 UICollectionView[3077:60b] {{0, 450}, {70, 70}}
2014-05-19 16:52:58.902 UICollectionView[3077:60b] {{125, 450}, {70, 70}}
2014-05-19 16:52:58.902 UICollectionView[3077:60b] {{250, 450}, {70, 70}}
2014-05-19 16:52:58.902 UICollectionView[3077:60b] {{0, 525}, {70, 70}}
2014-05-19 16:52:58.903 UICollectionView[3077:60b] {{125, 525}, {70, 70}}
2014-05-19 16:52:58.903 UICollectionView[3077:60b] {{250, 525}, {70, 70}}
2014-05-19 16:53:24.995 UICollectionView[3077:60b] {{0, 600}, {70, 70}}
2014-05-19 16:53:24.996 UICollectionView[3077:60b] {{125, 600}, {70, 70}}
2014-05-19 16:53:24.996 UICollectionView[3077:60b] {{250, 600}, {70, 70}}
分析上述打印信息A,B不难发现:125 - 70 = 55 > 40,所以,minimumInteritemSpacing只是单元格间的最小间距而已.
分析A,D发现,75 - 70 = 5,与minimumLineSpacing设定一致,因为我们是垂直滚动,所以纵向方向的间距是一致的.
知道这些,我们来实现网络请求照片墙的效果.
修改LargeUICollectionViewFlowLayout中的代码如下:
self.itemSize = CGSizeMake(100, 150); // 单元格尺寸
self.sectionInset = UIEdgeInsetsMake(0, 0, 0, 0); // 单元格边缘
self.minimumInteritemSpacing = 10.0f; // 横排单元格最小间隔
self.minimumLineSpacing = 10.0f; // 单元格最小行间距
修改ShowCollectionViewCell.h + ShowCollectionViewCell.m
#import <UIKit/UIKit.h>

@interface ShowCollectionViewCell : UICollectionViewCell

@property (nonatomic, strong) UIImageView  *showImageView;

@end
#import "ShowCollectionViewCell.h"
@implementation ShowCollectionViewCell
- (id)initWithFrame:(CGRect)frame
{
self = [super initWithFrame:frame];
if (self)
{
self.backgroundColor = [UIColor whiteColor];
CGRect rect = self.bounds;
rect.origin.x += 3;
rect.origin.y += 3;
rect.size.height -= 6;
rect.size.width -= 6;
_showImageView = [[UIImageView alloc] initWithFrame:rect];
[self addSubview:_showImageView];
}
return self;
}
@endRootViewController.m
#import "RootViewController.h"
#import "ShowCollectionViewCell.h"
#import "LargeUICollectionViewFlowLayout.h"
#import "YXGCD.h"
#import "SDWebImage.h"

// 重用标示
static NSString *identify = @"ItemIdentifier";

// 数据源
#define SOURCE_DATA @"http://www.duitang.com/album/1733789/masn/p/0/100/"


@interface RootViewController ()<UICollectionViewDelegate, UICollectionViewDataSource>

@property (nonatomic, strong) UICollectionView *collectionView;
@property (nonatomic, strong) NSMutableArray   *dataArray;  // 数据源

@end

@implementation RootViewController


- (void)viewDidLoad
{
    [super viewDidLoad];

    // 初始化数据源
    _dataArray = [[NSMutableArray alloc] init];

    // 初始化UICollectionView并指定一个UICollectionViewFlowLayout
    self.collectionView = \
    [[UICollectionView alloc] initWithFrame:self.view.bounds
                       collectionViewLayout:[LargeUICollectionViewFlowLayout new]];

    // 给UICollectionViewCell注册重用标示(collectionView会自动给我们创建重用的cell对象)
    [self.collectionView registerClass:[ShowCollectionViewCell class]
            forCellWithReuseIdentifier:@"ItemIdentifier"];

    // 设置代理对象
    self.collectionView.delegate   = self;
    self.collectionView.dataSource = self;

    // 将UICollectionView添加进父视图
    [self.view addSubview:_collectionView];


    [[GCDQueue globalQueue] execute:^{
        // 获取json数据
        NSData *data = [[NSData alloc] initWithContentsOfURL:[NSURL URLWithString:SOURCE_DATA]];

        // 转换数据
        NSDictionary *dataDictionary = [NSJSONSerialization JSONObjectWithData:data
                                                                       options:NSJSONReadingMutableLeaves|| NSJSONReadingMutableContainers
                                                                         error:nil];
        if (dataDictionary)
        {
            NSArray *dataArray = dataDictionary[@"data"][@"blogs"];
            for (NSDictionary *dic in dataArray)
            {
                NSLog(@"%@", dic[@"isrc"]);

                // 存储数据
                [_dataArray addObject:dic[@"isrc"]];
            }
        }

        // 主线程更新
        [[GCDQueue mainQueue] execute:^{
            [self.collectionView reloadData];
        }];
    }];
}

-(NSInteger)collectionView:(UICollectionView *)collectionView
    numberOfItemsInSection:(NSInteger)section
{
    return [_dataArray count];
}

-(UICollectionViewCell *)collectionView:(UICollectionView *)collectionView
                 cellForItemAtIndexPath:(NSIndexPath *)indexPath
{
    ShowCollectionViewCell *cell = \
    [collectionView dequeueReusableCellWithReuseIdentifier:@"ItemIdentifier"
                                              forIndexPath:indexPath];

    [cell.showImageView setImageWithURL:[NSURL URLWithString:_dataArray[indexPath.row]]];

    return cell;
}

@end
效果图如下:

一款显示壁纸的软件就这么搞定雏形了......
我们来尝试一下实时更换layout让图片自动布局,效果如下:

源码:
#import "RootViewController.h"
#import "ShowCollectionViewCell.h"
#import "LargeUICollectionViewFlowLayout.h"
#import "AnotherCollectionViewFlowLayout.h"
#import "YXGCD.h"
#import "SDWebImage.h"

// 重用标示
static NSString *identify = @"ItemIdentifier";

// 数据源
#define SOURCE_DATA @"http://www.duitang.com/album/1733789/masn/p/0/100/"


@interface RootViewController ()<UICollectionViewDelegate, UICollectionViewDataSource>

@property (nonatomic, strong) UICollectionView *collectionView;

@property (nonatomic, strong) LargeUICollectionViewFlowLayout *largeLayout;
@property (nonatomic, strong) AnotherCollectionViewFlowLayout *anotherLayout;

@property (nonatomic, strong) NSMutableArray   *dataArray;  // 数据源

@end

@implementation RootViewController


- (void)viewDidLoad
{
    [super viewDidLoad];

    // 初始化数据源
    _dataArray = [[NSMutableArray alloc] init];

    // 初始化两种布局
    _largeLayout   = [LargeUICollectionViewFlowLayout new];
    _anotherLayout = [AnotherCollectionViewFlowLayout new];

    // 初始化UICollectionView并指定一个UICollectionViewFlowLayout
    self.collectionView = \
    [[UICollectionView alloc] initWithFrame:self.view.bounds
                       collectionViewLayout:_largeLayout];

    // 给UICollectionViewCell注册重用标示(collectionView会自动给我们创建重用的cell对象)
    [self.collectionView registerClass:[ShowCollectionViewCell class]
            forCellWithReuseIdentifier:@"ItemIdentifier"];

    // 设置代理对象
    self.collectionView.delegate   = self;
    self.collectionView.dataSource = self;

    // 将UICollectionView添加进父视图
    [self.view addSubview:_collectionView];


    [[GCDQueue globalQueue] execute:^{
        // 获取json数据
        NSData *data = [[NSData alloc] initWithContentsOfURL:[NSURL URLWithString:SOURCE_DATA]];

        // 转换数据
        NSDictionary *dataDictionary = [NSJSONSerialization JSONObjectWithData:data
                                                                       options:NSJSONReadingMutableLeaves|| NSJSONReadingMutableContainers
                                                                         error:nil];
        if (dataDictionary)
        {
            NSArray *dataArray = dataDictionary[@"data"][@"blogs"];
            for (NSDictionary *dic in dataArray)
            {
                NSLog(@"%@", dic[@"isrc"]);

                // 存储数据
                [_dataArray addObject:dic[@"isrc"]];
            }
        }

        // 主线程更新
        [[GCDQueue mainQueue] execute:^{
            [self.collectionView reloadData];

            // 3s后切换布局动画
            [[GCDQueue mainQueue] execute:^{

                [_largeLayout invalidateLayout];
                [_collectionView setCollectionViewLayout:_anotherLayout
                                                animated:YES];

            } afterDelay:NSEC_PER_SEC * 3];
        }];
    }];
}

-(NSInteger)collectionView:(UICollectionView *)collectionView
    numberOfItemsInSection:(NSInteger)section
{
    return [_dataArray count];
}

-(UICollectionViewCell *)collectionView:(UICollectionView *)collectionView
                 cellForItemAtIndexPath:(NSIndexPath *)indexPath
{
    ShowCollectionViewCell *cell = \
    [collectionView dequeueReusableCellWithReuseIdentifier:@"ItemIdentifier"
                                              forIndexPath:indexPath];

    [cell.showImageView setImageWithURL:[NSURL URLWithString:_dataArray[indexPath.row]]];

    return cell;
}

@end

RootViewController.m
AnotherCollectionViewFlowLayout.h + AnotherCollectionViewFlowLayout.m
#import <UIKit/UIKit.h>

@interface AnotherCollectionViewFlowLayout : UICollectionViewFlowLayout

@end
#import "AnotherCollectionViewFlowLayout.h"
@implementation AnotherCollectionViewFlowLayout
- (instancetype)init
{
self = [super init];
if (self)
{
self.itemSize = CGSizeMake(150, 200); // 单元格尺寸
self.sectionInset = UIEdgeInsetsMake(0, 0, 0, 0); // 单元格边缘
self.minimumInteritemSpacing = 10.0f; // 横排单元格最小间隔
self.minimumLineSpacing = 20.0f; // 单元格最小行间距
}
return self;
}
@end几个核心的地方:(布局变化时自动匹配对于UICollectionView很重要哦)


so easy :)