本文为《Netty权威指南》的读书笔记,读书过程中也伴随着一些源码阅读和其他文档阅读,所以内容和《Netty权威指南》会略有不同,请知晓。
Netty Api地址:http://netty.io/5.0/api/
一 内容概述
Channel的主要方法介绍。
Channel的继承结构,以及核心类核心代码分析。
Unsafe的继承结构,以及核心类核心代码分析。
二 Channel设计理念
1. 设计理念
在Channel接口层,采用Facade模式进行统一封装,将网络I/O操作以及相关联的操作封装起来,统一对外提供。
Channel接口的定义尽量大而全,为SocketChannel和ServerSocketChannel提供统一的视图,由不同子类实现不同的功能,公共功能在抽象父类中实现,最大程度上实现功能和接口的重用。
具体实现采用聚合而非包含的方式,将相关的功能类聚合在Channel中,由Channel统一负责分配和调度,功能实现更加灵活。
2. 主要接口
《Netty权威指南》第340-342页讲述接口时基本上都是说在CahnnelFuture中,但这是不对的,这些接口都定义在Channel中,请注意。
以下示例代码均来自AbstractChannel。从Channel的代码中可以看到,所有对Channel的调用都被委派给pipeline(DefaultChannelPipeline),后面会专门开辟一偏内容,讲述Pipeline。
1) read
从当前Channel中读取数据到第一个inbound缓冲区中,如果数据被成功读取,触发ChannelHandler.channelRead(ChannelHandlerContext, Object)方法。
读取操作完成以后,触发ChannelHandler.channelReadComplete( ChannelHandlerContext )事件,这样业务的ChannelHandler可以决定是否需要继续读取数据。
如果已经有读操作请求被挂起,则后续的读操作会被忽略。
    public Channel read() {

        pipeline.read();

        return this;

    }
2) write
请求将当前的msg通过ChannelPipeline写入到目标Channel中。注意,此时消息并未发送出去,只有调用flush后msg才会被发送给对方。
    public ChannelFuture write(Object msg) {

        return pipeline.write(msg);

    }
3) close
主动关闭当前连接,通过ChannelPromise设置操作结果并进行结果通知,无论操作结果是否成功,都可以通过ChannelPromise获取操作结果。
该操作会级联触发ChannelPipeline中所有ChannelHandler.close()事件。
    public ChannelFuture close(ChannelPromise promise) {

        return pipeline.close(promise);

    }
4) connect
客户端使用指定的服务端地址发起连接请求,如果连接应为应答超时而失败,将会抛出ConnecttimeoutException;如果连接被拒,抛出ConnectException。该方法会级联触发ChannelHandler.connect事件。
    public ChannelFuture connect(SocketAddress remoteAddress, ChannelPromise promise) {

        return pipeline.connect(remoteAddress, promise);

    }
5) disconnect
请求断开与对端的连接,并使用ChannelPromise获取操作结果的通知信息。该方法会级联触发 ChannelHandler.disconnect事件。
    public ChannelFuture disconnect(ChannelPromise promise) {

        return pipeline.disconnect(promise);

    }
6) bind
绑定指定的本地Socket地址,该方法会级联触发ChannelHandler.bind事件。
    public ChannelFuture bind(SocketAddress localAddress, ChannelPromise promise) {

        return pipeline.bind(localAddress, promise);

    }
三 Channel源码分析
1. 继承关系
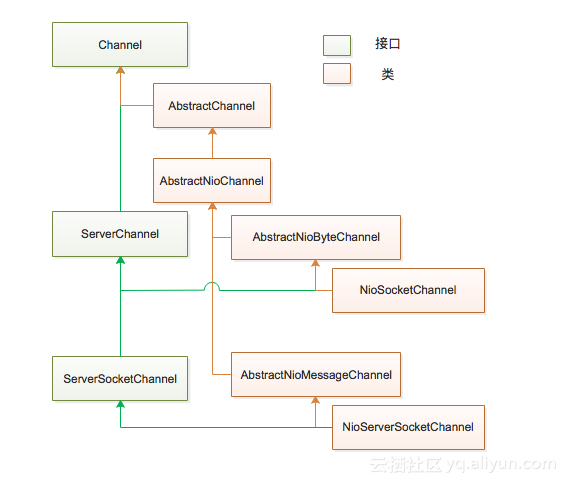
Netty是基于事件驱动的,所以我们可以理解为当Channel进行IO操作会产生IO事件,然后再ChannelPipeline中传播,由对应的ChannelHandler进行拦截和处理,不关心的事件直接忽略。
采用事件驱动的方式可以非常容易的通过事件定义划分事件拦截切面,方便业务和功能扩展。
2. AbstractChannel
聚合了Channel使用到的能力对象,有AbstractChannel提供初始化和统一封装,如果功能和子类强相关,则定义成抽象方法有子类具体实现。
实现较为简单,所以代码略去。
3. AbstractNioChannel
1) 属性
private final SelectableChannel ch;

用于设置SelectableChannel参数和进行IO操作。


protected final int readInterestOp;

相当于JDK SelectionKey的OP_READ


private volatile SelectionKey selectionKey;

Channel注册到EventLoop的返回键,selectionKey修改后为了让其他线程感知到,所以定义成volatile


private ChannelPromise connectPromise;
连接操作结果


private ScheduledFuture<?> connectTimeoutFuture;
定时器,用于管理连接超时
2) SelectionKey事件
    public static final int OP_READ = 1 << 0;
读事件

    public static final int OP_WRITE = 1 << 2;
写事件

    public static final int OP_CONNECT = 1 << 3;
客户端连接服务端

    public static final int OP_ACCEPT = 1 << 4;
服务端接收客户端连接
3) doRegister
注册的事件是0,表示对任何事件都不感兴趣,仅仅完成注册操作。
注册时可以指定附件,后续Channel接收到网络事件通知时可以从SelectionKey中重新获取之前的附件进行处理,此处将AbstractNioChannel子类自身作为附件注册。
如果Channel注册成功,返回selectionkey,通过selectionKey可以从多路复用其中获取channel对象。
如果抛出CancelledKeyException,说明当前返回的selectionKey已经被取消了;如果是第一次处理该异常,那么调用多路复用器的selectNow方法将已经取消的selectionKey移除,然后重新注册;如果不是第一次处理该异常,因为JDK申明不应该出现此情况,所以可能是JDK在NIO上存在bug,抛出错误让上层业务处理。
源码如下:
    protected void doRegister() throws Exception {

        boolean selected = false;

        for (;;) {

            try {

                selectionKey = javaChannel().register(eventLoop().selector, 0, this);

                return;

            } catch (CancelledKeyException e) {

                if (!selected) {

                    // Force the Selector to select now as the "canceled" SelectionKey may still be

                    // cached and not removed because no Select.select(..) operation was called yet.

                    eventLoop().selectNow();

                    selected = true;

                } else {

                    // We forced a select operation on the selector before but the SelectionKey is still cached

                    // for whatever reason. JDK bug ?

                    throw e;

                }

            }

        }

    }
4) doBeginRead
处理读操作之前,需要设置网络操作位为读。
首先确保当前Channel没有关闭,SelectionKey可用,并确保Channel监听OP_READ事件。
代码如下:
    protected void doBeginRead() throws Exception {

        if (inputShutdown) {

            return;

        }


        final SelectionKey selectionKey = this.selectionKey;

        if (!selectionKey.isValid()) {

            return;

        }


        final int interestOps = selectionKey.interestOps();

        if ((interestOps & readInterestOp) == 0) {

            selectionKey.interestOps(interestOps | readInterestOp);

        }

    }
4. AbstractNioByteChannel
1) doWrite
从发送消息环形数组ChannelOutboundBuffer获取一个消息,判断此消息是否为空,为空说明待发送消息已经发送完了,清除半包标识,退出循环。
根据消息类型,进行类型转换,接着判断此消息可读字节数是否为0,如果是说明消息不可读,丢弃并继续处理其他消息。
如果writeSpinCount=-1,则从Channel配置对象中获取循环发送次数。循环发送次数指:当一次发送没有完成时(写半包),继续循环的次数。设置写半包最大循环次数的原因是:当循环发送时,IO线程会一直尝试写操作,此时IO线程无法处理其他的IO操作(例如读新消息等),如果网络IO阻塞或者对方接收消息太慢,可能导致线程假死,影响其他任务的执行。
调用doWriteBytes发送消息,此方法为抽象方法,不同的子类有不同的实现。如果本次发送字节数为0,说明发送TCP缓冲区已满,发生了ZERO_WINDOW,如果此时再次发送,可能再次出现写0字节,空循环会占用CPU资源,导致IO线程无法处理其他的IO操作,所以将写半包标识setOpWrite设置为true,退出循环,释放IO线程。如果发送字节大于0,则更新总发送自己数;接着判断当前消息是否全部发送完成,如果是则设置发送完成(done=true),跳出循环。
通过调用in.progress(flushedAmount)更新发送进度。
如果消息未发送完成(done=true),将已经发送的消息从缓冲区中移除;否则调用incompleteWrite,设置写半包标识,启动刷新线程继续发送之前没有发送完成的半包消息。
代码如下
    protected void doWrite(ChannelOutboundBuffer in) throws Exception {

        int writeSpinCount = -1;


        for (;;) {

            Object msg = in.current(true);

            if (msg == null) {

                // Wrote all messages.

                clearOpWrite();

                break;

            }


            if (msg instanceof ByteBuf) {

                ByteBuf buf = (ByteBuf) msg;

                int readableBytes = buf.readableBytes();

                if (readableBytes == 0) {

                    in.remove();

                    continue;

                }


                boolean setOpWrite = false;

                boolean done = false;

                long flushedAmount = 0;

                if (writeSpinCount == -1) {

                    writeSpinCount = config().getWriteSpinCount();

                }

                for (int i = writeSpinCount - 1; i >= 0; i --) {

                    int localFlushedAmount = doWriteBytes(buf);

                    if (localFlushedAmount == 0) {

                        setOpWrite = true;

                        break;

                    }


                    flushedAmount += localFlushedAmount;

                    if (!buf.isReadable()) {

                        done = true;

                        break;

                    }

                }


                in.progress(flushedAmount);


                if (done) {

                    in.remove();

                } else {

                    incompleteWrite(setOpWrite);

                    break;

                }

            } else if (msg instanceof FileRegion) {

                FileRegion region = (FileRegion) msg;

                boolean setOpWrite = false;

                boolean done = false;

                long flushedAmount = 0;

                if (writeSpinCount == -1) {

                    writeSpinCount = config().getWriteSpinCount();

                }

                for (int i = writeSpinCount - 1; i >= 0; i --) {

                    long localFlushedAmount = doWriteFileRegion(region);

                    if (localFlushedAmount == 0) {

                        setOpWrite = true;

                        break;

                    }


                    flushedAmount += localFlushedAmount;

                    if (region.transfered() >= region.count()) {

                        done = true;

                        break;

                    }

                }


                in.progress(flushedAmount);


                if (done) {

                    in.remove();

                } else {

                    incompleteWrite(setOpWrite);

                    break;

                }

            } else {

                throw new UnsupportedOperationException("unsupported message type: " + StringUtil.simpleClassName(msg));

            }

        }

    }
5. AbstractNioMessageChannel
1) doWrite
此方法和AbstractNioByteChannel中的逻辑基本相同,主要差别是消息体类型只有ByteBuf,没有FileRegion。因为逻辑基本相同,所以不详细描述。
6. NioServerSocketChannel
1) doReadMessages
对于NioServerSocketChannel,他的读取操作就是接受客户端的连接,创建NioSocketChannel对象。
首先通过ServerSocketChannel的accept方法接收客户端连接,如果连接的SocketChannel不为空,则创建NioSocketChannel,接着将其加入到List<Object>buf中;最后返回1,表示服务端消息读取成功。
代码如下:
    protected int doReadMessages(List<Object> buf) throws Exception {

        SocketChannel ch = javaChannel().accept();


        try {

            if (ch != null) {

                buf.add(new NioSocketChannel(this, childEventLoopGroup().next(), ch));

                return 1;

            }

        } catch (Throwable t) {

            logger.warn("Failed to create a new channel from an accepted socket.", t);


            try {

                ch.close();

            } catch (Throwable t2) {

                logger.warn("Failed to close a socket.", t2);

            }
        }

        return 0;

    }
7. NioServerSocketChannel
1) doConnect
首先判断socket地址是否为空,不为空则调用bind方法绑定地址;如果bind成功,则继续调用connect发送TCP连接,TCP连接有以下几种可能:
ÃÂ 连接成功,返回true。
ÃÂ 暂时没有连接上,服务端没有返回ACK应答,连接结果不确定,返回false。
ÃÂ 连接失败,抛出异常
如果连接结果为false,则需要设置interestOps为SelectionKey.OP_CONNECT,监听连接事件。如果抛出异常,说明客户端的TCP握手请求直接被REST或被拒绝,此时需要关闭客户端连接
代码如下:
    protected boolean doConnect(SocketAddress remoteAddress, SocketAddress localAddress) throws Exception {

        if (localAddress != null) {

            javaChannel().socket().bind(localAddress);

        }


        boolean success = false;

        try {

            boolean connected = javaChannel().connect(remoteAddress);

            if (!connected) {

                selectionKey().interestOps(SelectionKey.OP_CONNECT);

            }

            success = true;

            return connected;

        } finally {

            if (!success) {

                doClose();

            }

        }

    }
2) doWrite
如果待发送字节数小于1或待发送内容为空,调用父类doWrite方法,退出发送。
获取循环发送次数(writeSpinCount),接着循环逐次发送,注意这里会对总的循环次数做一定的限制,如果这里不清楚见AbstractNioByteChannel#doWrite部分。
如果发送完成(done=true),清空ChannelOutboundBuffer,清楚写半包标识。
如果未发送完成(done=false),逐次从ChannelOutboundBuffer中获取ByteBuf。通过比较次ByteBuf的readableBytes、writtenBytes,来判断是否有待发送的字节。
ÃÂ 如果writtenBytes>readableBytes,说明当前的ByteBuf已经被完全发送出去,更新ChannelOutboundBuffer发送进度,删除此ByteBuf,接着进行writtenBytes -= readableBytes(这一步是因为ChannelOutboundBuffer中有多个ByteBuf,保证后续比较不会出现问题);
ÃÂ 如果writtenBytes < readableBytes说明此ByteBuf的消息未全部发送出去,所以更新ChannelOutboundBuffer发送进度,跳出循环
ÃÂ 如果writtenBytes = readableBytes说明此ByteBuf的消息正好全部发送出去了,所以更新ChannelOutboundBuffer发送进度,删除此ByteBuf,跳出循环
说明:
readableBytes=writerIndex-readerIndex;
writtenBytes=ChannelOutboundBuffer中所有ByteBuf的已发送的字节数目
代码如下:
    protected void doWrite(ChannelOutboundBuffer in) throws Exception {

        for (;;) {

            // Do non-gathering write for a single buffer case.

            final int msgCount = in.size();

            if (msgCount <= 1) {

                super.doWrite(in);

                return;

            }


            // Ensure the pending writes are made of ByteBufs only.

            ByteBuffer[] nioBuffers = in.nioBuffers();

            if (nioBuffers == null) {

                super.doWrite(in);

                return;

            }


            int nioBufferCnt = in.nioBufferCount();

            long expectedWrittenBytes = in.nioBufferSize();


            final SocketChannel ch = javaChannel();

            long writtenBytes = 0;

            boolean done = false;

            boolean setOpWrite = false;

            for (int i = config().getWriteSpinCount() - 1; i >= 0; i --) {

                final long localWrittenBytes = ch.write(nioBuffers, 0, nioBufferCnt);

                if (localWrittenBytes == 0) {

                    setOpWrite = true;

                    break;

                }

                expectedWrittenBytes -= localWrittenBytes;

                writtenBytes += localWrittenBytes;

                if (expectedWrittenBytes == 0) {

                    done = true;

                    break;

                }

            }


            if (done) {

                // Release all buffers

                for (int i = msgCount; i > 0; i --) {

                    in.remove();

                }


                // Finish the write loop if no new messages were flushed by in.remove().

                if (in.isEmpty()) {

                    clearOpWrite();

                    break;

                }

            } else {

                // Did not write all buffers completely.

                // Release the fully written buffers and update the indexes of the partially written buffer.


                for (int i = msgCount; i > 0; i --) {

                    final ByteBuf buf = (ByteBuf) in.current();

                    final int readerIndex = buf.readerIndex();

                    final int readableBytes = buf.writerIndex() - readerIndex;


                    if (readableBytes < writtenBytes) {

                        in.progress(readableBytes);

                        in.remove();

                        writtenBytes -= readableBytes;

                    } else if (readableBytes > writtenBytes) {

                        buf.readerIndex(readerIndex + (int) writtenBytes);

                        in.progress(writtenBytes);

                        break;

                    } else { // readableBytes == writtenBytes

                        in.progress(readableBytes);

                        in.remove();

                        break;

                    }

                }


                incompleteWrite(setOpWrite);

                break;

            }

        }

    }
四 Unsafe 介绍
Unsafe接口实际上是Channel的辅助接口,不应该被用户代码直接使用,而实际上IO操作都是有Unsafe接口负责完成的。
1. 继承关系
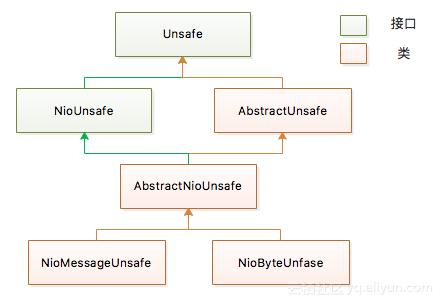
2. AbstractUnsafe
1) register
用于将当前Unsafe对应的Channel注册到EventLoop的多路复用器上,然后调用DefaultChannelPipeline的fireChannelRegistered方法。如果Channel被激活,则调用DefaultCahnnelPipeline的fireChannelActive方法。
判断当前所在的线程是否是Channel对应的NioEventLoop线程,如果是同一个线程,直接调用doRegister0进行注册;如果不是同一个线程,则将其封装成Runnable,放到NioEventLoop任务队列中执行。
注意:如果直接调用register0进行注册,会存在并发问题。
代码如下:
2) bind
主要用于绑定指定的地址、端口。
代码较为简单,所以省略,具体见AbstractUnsafe#bind方法。
3) disconnect
客户端或者服务端主动关闭连接。
代码较为简单,所以省略,具体见AbstractUnsafe#disconnect方法。
4) close
关闭链路。关闭链路前需要判断是否处于刷新状态。
如果处于刷新状态, 说明尚有消息尚未发送出去,需要等到消息发送完成后在关闭链路,见invokeLater()方法。
如果链路没有处于刷新状态,需要从closeFuture中判断关闭操作是否完成,如果已经完成,不需要重复关闭链路,设置ChannelPromise操作结果为成功并返回。
执行关闭操作,将消息发送缓冲区设置为空,JVM后续会回收此缓冲区;接着调用doClose方法关闭链路。
关闭操作成功,设置ChannelPromise操作结果为成功,失败则设置异常对象到ChannelPromise。
调用ChannelOutboundBuffer#close方法释放缓冲区的消息,随后构造链路关闭通知,放到NioEventLoop中执行。
最后调用deregister,将Channel从多路复用器上取消注册。
代码如下:
        public final void close(final ChannelPromise promise) {

            if (inFlush0) {

                invokeLater(new Runnable() {

                    @Override

                    public void run() {

                        close(promise);

                    }

                });

                return;

            }


            if (closeFuture.isDone()) {

                // Closed already.

                promise.setSuccess();

                return;

            }


            boolean wasActive = isActive();

            ChannelOutboundBuffer outboundBuffer = this.outboundBuffer;

            this.outboundBuffer = null; // Disallow adding any messages and flushes to outboundBuffer.


            try {

                doClose();

                closeFuture.setClosed();

                promise.setSuccess();

            } catch (Throwable t) {

                closeFuture.setClosed();

                promise.setFailure(t);

            }


            // Fail all the queued messages

            try {

                outboundBuffer.failFlushed(CLOSED_CHANNEL_EXCEPTION);

                outboundBuffer.close(CLOSED_CHANNEL_EXCEPTION);

            } finally {


                if (wasActive && !isActive()) {

                    invokeLater(new Runnable() {

                        @Override

                        public void run() {

                            pipeline.fireChannelInactive();

                        }

                    });

                }


                deregister();

            }

        }
5) write
如果Channel处于active状态,那么将消息写入ChannelOutboundBuffer。
Channel状态没有激活时,会处于以下两种状态之一:
ÃÂ NOT_YET_CONNECTED_EXCEPTION:Channel打开,但是TCP链路尚未成功建立
ÃÂ CLOSED_CHANNEL_EXCEPTION:Channel已经关闭。
代码较为简单,所以省略,具体见AbstractUnsafe#write方法。
6) flush
负责将发送缓冲区中待发送的消息全部写入Channel中,并发送给对方。
首先将缓冲区的unflushed指针修改为tail,表示此次需要发送消息的缓冲区范围。
此方法最终会调用AbstractChannel中的doWrite方法,此方法之前详细讲述了,这里不再累述。
代码较为简单,所以省略,具体见AbstractUnsafe#flush方法。
3. AbstractNioUnsafe
1) connect
连接。Connect可能有三个结果:
ÃÂ 连接成功,返回true。
ÃÂ 暂时没有连接上,服务端没有返回ACK应答,连接结果不确定,返回false。
ÃÂ 连接失败,抛出异常
如果对这里有疑问,请参考NioSocketChannel#doConnect部分内容。
需要注意的是,连接结果为false,会做两件事:
ÃÂ 根据连接超时时间添加添加一个定时器,超时时间到以后触发,如果发现还未完成连接,那么关闭连接句柄,释放资源,设置异常堆栈等。
ÃÂ 设置连接结果监听器,如果收到连接完成通知,则判断连接是否被取消了,如果取消了,那么执行关闭连接句柄,释放资源等逻辑。
代码见:
    public void connect(

            final SocketAddress remoteAddress, final SocketAddress localAddress, final ChannelPromise promise) {

        if (!ensureOpen(promise)) {

            return;

        }


        try {

            if (connectPromise != null) {

                throw new IllegalStateException("connection attempt already made");

            }


            boolean wasActive = isActive();

            if (doConnect(remoteAddress, localAddress)) {

                fulfillConnectPromise(promise, wasActive);

            } else {

                connectPromise = promise;

                requestedRemoteAddress = remoteAddress;


                // Schedule connect timeout.

                int connectTimeoutMillis = config().getConnectTimeoutMillis();

                if (connectTimeoutMillis > 0) {

                    connectTimeoutFuture = eventLoop().schedule(new Runnable() {

                        @Override

                        public void run() {

                            ChannelPromise connectPromise = AbstractNioChannel.this.connectPromise;

                            ConnectTimeoutException cause =

                                    new ConnectTimeoutException("connection timed out: " + remoteAddress);

                            if (connectPromise != null && connectPromise.tryFailure(cause)) {

                                close(voidPromise());

                            }

                        }

                    }, connectTimeoutMillis, TimeUnit.MILLISECONDS);

                }


                promise.addListener(new ChannelFutureListener() {

                    @Override

                    public void operationComplete(ChannelFuture future) throws Exception {

                        if (future.isCancelled()) {

                            if (connectTimeoutFuture != null) {

                                connectTimeoutFuture.cancel(false);

                            }

                            connectPromise = null;

                            close(voidPromise());

                        }

                    }

                });

            }

        } catch (Throwable t) {

            if (t instanceof ConnectException) {

                Throwable newT = new ConnectException(t.getMessage() + ": " + remoteAddress);

                newT.setStackTrace(t.getStackTrace());

                t = newT;

            }

            promise.tryFailure(t);

            closeIfClosed();

        }

    }
2) finishConnect
客户端接收到服务端的TCP握手应答消息时,通过SocketChannel# finishConnect方法对连接结果进行判断,存在三种可能的结果:
ÃÂ 连接成功,返回true。
ÃÂ 发生链路被关闭、链路终端等异常,连接失败。
ÃÂ 连接失败,返回false
连接失败,则抛出Error()错误,由调用方关闭句柄、资源。连接成功,则执行fulfillConnectPromise方法,此方法负责将SocketChannel修改为监听读操作位,监听网络读事件。如果连接超时,则由定时任务负责关闭客户单链接,将SocketChannel中Reactor线程的多路复用器中移除。
代码如下:
    public void finishConnect() {

        // Note this method is invoked by the event loop only if the connection attempt was

        // neither cancelled nor timed out.


        assert eventLoop().inEventLoop();

        assert connectPromise != null;


        try {

            boolean wasActive = isActive();

            doFinishConnect();

            fulfillConnectPromise(connectPromise, wasActive);

        } catch (Throwable t) {

            if (t instanceof ConnectException) {

                Throwable newT = new ConnectException(t.getMessage() + ": " + requestedRemoteAddress);

                newT.setStackTrace(t.getStackTrace());

                t = newT;

            }


            // Use tryFailure() instead of setFailure() to avoid the race against cancel().

            connectPromise.tryFailure(t);

            closeIfClosed();

        } finally {

            // Check for null as the connectTimeoutFuture is only created if a connectTimeoutMillis > 0 is used

            // See https://github.com/netty/netty/issues/1770

            if (connectTimeoutFuture != null) {

                connectTimeoutFuture.cancel(false);

            }

            connectPromise = null;

        }

    }
4. NioByteUnsafe
1) read
首先初始化RecvByteBufAllocator.Handle,用于后续分配缓冲区。
通过allocHandle.guess()获取下次预分配缓冲区容量,然后根据容量进行分配缓冲区。
异步读取消息doReadBytes(byteBuf),完成消息读取以后,需要对本次读取的数据进行判断,存在以下几种情况:
ÃÂ 返回值>0,表示读到了消息。
ÃÂ 返回值=0,表示没有就绪的消息可读。
ÃÂ 返回值=-1,表示读取失败。
如果返回值<=0,则释放缓冲区,另外返回值<0时,设置close=true,用于关闭连接、释放句柄资源等。退出循环。
如果返回值>0,则表示读取到数据,接着调用pipeline.fireChannelRead(byteBuf)。注意完成一次读操作,并不意味着读取到一个完整的消息,因为TCP底层存在组包、粘包,所以一次读操作可能包含多条消息,也可能试一个不完整的消息。接着释放缓冲区。
ÃÂ 为了防止读取字节过多,发生溢出,最大读取字节为Integer.MAX_VALUE,超过则跳出读取的循环。
ÃÂ 读取内容小于缓冲区可写容量,说明TCP缓冲区已经没有继续的字节可读取,说明读操作已完成,跳出循环。
ÃÂ 连续的读操作会阻塞任务队列中待执行的Task,所以连续读的次数要小于maxMessagesPerRead(默认16次)
读操作完成后,触发pipeline.fireChannelReadComplete()事件;并且将此次读取的总字节数传入allocHandle,以便于下次分配更适合的缓冲区容量。
代码如下:
    public void read() {

        final ChannelConfig config = config();

        final ChannelPipeline pipeline = pipeline();

        final ByteBufAllocator allocator = config.getAllocator();

        final int maxMessagesPerRead = config.getMaxMessagesPerRead();

        RecvByteBufAllocator.Handle allocHandle = this.allocHandle;

        if (allocHandle == null) {

            this.allocHandle = allocHandle = config.getRecvByteBufAllocator().newHandle();

        }

        if (!config.isAutoRead()) {

            removeReadOp();

        }


        ByteBuf byteBuf = null;

        int messages = 0;

        boolean close = false;

        try {

            int byteBufCapacity = allocHandle.guess();

            int totalReadAmount = 0;

            do {

                byteBuf = allocator.ioBuffer(byteBufCapacity);

                int writable = byteBuf.writableBytes();

                int localReadAmount = doReadBytes(byteBuf);

                if (localReadAmount <= 0) {

                    // not was read release the buffer

                    byteBuf.release();

                    close = localReadAmount < 0;

                    break;

                }


                pipeline.fireChannelRead(byteBuf);

                byteBuf = null;


                if (totalReadAmount >= Integer.MAX_VALUE - localReadAmount) {

                    // Avoid overflow.

                    totalReadAmount = Integer.MAX_VALUE;

                    break;

                }


                totalReadAmount += localReadAmount;

                if (localReadAmount < writable) {

                    // Read less than what the buffer can hold,

                    // which might mean we drained the recv buffer completely.

                    break;

                }

            } while (++ messages < maxMessagesPerRead);


            pipeline.fireChannelReadComplete();

            allocHandle.record(totalReadAmount);


            if (close) {

                closeOnRead(pipeline);

                close = false;

            }

        } catch (Throwable t) {

            handleReadException(pipeline, byteBuf, t, close);

        }

    }