原文地址:原文
译者:晋文格墨
注:译者水平有限,欢迎大家批评斧正。
Cocos2d是一个具有丰富的图形处理API,它可以使游戏开发者可以轻松地使用广泛的功能。本文将讨论一下sprites的基本用法。
绘制sprites
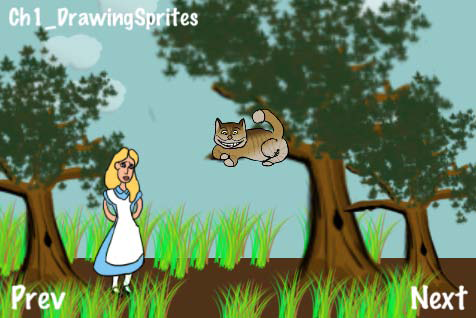
在2D游戏开发中最基本的任务就是绘制一个sprite。在这个领域里,cocosd给用户提供了很多的灵活性。在本小节里,我们将介绍如何使用CCSprite, spritesheets, CCSpriteFrameCache, 和 CCSpriteBatchNode来绘制sprite。我们也会再次熟悉一下mipmaping。本节中我们会看到《愛麗絲鏡中奇遇》中的一个场景。
准备
请参考此工程 RecipeCollection01,它包含了本节的所有代码。
继续….
执行如下代码:
@implementation Ch1_DrawingSprites
 -(CCLayer*) runRecipe {
 /*** Draw a sprite using CCSprite ***/
 CCSprite *tree1 = [CCSprite spriteWithFile:@"tree.png"];
//Position the sprite using the tree base as a guide (y anchor
point = 0)
[tree1 setPosition:ccp(20,20)];
tree1.anchorPoint = ccp(0.5f,0);
[tree1 setScale:1.5f];
[self addChild:tree1 z:2 tag:TAG_TREE_SPRITE_1];
/*** Load a set of spriteframes from a PLIST file and draw one by
name ***/
//Get the sprite frame cache singleton
CCSpriteFrameCache *cache = [CCSpriteFrameCache
sharedSpriteFrameCache];
//Load our scene sprites from a spritesheet
[cache addSpriteFramesWithFile:@"alice_scene_sheet.plist"];
//Specify the sprite frame and load it into a CCSprite
CCSprite *alice = [CCSprite spriteWithSpriteFrameName:@"alice.png"];
//Generate Mip Maps for the sprite
[alice.texture generateMipmap];
ccTexParams texParams = { GL_LINEAR_MIPMAP_LINEAR, GL_LINEAR, GL_
CLAMP_TO_EDGE, GL_CLAMP_TO_EDGE };
[alice.texture setTexParameters:&texParams];
//Set other information.
[alice setPosition:ccp(120,20)];
[alice setScale:0.4f];
alice.anchorPoint = ccp(0.5f,0);
//Add Alice with a zOrder of 2 so she appears in front of other
sprites
[self addChild:alice z:2 tag:TAG_ALICE_SPRITE];
//Make Alice grow and shrink.
[alice runAction: [CCRepeatForever actionWithAction:
[CCSequence actions:[CCScaleTo actionWithDuration:4.0f scale
:0.7f], [CCScaleTo actionWithDuration:4.0f scale:0.1f], nil] ] ];
/*** Draw a sprite CGImageRef ***/
UIImage *uiImage = [UIImage imageNamed: @"cheshire_cat.png"];
CGImageRef imageRef = [uiImage CGImage];
CCSprite *cat = [CCSprite spriteWithCGImage:imageRef key:@
"cheshire_cat.png"];
[cat setPosition:ccp(250,180)];
[cat setScale:0.4f];
[self addChild:cat z:3 tag:TAG_CAT_SPRITE];
/*** Draw a sprite using CCTexture2D ***/
CCTexture2D *texture = [[CCTextureCache sharedTextureCache]
addImage:@”tree.png”];
CCSprite *tree2 = [CCSprite spriteWithTexture:texture];
[tree2 setPosition:ccp(300,20)];
tree2.anchorPoint = ccp(0.5f,0);
[tree2 setScale:2.0f];
[self addChild:tree2 z:2 tag:TAG_TREE_SPRITE_2];
/*** Draw a sprite using CCSpriteFrameCache and CCTexture2D ***/
CCSpriteFrame *frame = [CCSpriteFrame frameWithTexture:texture
rect:tree2.textureRect];
[[CCSpriteFrameCache sharedSpriteFrameCache] addSpriteFrame:
frame name:@”tree.png”];
CCSprite *tree3 = [CCSprite spriteWithSpriteFrame:[[CCSpriteFrame
Cache sharedSpriteFrameCache] spriteFrameByName:@”tree.png”]];
[tree3 setPosition:ccp(400,20)];
tree3.anchorPoint = ccp(0.5f,0);
[tree3 setScale:1.25f];
[self addChild:tree3 z:2 tag:TAG_TREE_SPRITE_3];
/*** Draw sprites using CCBatchSpriteNode ***/
//Clouds
CCSpriteBatchNode *cloudBatch = [CCSpriteBatchNode
batchNodeWithFile:@"cloud_01.png" capacity:10];
[self addChild:cloudBatch z:1 tag:TAG_CLOUD_BATCH];
for(int x=0; x CCSprite *s = [CCSprite spriteWithBatchNode:cloudBatch
rect:CGRectMake(0,0,64,64)];
[s setOpacity:100];
[cloudBatch addChild:s];
[s setPosition:ccp(arc4random()%500-50, arc4random()%150+200)];
}
//Middleground Grass
int capacity = 10;
CCSpriteBatchNode *grassBatch1 = [CCSpriteBatchNode
batchNodeWithFile:@"grass_01.png" capacity:capacity];
[self addChild:grassBatch1 z:1 tag:TAG_GRASS_BATCH_1];
for(int x=0; x CCSprite *s = [CCSprite spriteWithBatchNode:grassBatch1
rect:CGRectMake(0,0,64,64)];
[s setOpacity:255];
[grassBatch1 addChild:s];
[s setPosition:ccp(arc4random()%500-50, arc4random()%20+70)];
}
//Foreground Grass
CCSpriteBatchNode *grassBatch2 = [CCSpriteBatchNode
batchNodeWithFile:@"grass_01.png" capacity:10];
[self addChild:grassBatch2 z:3 tag:TAG_GRASS_BATCH_2];
for(int x=0; x CCSprite *s = [CCSprite spriteWithBatchNode:grassBatch2
rect:CGRectMake(0,0,64,64)];
[s setOpacity:255];
[grassBatch2 addChild:s];
[s setPosition:ccp(arc4random()%500-50, arc4random()%40-10)];
}
/*** Draw colored rectangles using a 1px x 1px white texture ***/
//Draw the sky using blank.png
[self drawColoredSpriteAt:ccp(240,190) withRect:CGRectMa
ke(0,0,480,260) withColor:ccc3(150,200,200) withZ:0];
//Draw the ground using blank.png
[self drawColoredSpriteAt:ccp(240,30)
withRect:CGRectMake(0,0,480,60) withColor:ccc3(80,50,25) withZ:0];
return self;
}
-(void) drawColoredSpriteAt:(CGPoint)position withRect:(CGRect)rect
withColor:(ccColor3B)color withZ:(float)z {
CCSprite *sprite = [CCSprite spriteWithFile:@"blank.png"];
[sprite setPosition:position];
[sprite setTextureRect:rect];
[sprite setColor:color];
[self addChild:sprite];
//Set Z Order
[self reorderChild:sprite z:z];
}
@end
它是如何工作的….
本节给我们介绍了绘制sprite的一般方法:
从一个文件中创建一个CCSprite:
首先,介绍一些绘制一个sprite的最简单的方法。这涉及到使用CCSprite类方法,如下:
+(id)spriteWithFile:(NSString*)filename;
这是初始化一个sprite的最直接的方法,并且适合很多种情况。
从一个文件中加载一个sprite的另一种方法:
之后我们将看到使用UIImage/CG/ImageRef,CCTexture2D来创建CCSprite的例子,还有使用一个CCTexture2D对象创建CCSpriteFrame的例子。CGImageRef支持将Cocos2D绑定到其他的框架和工具。CCTexture2D是创建纹理的底层机制。
使用CCSpriteFrameCache加载spritesheet:
下面,我们将看到使用sprite的最美妙的方法,就是CCSpriteFrameCache类。CCSpriteFrameCache对象是所有sprite帧的缓存,在CocosD-iPhone v0.99中有介绍。使用一个spritesheet和它相关联的PLIST文件,我们可以加载多个sprite到缓存中。使用下面的代码我们可以使用缓存中的sprite创建CCSprite:
+(id)spriteWithSpriteFrameName:(NSString*)filename;
Mipmaping:
Mipmaping允许你缩放一个纹理或者不混淆你的sprites的情况下缩放一个背景。当我们将爱丽丝缩小时,混淆将不能避免地发生。但是开启Mipmaping之后,Cocos2D将在一个更小区域里动态地产生低分辨率的纹理来事像素化平滑过渡。返回前面的代码,将如下代码注释掉:
[alice.texture generateMipmap];
 ccTexParams texParams = { GL_LINEAR_MIPMAP_LINEAR, GL_LINEAR,
 GL_CLAMP_TO_EDGE, GL_CLAMP_TO_EDGE };
 [alice.texture setTexParameters:&texParams];
现在你可看到爱丽丝的像素画变小了。
使用CCSpriteBatchNode绘制多个sprite副本。
在v0.99.5版本引入的CCSpriteBatchNode类介绍了一个重复绘制同一个sprite对象的高效方方达。这是另一个额外高效的方法,虽然你可以不需要不这样做。在这三个例子中我们绘制了10个随机位置的白云和60个随机位置的小草。
绘制彩色的矩形。
最后,有一个经常会用的一个简单技术。通过绘制一个一个空白像素的sprite纹理,然后向其充颜色并设置它的textrueRect属性,这样我们就可以创建一个非常有用的色条:
CCSprite *sprite = [CCSprite spriteWithFile:@"blank.png"];
 [sprite setTextureRect:CGRectMake(0,0,480,320)];
 [sprite setColor:ccc3(255,128,0)];
值这个例子中,我们使用这个技术创建了一个简单的草地和天空背景。
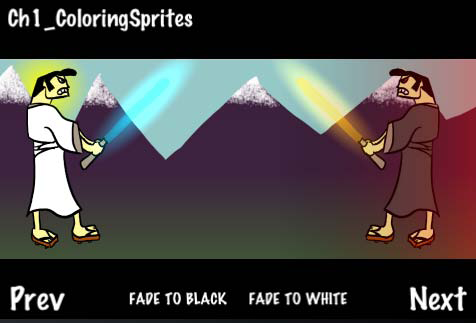
给sprites上色
在之前的小节中我们使用带颜色的矩形绘制了简单的草地和天空背景。能够设置纹理颜色和透明度的是一个简单工具,如果巧妙运用的话可以创造出非常酷的效果。在本小节中我们将创建两个武士各自拿着一个发光武士刀对峙的场景。
准备
请参考RecipeCollection01工程的代码并注意一些为简洁而删除的代码。
如何做?
执行如下代码:
//Add a sinister red glow gradient behind the evil samurai
 CCGradientLayer *redGradient = [CCGradientLayer
 layerWithColor:ccc4(0,0,0,0) toColor:ccc4(255,0,0,100) withDirection
 :CCGradientDirectionT_B width:200 height:200];
 [redGradient setPosition:ccp(280,60)];
 [redGradient setRotation:-90];
 [self addChild:redGradient z:2 tag:TAG_RED_GRADIENT];
// Make the swords glow
[self glowAt:ccp(230,280) withScale:CGSizeMake(3.0f, 11.0f)
withColor:ccc3(0,230,255) withRotation:45.0f withSprite:goodSamurai];
[self glowAt:ccp(70,280) withScale:CGSizeMake(3.0f, 11.0f)
withColor:ccc3(255,200,2) withRotation:-45.0f withSprite:evilSamurai];
return self;
}
-(void) initButtons {
[CCMenuItemFont setFontSize:16];
//’Fade To Black’ button
CCMenuItemFont* fadeToBlack = [CCMenuItemFont itemFromString:@
"FADE TO BLACK" target:self selector:@selector(fadeToBlackCallback:)];
CCMenu *fadeToBlackMenu = [CCMenu menuWithItems:fadeToBlack, nil];
fadeToBlackMenu.position = ccp( 180 , 20 );
[self addChild:fadeToBlackMenu z:4 tag:TAG_FADE_TO_BLACK];
}
/* Fade the scene to black */
-(void) fadeToBlackCallback:(id)sender {
CCSprite *fadeSprite = [self getChildByTag:TAG_FADE_SPRITE];
[fadeSprite stopAllActions];
[fadeSprite setColor:ccc3(0,0,0)];
[fadeSprite setOpacity:0.0f];
[fadeSprite runAction:
[CCSequence actions:[CCFadeIn actionWithDuration:2.0f], [CCFadeOut
actionWithDuration:2.0f], nil] ];
}
/* Create a glow effect */
-(void) glowAt:(CGPoint)position withScale:(CGSize)size
withColor:(ccColor3B)color withRotation:(float)rotation
withSprite:(CCSprite*)sprite {
CCSprite *glowSprite = [CCSprite spriteWithFile:@"fire.png"];
[glowSprite setColor:color];
[glowSprite setPosition:position];
[glowSprite setRotation:rotation];
[glowSprite setBlendFunc: (ccBlendFunc) { GL_ONE, GL_ONE }];
[glowSprite runAction: [CCRepeatForever actionWithAction:
[CCSequence actions:[CCScaleTo actionWithDuration:0.9f
scaleX:size.width scaleY:size.height], [CCScaleTo
actionWithDuration:0.9f scaleX:size.width*0.75f scaleY:size.
height*0.75f], nil] ] ];
[glowSprite runAction: [CCRepeatForever actionWithAction:
[CCSequence actions:[CCFadeTo actionWithDuration:0.9f
opacity:150], [CCFadeTo actionWithDuration:0.9f opacity:255], nil] ]
];
[sprite addChild:glowSprite];
}
@end
它是如何工作的?
本小节展示了一些基本的色彩处理技术。
设置sprite颜色
设置sprite颜色的最简单的的方法如下:
-(void) setColor:(ccColor3B)color;
设置sprite颜色有效减少了你可以显示的颜色,但是它允许在绘制的时候提供更多的编程灵活性。在本节中我们使用setColor设置了很多东西,只用它画了一个蓝色的天空,一个黄色的太阳,一个黑色的戏剧电影显示条,ccColor3B是一个C结构,它包含了3个GLubyte变量。使用如下的代码创建一个ccClor3B结构:
ccColor3B ccc3(const GLubyte r, const GLubyte g, const GLubyte
 b);
Cocos2d也定义了一系列的预定义的常量颜色,它们是:
ccWHITE, ccYELLOW, ccBLUE, ccGREEN, ccRED,
 ccMAGENTA, ccBLACK, ccORANGE, ccGRAY
过渡到一个颜色
让场景过渡到一个指定的颜色,我们可以使用一个blank.png技术,在最后我们将介绍它。我们首先绘制一个和场景一样大的sprite,然后将其填充我们要过渡的目标颜色,然后执行CCFadin动作将sprite过渡到这个颜色。
[fadeSprite setColor:ccc3(255,255,255)];
 [fadeSprite setOpacity:0.0f];
 [fadeSprite runAction: [CCFadeIn actionWithDuration:2.0f] ];
使用CCGradienLayer
使用CCGradienLayer类我们可以创建渐变效果。让背景中的山过渡到两个武士站在的草地,我们可以使用如下代码来实现渐变过渡:
CCGradientLayer *gradientLayer = [CCGradientLayer layerWithColor
 :ccc4(61,33,62,255) toColor:ccc4(65,89,54,255) withDirection:CCGra
 dientDirectionT_B width:480 height:100];
 [gradientLayer setPosition:ccp(0,50)];
 [self addChild:gradientLayer z:0 tag:TAG_GROUND_GRADIENT];
因为CCGradienLayer同样可以控制透明度,这个功能很有用。正如你看到的,那个邪恶的武士背后是发红光的。
让sprite发光:为了让demo中的刀发光我们使用巧妙的颜色操作,加上混合,调和和缩放动作。首先加载Cocos2d提供的fire.png。通过改变它X和Y方向尺寸,我们可以让其变瘦或者变胖。如果你想改变其纵横比(因为例子中的纵横比是3:11,已经很瘦了),你可以将其缩放的更生动些。你同样需要设置混合函数{GL_ONE,GL_ONE}添加混合。最后这个sprite的效果添加到真实的sprite上。
CCSprite *glowSprite = [CCSprite spriteWithFile:@"fire.png"];
 [glowSprite setColor:color];
 [glowSprite setPosition:position];
 [glowSprite setRotation:rotation];
 [glowSprite setBlendFunc: (ccBlendFunc) { GL_ONE, GL_ONE }];
 [glowSprite runAction: [CCRepeatForever actionWithAction:
 [CCSequence actions:[CCScaleTo actionWithDuration:0.9f
 scaleX:size.width scaleY:size.height], [CCScaleTo
 actionWithDuration:0.9f scaleX:size.width*0.75f scaleY:size.
 height*0.75f], nil] ] ];
 [glowSprite runAction: [CCRepeatForever actionWithAction:
 [CCSequence actions:[CCFadeTo actionWithDuration:0.9f
 opacity:150], [CCFadeTo actionWithDuration:0.9f opacity:255], nil]
 ] ];
 [sprite addChild:glowSprite];
sprite的动画
现在给sprite添加动画,这里要强调的是动画的复杂度和你制作动画的难度差不多。在本节中,我们将使用简单的动画创建一个引人入胜的效果。我们创建一群蝙蝠飞向一个让人惊悚的城堡。并使用之前介绍的技术添加一个冷色调的光照效果。
开始
请参考RecipeCollection01工程的代码,并注意遗漏的部分的代码。
如何做?
执行如下代码:
//SimpleAnimObject.h
 @interface SimpleAnimObject : CCSprite {
 int animationType;
 CGPoint velocity;
 }
@interface Ch1_AnimatingSprites {
NSMutableArray *bats;
CCAnimation *batFlyUp;
CCAnimation *batGlideDown;
CCSprite *lightningBolt;
CCSprite *lightningGlow;
int lightningRemoveCount;
}
-(CCLayer*) runRecipe {
//Add our PLIST to the SpriteFrameCache
[[CCSpriteFrameCache sharedSpriteFrameCache]
addSpriteFramesWithFile:@”simple_bat.plist”];
//Add a lightning bolt
lightningBolt = [CCSprite spriteWithFile:@"lightning_bolt.png"];
[lightningBolt setPosition:ccp(240,160)];
[lightningBolt setOpacity:64];
[lightningBolt retain];
//Add a sprite to make it light up other areas.
lightningGlow = [CCSprite spriteWithFile:@"lightning_glow.png"];
[lightningGlow setColor:ccc3(255,255,0)];
[lightningGlow setPosition:ccp(240,160)];
[lightningGlow setOpacity:100];
[lightningGlow setBlendFunc: (ccBlendFunc) { GL_ONE, GL_ONE }];
[lightningBolt addChild:lightningGlow];
//Set a counter for lightning duration randomization
lightningRemoveCount = 0;
//Bats Array Initialization
bats = [[NSMutableArray alloc] init];
//Add bats using a batch node.
CCSpriteBatchNode *batch1 = [CCSpriteBatchNode
batchNodeWithFile:@"simple_bat.png" capacity:10];
[self addChild:batch1 z:2 tag:TAG_BATS];
//Make them start flying up.
for(int x=0; x //Create SimpleAnimObject of bat
SimpleAnimObject *bat = [SimpleAnimObject
spriteWithBatchNode:batch1 rect:CGRectMake(0,0,48,48)];
[batch1 addChild:bat];
[bat setPosition:ccp(arc4random()%400+40, arc4random()%150+150)];
//Make the bat fly up. Get the animation delay (flappingSpeed).
float flappingSpeed = [self makeBatFlyUp:bat];
//Base y velocity on flappingSpeed.
bat.velocity = ccp((arc4random()%1000)/500 + 0.2f, 0.1f/
flappingSpeed);
//Add a pointer to this bat object to the NSMutableArray
[bats addObject:[NSValue valueWithPointer:bat]];
[bat retain];
//Set the bat’s direction based on x velocity.
if(bat.velocity.x > 0){
bat.flipX = YES;
}
}
//Schedule physics updates
[self schedule:@selector(step:)];
return self;
}
-(float)makeBatFlyUp:(SimpleAnimObject*)bat {
CCSpriteFrameCache * cache = [CCSpriteFrameCache
sharedSpriteFrameCache];
//Randomize animation speed.
float delay = (float)(arc4random()%5+5)/80;
CCAnimation *animation = [[CCAnimation alloc] initWithName:@
“simply_bat_fly” delay:delay];
//Randomize animation frame order.
int num = arc4random()%4+1;
for(int i=1; i [animation addFrame:[cache spriteFrameByName:[NSString
stringWithFormat:@"simple_bat_0%i.png",num]]];
num++;
if(num > 4){ num = 1; }
}
//Stop any running animations and apply this one.
[bat stopAllActions];
[bat runAction:[CCRepeatForever actionWithAction: [CCAnimate
actionWithAnimation:animation]]];
//Keep track of which animation is running.
bat.animationType = BAT_FLYING_UP;
return delay; //We return how fast the bat is flapping.
}
-(void)makeBatGlideDown:(SimpleAnimObject*)bat {
CCSpriteFrameCache * cache = [CCSpriteFrameCache
sharedSpriteFrameCache];
//Apply a simple single frame gliding animation.
CCAnimation *animation = [[CCAnimation alloc] initWithName:@
“simple_bat_glide” delay:100.0f];
[animation addFrame:[cache spriteFrameByName:@"simple_bat_01.png"]];
//Stop any running animations and apply this one.
[bat stopAllActions];
[bat runAction:[CCRepeatForever actionWithAction: [CCAnimate
actionWithAnimation:animation]]];
//Keep track of which animation is running.
bat.animationType = BAT_GLIDING_DOWN;
}
-(void)step:(ccTime)delta {
CGSize s = [[CCDirector sharedDirector] winSize];
for(id key in bats){
//Get SimpleAnimObject out of NSArray of NSValue objects.
SimpleAnimObject *bat = [key pointerValue];
//Make sure bats don’t fly off the screen
if(bat.position.x > s.width){
bat.velocity = ccp(-bat.velocity.x, bat.velocity.y);
bat.flipX = NO;
}else if(bat.position.x bat.velocity = ccp(-bat.velocity.x, bat.velocity.y);
bat.flipX = YES;
}else if(bat.position.y > s.height){
bat.velocity = ccp(bat.velocity.x, -bat.velocity.y);
[self makeBatGlideDown:bat];
}else if(bat.position.y bat.velocity = ccp(bat.velocity.x, -bat.velocity.y);
[self makeBatFlyUp:bat];
}
//Randomly make them fly back up
if(arc4random()%100 == 7){
if(bat.animationType == BAT_GLIDING_DOWN){ [self
makeBatFlyUp:bat]; bat.velocity = ccp(bat.velocity.x, -bat.
velocity.y); }
else if(bat.animationType == BAT_FLYING_UP){ [self
makeBatGlideDown:bat]; bat.velocity = ccp(bat.velocity.x, -bat.
velocity.y); }
}
//Update bat position based on direction
bat.position = ccp(bat.position.x + bat.velocity.x, bat.position.y
+ bat.velocity.y);
}
//Randomly make lightning strike
if(arc4random()%70 == 7){
if(lightningRemoveCount [self addChild:lightningBolt z:1 tag:TAG_LIGHTNING_BOLT];
lightningRemoveCount = arc4random()%5+5;
}
}
//Count down
lightningRemoveCount -= 1;
//Clean up any old lightning bolts
if(lightningRemoveCount == 0){
[self removeChildByTag:TAG_LIGHTNING_BOLT cleanup:NO];
}
}
@end
它是图和工作的?
本节将介绍使用SImpleAnimObject构造一个基本的动画类:
动画对象类的结构:
当一个动画转向另一个动画时,记录动画对象的状态是很重要的一个工作。在本例子中,我们使用SimpleAnimObject,它保存了随意的animationType的变量。我们同样保存了一个速度变量,它有一个Y值,此值和动画帧的延迟成反比:
@interface SimpleAnimObject : CCSprite {
 int animationType;
 CGPoint velocity;
 }
根据动画系统的深度,你同样需要保存更多的信息,比如指向一个正在执行的CCAnimation实例的指针,帧信息,和物理形状。
更多….
当你越来越深入学习Cocos2d游戏开发,你将会变得越来越倾向于使用assynchronous action来实现游戏的逻辑和人工智能。从CCAction这个类继承的类,任何移动的动作都可以使用CCMoveBy来实现CCNode的移动,实现CCSprite动画可以使用CCAnimation。当动作执行时,一个异步的定时机制保留在了后台中。刚开始程序员通常会过度依赖这个功能。当执行多动作时使用这个技术可以提高效率。在下面的例子中我们将使用一个整合计时器,它将允许我们
控制光照在屏幕上持续的时间。
//Randomly make lightning strike
 if(arc4random()%70 == 7){
 if(lightningRemoveCount [self addChild:lightningBolt z:1 tag:TAG_LIGHTNING_BOLT];
 lightningRemoveCount = arc4random()%5+5;
 }
 }
//Count down
lightningRemoveCount -= 1;
//Clean up any old lightning bolts
if(lightningRemoveCount == 0){
[self removeChildByTag:TAG_LIGHTNING_BOLT cleanup:NO];
}
就前面这段代码来说,通常使用同步计时器较异步计时器更胜一筹,记住这个,特别是当你的游戏规模越来越大时。
总结:
在本文中我们简单介绍了sprites的基本使用方法。