配置Oracle ACFS集群文件系统
- [grid@rac1 ~]$ crs_stat -t -v ora.registry.acfs
- Name Type R/RA F/FT Target State Host
- ----------------------------------------------------------------------
- ora....ry.acfs ora....fs.type 0/5 0/ ONLINE ONLINE rac1
- [grid@rac1 ~]$ crs_stat -t -v ora.ACFS.dg
- Name Type R/RA F/FT Target State Host
- ----------------------------------------------------------------------
- ora.ACFS.dg ora....up.type 0/5 0/ ONLINE ONLINE rac1
- [root@rac1 ~]# su - grid
- [grid@rac1 ~]$ !exp
- export DISPLAY=192.168.1.105:0
- [grid@rac1 ~]$ asmca


- [grid@rac1 ~]$ df -h
- Filesystem Size Used Avail Use% Mounted on
- /dev/vda3 26G 14G 11G 58% /
- /dev/vda1 99M 12M 83M 13% /boot
- tmpfs 1.2G 787M 441M 65% /dev/shm
- /dev/asm/vol1-330 5.0G 75M 5.0G 2% /u01/app/grid/acfsmounts/acfs_vol1
- [grid@rac1 ~]$ ssh rac2 "df -h"
- Filesystem Size Used Avail Use% Mounted on
- /dev/vda3 26G 14G 10G 59% /
- /dev/vda1 99M 12M 83M 13% /boot
- tmpfs 1.2G 787M 441M 65% /dev/shm
- /dev/asm/vol1-330 5.0G 75M 5.0G 2% /u01/app/grid/acfsmounts/acfs_vol1
- [grid@rac1 ~]$ cd /u01/app/grid/acfsmounts/acfs_vol1
- [grid@rac1 acfs_vol1]$ ls
- lost+found
- drwx------ 2 root root 65536 Jul 9 09:24 lost+found
- [grid@rac1 acfs_vol1]$ cp /etc/passwd ./
- [grid@rac2 ~]$ cd /u01/app/grid/acfsmounts/acfs_vol1
- [grid@rac2 acfs_vol1]$ ls
- lost+found passwd
- [grid@rac2 acfs_vol1]$ head -1 passwd
- root:x:0:0:root:/root:/bin/bash
- [grid@rac1 ~]$ echo $ORACLE_SID
- +ASM1
- [grid@rac1 ~]$ asmcmd
- ASMCMD> ls
- ACFS/
- CRS/
- DATA/
- FRA/
- ASMCMD> volcreate //查看帮助命令
- usage: volcreate -G diskgroup -s size [ --column number ] [ --width stripe_width ] [--redundancy {high|mirror|unprotected} ]
- [--primary {hot|cold}] [--secondary {hot|cold}] volume
- help: help volcreate
- ASMCMD> volcreate -G ACFS -s 5G vol2 //如果空间不足就会报这个错误
- ORA-15032: not all alterations performed
- ORA-15041: diskgroup "ACFS" space exhausted (DBD ERROR: OCIStmtExecute)
- ASMCMD> volcreate -G ACFS -s 4G vol2
- ASMCMD> volinfo -G ACFS vol2
- Diskgroup Name: ACFS
- Volume Name: VOL2
- Volume Device: /dev/asm/vol2-330
- State: ENABLED
- Size (MB): 4096
- Resize Unit (MB): 32
- Redundancy: UNPROT
- Stripe Columns: 4
- Stripe Width (K): 128
- Usage:
- Mountpath:
- ASMCMD> volinfo -G ACFS vol1
- Diskgroup Name: ACFS
- Volume Name: VOL1
- Volume Device: /dev/asm/vol1-330
- State: ENABLED
- Size (MB): 5120
- Resize Unit (MB): 32
- Redundancy: UNPROT
- Stripe Columns: 4
- Stripe Width (K): 128
- Usage: ACFS
- Mountpath: /u01/app/grid/acfsmounts/acfs_vol1
- [root@rac1 ~]# mkdir /vol2 (节点2创建相同的挂载点)
- [root@rac1 ~]# mkfs.acfs /dev/asm/vol2-330
- mkfs.acfs: version = 11.2.0.3.0
- mkfs.acfs: on-disk version = 39.0
- mkfs.acfs: volume = /dev/asm/vol2-330
- mkfs.acfs: volume size = 4294967296
- mkfs.acfs: Format complete.
- [root@rac1 ~]# mount -t acfs /dev/asm/vol2-330 /vol2/
- [root@rac1 ~]# df -h /vol2
- Filesystem Size Used Avail Use% Mounted on
- /dev/asm/vol2-330 4.0G 45M 4.0G 2% /vol2
- [root@rac1 ~]# acfsutil registry -a /dev/asm/vol2-330 /vol2/(注册后,节点2会自动挂载)
- acfsutil registry: mount point /vol2 successfully added to Oracle Registry
Oracle 11g 新特性 – ACFS 说明
Oracle 官网对ACFS 的说明如下:
Introduction to Oracle ACFS
http://docs.oracle.com/cd/E11882_01/server.112/e18951/asmfilesystem.htm
本文译自如下3篇blog:
http://www.rampant-books.com/t_hunter_using_oracle_acfs_on_linux_part1.htm
http://www.rampant-books.com/t_hunter_using_oracle_acfs_on_linux_part2.htm
http://www.rampant-books.com/t_hunter_using_oracle_acfs_on_linux_part3.htm
一.ACFS 说明
Introduced withOracle ASM 11g release 2, Oracle ASM Cluster File System (Oracle ACFS) is ageneral purpose POSIX compliant cluster file system implemented as part of OracleAutomatic Storage Management (Oracle ASM). Being POSIX compliant, all operatingsystem utilities we use with ext3 and other file systems can also be used withOracle ACFS given it belongs to the same family of related standards. OracleACFS extends the Oracle ASM architecture and is used to support many types offiles which are typically maintained outside of the Oracle database. Forexample Oracle ACFS can be used to store BFILEs, database trace files,executables, report files and even general purpose files like image, text,video, and audio files. In addition, Oracle ACFS can be used as a shared filesystem for Oracle home binaries.
--在Oracle 11gR2中引入了ORACLE ACFS(ASM Cluster FileSystem), ACFS 是一个通用的POSIX 标准的clusterfile system,是Oracle ASM 的一种应用。因为遵守POSIX 标准,所以使用ext3 或者其他文件系统的系统应用都可以使用Oracle ACFS来管理。Oracle ACFS 扩展了Oracle ASM的架构,ACFS 可以维护除database 之外的多种类型的文件。 比如ORACLE ACFS 可以用来存储BFILES,database trace files,可执行文件,report file 甚至向照片,文本文件,视频和音频文件等通用的文件。 另外OracleACFS 还可以用作Orale home binaries的sharefile system。
The featuresincluded with Oracle ACFS allow users to create, mount, and manage ACFS usingfamiliar Linux commands. Oracle ACFS provides support for snapshots and theability to dynamically resize existing file systems online using Oracle ASM DynamicVolume Manager (ADVM).
--Oracle ACFS 可以用户用户向执行linux 命令一样的来create,mount,和管理ACFS. ORACLE ACFS 提供了snapshots 功能,使用Oracle ASM Dynamic Volume Manager还可以在线动态的resize已经存在的file system。
Oracle ACFS leverages Oracle ASMfunctionality that enables:
--Oracle ACFS 增加了如下的ASM 功能:
(1) Oracle ACFS dynamic file system resizing
(2) Maximized performance through direct access to Oracle ASM disk groupstorage
(3) Balanced distribution of Oracle ACFS across Oracle ASM disk groupstorage for increased I/O parallelism
(4) Data reliability through Oracle ASM mirroring protection mechanisms
While OracleACFS is useful for storing general purpose files, there are certain files thatit is not meant for. For example, Oracle ASM (traditional disk groups) is stillthe preferred storage manager for all database files because Oracle ACFS doesnot support direct IO for file read and write operations in 11g release 2(11.2). Oracle ASM was specifically designed and optimized to provide the bestperformance for database file types. In addition to Oracle database files,Oracle ACFS does not support files for the Oracle grid infrastructure home.Finally, Oracle ACFS does not support any Oracle files that can be directlystored in Oracle ASM. For example, SPFILE, flashback log files, control files,archived redo log files, the grid infrastructure OCR and voting disk, etcshould be stored in Oracle ASM disk groups. The key point to remember is thatOracle ACFS is the preferred file manager for non-database files and isoptimized for general purpose / customer files which are maintained outside ofthe Oracle database.
--Oracle 是用来存储一般的文件,并不是专门来存储某种类型的文件。例如Oracle ASM,其一直优先用来存储所有的databasefiles。 因为在Oracle 11gR2里,Oracle ACFS 不支持direct IO 的读写操作。而Oracle ASM 则是专门设计和优化,从而已最好的性能来存放database files。除此了不支持Oracle database file之外,Oracle ACFS 还不支持用来存放grid infrastructure home。最后,Oracle ACFS 不支持对任何Oracle 文件的直接存放在ORACLE ASM里。比如,SPFILE,flashback log files,control files,archive redo logs。
最重要的是记住,ORACLE ACFS 优先用来管理non-database file.
This articledescribes three ways to create an Oracle ASM Cluster File System in an Oracle11g release 2 RAC database on the Linux operating environment:
--这边文章提供了Linux环境下,11gR2的3种创建Oracle ACFS的方法:
(1) ASM Configuration Assistant (ASMCA)
(2) Oracle Enterprise Manager (OEM)
(3) Command Line / SQL
There isactually a fourth method that can be employed to create an Oracle ASM ClusterFile System which is to use the ASMCMD command line interface. Throughout thisguide, I'll demonstrate how to use the ASMCMD command line interface in placeof SQL where appropriate.
--实际上有四种方法来创建ACFS.第四种方法就是使用ASMCMD命令。
The Linuxdistribution used in this guide is CentOS 5.5. CentOS is a freeEnterprise-class Linux Distribution derived from the Red Hat Enterprise Linux(RHEL) source and aims to be 100% binary compatible. Although Centos 5 isequivalent to RHEL 5, the CentOS operating system is not supported by OracleASM Cluster File System. Refer to the workaround documented in theprerequisites section of this article if you are using CentOS or a similar RedHat clone.
1.1 ACFS Components –ACFS 组件
Before divinginto the details on how to create and manage Oracle ASM Cluster File System, itmay be helpful to first discuss the major components. The figure below showsthe various components that make up Oracle ACFS and provides an illustration ofthe example configuration that will be created using this guide.
--在研究OracleACFS之前先了解一下Oracle ACFS的主要组成。下图显示了Orace ACFS的各种组成和使用说明。
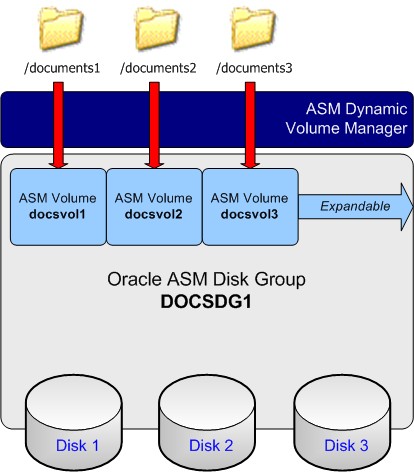
Everythingstarts with an Oracle ASM disk group. An Oracle ASM disk group is made up ofone or more disks shown in figure 1 as DOCSDG1. The next component is an OracleASM volume which is created within an Oracle ASM disk group. The exampleconfiguration illustrated above shows that we will be creating three volumesnamed docsvol1, docsvol2, and docsvol3 on the new disk group named DOCSDG1.Finally, we will be creating a cluster file system for each volume whose mountpoints will be /documents1, /documents2, and /documents3 respectively.
--一切都从OracleASM disk group 说起, Oracle ASM disk group 由一个或者多个disks组成,如上图中的DOCSDG1. 下一个组件就是ORACLE ASM volume,其在Oracle ASM DISK group中创建。上图示例中显示了在DOCSDG1的ASM group上,我们创建了三个volumes:docvolu1,dosvol2,docsvol3。最后在创建一个cluster file system,分别对应每一个volumns,并mount在/documents1, /documents2, and/documents3 三个目录下。
With OracleACFS, as long as there exists free space within the ASM disk group, any of thevolumes can be dynamically expanded which means the file system gets expandedas a result. As I will demonstrate later in this article, expanding a volume /file system is an effortless process and can be performed online without theneed to take any type of outage!
--使用Oracle ACFS,只要ASM disk group中存在空闲空间,任何一个volumes 都可以可以动态的进行扩展。下文会演示相关的操作。
1.2 Oracle ASM Dynamic Volume Manager (ADVM)
Besides anOracle ASM disk group, another key component to Oracle ACFS is the new OracleASM Dynamic Volume Manager (ADVM). ADVM provides volume management services anda standard driver interface to its client (ACFS, ext3, ext4, reiserfs, OCFS2,etc.). The ADVM services include functionality to create, resize, delete,enable, and disable dynamic volumes. An ASM dynamic volume is constructed outof an ASM file with an 'ASMVOL' type attribute to distinguish it from other ASMfile types (i.e.DATAFILE, TEMPFILE, ONLINELOG, etc.):
--除了OracleASM disk group,Oracle ACFS 另一个重要的组件就是Oracle ASM Dynamic Volume Manager (ADVM). ADVM 提供volume 的管理服务,并对客户端(ACFS,ext3,ext4…)提供标准的接口驱动. ADVM 的管理功能包含如下:create,resize,delete,enable 和disable dynamic volumes。ASM dynamic volume 与其他的ASM 文件类型(DATAFILE, TEMPFILE, ONLINELOG,etc)的的区别是使用了ASMVOL的属性来标记。
ASM FileName / Volume Name / Device Name Bytes FileType
--------------------------------------------------------------------------------- ------------------
+CRS/racnode-cluster/ASMPARAMETERFILE/REGISTRY.253.734544679 1,536 ASMPARAMETERFILE
+CRS/racnode-cluster/OCRFILE/REGISTRY.255.734544681 272,756,736 OCRFILE
------------------
272,758,272
+DOCSDG1 [DOCSVOL1]/dev/asm/docsvol1-300 34,359,738,368 ASMVOL
+DOCSDG1 [DOCSVOL2]/dev/asm/docsvol2-300 34,359,738,368 ASMVOL
+DOCSDG1 [DOCSVOL3]/dev/asm/docsvol3-300 26,843,545,600 ASMVOL
------------------
95,563,022,336
+FRA/RACDB/ARCHIVELOG/2010_11_08/thread_1_seq_69.264.734565029 42,991,616 ARCHIVELOG
+FRA/RACDB/ARCHIVELOG/2010_11_08/thread_2_seq_2.266.734565685 41,260,544 ARCHIVELOG
<SNIP >
+FRA/RACDB/ONLINELOG/group_3.259.734554873 52,429,312 ONLINELOG
+FRA/RACDB/ONLINELOG/group_4.260.734554877 52,429,312 ONLINELOG
------------------
12,227,537,408
+RACDB_DATA/RACDB/CONTROLFILE/Current.256.734552525 18,890,752 CONTROLFILE
+RACDB_DATA/RACDB/DATAFILE/EXAMPLE.263.734552611 157,294,592 DATAFILE
+RACDB_DATA/RACDB/DATAFILE/SYSAUX.260.734552569 1,121,984,512 DATAFILE
+RACDB_DATA/RACDB/DATAFILE/SYSTEM.259.734552539 744,497,152 DATAFILE
+RACDB_DATA/RACDB/DATAFILE/UNDOTBS1.261.734552595 791,683,072 DATAFILE
+RACDB_DATA/RACDB/DATAFILE/UNDOTBS2.264.734552619 209,723,392 DATAFILE
+RACDB_DATA/RACDB/DATAFILE/USERS.265.734552627 5,251,072 DATAFILE
+RACDB_DATA/RACDB/ONLINELOG/group_1.257.734552529 52,429,312 ONLINELOG
+RACDB_DATA/RACDB/ONLINELOG/group_2.258.734552533 52,429,312 ONLINELOG
+RACDB_DATA/RACDB/ONLINELOG/group_3.266.734554871 52,429,312 ONLINELOG
+RACDB_DATA/RACDB/ONLINELOG/group_4.267.734554875 52,429,312 ONLINELOG
+RACDB_DATA/RACDB/PARAMETERFILE/spfile.268.734554879 4,608 PARAMETERFILE
+RACDB_DATA/RACDB/TEMPFILE/TEMP.262.734552605 93,331,456 TEMPFILE
+RACDB_DATA/RACDB/spfileracdb.ora 4,608 PARAMETERFILE
------------------
3,352,382,464
Oracle ACFS andother supported 3rd party file systems can use Oracle ADVM as a volumemanagement platform to create and manage file systems while leveraging the fullpower and functionality of Oracle ASM features. A volume may be created in itsown Oracle ASM disk group or can share space in an already existing disk group.Any number of volumes can be created in an ASM disk group. Creating a newvolume in an Oracle ASM disk group can be performed using the ASM ConfigurationAssistant (ASMCA), Oracle Enterprise Manager (OEM), SQL , or ASMCMD. Forexample:
asmcmd volcreate -G docsdg1 -s 20G docsvol3
--Oracle ACFS 和其他支持第三方的文件系统都可以被Oracle ADVM 作为一个volume 的管理平台来创建和管理文件系统。Volume 可以在Oracle ASM disk group中创建或者在已经存在的disk group中共享空间。一个ASM disk group 可以创建任意个volume。 可以使用ASMCA,OEM,SQL 或者ASMCMD 命令来创建新的volume。
Once a newvolume is created in Linux, the ADVM device driver automatically creates avolume device on the OS that is used by clients to access the volume. Thesevolumes may be used as block devices, may contain a file system such as ext3,ext4, reiserfs, OCFS2 or Oracle ACFS may used (as described in this guide) inwhich case the oracle acfs driver is also used for I/O to the file system.(Note that on the Linux platform, Oracle ADVM volume devices are created asblock devices regardless of the configuration of the underlying storage in theOracle ASM disk group. Do not use raw (8) to map Oracle ADVM volume blockdevices into raw volume devices.)
当我们在linux环境下执行命令创建了一个新的volume后,ADVM设备驱动就会自动的在OS 的设备上创建一个volume device,这个volume device 就是client 访问和使用的。这些volume device 可以作为块设备,或其他的文件系统,如ext3,ext2,ext4,或Oracle ACFS来使用。
注意,在Linux 平台下,Oracle ADVM volume device 可以作为block device来创建,而不用关心ASM DISK GROUP 底层的配置。 不要使用raw命令来将ORACLE ADVM volume block device 映射到rawvolume devices上。
Under Linux, allvolume devices are externalized to the OS and appear dynamically as specialfiles in the /dev/asm directory. In this guide, we will use this OS volumedevice to create an Oracle ACFS:
--在Linux 平台下,所有的volume devices都会在/dev/asm 目录下以一个动态的特殊的文件来显示。
$ ls -l /dev/asm
total 0
brwxrwx--- 1 root asmadmin 252, 153601 Nov 28 13:49 docsvol1-300
brwxrwx--- 1 root asmadmin 252, 153602 Nov 28 13:49 docsvol2-300
brwxrwx--- 1 root asmadmin 252, 153603 Nov 28 13:56 docsvol3-300
$ /sbin/mkfs -t acfs -b 4k /dev/asm/docsvol3-300 -n "DOCSVOL3"
Oracle ADVMimplements its own extent and striping algorithm to ensure the highestperformance for general purpose files. An ADVM volume is four columns of 64MBextents and 128KB stripe width by default. ADVM writes data in 128KB stripes ina Round Robin fashion to each column before starting on the next four columnextents. ADVM uses Dirty Region Logging (DRL) for mirrorrecovery after a node or instance failure. This DRL scheme requires a DRL filein the ASM disk group to be associated with each ASM dynamic volume.
--Oracle ADVM 实现了自扩展,使用striping算法来确保最高的性能。 一个ADVM volume 默认有4个64MB 的extents ,并使用128KB的stripe width。在每个volume里, ADVM 会用128KB的stripes 在4个extents里循环的写数据。在node 或者instance failure后,ADVM 使用Dirty Region Logging (DRL)来做mirror recovery。 DRL 方案需要ASM DISK GROUP 中的DRL 文件动态的关联一个ASM dynamic volume。
二.ACFS 管理
2.1 准备工作
2.1.1 Install Oracle Grid Infrastructure
Oracle GridInfrastructure 11g Release 2 (11.2) or higher is required for Oracle ACFS.Oracle grid infrastructure includes Oracle Clusterware, Oracle ASM, OracleACFS, Oracle ADVM, and driver resources software components, which areinstalled into the Grid Infrastructure Home using theOracle Universal Installation (OUI) tool. Refer to this guide for instructionson how to configure Oracle grid infrastructure as part of an Oracle RAC 11grelease 2 database install on Linux.
--Oracle ACFS需要Oracle Grid Infrastructure 11.2 或者更高版本的支持。Oracle GI 包含Oracle Clusterware,Oracle ASM,Oracle ACFS,Oracle ADVM 和软件的相关的driver 资源。这些都可以使用OUI安装到Grid Infrastructure Home。
2.1.2 Log In as the Grid Infrastructure User
To perform theexamples demonstrated in this guide, it is assumed that the Oracle gridinfrastructure owner is 'grid'. If the Oracle grid infrastructure owner is'oracle', then log in as the oracle account.
--在这篇文章里将演示一些示例,假设使用grid用户安装的GI。如果是Oracle用户安装的GI,那么就用oracle 用户来进行登陆。
Log in as theOracle grid infrastructure owner and switch to the Oracle ASM environment onnode 1 of the RAC when performing non-root ACFS tasks:
--使用grid的用户登陆,在RAC的node1,切换到ASM 的环境执行non-root 的ACFS 任务。
[grid@racnode1~]$ id
uid=1100(grid) gid=1000(oinstall)groups=1000(oinstall),1200(asmadmin),1201(asmdba),1202(asmoper)
[grid@racnode1 ~]$ . oraenv
ORACLE_SID = [+ASM1] ? +ASM1
The Oracle base for ORACLE_HOME=/u01/app/11.2.0/grid is /u01/app/grid
[grid@racnode1 ~]$ dbhome
/u01/app/11.2.0/grid
[grid@racnode1 ~]$ echo $ORACLE_SID
+ASM1
2.1.3 Verify / Create ASM Disk Group
After validatingthe Oracle grid infrastructure installation and logging in as the Oracle grid infrastructureowner (grid), the next step is to decide which Oracle ASM disk group should beused to create the Oracle ASM dynamic volume(s). The following SQL demonstrateshow to search the available ASM disk groups:
--成功安装了OracleGI后,用GI的用户登陆,使用如下的SQL 查看有效的disk groups,在决定使用哪个disk group来创建Oracle ASM dynamic volume。
break on inst_id skip 1
column inst_id format 9999999 heading "Instance ID" justifyleft
column name format a15 heading "Disk Group" justify left
column total_mb format 999,999,999 heading"Total (MB)" justify right
column free_mb format 999,999,999 heading "Free(MB)" justify right
column pct_free format 999.99 heading "% Free" justify right
======================================================================
SQL> select inst_id, name, total_mb,free_mb, round((free_mb/total_mb)*100,2) pct_free
2 from gv$asm_diskgroup
3 where total_mb != 0
4 order by inst_id, name;
Instance ID Disk Group Total (MB) Free (MB) % Free
----------- --------------- ------------------------ -------
1 CRS 2,205 1,809 82.04
FRA 33,887 24,802 73.19
RACDB_DATA 33,887 30,623 90.37
2 CRS 2,205 1,809 82.04
FRA 33,887 24,802 73.19
RACDB_DATA 33,887 30,623 90.37
The same task can be accomplished using theASMCMD command-line utility:
--也可以使用ASMCMD 命令来查看上面SQL的结果:
[grid@racnode1 ~]$ asmcmd lsdg
If you find anexisting Oracle ASM disk group that has adequate space, the Oracle ASM dynamicvolume(s) can be created on that free space or a new ASM disk group can becreated.
--如果发现已经存在的ASMdisk group 有合适的空间,那么就可以在这个disk group上创建ASM dynamic volume,或者重建一个ASM disk group。
For the purposeof this guide, I will be creating a dedicated Oracle ASM disk group namedDOCSDG1 which will be used for all three Oracle ASM dynamic volumes. I alreadysetup a shared iSCSI volume and provisioned it using ASMLib. The ASMLib sharedvolume that will be used to create the new disk group is namedORCL:ASMDOCSVOL1.
--在这篇文章里,我专门创建一个ASMdisk group: DOCSDG1,并用其来创建三个ASMdynamic volumes。
[grid@racnode1 ~]$ sqlplus / as sysasm
SQL> select path, name,header_status, os_mb from v$asm_disk;
PATH NAME HEADER_STATUS OS_MB
------------------ ---------------------------- ----------
ORCL:ASMDOCSVOL1 PROVISIONED 98,303
ORCL:CRSVOL1 CRSVOL1 MEMBER 2,205
ORCL:DATAVOL1 DATAVOL1 MEMBER 33,887
ORCL:FRAVOL1 FRAVOL1 MEMBER 33,887
Afteridentifying the ASMLib volume and verifying it is accessible from all OracleRAC nodes, log in to the Oracle ASM instance and create the new disk group fromone of the Oracle RAC nodes. After verifying the disk group was created, log into the Oracle ASM instance on all other RAC nodes and mount the new disk group:
--在确定ASMlibvolume在所有节点都可以访问之后,就可以在其中一个节点上执行命令创建新的ASM disk group。创建成功之后,在其他节点上mount 新的disk group。
[grid@racnode1 ~]$sqlplus / as sysasm
SQL> CREATE DISKGROUP docsdg1 EXTERNAL REDUNDANCY DISK'ORCL:ASMDOCSVOL1' SIZE 98303 M;
Diskgroup created.
SQL>@asm_diskgroups
Disk Group Sector Block Allocation
Name Size Size Unit Size State Type Total Size (MB) Used Size (MB) Pct. Used
---------- ------------- ----------- -------- ------ --------------- -------------- ---------
CRS 512 4,096 1,048,576 MOUNTED EXTERN 2,205 396 17.96
DOCSDG1 512 4,096 1,048,576 MOUNTED EXTERN 98,303 50 .05
FRA 512 4,096 1,048,576 MOUNTED EXTERN 33,887 9,085 26.81
RACDB_DATA 512 4,096 1,048,576 MOUNTED EXTERN 33,887 3,264 9.63
--------------- --------------
Grand Total: 168,282 12,795
===============================================================================================
[grid@racnode2 ~]$sqlplus / as sysasm
SQL>ALTER DISKGROUP docsdg1 MOUNT;
Diskgroup altered.
SQL>@asm_diskgroups
Disk Group Sector Block Allocation
Name Size Size Unit Size State Type Total Size (MB) Used Size (MB) Pct. Used
---------- ------------- ----------- -------- ------ --------------- -------------- ---------
CRS 512 4,096 1,048,576 MOUNTED EXTERN 2,205 396 17.96
DOCSDG1 512 4,096 1,048,576 MOUNTED EXTERN 98,303 50 .05
FRA 512 4,096 1,048,576 MOUNTED EXTERN 33,887 9,085 26.81
RACDB_DATA 512 4,096 1,048,576 MOUNTED EXTERN 33,887 3,264 9.63
--------------- --------------
Grand Total: 168,282 12,795
2.1.4 Verify Oracle ASM Volume Driver
The operating environment used in thisguide is CentOS 5.5 x86_64:
--这里使用的操作系统环境是CentOS 5.5 x86_64:
[root@racnode1 ~]# uname -a
Linux racnode1 2.6.18-194.el5 #1 SMP FriApr 2 14:58:14 EDT 2010 x86_64 x86_64 x86_64 GNU/Linux
On supportedoperating systems, the Oracle ACFS modules will be configured and the OracleASM volume driver started by default after installing Oracle gridinfrastructure. With CentOS and other unsupported operating systems, aworkaround is required to enable Oracle ACFS. One of the first tasks is tomanually start the Oracle ASM volume driver:
--在支持的OS平台下,在安装完Oracle GI 后,默认会配置Oracle ACFS module和启用Oracle ASM volume driver。但是在 CentOS 和其他不支持的的操作系统下,需要手工的启用ORACLE ACFS。所以这里首先要做的就是手工的启动ORACLE ASMvolume driver:
[root@racnode1 ~]# /u01/app/11.2.0/grid/bin/acfsloadstart -s
ADVM/ACFS is not supported oncentos-release-5-5.el5.centos
The failedoutput from the above command should come as no surprise given Oracle ACFS isnot supported on CentOS.
--以上命令会返回失败,因为ORCLE ACFS 在CentOS平台不支持。
By default, theOracle ACFS modules do not get installed on CentOS because it is not asupported operating environment. This section provides a simple, butunsupported, workaround to get Oracle ACFS working on CentOS. This workaroundincludes some of the manual steps that are required to launch the Oracle ASMvolume driver when installing Oracle ACFS on a non-clustered system.
--默认情况,OracleACFS 模块不会在CentOS平台下安装。 因为Oracle不支持这种平台。这里提供一个简单,但不支持的解决方法,让Oracle ACFS 可以在CentOS平台下工作。如果ORACLE ACFS 安装在non-cluster 系统下,那么这个解决方案就需要一些手工的操作来加载OracleASM volume driver。
(Note that thesteps documented in this section serve as a workaround in order to setup OracleACFS on CentOS and is by no means supported by Oracle Corporation.Do not attempt these steps on a criticalproduction environment. You have been warned!)
--注意,这里的方法可以让我们在CentOS平台下使用ORACLE ACFS,但这并不意味着就是Oracle 支持的。 不能在核心的生产环境上使用这个方法。
The following steps will need to be runfrom all nodes in an Oracle RAC database cluster as root.
--在Oracle RAC 集群环境下使用root用户在所有的节点上执行如下的操作。
First, make a copy of the following Perlmodule:
--第一步:复制如下的Perl 模块:
[root@racnode1 ~]# cd/u01/app/11.2.0/grid/lib
[root@racnode1 lib]# cp -p osds_acfslib.pm osds_acfslib.pm.orig
[root@racnode2 ~]# cd /u01/app/11.2.0/grid/lib
[root@racnode2 lib]# cp -p osds_acfslib.pm osds_acfslib.pm.orig
Next, edit the osds_acfslib.pm Perl module.Search for the string 'support this release' (whichwas line 278 in my case).
--第二部,编辑osds_acfslib.pm Perl 模块,搜索字符串:'support this release',在这里是278行。
Replace
if (($release =~ /enterprise-release-5/)||
($release =~ /redhat-release-5/))
--将以上内容替换成如下内容:
with
if (($release =~ /enterprise-release-5/)||
($release =~ /redhat-release-5/) ||
($release =~ /centos-release-5/))
This will getyou past the supported version check; however, if you attempt to load theOracle ASM volume driver from either Oracle RAC node, you get the followingerror:
--这样修改之后可以通过版本支持的检查,但是如果我们在任一个Oracle RAC的节点上Load Oracle ASM volume driver,都会返回如下的错误:
[root@racnode1 ~]#/u01/app/11.2.0/grid/bin/acfsload start -s
acfsload: ACFS-9129: ADVM/ACFS notinstalled
To installADVM/ACFS, copy the following kernel modules from the Oracle gridinfrastructure home to the expected location:
--在安装ADVM/ACFS之前,先从Oracle GI Home 目录下复制如下kernel modules到其他位置。
[root@racnode1 ~]#mkdir /lib/modules/2.6.18-194.el5/extra/usm
[root@racnode1 ~]#cd /u01/app/11.2.0/grid/install/usm/EL5/x86_64/2.6.18-8/2.6.18-8.el5-x86_64/bin
[root@racnode1bin]# cp *ko /lib/modules/2.6.18-194.el5/extra/usm/
[root@racnode2 ~]#mkdir /lib/modules/2.6.18-194.el5/extra/usm
[root@racnode2 ~]#cd /u01/app/11.2.0/grid/install/usm/EL5/x86_64/2.6.18-8/2.6.18-8.el5-x86_64/bin
[root@racnode2bin]# cp *ko /lib/modules/2.6.18-194.el5/extra/usm/
Once the kernelmodules have been copied, we can verify the ADVM/ACFS installation by runningthe following from all Oracle RAC nodes:
--当kenrelmodules 复制完成后,我们可以在RAC的所有节点上运行如下命令验证ADVM/ACFS的安装情况:
[root@racnode1 ~]# cd/u01/app/11.2.0/grid/bin
[root@racnode1 bin]# ./acfsdriverstate-orahome /u01/app/11.2.0/grid version
ACFS-9205: OS/ADVM,ACFS installed version =2.6.18-8.el5(x86_64)/090715.1
[root@racnode2 ~]# cd/u01/app/11.2.0/grid/bin
[root@racnode2 bin]# ./acfsdriverstate-orahome /u01/app/11.2.0/grid version
ACFS-9205: OS/ADVM,ACFS installed version =2.6.18-8.el5(x86_64)/090715.1
The next step is to record dependencies forthe new kernel modules:
--执行如下命令,在新的kernel modules中记录依赖关系:
[root@racnode1 ~]# depmod
[root@racnode2 ~]# depmod
Now, running acfsload start -s willcomplete without any further messages:
--在所有节点,运行acfsload 命令启动acfs:
[root@racnode1 ~]# /u01/app/11.2.0/grid/bin/acfsloadstart -s
[root@racnode2 ~]#/u01/app/11.2.0/grid/bin/acfsload start –s
Check that the modules were successfullyloaded on all Oracle RAC nodes:
--在所有节点上检查模块是否启动成功:
[root@racnode1 ~]# lsmod | grep oracle
oracleacfs 877320 4
oracleadvm 221760 8
oracleoks 276880 2 oracleacfs,oracleadvm
oracleasm 84136 1
[root@racnode2 ~]# lsmod | grep oracle
oracleacfs 877320 4
oracleadvm 221760 8
oracleoks 276880 2 oracleacfs,oracleadvm
oracleasm 84136 1
Configure theOracle ASM volume driver to load automatically on system startup on all OracleRAC nodes. You will need to create an initialization script (/etc/init.d/acfsload)that contains the runlevel configuration and the acfsload command. Change thepermissions on the /etc/init.d/acfsload script to allow it to be executed byroot and then create links in the rc2.d, rc3.d, rc4.d, and rc5.d runleveldirectories using 'chkconfig --add':
--在所有节点配置ASMvolume driver 在系统启动时自动load。 创建一个初始化脚本:/etc/init.d/acfsload,包含runlevel和acfsload命令。 修改该脚本的权限,运行root执行它,并在rc2.d,rc3.d,rc4.d,rc5.d 脚本下创建该脚本的link。
[root@racnode1 ~]# chkconfig --list | grepacfsload
[root@racnode2 ~]# chkconfig --list | grepacfsload
=======================================================
[root@racnode1 ~]# cat >/etc/init.d/acfsload <<EOF
#!/bin/sh
# chkconfig: 2345 30 21
# description: Load Oracle ASM volumedriver on system startup
ORACLE_HOME=/u01/app/11.2.0/grid
export ORACLE_HOME
\$ORACLE_HOME/bin/acfsload start -s
EOF
[root@racnode2 ~]# cat >/etc/init.d/acfsload <<EOF
#!/bin/sh
# chkconfig: 2345 30 21
# description: Load Oracle ASM volumedriver on system startup
ORACLE_HOME=/u01/app/11.2.0/grid
export ORACLE_HOME
\$ORACLE_HOME/bin/acfsload start -s
EOF
=======================================================
[root@racnode1 ~]# chmod 755/etc/init.d/acfsload
[root@racnode2 ~]# chmod 755/etc/init.d/acfsload
=======================================================
[root@racnode1 ~]# chkconfig --addacfsload
[root@racnode2 ~]# chkconfig --addacfsload
=======================================================
[root@racnode1 ~]# chkconfig --list |grep acfsload
acfsload 0:off 1:off 2:on 3:on 4:on 5:on 6:off
[root@racnode2 ~]# chkconfig --list |grep acfsload
acfsload 0:off 1:off 2:on 3:on 4:on 5:on 6:off
If the Oraclegrid infrastructure 'ora.registry.acfs' resource does notexist, create it. This only needs to be performed from one of the Oracle RACnodes:
--如果Oracle GI的ora.registry.acfs 资源不存在,那么先创建它,创建该资源只需要一个节点执行就可以了。
[root@racnode1 ~]# su - grid -ccrs_stat | grep acfs
[root@racnode2 ~]# su - grid -ccrs_stat | grep acfs
=======================================================
[root@racnode1 ~]# /u01/app/11.2.0/grid/bin/crsctladd type ora.registry.acfs.type \
-basetypeora.local_resource.type \
-file /u01/app/11.2.0/grid/crs/template/registry.acfs.type
[root@racnode1 ~]# /u01/app/11.2.0/grid/bin/crsctladd resource ora.registry.acfs \
-attrACL=\'owner:root:rwx,pgrp:oinstall:r-x,other::r--\' \
-type ora.registry.acfs.type-f
=======================================================
[root@racnode1 ~]# su - grid -ccrs_stat | grep acfs
NAME=ora.registry.acfs
TYPE=ora.registry.acfs.type
[root@racnode2 ~]# su - grid -ccrs_stat | grep acfs
NAME=ora.registry.acfs
TYPE=ora.registry.acfs.type
Next, copy theOracle ACFS executables to /sbin and set the appropriate permissions. TheOracle ACFS executables are located in the GRID_HOME/install/usm/EL5/<ARCHITECTURE>/<KERNEL_VERSION>/<FULL_KERNEL_VERSION>/bindirectory (12 files) and include any file without the *.ko extension:
--下一步,复制OracleACFS的执行文件到/sbin目录,并设置合适的权限。OracleACFS的执行文件在GRID_HOME/install/usm/EL5/<ARCHITECTURE>/<KERNEL_VERSION>/<FULL_KERNEL_VERSION>/bin目录下,共有12个文件,包含任何除了*.ko 为扩展名的文件。
[root@racnode1 ~]# cd/u01/app/11.2.0/grid/install/usm/EL5/x86_64/2.6.18-8/2.6.18-8.el5-x86_64/bin
[root@racnode1 bin]# cp acfs* /sbin;chmod 755 /sbin/acfs*
[root@racnode1 bin]# cp advmutil*/sbin; chmod 755 /sbin/advmutil*
[root@racnode1 bin]# cp fsck.acfs*/sbin; chmod 755 /sbin/fsck.acfs*
[root@racnode1 bin]# cp mkfs.acfs*/sbin; chmod 755 /sbin/mkfs.acfs*
[root@racnode1 bin]# cp mount.acfs*/sbin; chmod 755 /sbin/mount.acfs*
[root@racnode2 ~]# cd/u01/app/11.2.0/grid/install/usm/EL5/x86_64/2.6.18-8/2.6.18-8.el5-x86_64/bin
[root@racnode2 bin]# cp acfs* /sbin;chmod 755 /sbin/acfs*
[root@racnode2 bin]# cp advmutil*/sbin; chmod 755 /sbin/advmutil*
[root@racnode2 bin]# cp fsck.acfs*/sbin; chmod 755 /sbin/fsck.acfs*
[root@racnode2 bin]# cp mkfs.acfs*/sbin; chmod 755 /sbin/mkfs.acfs*
[root@racnode2 bin]# cp mount.acfs*/sbin; chmod 755 /sbin/mount.acfs*
As a final step,modify any of the Oracle ACFS shell scripts copied to the /sbin directory(above) to include the ORACLE_HOME for grid infrastructure. The successfulexecution of these scripts requires access to certain Oracle shared librariesthat are found in the grid infrastructure Oracle home. Since many of the OracleACFS shell scripts will be executed as the root user account, the ORACLE_HOMEenvironment variable will typically not be set in the shell and will result inthe executable to fail. An easy workaround to get past this error is to set theORACLE_HOME environment variable for the Oracle grid infrastructure home in theOracle ACFS shell scripts on all Oracle RAC nodes. The ORACLE_HOME should beset at the beginning of the file after the header comments as shown in thefollowing example:
--最后一步,修改任意一个ORACLEACFS shell脚本,添加ORACLE_HOME参数,并复制到/sbin 目录下。成功执行这些脚本需要访问GI ORACLE_HOME下的 某个sharelibraries。 因为一些ACFS 的shell脚本需要用root用户来执行,默认没有设置ORACLE_HOME变量,所以执行脚本时就会失败。一个简单的解决方法就是在所有节点上修改GI HOME 下的ORACLE ACFS shell脚本,添加ORACLE_HOME 变量。ORACLE_HOME 变量需要添加脚本顶部的注释之后,示例如下:
#!/bin/sh
#
# Copyright (c) 2001, 2009, Oracle and/orits affiliates. All rights reserved.
#
ORACLE_HOME=/u01/app/11.2.0/grid
ORA_CRS_HOME=%ORA_CRS_HOME%
if [ ! -d $ORA_CRS_HOME ]; then
ORA_CRS_HOME=$ORACLE_HOME
fi
...
Add theORACLE_HOME environment variable for the Oracle grid infrastructure home asnoted above to the following Oracle ACFS shell scripts on all Oracle RAC nodes:
--所有节点上的如下脚本都需要添加ORACLE_HOME 变量:
· /sbin/acfsdbg
· /sbin/acfsutil
· /sbin/advmutil
· /sbin/fsck.acfs
· /sbin/mkfs.acfs
· /sbin/mount.acfs
2.1.5 Verify ASM Disk Group Compatibility Level
Thecompatibility level for the Oracle ASM disk group must be at least 11.2 inorder to create an Oracle ASM volume. From the Oracle ASM instance, perform thefollowing checks:
--为了创建OracleASM volume,Oracle ASM 实例的compatibilitylevel 级别至少需要设置为11.2. 可以通过如下的SQL来检查ASM instance的compatibility值:
SQL> SELECT compatibility,database_compatibility
2 FROM v$asm_diskgroup
3 WHERE name = 'DOCSDG1';
COMPATIBILITY DATABASE_COMPATIBILITY
---------------- -----------------------
10.1.0.0.0 10.1.0.0.0
If the resultsshow something other than 11.2 or higher (as the above example shows), we needto set the compatibility to at least 11.2 by issuing the following series ofSQL statements from the Oracle ASM instance:
--如果compatibility值不等于11.2,那么可以通过如下的方式来修改该值:
[grid@racnode1 ~]$ sqlplus / as sysasm
SQL> ALTER DISKGROUP docsdg1 SETATTRIBUTE 'compatible.asm' = '11.2';
Diskgroup altered.
SQL> ALTER DISKGROUP docsdg1 SETATTRIBUTE 'compatible.rdbms' = '11.2';
Diskgroup altered.
SQL> ALTER DISKGROUP docsdg1 SETATTRIBUTE 'compatible.advm' = '11.2';
Diskgroup altered.
If you receivean error while attempting to set the 'compatible.advm'attribute, verify that the Oracle ASM volume driver is running:
如果在设置设置compatible.advm属性时接收到错误信息,先检查ASM volumedriver 是否正在运行:
SQL> ALTER DISKGROUP docsdg1 SETATTRIBUTE 'compatible.advm' = '11.2';
ALTER DISKGROUP docsdg1 SET ATTRIBUTE'compatible.advm' = '11.2'
*
ERROR at line 1:
ORA-15032: not all alterations performed
ORA-15242: could not set attributecompatible.advm
ORA-15238: 11.2 is not a valid value forattribute compatible.advm
ORA-15477: cannot communicate with thevolume driver
Verify the changes to the compatibilitylevel:
--验证compatibility 的值:
SQL> SELECT compatibility,database_compatibility
2 FROM v$asm_diskgroup
3 WHERE name = 'DOCSDG1';
COMPATIBILITY DATABASE_COMPATIBILITY
---------------- -----------------------
11.2.0.0.0 11.2.0.0.0
2.2 ASM Configuration Assistant (ASMCA)
This sectionincludes step-by-step instructions on how to create an Oracle ASM cluster filesystem using the Oracle ASM Configuration Assistant (ASMCA). Note that at thetime of this writing, ASMCA only supports the creation of volumes and filesystems. Deleting an Oracle ASM volume or file system requires thecommand-line.
--这里演示如果使用ASMCA来一步一步创建ASM cluster file system。在写这边文章的时候,ASMCA 仅支持创建volume 和file system,删除Oracle ASM volume或者file system需要使用命令行来操作。
2.2.1 Create Mount Point
From each Oracle RAC node, create adirectory that will be used to mount the new Oracle ACFS:
--在每个节点上,创建一个目录用来挂载Oracle ACFS:
[root@racnode1 ~]# mkdir /documents1
[root@racnode2 ~]# mkdir /documents1
2.2.2 Create ASM Cluster File System
As the Oraclegrid infrastructure owner, run the ASM Configuration Assistant (asmca) fromonly one node in the cluster (racnode1 for example):
在其中任一节点上用Oracle GI用户执行asmca命令:
[grid@racnode1 ~]$ asmca
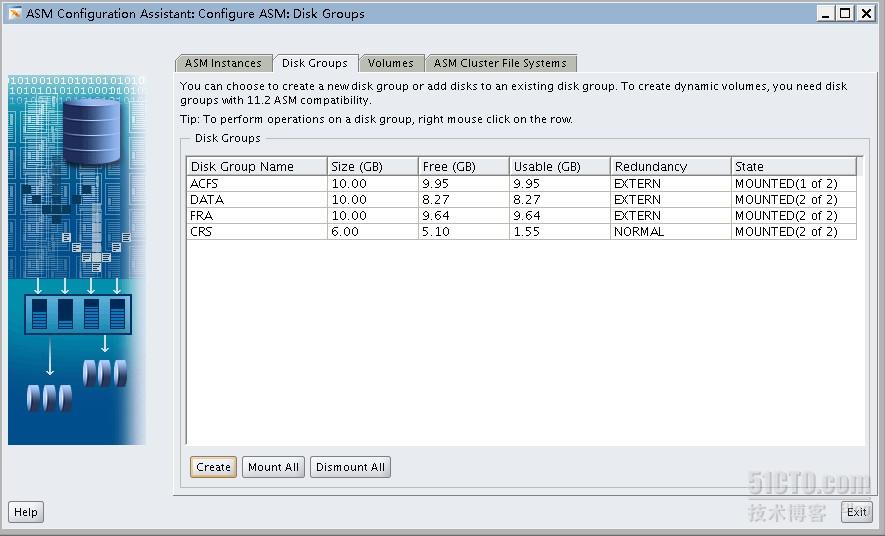
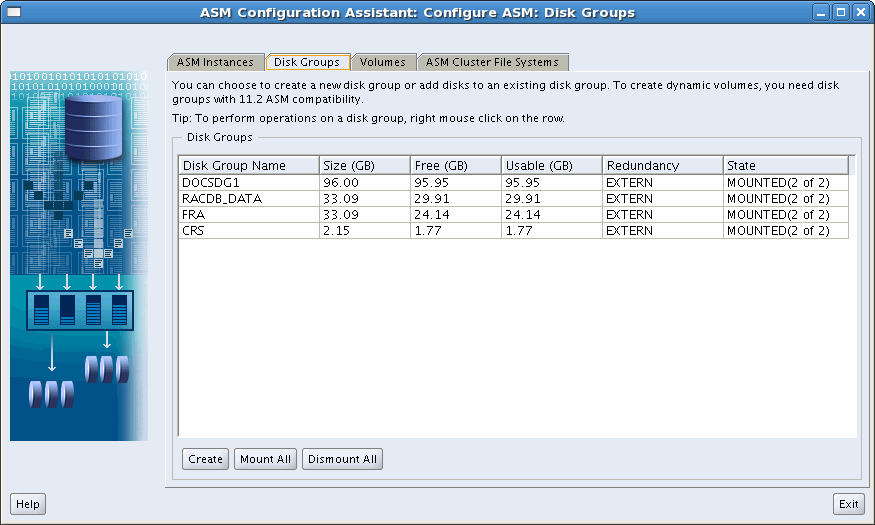
The followingare the screen names and responses with the ASM Configuration Assistant DiskGroups: When the Oracle ASM configuration assistant starts you arepresented with the 'Disk Groups' tab as shown here.
--如下截屏是运行ASMCA,并选择Disk Groups后的图示。
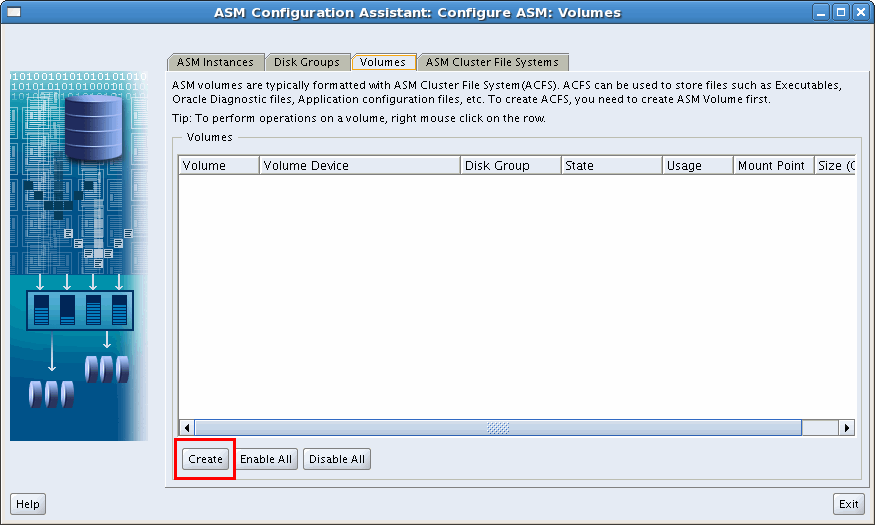
Volumes: Click on the 'Volumes' tabthen click the [Create] button.
--点击Volumes 标签,然后点击Create按钮:
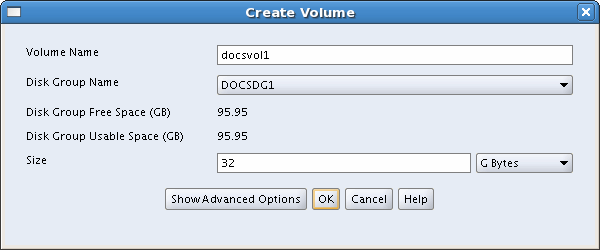
Create ASMVolume: Then create a new ASM volume by supplying a "VolumeName", "Disk Group Name", and "Size". For the purposeof this example, I will be creating a 32GB volume named "docsvol1" onthe "DOCSDG1" ASM disk group. After verifying all values in thisdialog are correct, click the [OK] button.
--填写VolumeName,Disk Group Name,和Size 选项,创建一个新的ASM Volume。如下显示,这里在DOCSDG1的ASM DISK GROUP上创建了一个docsvol1的Volume,大小32GB。 之后会弹出一个对话,让我们验证信息的准确性,点击确认即可。
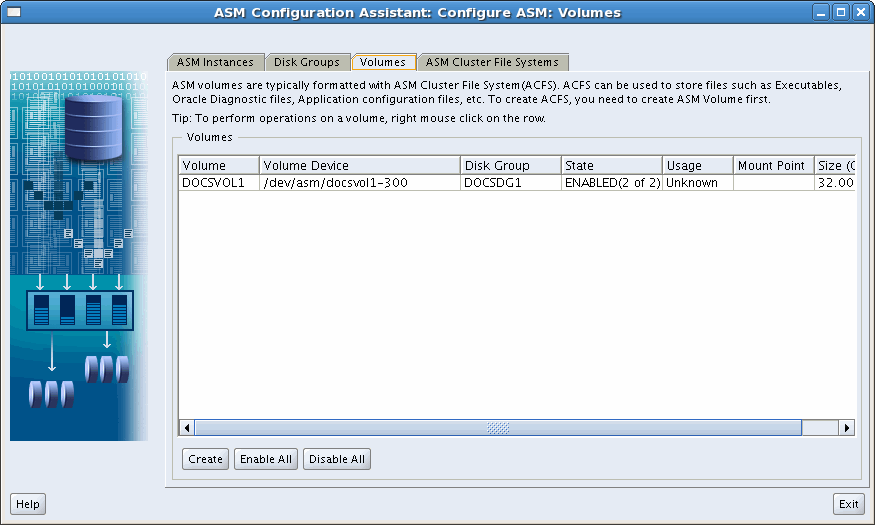
Volume Created: After the volume iscreated, acknowledge the 'Volume: Creation' dialog. When returned to the"Volumes" tab, the "State" for the new ASM volume shouldbe ENABLED for all Oracle RAC nodes (i.e. 'ENABLED(2 of2)')..
--创建完volume后,在ASMCA工具的主界面选择Volumes 标签。 在所有节点上,新的ASM volume 状态应该为ENABLE。
ASM Cluster FileSystems: Click on the 'ASM Cluster File Systems' tab then clickthe [Create] button.
--选择“ASMCLUSTER FILE SYSTEM” 标签后,点击CREAT E 按钮。
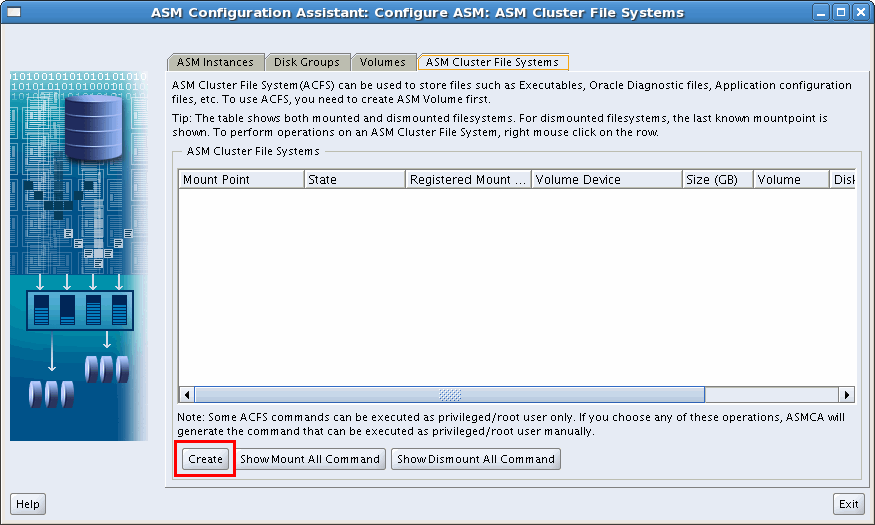
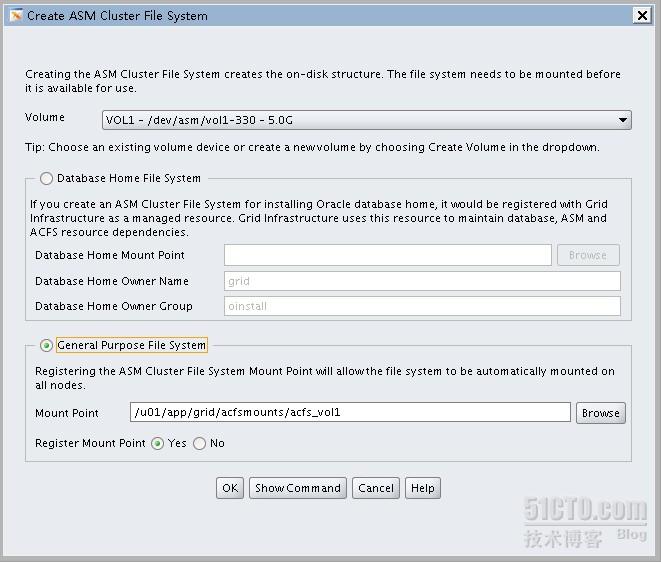
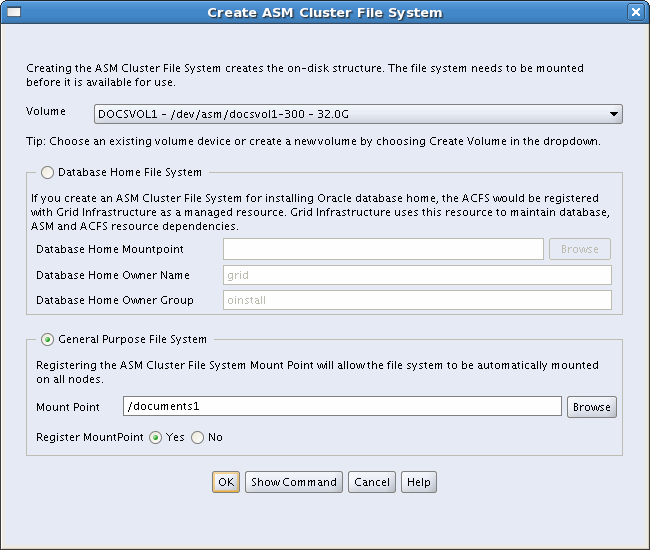
Create ASMCluster File System: Verify that the newly created volume (DOCSVOL1) isselected in the 'Volume' list. Select the 'General Purpose File System' option.Enter the previously created mount point directory (/documents1) or leave thesuggested mount point. Select the 'Yes' option for 'Register MountPoint'.After verifying all values in this dialog are correct, clickthe [OK] button.
--创建ASMCluster File System:在Volume 列表里选择我们创建的volume(DOCSVOL1)。 选择“General Purpose File System” 选项。 选择我们之前创建的目录作为挂载点,选择:'Register MountPoint'选项为YES。 然后弹出对话框,确认我们填写的信息,点击OK。创建即可。
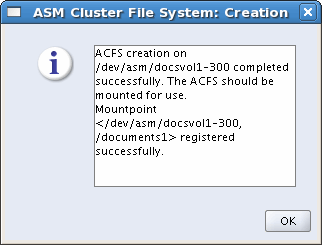
ASM Cluster File System Created: Afterthe ASM Cluster File System is created, acknowledge the 'ASM Cluster FileSystem: Creation' dialog.
--在ASM Cluster File System 创建之后,会弹出一个通知窗口。
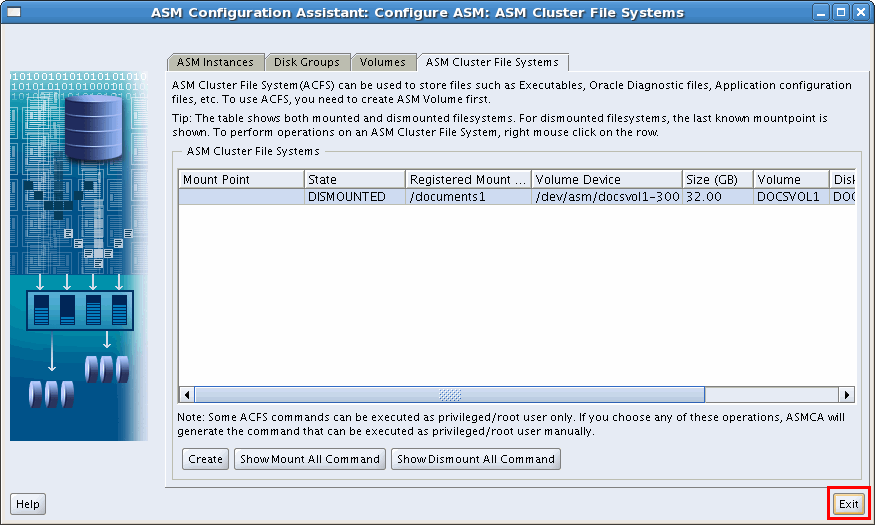
ASM Cluster FileSystems: The newly created Oracle ASM cluster file system is now listedunder the 'ASM Cluster File Systems' tab. Note that the newclustered file system is not mounted. That will need to be performed manuallyon all Oracle RAC nodes as a privileged user (root) after exiting from theASMCA. Exit the ASM Configuration Assistant by clicking the [Exit] button.
--创建完之后,在'ASMCluster File Systems'标签下就可以看到我们创建的ACFS信息。 注意,这里新创建的ACFS 并没有挂载。 我们需要在所有节点上用root用户来手工的执行挂载操作。这里点击EXIT退出ASMCA.
2.3 Mount the ASM Cluster File System
Now that the newOracle ASM cluster file system has been created and registered in the OracleACFS mount registry, log in to all Oracle RAC nodes as root and runthe following mount command:
--现在已经创建完ASMCluster File System,并将其注册到Oracle ACFS mount registry。在所有节点用root登陆,并执行如下命令进行挂载:
[root@racnode1 ~]# /bin/mount -t acfs/dev/asm/docsvol1-300 /documents1
/sbin/mount.acfs.bin: error while loadingshared libraries: libhasgen11.so:
cannot open shared object file: No suchfile or directory
[root@racnode2 ~]# /bin/mount -t acfs/dev/asm/docsvol1-300 /documents1
/sbin/mount.acfs.bin: error while loadingshared libraries: libhasgen11.so:
cannot open shared object file: No suchfile or directory
If you don'thave the ORACLE_HOME environment variable set to the Oracle grid infrastructurehome as explained in the prerequisites section to this guide, the mount commandwill fail as shown above. In order to mount the new cluster file system, theOracle ASM ACFS binaries need access to certain shared libraries in theORACLE_HOME for grid infrastructure. An easy workaround to get past this erroris to set the ORACLE_HOME environment variable for grid infrastructure in thefile/sbin/mount.acfs on all Oracle RAC nodes. TheORACLE_HOME should be set at the beginning of the file after the headercomments as follows:
--如果没有按照该文档之前说的设置ORACLE_HOME环境变量,那么就会遇到上面的错误。 为了能成功挂载新的ACFS,Oracle ASM ACFS binaries需要访问ORACLE_HOME(GI目录)下某些shared libraries。 一个简单的解决方法,是在所有节点的/sbin/mount.acfs文件里设置ORACLE_HOME变量。示例如下:
#!/bin/sh
#
# Copyright (c) 2001, 2009, Oracle and/orits affiliates. All rights reserved.
#
ORACLE_HOME=/u01/app/11.2.0/grid
ORA_CRS_HOME=%ORA_CRS_HOME%
if [ ! -d $ORA_CRS_HOME ]; then
ORA_CRS_HOME=$ORACLE_HOME
fi
...
You should now be able to successfullymount the volume:
--现在就可以成功挂载了:
[root@racnode1 ~]# /bin/mount -t acfs/dev/asm/docsvol1-300 /documents1
[root@racnode2 ~]# /bin/mount -t acfs/dev/asm/docsvol1-300 /documents1
2.4 Verify Mounted Cluster File System
To verify thatthe new cluster file system mounted properly, run the following mount commandfrom all Oracle RAC nodes:
--在所有节点上执行如下命令,来验证ACFS是否正确挂载:
[root@racnode1 ~]# mount
/dev/mapper/VolGroup00-LogVol00 on / typeext3 (rw)
proc on /proc type proc (rw)
sysfs on /sys type sysfs (rw)
devpts on /dev/pts type devpts(rw,gid=5,mode=620)
/dev/sdb1 on /local type ext3 (rw)
/dev/sda1 on /boot type ext3 (rw)
tmpfs on /dev/shm type tmpfs (rw)
none on /proc/sys/fs/binfmt_misc typebinfmt_misc (rw)
sunrpc on /var/lib/nfs/rpc_pipefs typerpc_pipefs (rw)
domo:PUBLIC on /domo type nfs(rw,addr=192.168.1.121)
oracleasmfs on /dev/oracleasm typeoracleasmfs (rw)
/dev/asm/docsvol1-300 on /documents1 typeacfs (rw)
[root@racnode2 ~]# mount
/dev/mapper/VolGroup00-LogVol00 on / typeext3 (rw)
proc on /proc type proc (rw)
sysfs on /sys type sysfs (rw)
devpts on /dev/pts type devpts(rw,gid=5,mode=620)
/dev/sdb1 on /local type ext3 (rw)
/dev/sda1 on /boot type ext3 (rw)
tmpfs on /dev/shm type tmpfs (rw)
none on /proc/sys/fs/binfmt_misc typebinfmt_misc (rw)
sunrpc on /var/lib/nfs/rpc_pipefs typerpc_pipefs (rw)
domo:Public on /domo type nfs(rw,addr=192.168.1.121)
oracleasmfs on /dev/oracleasm typeoracleasmfs (rw)
/dev/asm/docsvol1-300 on /documents1 typeacfs (rw)
2.5 Set Permissions for ACFS
With the newcluster file system now mounted on all Oracle RAC nodes, change the permissionsto allow user access. For the purpose of this example, I want to grant the oracleuser account and dba group read/write permissions. Run the following as rootfrom only one node in the Oracle RAC:
--在所有节点上挂载好ACFS之后,设置挂载点允许相关用户来访问。在这里,我们将挂载点/docments1 赋予dba 组的Oracle 用户下,并给予了读写的权限,只需要用root用户在一个节点上运行如下命令:
[root@racnode1 ~]# chown oracle.dba/documents1
[root@racnode1 ~]# chmod 775/documents1
Test –测试
Now let's perform a test to see if all ofour hard work paid off.
Node 1 –节点1
Log in to thefirst Oracle RAC node as the oracle user account and create a test file on thenew cluster file system:
--在节点1上用oracle 用户登陆,并在挂载点上创建一个测试文件。
[oracle@racnode1~]$ id
uid=1101(oracle)gid=1000(oinstall) groups=1000(oinstall),1201(asmdba),1300(dba),1301(oper)
[oracle@racnode1~]$ echo "The Hunter Family: Jeff, Melody, and Alex" >/documents1/test.txt
[oracle@racnode1~]$ ls -l /documents1
total 72
drwxr-xr-x 5root root 4096 Nov 23 21:17 .ACFS/
drwx------ 2root root 65536 Nov 23 21:17 lost+found/
-rw-r--r-- 1 oracleoinstall 42 Nov 23 21:25 test.txt
Node 2 –节点2
Log in to thesecond Oracle RAC node as the oracle user account and verify the presenceand content of the test file:
--在第二个节点上用oracle用户登陆,并验证之前创建的测试文件是否存在:
[oracle@racnode2 ~]$ id
uid=1101(oracle) gid=1000(oinstall)groups=1000(oinstall),1201(asmdba),1300(dba),1301(oper)
[oracle@racnode2 ~]$ ls -l /documents1
total 72
drwxr-xr-x 5 root root 4096 Nov 23 21:17 .ACFS/
drwx------ 2 root root 65536 Nov 23 21:17 lost+found/
-rw-r--r-- 1 oracle oinstall 42 Nov 23 21:25 test.txt
[oracle@racnode2 ~]$ cat/documents1/test.txt
The Hunter Family: Jeff, Melody, and Alex
2.6 Oracle Enterprise Manager (OEM)
This sectionpresents a second method that can be used to create an Oracle ASM cluster filesystem; namely, Oracle Enterprise Manager (OEM). Similar to the ASMConfiguration Assistant (ASMCA), OEM provides a convenient graphical userinterface for creating and maintaining ASM cluster file systems.
第二种用来创建Oracle ASMCluster File System: OEM,与ASMCA工具类似,OEM 提供了图形接口来创建和维护ACFS 系统。
Create Mount Point
From each Oracle RAC node, create adirectory that will be used to mount the new Oracle ACFS:
--在每个RAC 节点上,创建一个目录用来作为新的ACFS的挂载点:
[root@racnode1 ~]# mkdir /documents2
[root@racnode2 ~]# mkdir /documents2
三. ACFS Snapshots
Oracle ASMCluster File System includes a feature called snapshots. An Oracle ACFSsnapshot is an online, read-only, point in timecopy of an Oracle ACFSfile system. The snapshot process uses Copy-On-Writefunctionality which makes efficient use of disk space. Note that snapshots workat the block level instead of the file level. Before an Oracle ACFS file extentis modified or deleted, its current value is copied to the snapshot to maintainthe point-in-time view of the file system. (Note: When a file is modified, onlythe changed blocks are copied to the snapshot location which helps conservedisk space.)
--Oracle ASM ClusterFile System 包含了一个叫“快照”的特性。OracleACFS 快照是一个online,read-only,对Oracle ACFS 文件系统的一个基于时间点的复制。 快照进程使用的是Copy-On-Write的方法来有效的使用磁盘空间。注意快照是在block 级别进行复制,而不是在文件级别。在OracleACFS 文件extents 被修改或者删除时,会把当前值copy到snapshot里,从而来位置一个基于时间点的视图。 注意,当ACFS 文件被修改时,仅仅是被修改的blocks copy到snapshot的位置,从而有效利用存储空间。
Once an OracleACFS snapshot is created, all snapshot files are immediately available for use.Snapshots are always available as long as the file system is mounted. Thisprovides support for online recovery of files inadvertently modified or deletedfrom a file system. You can have up to 63 snapshot views supported for eachfile system. This provides for a flexible online file recovery solution whichcan span multiple views. You can also use an Oracle ACFS snapshot as the sourceof a file system backup, as it can be created on demand to deliver a current,consistent, online view of an active file system. Once the Oracle ACFS snapshotis created, simply backup the snapshot to another disk or tape location tocreate a consistent backup set of the files. (Note: Oracle ACFS snapshots canbe created and deleted on demand without the need to take the file systemoffline. ACFS snapshots provide a point-in-time consistent view of the entirefile system which can be used to restore deleted or modified files and toperform backups.)
--一旦OracleACFS的snapshot被创建,所有的snapshotfile都可以立即被使用。在ACFS 系统mount期间,snapshot 一直保持可用。这样在错误修改或者删除后,可以使用快照来进行onlinerecovery。每个ACFS 系统最后可以设置63个snapshot。这样提供了丰富的online file recovery 方案. 我们也可以使用ORACLE ACFS snapshot 来作为源file system 的一个备份,可以对active file system创建一个当前的,一致的,online view的备份。 一旦ORACLE ACFS 快照创建完成,可以简单的备份快照到其他硬盘或者磁带上。
注意: Oracle ACFS 快照可以随时创建和删除,不需要将ACFS offline。 ACFS 快照对整个file system提供了一个基于时间点的一致性视图,可以使用这些视图来还原被删除或者修改的files,或者执行backup。
All storage forOracle ACFS snapshots are maintained within the file system which eliminatesthe need for separate storage pools for file systems and snapshots. As shown inthe next section, Oracle ACFS file systems can be dynamically re-sized toaccommodate addition file and snapshot storage requirements.
--所有的ACFS 的快照文件都是存放file system进行存储和维护,从而不需要对file system 和snapshots进行独立的维护。在下一节中会提到,Oracle ACFS 可以根据 addition file 和snapshot 存储的需要来进行动态的re-size。
Oracle ACFSsnapshots are administered with the acfsutil snap command. This section willprovide an overview on how to create and retrieve Oracle ACFS snapshots.
Oracle ACFS 快照由acfsutil snap命令来进行管理。 下文会介绍如何来创建和恢复ACFS 快照。
3.1 Oracle ACFS Snapshot Location
Whenever youcreate an Oracle ACFS file system, a hidden directory is created as asub-directory to the Oracle ACFS file system named .ACFS. (Note that hiddenfiles and directories in Linux start with leading period.)
--无论我们何时创建一个ACFS文件系统,都会自动创建一个隐藏的子目录(.ACFS)与ORACLEACFS 文件系统对应。
[oracle@racnode1 ~]$ ls -lFA/documents3
total 2851148
drwxr-xr-x 5 root root 4096 Nov 26 17:57 .ACFS/
-rw-r--r-- 1 oracle oinstall 1239269270Nov 27 16:02 linux.x64_11gR2_database_1of2.zip
-rw-r--r-- 1 oracle oinstall 1111416131Nov 27 16:03 linux.x64_11gR2_database_2of2.zip
-rw-r--r-- 1 oracle oinstall 555366950 Nov 27 16:03linux.x64_11gR2_examples.zip
drwx------ 2 root root 65536 Nov 26 17:57 lost+found/
If you don'thave the ORACLE_HOME environment variable set to the Oracle grid infrastructurehome as explained in the prerequisites section to this guide, the mount commandwill fail as shown above. In order to mount the new cluster file system, theOracle ASM ACFS binaries need access to certain shared libraries in theORACLE_HOME for grid infrastructure. An easy workaround to get past this erroris to set the ORACLE_HOME environment variable for grid infrastructure in thefile /sbin/mount.acfs on all Oracle RAC nodes. The ORACLE_HOME should be set atthe beginning of the file after the header comments as follows:
--如果没有设置ORACLE_HOME的环境变量,mount命令会执行失败。
Found in the.ACFS are two directories named repl and snaps. All Oracle ACFS snapshotsare stored in the snaps directory.
--.ACFS 目录有2个子目录:repl 和snaps。 所有的ACFS快照都存储在snaps目录下:
[oracle@racnode1 ~]$ ls -lFA/documents3/.ACFS
total 12
drwx------ 2 root root 4096 Nov 26 17:57.fileid/
drwx------ 6 root root 4096 Nov 26 17:57repl/
drwxr-xr-x 2 root root 4096 Nov 27 15:53snaps/
Since no Oracle ACFS snapshots exist, thesnaps directory is empty.
--因为这里没有ACFS 快照的存在,所以snaps目录为空:
[oracle@racnode1 ~]$ ls -lFA/documents3/.ACFS/snaps
total 0
3.2 Create Oracle ACFS Snapshot
Let's start bycreating an Oracle ACFS snapshot named snap1 for the Oracle ACFSmounted on /documents3. This operation should be performed as root or theOracle grid infrastructure owner:
--让我们为/documents3的挂载点创建一个叫作snap1的快照。用GI的用户或者root执行如下操作:
[root@racnode1 ~]# /sbin/acfsutil snapcreate snap1 /documents3
acfsutil snap create: Snapshot operation iscomplete.
The data for thenew snap1 snapshot will be stored in /documents3/.ACFS/snaps/snap1. Once thesnapshot is created, any existing files and/or directories in the file systemare automatically accessible from the snapshot directory. For example, when Icreated the snap1 snapshot, the three Oracle ZIP files were made available fromthe snapshot /documents3/.ACFS/snaps/snap1:
--snap1 快照的数据将会存储在/documents3/.ACFS/snaps/snap1目录下。一般快照创建完成,在快照目录下可以访问ACFS 文件系统里的任何存在的文件或者目录,例如,当我们创建了snap1的快照,在/documents3/.ACFS/snaps/snap1目录下就可以看到3个Oracle ZIP 文件。
[oracle@racnode1 ~]$ ls -lFA/documents3/.ACFS/snaps/snap1
total 2851084
drwxr-xr-x 5 root root 4096 Nov 26 17:57 .ACFS/
-rw-r--r-- 1 oracle oinstall 1239269270 Nov27 16:02 linux.x64_11gR2_database_1of2.zip
-rw-r--r-- 1 oracle oinstall 1111416131 Nov27 16:03 linux.x64_11gR2_database_2of2.zip
-rw-r--r-- 1 oracle oinstall 555366950 Nov 27 16:03linux.x64_11gR2_examples.zip
?--------- ? ? ? ? ? lost+found
It is importantto note that when the snapshot gets created, nothing is actually stored in thesnapshot directory, so there is no additional space consumption. The snapshotdirectory will only contain modified file blocks when a file isupdated or deleted.
这里非常重要的一点,当我们创建完快照之后,实际上没有任何数据存储在快照的目录,所以也不需要消耗额外的存储空间。当ACFS 中的文件被修改时, 快照目录会先保存被修改的block。
3.3 Restore Files From an Oracle ACFS Snapshot
When a file isdeleted (or modified), this triggers an automatic backup of all modified fileblocks to the snapshot. For example, if I delete thefile /documents3/linux.x64_11gR2_examples.zip, the previous images of thefile blocks are copied to the snap1 snapshot where it can be restoredfrom at a later time if necessary:
--当一个文件被删除或者修改,会自动触发并备份所有修改的文件block到快照。 比如,如果我们删除/documents3/linux.x64_11gR2_examples.zip文件,前文件的镜像会被copy到snap1的快照目录下,这样我们可以在以后需要时恢复这个文件。
[oracle@racnode1 ~]$ rm/documents3/linux.x64_11gR2_examples.zip
If you werelooking for functionality in Oracle ACFS to perform a rollback of thecurrent file system to a snapshot, then I have bad news; one doesn't exist.Hopefully this will be a feature introduced in future versions!
In the casewhere you accidentally deleted a file from the current file system, it can berestored by copying it from the snapshot, back to the the current file system:
--在这个案例里,如果我们意外删除了当前文件系统里的一个文件,可以直接从快照中使用cp命令进行还原。
[oracle@racnode1 ~]$ cp/documents3/.ACFS/snaps/snap1/linux.x64_11gR2_examples.zip /documents3
3.4 Display Oracle ACFS Snapshot Information
The '/sbin/acfsutilinfo fs' command can provide file system information as well aslimited information on any Oracle ACFS snapshots:
'/sbin/acfsutil info fs'命令可以提供文件系统的信息,同时也会提供任何ACFS 快照的限制信息。
[oracle@racnode1 ~]$ /sbin/acfsutilinfo fs /documents3
/documents3
ACFS Version: 11.2.0.1.0.0
flags: MountPoint,Available
mount time: Sat Nov 27 03:07:502010
volumes: 1
total size: 26843545600
total free: 23191826432
primary volume: /dev/asm/docsvol3-300
label: DOCSVOL3
flags: Primary,Available
on-disk version: 39.0
allocation unit: 4096
major, minor: 252, 153603
size: 26843545600
free: 23191826432
numberof snapshots: 1
snapshot space usage: 560463872
From the exampleabove, you can see that I have only one active snapshot that is consumingapproximately 560MB of disk space. This coincides with the size of the file Iremoved earlier (/documents3/linux.x64_11gR2_examples.zip) which triggered aback up of all modified file image blocks.
--从上面的示例,可以看到这里只有一个active 的snapshot,它消耗了大约560M的磁盘空间。这个大小正好和我们之前rm掉的文件大小一致。
To query allsnapshots, simply list the directories under '<ACFS_MOUNT_POINT>/.ACFS/snaps'.Each directory under the snaps directory is an Oracle ACFS snapshot.
--如果要查询所有的快照,可以查看'<ACFS_MOUNT_POINT>/.ACFS/snaps'目录,ACFS快照在该目录下都会有一个独立的目录。
Another usefultechnique used to obtain information about Oracle ACFS snapshots is to querythe view V$ASM_ACFSSNAPSHOTS from the Oracle ASM instance:
--也可以从ASMInstance中查询V$ASM_ACFSSNAPSHOTS视图来获取Oracle ACFS 快照的信息。
column snap_name format a15 heading "Snapshot Name"
column fs_name format a15 heading "File System"
column vol_device format a25 heading "Volume Device"
column create_time format a20 heading "Create Time"
======================================================================
SQL> select snap_name, fs_name,vol_device,
2 to_char(create_time, 'DD-MON-YYYYHH24:MI:SS') as create_time
3 from v$asm_acfssnapshots
4 order by snap_name;
Snapshot Name File System Volume Device Create Time
--------------- ---------------------------------------- --------------------
snap1 /documents3 /dev/asm/docsvol3-300 27-NOV-2010 16:11:29
3.5 Delete Oracle ACFS Snapshot
Use the 'acfsutil snap delete'command to delete an existing Oracle ACFS snapshot:
--可以使用'acfsutil snap delete' 命令删除已经存在的ORACLE ACFS 快照:
[root@racnode1 ~]# /sbin/acfsutil snapdelete snap1 /documents3
acfsutil snap delete: Snapshot operationis complete.
四. Managing ACFS
4.1 Oracle ACFS and Dismount or Shutdown Operations
If you takeanything away from this article, know and understand the importance of dismountingany active file system configured with an Oracle ASM Dynamic Volume Manager(ADVM) volume device, BEFORE shutting down an Oracle ASM instance ordismounting a disk group! Failure to do so will result in I/O failures and veryangry users!
After the filesystem(s) have been dismounted, all open references to Oracle ASM files areremoved and associated disk groups can then be dismounted or the Oracle ASMinstance shut down.
--在ACFS 文件系统被dismount 之后,所有与ORACLE ASM files 相关联的连接都会被移除,关联的ASM disk group 才可以被dismount,或者ASM instance 可以被shutdown。
If the OracleASM instance or disk group is forcibly shut down or fails while an associatedOracle ACFS is active, the file system is placed into an offline error state.When the file system is placed in an offline error state, applications willstart to encounter I/O failures and any Oracle ACFS user data and metadatabeing writen at the time of the termination may not be flushed to ASM storagebefore it is fenced. If a SHUTDOWN ABORT operation on the Oracle ASM instanceis required and you are not able to dismount the file system, issue two synccommand to flush any cached file system data and metadata to persistentstorage:
--在Active 状态的ACFS 与ASM disk group 关联时,如果Oracle ASM instance 或者disk group 被强制的shut down或者fails, 那么filesystem 就会变成offline 状态。当ACFS filesystem变成了offline 状态,应用在使用时就会遇到I/O失败,并且在中断时刻,任何ACFS 用户的data 和 metadata 可能没有及时刷新到ASM storage 中。 所以如果我们需要强制关闭ORACLE ASM INSTANCE,并且我们没有dismount ACFS 文件系统,可以执行2次sync命令,已将任何filesystem 缓存中的data 和 metadata 刷到ASM Storage中。如下:
[root@racnode1 ~]# sync
[root@racnode1 ~]# sync
Using atwo-node Oracle RAC, I forced an Oracle ASM instance shutdown on node 1 tosimulate a failure: (Note: This should go without saying, but I'll say itanyway. DO NOT attempt the following on a production environment.)
--这里使用2个节点的RAC,我强制shutdown 节点1上的ASM instance,来模拟一次失败。 不要在任何生产环境使用这种操作。
SQL> shutdown abort
ASM instance shutdown
Any subsequent attempt to access an offlinefile system on that node will result in an I/O error:
--在shutdown ASM 实例之后,任何访问offline 的ACFS file system 都会返回IO错误:
[oracle@racnode1 ~]$ ls -l /documents3
ls: /documents3: Input/output error
[oracle@racnode1 ~]$ df -k
Filesystem 1K-blocks Used Available Use% Mounted on
/dev/mapper/VolGroup00-LogVol00
145344992 22459396 115383364 17% /
/dev/sdb1 151351424 192072 143346948 1% /local
/dev/sda1 101086 12632 83235 14% /boot
tmpfs 2019256 0 2019256 0% /dev/shm
df: `/documents1': Input/output error
df: `/documents2': Input/output error
df: `/documents3': Input/output error
domo:PUBLIC 4799457152 1901758592 2897698560 40% /domo
Recovering afile system from an offline error state requires dismounting and remounting theOracle ACFS file system. Dismounting an active file system, even one that is offline,requires stopping all applications using the file system, including any shellreferences. For example, I had a shell session that previously changeddirectory (cd) into the /documents3 file system before the forced shutdown:
--恢复offline 状态的ACFS file system需要重新dismount 和 remount ACFS file system。卸载一个active 的file system ,甚至是offline 的,都需要停止ACFS 文件系统上的所有操作,包括任何shell reference。比如在我们强制关闭之前,有一个shell session,将目录改变到我们mount点:/documents3.
[root@racnode1 ~]# umount /documents1
[root@racnode1 ~]# umount /documents2
[root@racnode1 ~]# umount /documents3
umount: /documents3: device is busy
umount: /documents3: device is busy
Use the Linux fuser or lsof command toidentify processes and kill if necessary:
--如果需要,可以使用linux 的fuser或者lsoff 命令确认相关的进行并kill掉:
[root@racnode1 ~]# fuser /documents3
/documents3: 16263c
[root@racnode1 ~]# kill -9 16263
[root@racnode1 ~]# umount /documents3
Restart theOracle ASM instance (or in my case, all Oracle grid infrastructure serviceswere stopped as a result of me terminating the Oracle ASM instance):
--重启ORACLE ASMinstance:
[root@racnode1 ~]# /u01/app/11.2.0/grid/bin/crsctlstop cluster
[root@racnode1 ~]# /u01/app/11.2.0/grid/bin/crsctlstart cluster
All of my OracleACFS volumes were added to the Oracle ACFS mount registry and will thereforeautomatically mount when Oracle grid infrastructure starts. If you need tomanually mount the file system, verify the volume is enabled before attemptingto mount:
--重启后,在OracleGI 启动时,所有的ORACLE ACFS volumes都会添加到ACFS MOUNT registry中,并自动进行mount。如果需要手工来mount 这些file system,在尝试mount之前需要先验证volume的状态:
[root@racnode1 ~]# mount
/dev/mapper/VolGroup00-LogVol00 on / typeext3 (rw)
proc on /proc type proc (rw)
sysfs on /sys type sysfs (rw)
devpts on /dev/pts type devpts(rw,gid=5,mode=620)
/dev/sdb1 on /local type ext3 (rw)
/dev/sda1 on /boot type ext3 (rw)
tmpfs on /dev/shm type tmpfs (rw)
none on /proc/sys/fs/binfmt_misc typebinfmt_misc (rw)
sunrpc on /var/lib/nfs/rpc_pipefs typerpc_pipefs (rw)
oracleasmfs on /dev/oracleasm typeoracleasmfs (rw)
domo:PUBLIC on /domo type nfs(rw,addr=192.168.1.121)
/dev/asm/docsvol1-300 on /documents1 typeacfs (rw)
/dev/asm/docsvol2-300 on /documents2 typeacfs (rw)
/dev/asm/docsvol3-300 on /documents3 typeacfs (rw)
4.2 Resize File System
With OracleACFS, as long as there exists free space within the ASM disk group, any of theASM volumes can be dynamically expanded which means the file system getsexpanded as a result. Note that if you are using another file system other thanOracle ACFS, as long as that file system can support online resizing, they toocan be dynamically re-sized. The one exception to 3rd party file systems isonline shrinking. Ext3, for example, supports online resizing but does notsupport online shrinking.
--使用ORACLEACFS,只要ASM DISK GROUP里还有可用的空间,任何一个ASM volume 都可以进行动态的扩展,也就意味着file system可以进行动态的扩展。注意,如果使用的是其他的file system,只要file system 支持online resize,ACFS 也就可以进行动态扩展,唯一例外的就是第三方的file system 不支持online shrink。
Use thefollowing syntax to add space to an Oracle ACFS on the fly without the need totake any type of outage.
--使用如下方法给ORACLEACFS 在线添加空间:
First, verifythere is enough space in the current Oracle ASM disk group to extend thevolume:
--首先验证当前ASMDISK GROUP 可用的磁盘空间情况:
SQL> select name, total_mb, free_mb,round((free_mb/total_mb)*100,2) pct_free
2 from v$asm_diskgroup
3 where total_mb != 0
4 order by name;
Disk Group Total (MB) Free (MB) % Free
--------------- ------------ -------------------
CRS 2,205 1,809 82.04
DOCSDG1 98,303 12,187 12.40
FRA 33,887 22,795 67.27
RACDB_DATA 33,887 30,584 90.25
The same task can be accomplished using theASMCMD command-line utility:
--使用asmcmd 命令行工具来分配:
[grid@racnode1 ~]$ asmcmd lsdg
From the 12GB offree space in the DOCSDG1 ASM disk group, let's extend the file system (volume)by another 5GB. Note that this can be performed while the file system is onlineand accessible by clients no outage is required:
--DOCSDG1 ASM disk group 有12GB的空闲空间,我们扩展5GB。 注意这里可以在线进行,即ACFS 保持online 状态,客户端可以进行访问:
[root@racnode1 ~]# /sbin/acfsutil size+5G /documents3
acfsutil size: new file system size:26843545600 (25600MB)
Verify the new size of the file system fromall Oracle RAC nodes:
--在所有节点验证ACFS FILE SYSTEM的大小:
[root@racnode1 ~]# df -k
Filesystem 1K-blocks Used Available Use% Mounted on
/dev/mapper/VolGroup00-LogVol00
145344992 21952712 115890048 16% /
/dev/sdb1 151351424 192072 143346948 1% /local
/dev/sda1 101086 12632 83235 14% /boot
tmpfs 2019256 1135852 883404 57% /dev/shm
domo:PUBLIC 4799457152 1901103872 2898353280 40% /domo
/dev/asm/docsvol1-300
33554432 197668 33356764 1% /documents1
/dev/asm/docsvol2-300
33554432 197668 33356764 1% /documents2
/dev/asm/docsvol3-300
26214400 183108 26031292 1% /documents3
[root@racnode2 ~]# df -k
Filesystem 1K-blocks Used Available Use% Mounted on
/dev/mapper/VolGroup00-LogVol00
145344992 13803084 124039676 11% /
/dev/sdb1 151351424 192072 143346948 1% /local
/dev/sda1 101086 12632 83235 14% /boot
tmpfs 2019256 1135852 883404 57% /dev/shm
domo:Public 4799457152 1901103872 2898353280 40% /domo
/dev/asm/docsvol1-300
33554432 197668 33356764 1% /documents1
/dev/asm/docsvol2-300
33554432 197668 33356764 1% /documents2
/dev/asm/docsvol3-300
26214400 183108 26031292 1% /documents3
4.3 Useful ACFS Commands
This sectioncontains several useful commands that can be used to administer Oracle ACFS.Note that many of the commands described in this section have already beendiscussed throughout this guide.
--这节包含几个常用的管理ORACLEACFS的命令,注意这些命令在前面的章节里已经讨论过。
4.3.1 ASM Volume Driver
--Load the Oracle ASMvolume driver:
[root@racnode1 ~]# /u01/app/11.2.0/grid/bin/acfsloadstart -s
--Unload the Oracle ASMvolume driver:
[root@racnode1 ~]# /u01/app/11.2.0/grid/bin/acfsloadstop
--Check if Oracle ASMvolume driver is loaded:
[root@racnode1 ~]# lsmod | grep oracle
oracleacfs 877320 4
oracleadvm 221760 8
oracleoks 276880 2 oracleacfs,oracleadvm
oracleasm 84136 1
4.3.2 ASM Volume Management
--Create new Oracle ASMvolume using ASMCMD
[grid@racnode1 ~]$ asmcmd volcreate -Gdocsdg1 -s 20G --redundancy unprotected docsvol3
--Resize Oracle ACFS filesystem (add 5GB):
[root@racnode1 ~]# /sbin/acfsutil size+5G /documents3
acfsutil size: new file system size:26843545600 (25600MB)
--Delete Oracle ASMvolume using ASMCMD:
[grid@racnode1 ~]$ asmcmd voldelete -Gdocsdg1 docsvol3
4.3.3 Disk Group / File System / Volume Information
--Get detailed Oracle ASMdisk group information:
[grid@racnode1 ~]$ asmcmd lsdg
--Format an Oracle ASMcluster file system:
[grid@racnode1 ~]$ /sbin/mkfs -t acfs-b 4k /dev/asm/docsvol3-300 -n "DOCSVOL3"
mkfs.acfs: version = 11.2.0.1.0.0
mkfs.acfs: on-disk version = 39.0
mkfs.acfs: volume = /dev/asm/docsvol3-300
mkfs.acfs: volume size = 21474836480
mkfs.acfs: Format complete.
--Get detailed filesystem information:
[root@racnode1 ~]# /sbin/acfsutil infofs
/documents1
ACFS Version: 11.2.0.1.0.0
flags: MountPoint,Available
mount time: Fri Nov 26 18:38:482010
volumes: 1
total size: 34359738368
total free: 34157326336
primary volume: /dev/asm/docsvol1-300
label:
flags: Primary,Available,ADVM
on-disk version: 39.0
allocation unit: 4096
major, minor: 252, 153601
size: 34359738368
free: 34157326336
ADVM diskgroup DOCSDG1
ADVM resize increment: 268435456
ADVM redundancy: unprotected
ADVM stripe columns: 4
ADVM stripe width: 131072
number of snapshots: 0
snapshot space usage: 0
/documents2
ACFS Version: 11.2.0.1.0.0
flags: MountPoint,Available
mount time: Fri Nov 26 18:38:482010
volumes: 1
total size: 34359738368
total free: 34157326336
primary volume: /dev/asm/docsvol2-300
label:
flags: Primary,Available,ADVM
on-disk version: 39.0
allocation unit: 4096
major, minor: 252, 153602
size: 34359738368
free: 34157326336
ADVM diskgroup DOCSDG1
ADVM resize increment: 268435456
ADVM redundancy: unprotected
ADVM stripe columns: 4
ADVM stripe width: 131072
number of snapshots: 0
snapshot space usage: 0
--Get ASM volumeinformation:
[grid@racnode1 ~]$ asmcmd volinfo -a
Diskgroup Name: DOCSDG1
Volume Name: DOCSVOL1
Volume Device: /dev/asm/docsvol1-300
State: ENABLED
Size (MB): 32768
Resize Unit (MB): 256
Redundancy: UNPROT
Stripe Columns: 4
Stripe Width (K): 128
Usage: ACFS
Mountpath: /documents1
Volume Name: DOCSVOL2
Volume Device: /dev/asm/docsvol2-300
State: ENABLED
Size (MB): 32768
Resize Unit (MB): 256
Redundancy: UNPROT
Stripe Columns: 4
Stripe Width (K): 128
Usage: ACFS
Mountpath: /documents2
Volume Name: DOCSVOL3
Volume Device: /dev/asm/docsvol3-300
State: ENABLED
Size (MB): 25600
Resize Unit (MB): 256
Redundancy: UNPROT
Stripe Columns: 4
Stripe Width (K): 128
Usage: ACFS
Mountpath: /documents3
--Get volume status usingASMCMD command:
[grid@racnode1 ~]$ asmcmd volstat
DISKGROUP NUMBER / NAME: 2 / DOCSDG1
---------------------------------------
VOLUME_NAME
READS BYTES_READ READ_TIME READ_ERRS
WRITES BYTES_WRIEN WRITE_TIME WRITE_ERRS
-------------------------------------------------------------
DOCSVOL1
517 408576 1618 0
17007 69280768 63456 0
DOCSVOL2
512 406016 2547 0
17007 69280768 66147 0
DOCSVOL3
13961 54525952 172007 0
10956 54410240 41749 0
--Enable a volume usingthe ASMCMD command:
[grid@racnode1 ~]$ asmcmd volenable -Gdocsdg1 docsvol3
--Disable a volume usingthe ASMCMD command
[root@racnode1 ~]# umount /documents3
[root@racnode2 ~]# umount /documents3
[grid@racnode1 ~]$ asmcmd voldisable -Gdocsdg1 docsvol3
4.3.4 Mount Commands
--Mount single OracleACFS volume on the local node:
[root@racnode1 ~]# /bin/mount -t acfs/dev/asm/docsvol3-300 /documents3
--Unmount single OracleACFS volume on the local node:
[root@racnode1 ~]# umount /documents3
--Mount all Oracle ACFSvolumes on the local node using the metadata found in the Oracle ACFS mountregistry:
[root@racnode1 ~]# /sbin/mount.acfs -oall
--Unmount all Oracle ACFSvolumes on the local node using the metadata found in the Oracle ACFS mountregistry:
[root@racnode1 ~]# /bin/umount -t acfs-a
4.3.5 Oracle ACFS Mount Registry
--Register new mountpoint in the Oracle ACFS mount registry:
[root@racnode1 ~]# /sbin/acfsutilregistry -f -a /dev/asm/docsvol3-300 /documents3
acfsutil registry: mount point /documents3successfully added to Oracle Registry
--Query the Oracle ACFSmount registry:
[root@racnode1 ~]# /sbin/acfsutilregistry
Mount Object:
Device: /dev/asm/docsvol1-300
Mount Point: /documents1
Disk Group: DOCSDG1
Volume: DOCSVOL1
Options: none
Nodes: all
Mount Object:
Device: /dev/asm/docsvol2-300
Mount Point: /documents2
Disk Group: DOCSDG1
Volume: DOCSVOL2
Options: none
Nodes: all
Mount Object:
Device: /dev/asm/docsvol3-300
Mount Point: /documents3
Disk Group: DOCSDG1
Volume: DOCSVOL3
Options: none
Nodes: all
--Unregister volume andmount point from the Oracle ACFS mount registry:
[root@racnode1 ~]# acfsutil registry -d/documents3
acfsutil registry: successfully removedACFS mount point /documents3 from Oracle Registry
4.3.6 Oracle ACFS Snapshots
--Use the 'acfsutil snapcreate' command to create an Oracle ACFS snapshot named snap1 for an OracleACFS mounted on /documents3: :
[root@racnode1 ~]# /sbin/acfsutil snapcreate snap1 /documents3
acfsutil snap create: Snapshot operationis complete.
--Use the 'acfsutil snapdelete' command to delete an existing Oracle ACFS snapshot:
[root@racnode1 ~]# /sbin/acfsutil snapdelete snap1 /documents3
acfsutil snap delete: Snapshot operationis complete.
4.4 Oracle ASM / ACFS Dynamic Views 相关视图
This sectioncontains information about using dynamic views to display Oracle AutomaticStorage Management (Oracle ASM), Oracle Automatic Storage Management ClusterFile System (Oracle ACFS), and Oracle ASM Dynamic Volume Manager (Oracle ADVM)information. These views are accessible from the Oracle ASM instance.
--这节包含一些常用的有关ORACLEASM ,ORACLE ACFS,ORACLE ADVM 的动态性能视图,可以在ORACLE ASM 实例中访问这些视图。
4.4.1 Oracle Automatic Storage Management (Oracle ASM)
| View Name |
Description |
| V$ASM_ALIAS |
Contains one row for every alias present in every disk group mounted by the Oracle ASM instance. |
| V$ASM_ATTRIBUTE |
Displays one row for each attribute defined. In addition to attributes specified by CREATE DISKGROUP and ALTER DISKGROUP statements, the view may show other attributes that are created automatically. Attributes are only displayed for disk groups where COMPATIBLE.ASM is set to 11.1 or higher. |
| V$ASM_CLIENT |
In an Oracle ASM instance, identifies databases using disk groups managed by the Oracle ASM instance. In a DB instance, contains information about the Oracle ASM instance if the database has any open Oracle ASM files. |
| V$ASM_DISK |
Contains one row for every disk discovered by the Oracle ASM instance, including disks that are not part of any disk group. This view performs disk discovery every time it is queried. |
| V$ASM_DISK_IOSTAT |
Displays information about disk I/O statistics for each Oracle ASM client. In a DB instance, only the rows for that instance are shown. |
| V$ASM_DISK_STAT |
Contains the same columns as V$ASM_DISK, but to reduce overhead, does not perform a discovery when it is queried. It only returns information about any disks that are part of mounted disk groups in the storage system. To see all disks, use V$ASM_DISK instead. |
| V$ASM_DISKGROUP |
Describes a disk group (number, name, size related info, state, and redundancy type). This view performs disk discovery every time it is queried. |
| V$ASM_DISKGROUP_STAT |
Contains the same columns as V$ASM_DISKGROUP, but to reduce overhead, does not perform a discovery when it is queried. It does not return information about any disks that are part of mounted disk groups in the storage system. To see all disks, use V$ASM_DISKGROUP instead. |
| V$ASM_FILE |
Contains one row for every Oracle ASM file in every disk group mounted by the Oracle ASM instance. |
| V$ASM_OPERATION |
In an Oracle ASM instance, contains one row for every active Oracle ASM long running operation executing in the Oracle ASM instance. In a DB instance, contains no rows. |
| V$ASM_TEMPLATE |
Contains one row for every template present in every disk group mounted by the Oracle ASM instance. |
| V$ASM_USER |
Contains the effective operating system user names of connected database instances and names of file owners. |
| V$ASM_USERGROUP |
Contains the creator for each Oracle ASM File Access Control group. |
| V$ASM_USERGROUP_MEMBER |
Contains the members for each Oracle ASM File Access Control group. |
4.4.2 Oracle Automatic Storage Management Cluster FileSystem (Oracle ACFS)
| View Name |
Description |
| V$ASM_ACFSSNAPSHOTS |
Contains snapshot information for every mounted Oracle ACFS file system. |
| V$ASM_ACFSVOLUMES |
Contains information about mounted Oracle ACFS volumes, correlated with V$ASM_FILESYSTEM. |
| V$ASM_FILESYSTEM |
Contains columns that display information for every mounted Oracle ACFS file system. |
| V$ASM_VOLUME |
Contains information about each Oracle ADVM volume that is a member of an Oracle ASM instance. |
| V$ASM_VOLUME_STAT |
Contains information about statistics for each Oracle ADVM volume. |
4.5 Use fsck to Check and Repair the Cluster File System
Use the regularLinux fsck command to check and repair the Oracle ACFS. This only needs to beperformed from one of the Oracle RAC nodes:
--使用常用的linuxfsck命令可以检查并修复ORACLE ACFS。 该命令只需要在一个节点执行:
[root@racnode1 ~]# /sbin/fsck -t acfs/dev/asm/docsvol3-300
fsck 1.39 (29-May-2006)
fsck.acfs: version = 11.2.0.1.0.0
fsck.acfs: ACFS-00511:/dev/asm/docsvol3-300 is mounted on at least one node of the cluster.
fsck.acfs: ACFS-07656: Unable tocontinue
The fsck operating cannot be performedwhile the file system is online. Unmount the cluster file system from allOracle RAC nodes:
--当ACFS 文件系统online时不能执行fsck命令,需要在所有节点上先unmount ACFS文件系统:
[root@racnode1 ~]# umount /documents3
[root@racnode2 ~]# umount /documents3
Now check the cluster file system with thefile system unmounted:
--unmounted 之后就可以使用fsck命令:
[root@racnode1 ~]# /sbin/fsck -t acfs/dev/asm/docsvol3-300
fsck 1.39 (29-May-2006)
fsck.acfs: version = 11.2.0.1.0.0
Oracle ASM Cluster File System (ACFS)On-Disk Structure Version: 39.0
*****************************
********** Pass 1: **********
*****************************
The ACFS volume was created at Fri Nov 26 17:20:27 2010
Checking primary file system...
Files checked in primary filesystem: 100%
Checking if any files are orphaned...
0 orphans found
fsck.acfs: Checker completed with noerrors.
Remount the cluster file system on allOracle RAC nodes:
--执行fsck命令后,重新mount 文件系统:
[root@racnode1 ~]# /bin/mount -t acfs/dev/asm/docsvol3-300 /documents3
[root@racnode2 ~]# /bin/mount -t acfs/dev/asm/docsvol3-300 /documents3
4.6 Drop ACFS / ASM Volume
Unmount the cluster file system from allOracle RAC nodes:
--在所有节点上umount ACFS 系统:
[root@racnode1 ~]# umount /documents3
[root@racnode2 ~]# umount /documents3
Log in to the ASM instance and drop the ASMdynamic volume from one of the Oracle RAC nodes:
--在任一节点上连接到ASM instance,并drop 掉ASM dynamic volume:
[grid@racnode1 ~]$ sqlplus / as sysasm
SQL> ALTER DISKGROUP docsdg1 DROPVOLUME docsvol3;
Diskgroup altered.
The same task can be accomplished usingthe ASMCMD command-line utility:
--也可以使用ASMCMD 命令行工具实现这个功能:
[grid@racnode1 ~]$ asmcmd voldelete -Gdocsdg1 docsvol3
Unregister thevolume and mount point from the Oracle ACFS mount registry from one of theOracle RAC nodes:
--在任一节点上,从ACFSmount registry中unregister volume 和mount point 的信息:
[root@racnode1 ~]# acfsutil registry -d/documents3
acfsutil registry: successfully removedACFS mount point /documents3 from Oracle Registry
Finally, remove the mount point directoryfrom all Oracle RAC nodes (if necessary):
--最后一般,在所有节点上移除mount point 目录:
[root@racnode1 ~]# rmdir /documents3
[root@racnode2 ~]# rmdir /documents3
About Me
...............................................................................................................................
● 本文整理自网络
● 本文在itpub(http://blog.itpub.net/26736162)、博客园(http://www.cnblogs.com/lhrbest)和个人微信公众号(xiaomaimiaolhr)上有同步更新
● 本文itpub地址:http://blog.itpub.net/26736162/abstract/1/
● 本文博客园地址:http://www.cnblogs.com/lhrbest
● 本文pdf版及小麦苗云盘地址:http://blog.itpub.net/26736162/viewspace-1624453/
● 数据库笔试面试题库及解答:http://blog.itpub.net/26736162/viewspace-2134706/
● QQ群:230161599 微信群:私聊
● 联系我请加QQ好友(646634621),注明添加缘由
● 于 2017-07-01 09:00 ~ 2017-07-31 22:00 在魔都完成
● 文章内容来源于小麦苗的学习笔记,部分整理自网络,若有侵权或不当之处还请谅解
● 版权所有,欢迎分享本文,转载请保留出处
...............................................................................................................................
拿起手机使用微信客户端扫描下边的左边图片来关注小麦苗的微信公众号:xiaomaimiaolhr,扫描右边的二维码加入小麦苗的QQ群,学习最实用的数据库技术。