本文所描述的是在Red Hat 5.5下使用vmware server 来安装Oracle 10g RAC(OCFS + ASM),本文假定你的RHEL5已经安装完毕,下面列出的是对Linux的具体配置及安装过程。
一、安装环境
1.主机操作系统环境概况:
主机名 |
操作系统 |
处理器 |
内存 |
磁盘 |
网卡 |
robinson |
Windows XP Professional Service Pack 3 |
Intel酷睿2双核 1.6GHZ |
3GB DDR2 667 MHz |
500 GB, SATA 7200 RPM |
Intel Pro/1000 MT |
2.客户操作系统环境概况:
主机名 |
操作系统 |
处理器 |
内存 |
node1 |
RHEL 5.5(32 位) |
1 |
800MB |
node2 |
RHEL 5.5(32 位) |
1 |
800MB |
3.虚拟磁盘布局概况:
主机操作系统上的虚拟磁盘 |
客户操作系统上的虚拟磁盘 |
虚拟设备节点 |
大小 (MB) |
描述 |
E:\VirtualMachine\Node1\localdisk.vmdk |
/dev/sda1 |
SCSI 0:0 |
20 |
“/”挂载点 |
E:\VirtualMachine\sharedstorage\ocfs2disk.vmdk |
/dev/sdb |
SCSI 1:0 |
536 |
OCFS2 磁盘 |
E:\VirtualMachine\sharedstorage\asmdisk1.vmdk |
/dev/sdc |
SCSI 1:1 |
4294 |
ASM 磁盘组 1 |
E:\VirtualMachine\sharedstorage\asmdisk2.vmdk |
/dev/sdd |
SCSI 1:2 |
4294 |
ASM 磁盘组 1 |
E:\VirtualMachine\sharedstorage\asmdisk3.vmdk |
/dev/sde |
SCSI 1:3 |
3221 |
ASM 闪回恢复区 |
(要配置共享存储,客户 OS 不能与共享存储共享同一个 SCSI 总线。指定客户 OS 使用 SCSI0,共享磁盘使用 SCSI1。)
4.RAC 数据库环境概况:
主机名 |
ASM 实例名 |
RAC 实例名 |
数据库名 |
数据库文件存储 |
OCR 与表决磁盘 (Voting Disk) |
node1 |
+ASM1 |
ora10g1 |
ora10g |
ASM |
OCFS2 |
node2 |
+ASM2 |
ora10g2 |
ora10g |
ASM |
OCFS2 |
二、虚拟机设置
1. 对于虚拟机的创建,此处不做演示,需要注意的是设置虚拟机的参数。当第一个虚拟机添加后,修改如下参数:
修改E:\VirtualMachine\Node1\node1.vmx
增加以下内容:
disk.locking = "FALSE"
diskLib.dataCacheMaxSize = "0"
diskLib.dataCacheMaxReadAheadSize = "0"
diskLib.dataCacheMinReadAheadSize = "0"
diskLib.dataCachePageSize = "4096"
diskLib.maxUnsyncedWrites = "0"
scsi1.present = "TRUE"
scsi1.virtualDev = "lsilogic"
scsi1.sharedBus = "VIRTUAL"
scsi1:0.deviceType = "disk"
scsi1:1.deviceType = "disk"
scsi1:2.deviceType = "disk"
scsi1:3.deviceType = "disk"
删除原来文件中的scsi1.sharedBus = “none”
如果你安装的虚拟机中使用了更多的scsi设备,则相应增加中间的那段内容,并修改为对应的scsi为对应的数字。
2. 其次可以通过虚拟机来设置来同步主机与客户机的时间,也可以通过配置ntp.conf来设置时间同步服务。下面通过vmware来配置时间同步。
执行“vmware-toolbox”以显示 VMware Tools Properties 窗口。在 Options 选项卡下,选择 Time synchronization between the virtual machine and the host operating system。您应该发现 tools.syncTime = "TRUE" 参数已经追加到虚拟机配置文件E:\VirtualMachine\Node1\node1.vmx中。
接下来编辑 /boot/grub/grub.conf,并将选项“clock=pit nosmp noapic nolapic”添加到读取内核 /boot/ 的那一行。您已经将选项添加到两个内核,现在只需对特定内核进行更改。
#boot=/dev/sda
default=0
timeout=5
splashimage=(hd0,0)/boot/grub/splash.xpm.gz
hiddenmenu
title Enterprise (2.6.9-42.0.0.0.1.ELsmp)
root (hd0,0)
kernel /boot/vmlinuz-2.6.9-42.0.0.0.1.ELsmp ro
root=LABEL=/ rhgb quiet clock=pit nosmp noapic nolapic
initrd /boot/initrd-2.6.9-42.0.0.0.1.ELsmp.img
title Enterprise-up (2.6.9-42.0.0.0.1.EL)
root (hd0,0)
kernel /boot/vmlinuz-2.6.9-42.0.0.0.1.EL ro root=LABEL=/
rhgb quiet clock=pit nosmp noapic nolapic
initrd /boot/initrd-2.6.9-42.0.0.0.1.EL.img
重新启动 node1。
# init 6
三、Oracle 安装环境及内核参数配置
1. 内核版本检查(主要是用于下载对应的asmlib包)
[root@node1 ~]# uname -a
Linux node1.oradb.com 2.6.18-194.el5 #1 SMP Tue Mar 16 21:52:43 EDT 2010 i686 i686 i386 GNU/Linux
[root@node1 asmlib]# rpm -qa | grep kernel
kernel-devel-2.6.18-194.el5
kernel-2.6.18-194.el5
kernel-headers-2.6.18-194.el5
2. 安装Oracle所需的RPM包检查及安装
[root@node1 ~]# rpm -q --qf '%{NAME}-%{VERSION}-%{RELEASE}(%{ARCH})\n' \
> binutils \
> compat-db \
> compat-libstdc++ \
> gcc \
> gcc-c++ \
> glibc \
> glibc-common \
> libstdc++ \
> libstdc++-devel \
> make \
> pdksh sysstat \
> setarch \
> glibc-devel \
> libaio \
>openmotif \
> openmotif22
如果上述包没有安装,请按照下列方式进行安装,对于已经安装的包,由于rpm 使用了参数-U ,故会被更新。
[root@node1 ~]# mkdir /mnt/cdrom
[root@node1 ~]# mount /dev/cdrom /mnt/cdrom
mount: block device /dev/cdrom is write-protected, mounting read-only
[root@node1 ~]# cd /mnt/cdrom
[root@node1 cdrom]# cd Server
rpm -Uvh setarch-2*
rpm -Uvh compat-libstdc++-33-3*
rpm -Uvh make-3*
rpm -Uvh glibc-2*
rpm -Uvh openmotif-2*
rpm -Uvh compat-db-4*
rpm -Uvh gcc-4*
rpm -Uvh libaio-0*
rpm -Uvh rsh-*
rpm -Uvh compat-gcc-34*
rpm -Uvh compat-gcc-34-c++*
rpm -Uvh openmotif22*
3. 安装asmlib包。从 OTN 下载ASM 库,并以 root 用户身份安装 ASM RPM,安装方法同上,rpm –Uvh rpm_package_name,下面是安装后的asmlib包。注意,下载的asmlib包的版本应与你系统内核版本一致。
[root@node1 asmlib]# rpm -qa | grep oracleasm
oracleasm-support-2.1.4-1.el5
oracleasm-2.6.18-194.el5-debuginfo-2.0.5-1.el5
oracleasmlib-2.0.4-1.el5
oracleasm-2.6.18-194.el5-2.0.5-1.el5
4. 安装ocfs2包
从下面的链接中下载ocfs安装包,使用rpm –Uvh rpm_package_name方式来安装。
http://oss.oracle.com/projects/ocfs2/files/
http://oss.oracle.com/projects/ocfs2-tools/files/
下面是本机已安装的ocfs包
[root@node1 asmlib]# rpm -qa | grep ocfs2
ocfs2-2.6.18-194.el5-1.4.7-1.el5
ocfs2-tools-debuginfo-1.4.4-1.el5
ocfs2-tools-devel-1.4.4-1.el5
ocfs2console-1.4.4-1.el5
ocfs2-tools-1.4.4-1.el5
ocfs2-2.6.18-194.el5-debuginfo-1.4.7-1.el5
5. 配置hosts文件 vi /etc/hosts
# Do not remove the following line, or various programs
# that require network functionality will fail.
127.0.0.1 node1.oradb.com node1 localhost.localdomain localhost
#::1 localhost6.localdomain6 localhost6
127.0.0.1 node1.oradb.com node1
# Public
192.168.0.11 node1.oradb.com node1
192.168.0.12 node2.oradb.com node2
#Private
10.101.0.11 node1-priv.oradb.com node1-priv
10.101.0.12 node2-priv.oradb.com node2-priv
#Virtual
192.168.0.21 node1-vip.oradb.com node1-vip
192.168.0.22 node2-vip.oradb.com node2-vip
6. 配置/etc/sysctl.conf
kernel.shmall = 2097152
kernel.shmmax = 2147483648
kernel.shmmni = 4096
# semaphores: semmsl, semmns, semopm, semmni
kernel.sem = 250 32000 100 128
fs.file-max = 65536
net.ipv4.ip_local_port_range = 1024 65000
net.core.rmem_default=262144
net.core.rmem_max=262144
net.core.wmem_default=262144
net.core.wmem_max=262144
要使更改立即生效,请执行 /sbin/sysctl –p。
7. 配置/etc/security/limits.conf
soft nproc 2047
hard nproc 16384
soft nofile 1024
hard nofile 65536
8. 配置/etc/pam.d/login
session required /lib/security/pam_limits.so
9. 配置/etc/selinux/config
SELINUX=disabled
10. 配置 hangcheck timer 内核模块。hangcheck timer 内核模块可监控系统的运行情况,并重新启动出现故障的 RAC 节点。它使用两个参数,即 hangcheck_tick(定义系统检查频率)和 hangcheck_margin(定义在重置 RAC 节点前的最大挂起延时)来确定节点是否出现故障。
在 /etc/modprobe.conf 中添加以下行,以设置 hangcheck 内核模块参数。
options hangcheck-timer hangcheck_tick=30 hangcheck_margin=180
使之立即生效,执行 modeprobe –v hangcheck-timer
11. 创建 oracle 用户。以 root 用户身份执行
[root@node1 ~]# groupadd oinstall
[root@node1 ~]# groupadd dba
[root@node1 ~]# mkdir /ocfs
[root@node1 ~]# useradd -g oinstall -G dba oracle
[root@node1 ~]# chown oracle:dba /u01
[root@node1 ~]# passwd oracle
Changing password for user oracle.
New UNIX password:
BAD PASSWORD: it is based on a dictionary word
Retype new UNIX password:
passwd: all authentication tokens updated successfully.
[root@node1 /]# grep oracle /etc/passwd /etc/shadow /etc/group
/etc/passwd:oracle:x:500:500::/home/oracle:/bin/bash
/etc/shadow:oracle:$1$EJZSaKbj$RZTdJYskIYV7NeO4h2VEx1:15054:0:99999:7:::
/etc/group:dba:x:501:oracle
12. 使用Oracle用户登录并创建 oracle 用户环境文件。
[oracle@node1 ~]$ vi ~/.bash_profile
if [ -t 0 ]; then
stty intr ^C
fi
# User specific environment and startup programs
umask 022
export ORACLE_BASE=/u01/app/oracle
export ORA_CRS_HOME=$ORACLE_BASE/product/10.2.0/crs_1
export ORACLE_HOME=$ORACLE_BASE/product/10.2.0/db_1
export ORACLE_SID=ora10g1
export PATH=$ORACLE_HOME/bin:$ORA_CRS_HOME/bin:$PATH
export LD_LIBRARY_PATH=$ORACLE_HOME/lib
export ORA_NLS10=$ORACLE_HOME/nls/data
[oracle@node1 ~]$ . ~/.bash_profile
13. 创建文件系统目录结构。以 oracle 用户身份执行。
[oracle@node1 ~]$ mkdir -p $ORACLE_BASE/admin
[oracle@node1 ~]$ mkdir -p $ORACLE_HOME
[oracle@node1 ~]$ mkdir -p $ORA_CRS_HOME
[oracle@node1 ~]$ mkdir -p /u01/oradata/ora10g
14. 配置Oracle ASM磁盘分区。
[root@node1 ~]# fdisk /dev/sdb
Command (m for help): n
Command action
e extended
p primary partition (1-4)
p
Partition number (1-4): 1
First cylinder (1-512, default 1):
Using default value 1
Last cylinder or +size or +sizeM or +sizeK (1-512, default 512):
Using default value 512
Command (m for help): w
The partition table has been altered!
Calling ioctl() to re-read partition table.
Syncing disks.
其余的磁盘分区方式同上如法炮制,最终的分区结果如下
[root@node1 ~]# fdisk -l
Disk /dev/sda: 19.3 GB, 19327352832 bytes
255 heads, 63 sectors/track, 2349 cylinders
Units = cylinders of 16065 * 512 = 8225280 bytes
Device Boot Start End Blocks Id System
/dev/sda1 * 1 1044 8385898+ 83 Linux
/dev/sda2 1045 1305 2096482+ 82 Linux swap / Solaris
/dev/sda3 1306 2349 8385930 83 Linux
Disk /dev/sdb: 536 MB, 536870912 bytes
64 heads, 32 sectors/track, 512 cylinders
Units = cylinders of 2048 * 512 = 1048576 bytes
Device Boot Start End Blocks Id System
/dev/sdb1 1 512 524272 83 Linux
Disk /dev/sdc: 4294 MB, 4294967296 bytes
255 heads, 63 sectors/track, 522 cylinders
Units = cylinders of 16065 * 512 = 8225280 bytes
Device Boot Start End Blocks Id System
/dev/sdc1 1 522 4192933+ 83 Linux
Disk /dev/sdd: 4294 MB, 4294967296 bytes
255 heads, 63 sectors/track, 522 cylinders
Units = cylinders of 16065 * 512 = 8225280 bytes
Device Boot Start End Blocks Id System
/dev/sdd1 1 522 4192933+ 83 Linux
Disk /dev/sde: 3221 MB, 3221225472 bytes
255 heads, 63 sectors/track, 391 cylinders
Units = cylinders of 16065 * 512 = 8225280 bytes
Device Boot Start End Blocks Id System
/dev/sde1 1 391 3140676 83 Linux
[root@node1 ~]# vi /etc/sysconfig/rawdevices
/dev/raw/raw1 /dev/sdc1
/dev/raw/raw2 /dev/sdd1
/dev/raw/raw3 /dev/sde1
[root@node1 ~]# /sbin/service rawdevices restart
Assigning devices:
/dev/raw/raw1 --> /dev/sdc1
/dev/raw/raw1: bound to major 8, minor 33
/dev/raw/raw2 --> /dev/sdd1
/dev/raw/raw2: bound to major 8, minor 49
/dev/raw/raw3 --> /dev/sde1
/dev/raw/raw3: bound to major 8, minor 65
done
[root@node1 ~]# chown oracle:dba /dev/raw/raw[1-3]
[root@node1 ~]# chmod 660 /dev/raw/raw[1-3]
[root@node1 ~]# ls -lat /dev/raw/raw*
crw-rw---- 1 oracle dba 162, 3 Mar 21 10:19 /dev/raw/raw3
crw-rw---- 1 oracle dba 162, 2 Mar 21 10:19 /dev/raw/raw2
crw-rw---- 1 oracle dba 162, 1 Mar 21 10:19 /dev/raw/raw1
以 oracle 用户身份执行
[oracle@node1 ~]$ ln -sf /dev/raw/raw1 /u01/oradata/ora10g/asmdisk1
[oracle@node1 ~]$ ln -sf /dev/raw/raw2 /u01/oradata/ora10g/asmdisk2
[oracle@node1 ~]$ ln -sf /dev/raw/raw3 /u01/oradata/ora10g/asmdisk3
将下面的内容增加到/etc/rc.local文件(root帐户),
chown oracle:dba /dev/raw/raw1
chown oracle:dba /dev/raw/raw2
chown oracle:dba /dev/raw/raw3
chmod 660 /dev/raw/raw1
chmod 660 /dev/raw/raw2
chmod 660 /dev/raw/raw3
单个虚拟机配置完毕,关闭虚拟机node1,接下来增加第二个虚拟机并配置。
15. 配置第二个虚拟机,node2。
复制E:\VirtualMachine\Node1文件夹下所有内容,到相同路径,并将node1文件夹重命名为node2。
在Vmware Web界面,单击 Virtual Machine,再单击Add Virtual Machine to Inventory。
单击Configure VM ,在Virtual Machine Name处输入Node2。
启动Node2后,单击I_copied it。
启动node2节点后,新建一个终端窗口,输入system-config-network,配置网络,如下图:

将eth0和eth1放置在非激活状态,并删除,接下来编辑别名为eth0.bak和eth1.bak,将eth0.bak的IP地址改为192.168.0.12,eth1.bak的IP改为10.101.0.12,并分别单击Hardware Device 选项卡,单击probe,以便为每个以太网设备分配新 MAC 地址。将两个网卡的名字改为eth0,eth1
修改DNS选项卡中的hostname为node2.oradb.com
使用oracle身份,编辑.bash_profile,将ORACLE_SID改为ora10g2
使用root身份,修改/etc/hosts文件,被修改的内容如下
127.0.0.1 node2.oradb.com node2
修改 /export/home/oracle/.profile。用 ora10g2替换 ORACLE_SID 的值。
16. 建立等效性
以oracle用户在node1上执行
[oracle@node1 ~]$ mkdir ~/.ssh
[oracle@node1 ~]$ chmod 700 ~/.ssh
[oracle@node1 ~]$ ssh-keygen -t rsa
Generating public/private rsa key pair.
Enter file in which to save the key (/home/oracle/.ssh/id_rsa):
Enter passphrase (empty for no passphrase):
Enter same passphrase again:
Your identification has been saved in /home/oracle/.ssh/id_rsa.
Your public key has been saved in /home/oracle/.ssh/id_rsa.pub.
The key fingerprint is:
ce:86:57:ab:7d:70:c7:44:4d:7b:f4:17:18:6c:18:bd oracle@node1.oradb.com
[oracle@node1 ~]$ ssh-keygen -t dsa
Generating public/private dsa key pair.
Enter file in which to save the key (/home/oracle/.ssh/id_dsa):
Enter passphrase (empty for no passphrase):
Enter same passphrase again:
Your identification has been saved in /home/oracle/.ssh/id_dsa.
Your public key has been saved in /home/oracle/.ssh/id_dsa.pub.
The key fingerprint is:
48:fc:43:72:39:3b:83:95:1d:55:40:53:c0:35:63:c2 oracle@node1.oradb.com
接下来以oracle用户在node2上执行
[oracle@node2 ~]$ mkdir ~/.ssh
[oracle@node2 ~]$ chmod 700 ~/.ssh
[oracle@node2 ~]$ ssh-keygen -t rsa
Generating public/private rsa key pair.
Enter file in which to save the key (/home/oracle/.ssh/id_rsa):
Enter passphrase (empty for no passphrase):
Enter same passphrase again:
Your identification has been saved in /home/oracle/.ssh/id_rsa.
Your public key has been saved in /home/oracle/.ssh/id_rsa.pub.
The key fingerprint is:
e9:3a:46:e8:5b:93:12:25:d0:a0:a4:f5:b8:eb:e2:45 oracle@node2.oradb.com
[oracle@node2 ~]$ ssh-keygen -t dsa
Generating public/private dsa key pair.
Enter file in which to save the key (/home/oracle/.ssh/id_dsa):
Enter passphrase (empty for no passphrase):
Enter same passphrase again:
Your identification has been saved in /home/oracle/.ssh/id_dsa.
Your public key has been saved in /home/oracle/.ssh/id_dsa.pub.
The key fingerprint is:
f8:c2:ab:fb:c5:c8:68:c6:ec:df:69:8c:b5:26:37:ef oracle@node2.oradb.com
接下来以oracle用户在node1上执行
[oracle@node1 ~]$ cat ~/.ssh/id_rsa.pub >> ~/.ssh/authorized_keys
[oracle@node1 ~]$ cat ~/.ssh/id_dsa.pub >> ~/.ssh/authorized_keys
[oracle@node1 ~]$ ssh node2 cat ~/.ssh/id_rsa.pub >> ~/.ssh/authorized_keys
The authenticity of host 'node2 (192.168.0.12)' can't be established.
RSA key fingerprint is b0:71:5f:89:e0:9a:9d:c5:16:66:ec:a9:6d:d9:66:c9.
Are you sure you want to continue connecting (yes/no)? yes
Warning: Permanently added 'node2,192.168.0.12' (RSA) to the list of known hosts.
oracle@node2's password:
[oracle@node1 ~]$ ssh node2 cat ~/.ssh/id_dsa.pub >> ~/.ssh/authorized_keys
oracle@node2's password:
[oracle@node1 ~]$ scp ~/.ssh/authorized_keys node2:~/.ssh/authorized_keys
oracle@node2's password:
authorized_keys 100% 2032 2.0KB/s 00:00
在每个节点上做如下测试
[oracle@node1 ~]$ssh node1 date; ssh node2 date;
[oracle@node1 ~]$ssh node1-priv date;ssh node2-priv date;
[oracle@node1 ~]$ssh node1.oradb.com date;ssh node2.oradb.com date;
[oracle@node1 ~]$ssh node1-priv.oradb.com date; ssh node2-priv.oradb.com date;
17. 配置 Oracle 自动存储管理 (ASM),在两个节点上配置
[root@node1 ~]# /etc/init.d/oracleasm configure
Configuring the Oracle ASM library driver.
This will configure the on-boot properties of the Oracle ASM library
driver. The following questions will determine whether the driver is
loaded on boot and what permissions it will have. The current values
will be shown in brackets ('[]'). Hitting <ENTER> without typing an
answer will keep that current value. Ctrl-C will abort.
Default user to own the driver interface []: oracle
Default group to own the driver interface []: dba
Start Oracle ASM library driver on boot (y/n) [n]: y
Scan for Oracle ASM disks on boot (y/n) [y]: y
Writing Oracle ASM library driver configuration: done
Initializing the Oracle ASMLib driver: [ OK ]
Scanning the system for Oracle ASMLib disks: [ OK ]
在任一节点创建ASM 磁盘
[root@node1 ~]# /etc/init.d/oracleasm createdisk VOL1 /dev/sdc1
Marking disk "VOL1" as an ASM disk: [ OK ]
[root@node1 ~]# /etc/init.d/oracleasm createdisk VOL2 /dev/sdd1
Marking disk "VOL2" as an ASM disk: [ OK ]
[root@node1 ~]# /etc/init.d/oracleasm createdisk VOL3 /dev/sde1
Marking disk "VOL3" as an ASM disk: [ OK ]
[root@node1 ~]# /etc/init.d/oracleasm listdisks
VOL1
VOL2
VOL3
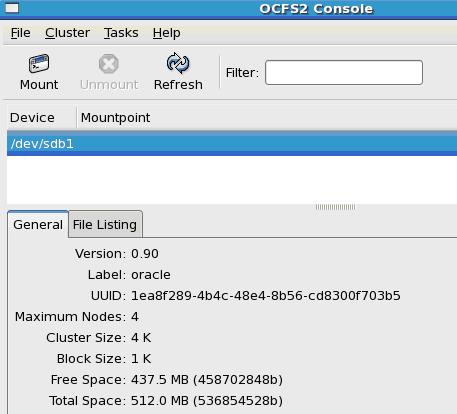
18. 创建 OCFS2 配置文件。在 node1 上,以 root 用户身份执行
在终端窗口输入ocsf2console,选择cluster,然后选择configure nodes。
“集群堆栈已经启动”:单击 Close。
节点配置:单击 Add。
新增节点:添加以下节点,然后单击 Apply。 图示如下:

验证最终生成的配置文件
[root@node1 ~]# more /etc/ocfs2/cluster.conf
node:
ip_port = 7777
ip_address = 192.168.0.11
number = 0
name = node1
cluster = ocfs2
node:
ip_port = 7777
ip_address = 192.168.0.12
number = 1
name = node2
cluster = ocfs2
cluster:
node_count = 2
name = ocfs2
在OCFS2 控制台上选择 Cluster 和 Propagate Configuration 以将配置文件传播到 node2

配置 O2CB 驱动程序
[root@node1 ~]# /etc/init.d/o2cb unload
Stopping O2CB cluster ocfs2: OK
Unmounting ocfs2_dlmfs filesystem: OK
Unloading module "ocfs2_dlmfs": OK
Unmounting configfs filesystem: OK
Unloading module "configfs": OK
[root@node1 ~]#
[root@node1 ~]# /etc/init.d/o2cb configure
Configuring the O2CB driver.
This will configure the on-boot properties of the O2CB driver.
The following questions will determine whether the driver is loaded on
boot. The current values will be shown in brackets ('[]'). Hitting
<ENTER> without typing an answer will keep that current value. Ctrl-C
will abort.
Load O2CB driver on boot (y/n) [n]: y
Cluster stack backing O2CB [o2cb]:
Cluster to start on boot (Enter "none" to clear) [ocfs2]:
Specify heartbeat dead threshold (>=7) [31]: 61
Specify network idle timeout in ms (>=5000) [30000]:
Specify network keepalive delay in ms (>=1000) [2000]:
Specify network reconnect delay in ms (>=2000) [2000]:
Writing O2CB configuration: OK
Loading filesystem "configfs": OK
Mounting configfs filesystem at /sys/kernel/config: OK
Loading filesystem "ocfs2_dlmfs": OK
Mounting ocfs2_dlmfs filesystem at /dlm: OK
Starting O2CB cluster ocfs2: OK
格式化ocfs磁盘
[root@node2 /]# /etc/init.d/o2cb status
Driver for "configfs": Loaded
Filesystem "configfs": Mounted
Driver for "ocfs2_dlmfs": Loaded
Filesystem "ocfs2_dlmfs": Mounted
Checking O2CB cluster ocfs2: Online
Heartbeat dead threshold = 61
Network idle timeout: 30000
Network keepalive delay: 2000
Network reconnect delay: 2000
Checking O2CB heartbeat: Not active
挂载文件系统。在两个节点上以root用户执行
[root@node1 ~]# mount -t ocfs2 -o datavolume,nointr /dev/sdb1 /ocfs
要在引导时挂载文件系统,在两个节点的 /etc/fstab 中添加以下行。
/etc/fstab
/dev/sdb1 /ocfs ocfs2 _netdev,datavolume,nointr 0 0
创建 Oracle 集群件目录。在 OCR 和表决磁盘将驻留的 OCFS2 文件系统中创建目录。
在 node1 上执行
# mkdir /ocfs/clusterware
# chown -R oracle:dba /ocfs
四、 安装Oracle Clusterware 及Oracle Database
1. 执行安装前校验
[oracle@node1 cluvfy]$ /u01/Clusterware/clusterware/cluvfy/runcluvfy.sh stage -pre crsinst -n node1,node2 -verbose
详细参考:使用 runcluvfy 校验Oracle RAC安装环境
2. 安装Oracle Clusterware
[root@node1 ~]# xhost +
access control disabled, clients can connect from any host
[oracle@node1 clusterware]$ /u01/Clusterware_soft/clusterware/runInstaller -ignoreSysPrereqs
在出现的操作界面中根据提示一路next,对于检测安装环境选择忽略,下面列出重点截图
需要将节点2(node2)添加进去,点击add 来添加node2的信息,添加后如下图:

下面设定哪个网卡用作public network,哪个用作private network
将 192.168.0.0改为public 类型

下面是设定ocr及votingdisk的冗余度及存放位置,仅做测试使用,因此选择使用External Redundancy模式。在OCR Location处输入存放位置:/ocfs/clusterware/ocr。对于接下的Votingdisk冗余模式同样选择External Redundancy,
存放位置:/ocfs/clusterware/votingdisk

最后给出的是即将安装clusterware的摘要信息。点击Install则开始复制文件。
文件复制完毕后有两个重要的脚步需要执行一个是orainstRoot.sh,一个是root.sh,分别在两个节点按顺序一一执行。下面是给出执行顺序:
在 node1上执行 /u01/app/oracle/oraInventory/orainstRoot.sh
在 node2 上执行 /u01/app/oracle/oraInventory/orainstRoot.sh
在 node1 上执行 /u01/app/oracle/product/10.2.0/crs_1/root.sh
在 node2 上执行 /u01/app/oracle/product/10.2.0/crs_1/root.sh
[root@node1 ~]# /u01/app/oracle/oraInventory/orainstRoot.sh
Changing permissions of /u01/app/oracle/oraInventory to 770.
Changing groupname of /u01/app/oracle/oraInventory to oinstall.
The execution of the script is complete
[root@node2 ~]# /u01/app/oracle//oraInventory/orainstRoot.sh
Changing permissions of /u01/app/oracle/oraInventory to 770.
Changing groupname of /u01/app/oracle/oraInventory to oinstall.
The execution of the script is complete
[root@node1 ~]# /u01/app/oracle/product/10.2.0/db_1/root.sh
WARNING: directory '/u01/app/oracle/product/10.2.0' is not owned by root
WARNING: directory '/u01/app/oracle/product' is not owned by root
WARNING: directory '/u01/app/oracle' is not owned by root
WARNING: directory '/u01/app' is not owned by root
WARNING: directory '/u01' is not owned by root
Checking to see if Oracle CRS stack is already configured
/etc/oracle does not exist. Creating it now.
Setting the permissions on OCR backup directory
Setting up NS directories
Oracle Cluster Registry configuration upgraded successfully
WARNING: directory '/u01/app/oracle/product/10.2.0' is not owned by root
WARNING: directory '/u01/app/oracle/product' is not owned by root
WARNING: directory '/u01/app/oracle' is not owned by root
WARNING: directory '/u01/app' is not owned by root
WARNING: directory '/u01' is not owned by root
assigning default hostname node1 for node 1.
assigning default hostname node2 for node 2.
Successfully accumulated necessary OCR keys.
Using ports: CSS=49895 CRS=49896 EVMC=49898 and EVMR=49897.
node <nodenumber>: <nodename> <private interconnect name> <hostname>
node 1: node1 node1-priv node1
node 2: node2 node2-priv node2
Creating OCR keys for user 'root', privgrp 'root'..
Operation successful.
Now formatting voting device: /ocfs/clusterware/votingdisk
Format of 1 voting devices complete.
Startup will be queued to init within 90 seconds.
Adding daemons to inittab
Expecting the CRS daemons to be up within 600 seconds.
CSS is active on these nodes.
node1
CSS is inactive on these nodes.
node2
Local node checking complete.
Run root.sh on remaining nodes to start CRS daemons.
[root@node2 ~]# /u01/app/oracle/product/10.2.0/db_1/root.sh
WARNING: directory '/u01/app/oracle/product/10.2.0' is not owned by root
WARNING: directory '/u01/app/oracle/product' is not owned by root
WARNING: directory '/u01/app/oracle' is not owned by root
WARNING: directory '/u01/app' is not owned by root
WARNING: directory '/u01' is not owned by root
Checking to see if Oracle CRS stack is already configured
Setting the permissions on OCR backup directory
Setting up NS directories
Oracle Cluster Registry configuration upgraded successfully
WARNING: directory '/u01/app/oracle/product/10.2.0' is not owned by root
WARNING: directory '/u01/app/oracle/product' is not owned by root
WARNING: directory '/u01/app/oracle' is not owned by root
WARNING: directory '/u01/app' is not owned by root
WARNING: directory '/u01' is not owned by root
clscfg: EXISTING configuration version 3 detected.
clscfg: version 3 is 10G Release 2.
assigning default hostname node1 for node 1.
assigning default hostname node2 for node 2.
Successfully accumulated necessary OCR keys.
Using ports: CSS=49895 CRS=49896 EVMC=49898 and EVMR=49897.
node <nodenumber>: <nodename> <private interconnect name> <hostname>
node 1: node1 node1-priv node1
node 2: node2 node2-priv node2
clscfg: Arguments check out successfully.
NO KEYS WERE WRITTEN. Supply -force parameter to override.
-force is destructive and will destroy any previous cluster
configuration.
Oracle Cluster Registry for cluster has already been initialized
Startup will be queued to init within 90 seconds.
Adding daemons to inittab
Expecting the CRS daemons to be up within 600 seconds.
CSS is active on these nodes.
node1
node2
CSS is active on all nodes.
Waiting for the Oracle CRSD and EVMD to start
Oracle CRS stack installed and running under init(1M)
Running vipca(silent) for configuring nodeapps
/u01/app/oracle/product/10.2.0/db_1/jdk/jre//bin/java: error while loading shared libraries: libpthread.so.0: cannot open shared object file: No such file or directory
[root@node2 ~]#
通常情况下,我们会碰到上述错误,即:
/u01/app/oracle/product/10.2.0/db_1/jdk/jre//bin/java: error while loading shared libraries: libpthread.so.0: cannot open shared object file: No such file or directory
对于这个错误,我们可以修改vipca文件来解决,修改方法如下:
[root@node2 ~]# vi /u01/app/oracle/product/10.2.0/crs_1/bin/vipca
找到如下内容:
Remove this workaround when the bug 3937317 is fixed
arch=`uname -m`
if [ "$arch" = "i686" -o "$arch" = "ia64" ]
then
LD_ASSUME_KERNEL=2.4.19
export LD_ASSUME_KERNEL
fi
#End workaround
在fi 后新添加一行:
unset LD_ASSUME_KERNEL
以及srvctl 文件
[root@node2 ~]# vi /u01/app/oracle/product/10.2.0/crs_1/bin/srvctl
找到如下内容:
LD_ASSUME_KERNEL=2.4.19
export LD_ASSUME_KERNEL
同样在其后新增加一行:
unset LD_ASSUME_KERNEL
保存退出,然后在node2 重新执行root.sh
实际上这个问题是由于Oracle bug所产生的,将Clusterware 升级到10.2.0.4可以解决该问题。
安装完毕之后,使用crs_stat来验证Clusterware的状况
[oracle@node1 ~]$ crs_stat -t
Name Type Target State Host
------------------------------------------------------------
ora.node1.gsd application ONLINE ONLINE node1
ora.node1.ons application ONLINE ONLINE node1
ora.node1.vip application ONLINE ONLINE node1
ora.node2.gsd application ONLINE ONLINE node2
ora.node2.ons application ONLINE ONLINE node2
ora.node2.vip application ONLINE ONLINE node2
实际上,在此可以先安装Oracle 10g Clusterware的patch,在此,我们先安装database软件,后续再安装patch。
3. 安装Oracle 10g Database
将下载的对应的安装包使用unzip以root身份解压后,执行runInstaller进行安装,如下:
[root@node1 ~]# xhost +
access control disabled, clients can connect from any host
[root@node1 u01]# cd Oracle10g_Install/
[root@node1 Oracle10g_Install]# ls
doc install response runInstaller stage welcome.html
[root@node1 Oracle10g_Install]# pwd
/u01/Oracle10g_Install
[root@node1 Oracle10g_Install]# ./runInstaller –ignoreSysprereqs
在安装界面根据提示一路next,下面列出重点图示。
注意节点需要选择所有节点
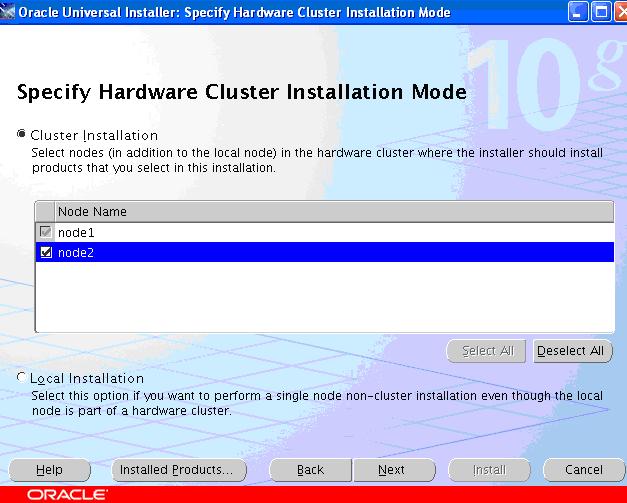
在下面的图示中安装的选项选择Install database software only,后续升级后再创建database。

安装的最后需要执行两个脚本,如下图所示,在两个节点以root身份分别执行。

4. 升级Clusterware到10.2.0.4(注意Oracle patch中包含了Clusterware及Database补丁)
对于Clusterware与Database的升级重要的是要选择合适的安装路径,如下图,选择OraCrs10g_home,则Path路径会自动变为crs_1

由于升级是对RAC的所有节点升级,因此在此同样需要选择双节点,如下图

下面是补丁更新的摘要信息

安装完毕前需要执行的重要脚本及步骤
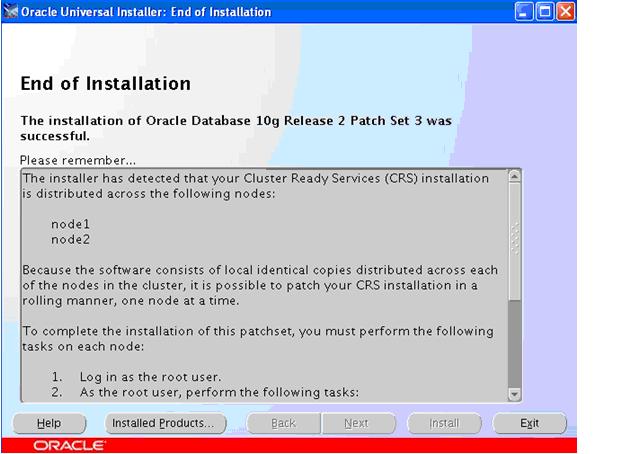
根据下面的这段话来逐步操作
The installer has detected that your Cluster Ready Services (CRS) installation is distributed across the following nodes:
node1
node2
Because the software consists of local identical copies distributed across each of the nodes in the cluster, it is possible to patch your CRS installation in a rolling manner, one node at a time.
To complete the installation of this patchset, you must perform the following tasks on each node:
1. Log in as the root user.
2. As the root user, perform the following tasks:
a. Shutdown the CRS daemons by issuing the following command:
/u01/app/oracle/product/10.2.0/crs_1/bin/crsctl stop crs
b. Run the shell script located at:
/u01/app/oracle/product/10.2.0/crs_1/install/root102.sh
This script will automatically start the CRS daemons on the
patched node upon completion.
3. After completing this procedure, proceed to the next node and repeat.
[root@node1 ~]# /u01/app/oracle/product/10.2.0/crs_1/bin/crsctl stop crs
Stopping resources.
Successfully stopped CRS resources
Stopping CSSD.
Shutting down CSS daemon.
Shutdown request successfully issued.
[root@node1 ~]# /u01/app/oracle/product/10.2.0/crs_1/install/root102.sh
Completed patching clusterware files to /u01/app/oracle/product/10.2.0/crs_1
Relinking some shared libraries.
Relinking of patched files is complete.
WARNING: directory '/u01/app/oracle/product/10.2.0' is not owned by root
WARNING: directory '/u01/app/oracle/product' is not owned by root
WARNING: directory '/u01/app/oracle' is not owned by root
WARNING: directory '/u01/app' is not owned by root
WARNING: directory '/u01' is not owned by root
Preparing to recopy patched init and RC scripts.
Recopying init and RC scripts.
Startup will be queued to init within 30 seconds.
Starting up the CRS daemons.
Waiting for the patched CRS daemons to start.
This may take a while on some systems.
.
10204 patch successfully applied.
clscfg: EXISTING configuration version 3 detected.
clscfg: version 3 is 10G Release 2.
Successfully accumulated necessary OCR keys.
Using ports: CSS=49895 CRS=49896 EVMC=49898 and EVMR=49897.
node <nodenumber>: <nodename> <private interconnect name> <hostname>
node 1: node1 node1-priv node1
Creating OCR keys for user 'root', privgrp 'root'..
Operation successful.
clscfg -upgrade completed successfully
在node2节点上执行的同样的操作,成功后回到安装界面点击exit即可。
5. 升级Database 到10.2.0.4
对于Database的升级与Clusterware升级方式类似,注意升级路径的选择,同样需要选择所有节点。
注意最后同样有两个脚本要执行,图示省略。