注:本文是【ASP.NET Web API系列教程】的一部分,如果您是第一次看本博客文章,请先看前面的内容。
Part 3: Creating an Admin Controller
第3部分:创建Admin控制器
本文引自:http://www.asp.net/web-api/overview/creating-web-apis/using-web-api-with-entity-framework/using-web-api-with-entity-framework,-part-3
Add an Admin Controller
添加Admin控制器
In this section, we’ll add a Web API controller that supports CRUD (create, read, update, and delete) operations on products. The controller will use Entity Framework to communicate with the database layer. Only administrators will be able to use this controller. Customers will access the products through another controller.
在本小节中,我们要添加一个对产品支持CRUD(创建、读取、更新和删除)操作的Web API控制器。该控制器将使用实体框架与数据库层进行通信。只有管理员才能够使用这个控制器。客户端将通过另一个控制器访问产品。
In Solution Explorer, right-click the Controllers folder. Select Add and then Controller.
在“解决方案资源管理器”中右击Controllers文件夹,选择“添加”,然后选“控制器”(见图2-16)。
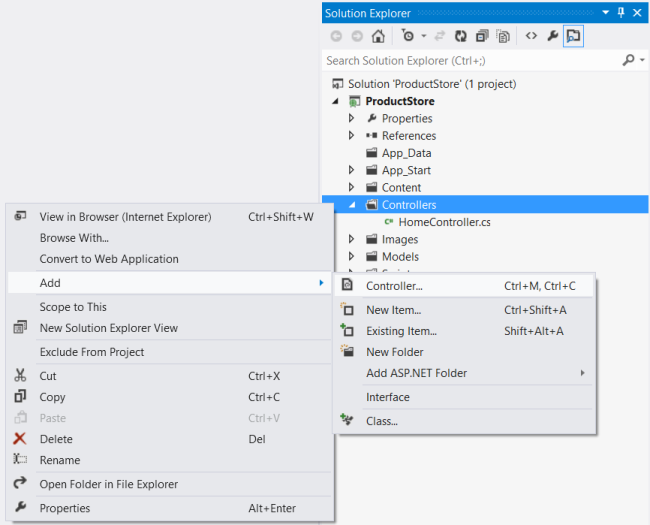
图2-16. 添加控制器
In the Add Controller dialog, name the controller AdminController. Under Template, select "API controller with read/write actions, using Entity Framework". Under Model class, select "Product (ProductStore.Models)". Under Data Context, select "<New Data Context>".
在“添加控制器”对话框中,将此控制器命名为AdminController。在“模板”下选择“带有读/写动作的API控制器(用实体框架)”。在“模型类”下选择“Product (ProductStore.Models)”。在“数据上下文”下选择“<新数据上下文>”(见图2-17)。
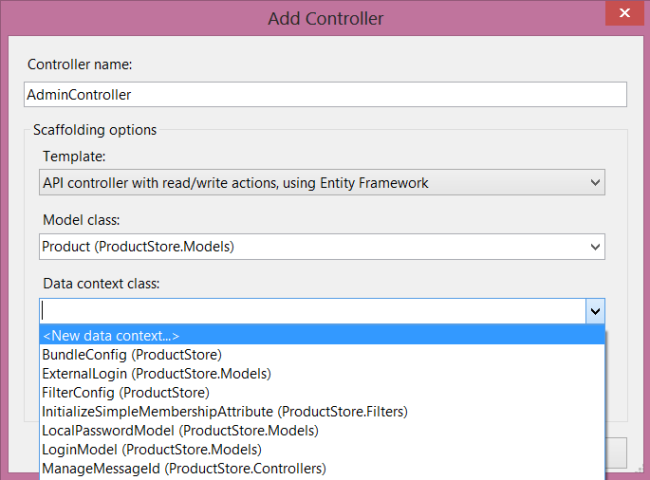
图2-17. 添加控制器对话框中的设置
If the Model class drop-down does not show any model classes, make sure you compiled the project. Entity Framework uses reflection, so it needs the compiled assembly.
如果“模型类”下拉列表未显示任何模型类,请确保已编译了此项目。实体框架使用反射,因此它需要已编译的程序集。
Selecting "<New Data Context>" will open the New Data Context dialog. Name the data context ProductStore.Models.OrdersContext.
选择“<新数据上下文>”会打开“新数据上下文”对话框。将该数据上下文命名为ProductStore.Models.OrdersContext(见图2-18)。
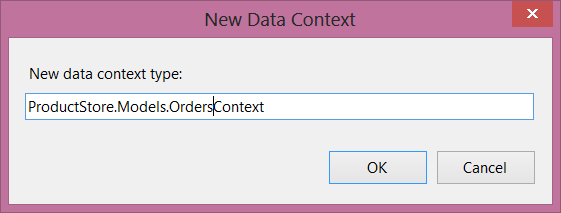
图2-18. 命名“新数据上下文”
Click OK to dismiss the New Data Context dialog. In the Add Controller dialog, click Add.
点击“OK”退出这个“新数据上下文”对话框。在“添加控制器”对话框中点击“添加”。
Here's what got added to the project:
以下是添加到项目的内容:
- A class named OrdersContext that derives from DbContext. This class provides the glue between the POCO models and the database.
一个名称为OrdersContext的类,它派生于DbContext。这个类提供了POCO模型与数据库之间的粘合。 - A Web API controller named AdminController. This controller supports CRUD operations on Product instances. It uses the OrdersContext class to communicate with Entity Framework.
一个名称为AdminController的Web API控制器。这个控制器支持对Product实例的CRUD操作。它使用OrdersContext类与实体框架进行通信。 - A new database connection string in the Web.config file.
Web.config文件中的一个新的数据库连接字符串。
上述新添加项见图2-19。
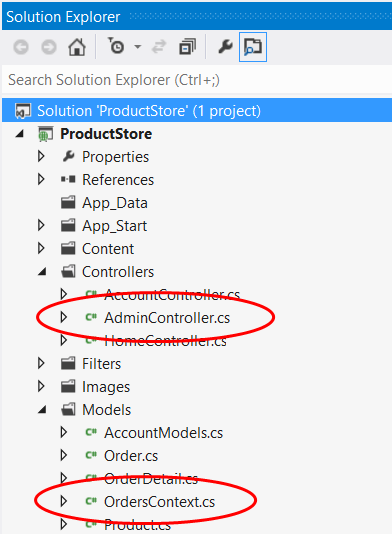
图2-19. 新添加到项目的内容
Open the OrdersContext.cs file. Notice that the constructor specifies the name of the database connection string. This name refers to the connection string that was added to Web.config.
打开OrdersContext.cs文件。注意,其构造器指明了数据库连接字符串的名称。该名称是指被添加到Web.config的连接字符串。
public OrdersContext() : base("name=OrdersContext")
Add the following properties to the OrdersContext class:
将以下属性添加到OrdersContext类:
public DbSet<Order> Orders { get; set; }

public DbSet<OrderDetail> OrderDetails { get; set; }
A DbSet represents a set of entities that can be queried. Here is the complete listing for the OrdersContext class:
DbSet表示一组能够被查询的实体。以下是这个OrdersContext类的完整清单:
public class OrdersContext : DbContext
{
    public OrdersContext() : base("name=OrdersContext")
    {
    }

    public DbSet<Order> Orders { get; set; }
    public DbSet<OrderDetail> OrderDetails { get; set; }
    public DbSet<Product> Products { get; set; }
}
The AdminController class defines five methods that implement basic CRUD functionality. Each method corresponds to a URI that the client can invoke:
AdminController类定义了实现基本的CRUD功能的五个方法。每个方法对应于一个客户端可以请求的URI(见表2-2):
| Controller Method 控制器方法 |
Description 描述 |
URI | HTTP Method HTTP方法 |
|---|---|---|---|
| GetProducts | Gets all products. 获取全部产品 |
api/products | GET |
| GetProduct | Finds a product by ID. 根据ID查找一个产品 |
api/products/id | GET |
| PutProduct | Updates a product. 更新一个产品 |
api/products/id | PUT |
| PostProduct | Creates a new product. 创建一个新产品 |
api/products | POST |
| DeleteProduct | Deletes a product. 删除一个产品 |
api/products/id | DELETE |
Each method calls into OrdersContext to query the database. The methods that modify the collection (PUT, POST, and DELETE) call db.SaveChanges to persist the changes to the database. Controllers are created per HTTP request and then disposed, so it is necessary to persist changes before a method returns.
每一个方法调用都会进入OrdersContext对数据库进行查询。对数据集进行修改的方法(PUT、POST以及DELETE)会调用db.SaveChanges,以便把这些修改持久化回数据库。每个HTTP请求都会创建控制器(实例),然后清除它。因此,在一个方法返回之前,对修改持久化是必要的。
Add a Database Initializer
添加数据库初始化器
Entity Framework has a nice feature that lets you populate the database on startup, and automatically recreate the database whenever the models change. This feature is useful during development, because you always have some test data, even if you change the models.
实体框架有一个很好的特性,它让你在(应用程序)启动时填充数据库,并在模型发生修改时重建数据库。这个特性在开发期间是有用的,因为你总会有一些测试数据,甚至会修改模型。
In Solution Explorer, right-click the Models folder and create a new class named OrdersContextInitializer. Paste in the following implementation:
在“解决方案资源管理器”中,右击Models文件夹,并创建一个名称为OrdersContextInitializer的新类。粘贴以下实现:
namespace ProductStore.Models
{
    using System;
    using System.Collections.Generic;
    using System.Data.Entity;

    public class OrdersContextInitializer : DropCreateDatabaseIfModelChanges<OrdersContext>
    {
        protected override void Seed(OrdersContext context)
        {
            var products = new List<Product>()
            {
                new Product() { Name = "Tomato Soup", Price = 1.39M, ActualCost = .99M },
                new Product() { Name = "Hammer", Price = 16.99M, ActualCost = 10 },
                new Product() { Name = "Yo yo", Price = 6.99M, ActualCost = 2.05M }
            };

            products.ForEach(p => context.Products.Add(p));
            context.SaveChanges();

            var order = new Order() { Customer = "Bob" };
            var od = new List<OrderDetail>()
            {
                new OrderDetail() { Product = products[0], Quantity = 2, Order = order},
                new OrderDetail() { Product = products[1], Quantity = 4, Order = order }
            };
            context.Orders.Add(order);
            od.ForEach(o => context.OrderDetails.Add(o));

            context.SaveChanges();
        }
    }
}
By inheriting from the DropCreateDatabaseIfModelChanges class, we are telling Entity Framework to drop the database whenever we modify the model classes. When Entity Framework creates (or recreates) the database, it calls the Seed method to populate the tables. We use the Seed method to add some example products plus an example order.
通过对DropCreateDatabaseIfModelChanges类的继承,我们是在告诉实体框架,无论何时修改了模型类,便删除数据库。当实体框架创建(或重建)数据库时,它会调用Seed方法去填充数据库。我们用这个Seed方法添加了一些例子产品和一个例子订单。
This feature is great for testing, but don’t use the DropCreateDatabaseIfModelChanges class in production, because you could lose your data if someone changes a model class.
这个特性对于测试是很棒的,但在产品(指正式运行的应用程序 — 译者注)中不要使用这个DropCreateDatabaseIfModelChanges类。因为,如果有人修改了模型类,便会丢失数据。
Next, open Global.asax and add the following code to the Application_Start method:
下一步,打开Global.asax,并将以下代码添加到Application_Start方法中:
System.Data.Entity.Database.SetInitializer(
    new ProductStore.Models.OrdersContextInitializer());
Send a Request to the Controller
向控制器发送请求
At this point, we haven’t written any client code, but you can invoke the web API using a web browser or an HTTP debugging tool such as Fiddler. In Visual Studio, press F5 to start debugging. Your web browser will open to http://localhost:portnum/, where portnum is some port number.
此刻,我们还没有编写任何客户端代码,但你已经可以使用Web浏览器或诸如Fiddler之类的调试工具来调用这个Web API了。在Visual Studio中按F5键启动调试。你的浏览器将打开网址http://localhost:portnum/,这里,portnum是某个端口号。
Send an HTTP request to "http://localhost:portnum/api/admin". The first request may be slow to complete, because Entify Entity Framework needs to create and seed the database. The response should something similar to the following:
发送一个HTTP请求到“http://localhost:portnum/api/admin”。第一次请求可能会慢一些才能完成,因为实体框架需要创建和种植数据库。其响应应当类似于下面这样:
HTTP/1.1 200 OK
Server: ASP.NET Development Server/10.0.0.0
Date: Mon, 18 Jun 2012 04:30:33 GMT
X-AspNet-Version: 4.0.30319
Cache-Control: no-cache
Pragma: no-cache
Expires: -1
Content-Type: application/json; charset=utf-8
Content-Length: 175
Connection: Close

[{"Id":1,"Name":"Tomato Soup","Price":1.39,"ActualCost":0.99},{"Id":2,"Name":"Hammer",
"Price":16.99,"ActualCost":10.00},{"Id":3,"Name":"Yo yo","Price":6.99,"ActualCost":
2.05}]
看完此文如果觉得有所收获,恳请给个推荐
