在上一篇jsf环境搭建的基础上 , 加入spring框架 , 先看下目录结构
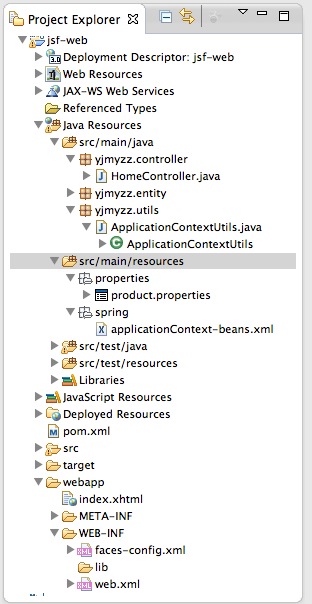
src/main/resources 这个source folder 放置web项目所需的主要配置,打包时,会自动打包到WEB-INF下
首先看下pom.xml,需要引入一些依赖项:


 1 <project xmlns="http://maven.apache.org/POM/4.0.0" xmlns:xsi="http://www.w3.org/2001/XMLSchema-instance"
 2     xsi:schemaLocation="http://maven.apache.org/POM/4.0.0 http://maven.apache.org/xsd/maven-4.0.0.xsd">
 3     <modelVersion>4.0.0</modelVersion>
 4     <groupId>yjmyzz</groupId>
 5     <artifactId>jsf-web</artifactId>
 6     <version>1.0</version>
 7     <packaging>war</packaging>
 8
 9
10     <dependencies>
11         <!-- 单元测试 -->
12         <dependency>
13             <groupId>junit</groupId>
14             <artifactId>junit</artifactId>
15             <version>4.7</version>
16             <scope>test</scope>
17         </dependency>
18
19         <!-- jsf -->
20         <dependency>
21             <groupId>org.jboss.spec.javax.faces</groupId>
22             <artifactId>jboss-jsf-api_2.1_spec</artifactId>
23             <version>2.1.19.1.Final-redhat-1</version>
24             <scope>compile</scope>
25         </dependency>
26
27
28         <!-- spring -->
29         <dependency>
30             <groupId>org.springframework</groupId>
31             <artifactId>spring-context</artifactId>
32             <version>4.0.2.RELEASE</version>
33         </dependency>
34
35
36         <dependency>
37             <groupId>org.springframework</groupId>
38             <artifactId>spring-web</artifactId>
39             <version>4.0.2.RELEASE</version>
40         </dependency>
41
42
43         <!-- servlet支持 -->
44         <dependency>
45             <groupId>javax.servlet</groupId>
46             <artifactId>servlet-api</artifactId>
47             <version>2.5</version>
48         </dependency>
49
50     </dependencies>
51
52     <build>
53         <plugins>
54             <plugin>
55                 <artifactId>maven-compiler-plugin</artifactId>
56                 <version>3.1</version>
57                 <configuration>
58                     <source>1.7</source>
59                     <target>1.7</target>
60                 </configuration>
61             </plugin>
62             <plugin>
63                 <artifactId>maven-war-plugin</artifactId>
64                 <version>2.3</version>
65                 <configuration>
66                     <warSourceDirectory>webapp</warSourceDirectory>
67                     <failOnMissingWebXml>false</failOnMissingWebXml>
68                 </configuration>
69             </plugin>
70         </plugins>
71     </build>
72 </project>
1. 自动加载配置文件
在web项目中,可以让spring自动加载配置文件(即上图中的src/main/resouces/spring下的xml文件),WEB-INF/web.xml中参考以下设置:
 1 <?xml version="1.0" encoding="UTF-8"?>
 2 <web-app xmlns:xsi="http://www.w3.org/2001/XMLSchema-instance" xmlns="http://java.sun.com/xml/ns/javaee" xsi:schemaLocation="http://java.sun.com/xml/ns/javaee http://java.sun.com/xml/ns/javaee/web-app_3_0.xsd" id="WebApp_ID" version="3.0">
 3      <display-name>jsf-web</display-name>
 4
 5      <welcome-file-list>
 6        <welcome-file>index.html</welcome-file>
 7      </welcome-file-list>
 8
 9     <listener>
10      <listener-class>
11        org.springframework.web.context.ContextLoaderListener
12       </listener-class>
13     </listener>
14
15     <context-param>
16      <param-name>contextConfigLocation</param-name>
17       <param-value>
18        classpath*:spring/applicationContext-*.xml
19       </param-value>
20     </context-param>
21
22 </web-app>
解释一下: classpath*:spring/applicationContext-*.xml 这里表示将加载classpath路径下 spring目录下的所有以applicationContext-开头的xml文件 , 通常为了保持配置文件的清爽 , 我们会把配置分成多份 : 比如 applicationContext-db.xml 用来配置DataSource , applicationContext-cache.xml用来配置缓存...等等.
2.代码中如何取得ApplicationContext实例
 1 package yjmyzz.utils;
 2
 3 import javax.faces.context.FacesContext;
 4 import javax.servlet.ServletContext;
 5
 6 import org.springframework.context.ApplicationContext;
 7 import org.springframework.web.context.support.WebApplicationContextUtils;
 8
 9 public class ApplicationContextUtils {
10
11     public static ApplicationContext getApplicationContext() {
12         ServletContext context = (ServletContext) FacesContext
13                 .getCurrentInstance().getExternalContext().getContext();
14         ApplicationContext appctx = WebApplicationContextUtils
15                 .getRequiredWebApplicationContext(context);
16
17         return appctx;
18     }
19
20     public static <T> T getBean(Class<T> t) {
21         return getApplicationContext().getBean(t);
22     }
23 }
有了这个工具类 , 就可以方便的取得注入的Bean
3. 使用properties文件注入
为了演示注入效果,先定义一个基本的Entity类
 1 package yjmyzz.entity;
 2
 3 import java.io.Serializable;
 4
 5 public class ProductEntity implements Serializable {
 6
 7     private static final long serialVersionUID = -2055674628624266800L;
 8     /*
 9      * 产品编码
10      */
11     private String productNo;
12
13     /**
14      * 产品名称
15      */
16     private String productName;
17
18     /**
19      * 产品ID
20      */
21     private Long productId;
22
23     public String getProductNo() {
24         return productNo;
25     }
26
27     public void setProductNo(String productNo) {
28         this.productNo = productNo;
29     }
30
31     public String getProductName() {
32         return productName;
33     }
34
35     public void setProductName(String productName) {
36         this.productName = productName;
37     }
38
39     public Long getProductId() {
40         return productId;
41     }
42
43     public void setProductId(Long productIdLong) {
44         this.productId = productIdLong;
45     }
46
47     @Override
48     public String toString() {
49         return productId + "/" + productNo + "/" + productName;
50     }
51
52 }
然后在applicationContext-beans.xml中配置以下内容:
 1 <?xml version="1.0" encoding="UTF-8"?>
 2 <beans xmlns="http://www.springframework.org/schema/beans"
 3     xmlns:xsi="http://www.w3.org/2001/XMLSchema-instance"
 4     xsi:schemaLocation="http://www.springframework.org/schema/beans
 5            http://www.springframework.org/schema/beans/spring-beans-3.0.xsd">
 6
 7     <bean id="propertyConfigurer"
 8         class="org.springframework.beans.factory.config.PropertyPlaceholderConfigurer">
 9         <property name="locations">
10             <list>
11                 <value>classpath:properties/*.properties</value>
12             </list>
13         </property>
14     </bean>
15
16     <bean id="productEntity" class="yjmyzz.entity.ProductEntity">
17         <property name="productId" value="${product.id}" />
18         <property name="productNo" value="${product.no}" />
19         <property name="productName" value="${product.name}" />
20         <!-- <property name="productId">
21             <bean class="java.lang.Long">
22                 <constructor-arg index="0" value="${product.id}" />
23             </bean>
24         </property>
25          -->
26     </bean>
27 </beans>
注:classpath:properties/*.properties表示运行时 , spring容器会自动加载classpath\properties目录下的所有以.properties后缀结尾的文件 , 我们在src/main/resources/properties/下放置一个product.properties属性文件 , 内容如下:
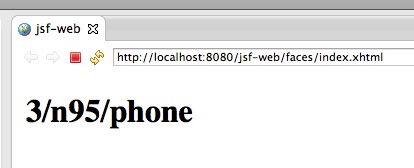
1 product.id=3
2 product.no=n95
3 product.name=phone
该文件被spring自动加载后 , 就可以用里面定义的属性值 , 为Bean做setter属性注入 , 即配置文件中的<property name="productId" value="${product.id}" />
4.验证注入是否成功
在HomeController里 , 向Spring容器要一个Bean , 显示下它的属性:
 1 package yjmyzz.controller;
 2
 3 import javax.faces.bean.ManagedBean;
 4
 5 import yjmyzz.entity.ProductEntity;
 6 import yjmyzz.utils.ApplicationContextUtils;
 7
 8 @ManagedBean(name = "Home")
 9 public class HomeController {
10
11     public String sayHello() {
12
13         ProductEntity product = ApplicationContextUtils
14                 .getBean(ProductEntity.class);
15
16         return product.toString();
17     }
18
19 }
index.xhtml里仍然跟上篇相同:
 1 <!DOCTYPE html PUBLIC "-//W3C//DTD XHTML 1.0 Transitional//EN" "http://www.w3.org/TR/xhtml1/DTD/xhtml1-transitional.dtd">
 2 <html xmlns="http://www.w3.org/1999/xhtml"
 3       xmlns:h="http://java.sun.com/jsf/html"
 4       xmlns:f="http://java.sun.com/jsf/core"
 5       xmlns:ui="http://java.sun.com/jsf/facelets">
 6
 7 <h:head>
 8     <title>jsf-web</title>
 9 </h:head>
10 <body>
11     <h1>
12         #{Home.sayHello()}
13
14     </h1>
15 </body>
16 </html>
最后部署到jboss上 , 运行截图如下: