简单的来说,根文件系统包括虚拟根文件系统和真实根文件系统。在Kernel启动的初始阶段,首先去创建虚拟的根文件系统,接下来再去调用do_mount来加载真正的文件系统,并将根文件系统切换到真正的文件系统,也即真实的文件系统。
一.什么是根文件系统
在传统的Windows机器上目录结构中,可能会包括C:或者D:盘,而他们一般就称之为特定逻辑磁盘的根目录。从文件系统的层面来说,每一个分区都包含了一个根目录区,也即系统中存在多个根目录。
但是,在Linux系统中,目录结构与Windows上有较大的不同。系统中只有一个根目录,路径是“/”,而其它的分区只是挂载在根目录中的一个文件夹,如“/proc”和“system”等,这里的“/”就是Linux中的根目录。
对应根目录也就存在一个根目录文件系统的概念,我们可以将某一个分区挂载为根目录文件系统,如6410公版中就将mtdblk2挂载为根目录文件系统。程序中可以通过U-Boot给Kernel指定参数或者编译选项来指定,如目前的开发板中就通过如下的编译选项来制定根目录文件系统:
| CONFIG_CMDLINE="console=ttyS0,115200 mem=108M rdinit=/linuxrc root=/dev/mtdblock2" |
简单的来说,根目录文件系统就是一种目录结构,包括了Linux启动的时候所必须的一些目录结构和重要文件。
根文件系统有两种,一种是虚拟根文件系统,另外一种是真实的根文件系统。一般情况下,会首先在虚拟的根文件系统中做一部分工作,然后切换到真实的根文件系统下面。
笼统的来说,虚拟的根文件系统包括三种类型,即Initramfs、cpio-initrd和image-initrd。
二.相关重要概念
1. Initrd
Initrd是在Linux中普遍采用的一种技术,就是由Bootloader加载的内存盘。在系统启动的过程中,首先会执行Initrd中的“某一个文件” 来完成驱动模块加载的任务,第二阶段才会执行真正的根文件系统中的/sbin/init。这里提到的第一阶段是为第二阶段服务的,主要是用来加载根文件系统以及根文件系统存储介质的驱动程序。
资料中提到,存在多种类型的Initrd,实际应用中包括无Initrd、Linux Kernel和Initrd打包、Linux Kernel和Initrd分离以及RAMDisk Initrd。
目前,手中项目采用的就是第四种策略。在系统启动的时候,U-Boot会将Linux Kernel和Rootfs加载到内存,并跳转到Linux Kernel的入口地址执行程序。这篇文章将侧重对该种情况进行分析。
三.根文件系统加载代码分析
1. VFS的注册
首先不得不从老掉牙的Linux系统的函数start_kernel()说起。函数start_kernel()中会去调用vfs_caches_init()来初始化VFS。
下面看一下函数vfs_caches_init ()的代码:
| void __init vfs_caches_init(unsigned long mempages) { unsigned long reserve; /* Base hash sizes on available memory, with a reserve equal to 150% of current kernel size */ reserve = min((mempages - nr_free_pages()) * 3/2, mempages - 1); mempages -= reserve; names_cachep = kmem_cache_create("names_cache", PATH_MAX, 0, SLAB_HWCACHE_ALIGN|SLAB_PANIC, NULL); dcache_init(); inode_init(); files_init(mempages); [1] mnt_init(); bdev_cache_init(); chrdev_init(); } |
代码【1】:vfs_caches_init()中最重要的函数。函数mnt_init()会创建一个rootfs,这是个虚拟的rootfs,即内存文件系统,后面还会指向真实的文件系统。
接下来看一下函数mnt_init():
| Void __init mnt_init(void) { unsigned u; int err; init_rwsem(&namespace_sem); mnt_cache = kmem_cache_create("mnt_cache", sizeof(struct vfsmount), 0, SLAB_HWCACHE_ALIGN | SLAB_PANIC, NULL); mount_hashtable = (struct list_head *)__get_free_page(GFP_ATOMIC); if (!mount_hashtable) panic("Failed to allocate mount hash table/n"); printk("Mount-cache hash table entries: %lu/n", HASH_SIZE); for (u = 0; u < HASH_SIZE; u++) INIT_LIST_HEAD(&mount_hashtable[u]); err = sysfs_init(); if (err) printk(KERN_WARNING "%s: sysfs_init error: %d/n", __func__, err); fs_kobj = kobject_create_and_add("fs", NULL); if (!fs_kobj) printk(KERN_WARNING "%s: kobj create error/n", __func__); [1] init_rootfs(); [2] init_mount_tree(); } |
代码[1]:创建虚拟根文件系统;
代码[2]:注册根文件系统。
接下来看一下函数init_mount_tree()的代码:
| static void __init init_mount_tree(void) { struct vfsmount *mnt; struct mnt_namespace *ns; struct path root; [1] mnt = do_kern_mount("rootfs", 0, "rootfs", NULL); if (IS_ERR(mnt)) panic("Can't create rootfs"); ns = kmalloc(sizeof(*ns), GFP_KERNEL); if (!ns) panic("Can't allocate initial namespace"); atomic_set(&ns->count, 1); INIT_LIST_HEAD(&ns->list); init_waitqueue_head(&ns->poll); ns->event = 0; list_add(&mnt->mnt_list, &ns->list); ns->root = mnt; mnt->mnt_ns = ns; init_task.nsproxy->mnt_ns = ns; get_mnt_ns(ns); root.mnt = ns->root; root.dentry = ns->root->mnt_root; set_fs_pwd(current->fs, &root); [2] set_fs_root(current->fs, &root); } |
代码[1]:创建虚拟文件系统;
代码[2]:将当前的文件系统配置为根文件系统。
可能有人会问,为什么不直接把真实的文件系统配置为根文件系统?
答案很简单,内核中没有根文件系统的设备驱动,如USB等存放根文件系统的设备驱动,而且即便你将根文件系统的设备驱动编译到内核中,此时它们还尚未加载,其实所有的Driver是由在后面的Kernel_Init线程进行加载。所以需要CPIO Initrd、Initrd和RAMDisk Initrd。另外,我们的Root设备都是以设备文件的方式指定的,如果没有根文件系统,设备文件怎么可能存在呢?
2. VFS的挂载
接下来,Kernel_Start会去调用rest_init()并会去创建系统中的第一个进程Kernel_Init,并由其调用所有模块的初始化函数,其中ROOTFS的初始化函数也在这个期间被调用。
函数rest_init代码如下:
| /* * We need to finalize in a non-__init function or else race conditions * between the root thread and the init thread may cause start_kernel to * be reaped by free_initmem before the root thread has proceeded to * cpu_idle. * * gcc-3.4 accidentally inlines this function, so use noinline. */ static noinline void __init_refok rest_init(void) __releases(kernel_lock) { int pid; kernel_thread(kernel_init, NULL, CLONE_FS | CLONE_SIGHAND); numa_default_policy(); pid = kernel_thread(kthreadd, NULL, CLONE_FS | CLONE_FILES); kthreadd_task = find_task_by_pid_ns(pid, &init_pid_ns); unlock_kernel(); /* * The boot idle thread must execute schedule() * at least once to get things moving: */ init_idle_bootup_task(current); rcu_scheduler_starting(); preempt_enable_no_resched(); schedule(); preempt_disable(); /* Call into cpu_idle with preempt disabled */ cpu_idle(); } |
函数Kernel_Init代码如下:
| static int __init kernel_init(void * unused) { lock_kernel(); /* * init can run on any cpu. */ set_cpus_allowed_ptr(current, CPU_MASK_ALL_PTR); /* * Tell the world that we're going to be the grim * reaper of innocent orphaned children. * * We don't want people to have to make incorrect * assumptions about where in the task array this * can be found. */ init_pid_ns.child_reaper = current; cad_pid = task_pid(current); smp_prepare_cpus(setup_max_cpus); do_pre_smp_initcalls(); start_boot_trace(); smp_init(); sched_init_smp(); cpuset_init_smp(); [1] do_basic_setup(); /* * check if there is an early userspace init. If yes, let it do all * the work */ [2] if (!ramdisk_execute_command) ramdisk_execute_command = "/init"; [3] if (sys_access((const char __user *) ramdisk_execute_command, 0) != 0) { ramdisk_execute_command = NULL; prepare_namespace(); } /* * Ok, we have completed the initial bootup, and * we're essentially up and running. Get rid of the * initmem segments and start the user-mode stuff.. */ init_post(); return 0; } |
代码[1]:函数do_basic_setup()调用所有模块的初始化函数,包括initramfs的初始化函数populate_rootfs。这部分代码在init/initramfs.c下面,函数populate_rootfs通过如下方式导出:
| rootfs_initcall(populate_rootfs); |
代码[2]:ramdisk_execute_command值通过“rdinit=”指定,如果未指定,则采用默认的值/init。
代码[3]:检查根文件系统中是否存在文件ramdisk_execute_command,如果存在的话则执行init_post(),否则执行prepare_namespace()挂载根文件系统。
需要特别指出的是initramfs.c模块的入口函数populate_rootfs()是否执行取决于Kernel的编译选项。参照linux/init目录下的makefile文件,如下:
| # # Makefile for the linux kernel. # obj-y := main.o version.o mounts.o ifneq ($(CONFIG_BLK_DEV_INITRD),y) obj-y += noinitramfs.o else obj-$(CONFIG_BLK_DEV_INITRD) += initramfs.o endif obj-$(CONFIG_GENERIC_CALIBRATE_DELAY) += calibrate.o mounts-y := do_mounts.o mounts-$(CONFIG_BLK_DEV_RAM) += do_mounts_rd.o mounts-$(CONFIG_BLK_DEV_INITRD) += do_mounts_initrd.o mounts-$(CONFIG_BLK_DEV_MD) += do_mounts_md.o |
主要完成Initrd的检测工作,检查出是CPIO Initrd还是Initramfs还是Image-Initrd还是需要在编译的时候做如下的配置(General setupàInitramfs/initrd support):

该函数的代码如下:
| static int __init populate_rootfs(void) { [1] char *err = unpack_to_rootfs(__initramfs_start, __initramfs_end - __initramfs_start, 0); if (err) panic(err); [2] if (initrd_start) { #ifdef CONFIG_BLK_DEV_RAM int fd; printk(KERN_INFO "checking if image is initramfs..."); [3] err = unpack_to_rootfs((char *)initrd_start, initrd_end - initrd_start, 1); if (!err) { printk(" it is/n"); unpack_to_rootfs((char *)initrd_start, initrd_end - initrd_start, 0); free_initrd(); return 0; } printk("it isn't (%s); looks like an initrd/n", err); [4] fd = sys_open("/initrd.image", O_WRONLY|O_CREAT, 0700); if (fd >= 0) { [5] sys_write(fd, (char *)initrd_start, initrd_end - initrd_start); sys_close(fd); [6] free_initrd(); } #else printk(KERN_INFO "Unpacking initramfs..."); [7] err = unpack_to_rootfs((char *)initrd_start, initrd_end - initrd_start, 0); if (err) panic(err); printk(" done/n"); free_initrd(); #endif } return 0; } |
代码[1]:unpack_to_rootfs顾名思义,就是解压包到rootfs,其具有两个功能,一个是检测是否是属于cpio包,另外一个就是解压cpio包,通过最后一个参数进行控制。1:检测,0:解压。其实,Initramfs也是压缩过后的CPIO文件。
资料中提到,Linux2.5中开始引入initramfs,在Linux2.6中一定存在,而且编译的时候通过连接脚本arch/arm/kernel/vmlinux.lds将其编译到__initramfs_start~__initramfs_end,执行完unpack_to_rootfs后将被拷贝到根目录。
代码[2]:判断是否加载了Initrd,无论对于那种格式的Initrd,即无论是CPIO-Initrd还是Image-Initrd,U-Boot都会将其拷贝到initrd_start。当然了,如果是initramfs的情况下,该值肯定为空了。
代码[3]:判断加载的是不是CPIO-Initrd。
通过在这里主要用于检测,如果是编译到Linux Kernel的CPIO Initrd,__initramfs_end - __initramfs_start应该是大于零的,否则为零,其实也就是通过这里来判断是否为CPIO Initrd。
代码[4]:如果不是CPIO-Initrd,则就是Image-Initrd,将其内容保存到文件/initrd.image中。在根文件系统中创建文件/initrd.image。
代码[5]:这里是对Image-Initrd提供支持的,将内存中的initrd赋值到initrd.image中,以释放内存空间。
代码[6]:释放Initrd所占用的内存空间。
另外,如果要支持Image-Initrd的话,必须要配置CONFIG_BLK_DEV_RAM,配置的方法上面已经讲过。
下面接着来分析函数kernel_init
| static int __init kernel_init(void * unused) { … do_basic_setup(); /* * check if there is an early userspace init. If yes, let it do all * the work */ if (!ramdisk_execute_command) ramdisk_execute_command = "/init"; [1] if (sys_access((const char __user *) ramdisk_execute_command, 0) != 0) { ramdisk_execute_command = NULL; prepare_namespace(); } /* * Ok, we have completed the initial bootup, and * we're essentially up and running. Get rid of the * initmem segments and start the user-mode stuff.. */ init_post(); return 0; } |
代码[1]:前面在对函数populate_rootfs进行分析的时候已经知道,对于initramfs和cpio-initrd的情况,都会将文件系统(其实是一个VFS)解压到根文件系统。如果虚拟文件系统中存在ramdisk_execute_command指定的文件则直接转向init_post()来执行,否则执行函数prepare_namespace()。
3. 根文件系统的挂载
从上面的代码分析中知道,对于Image-Initrd或者VFS(即InitRamfs或者CPIO-Initrd)中不存在文件ramdisk_execute_command的情况,则执行prepare_namespace()。
接下来看一下函数prepare_namespace()的代码:
| /* * Prepare the namespace - decide what/where to mount, load ramdisks, etc. */ void __init prepare_namespace(void) { int is_floppy; [1] if (root_delay) { printk(KERN_INFO "Waiting %dsec before mounting root device.../n", root_delay); ssleep(root_delay); } /* * wait for the known devices to complete their probing * * Note: this is a potential source of long boot delays. * For example, it is not atypical to wait 5 seconds here * for the touchpad of a laptop to initialize. */ [2] wait_for_device_probe(); md_run_setup(); [3] if (saved_root_name[0]) { root_device_name = saved_root_name; if (!strncmp(root_device_name, "mtd", 3) || !strncmp(root_device_name, "ubi", 3)) { [4] mount_block_root(root_device_name, root_mountflags); goto out; } [5] ROOT_DEV = name_to_dev_t(root_device_name); if (strncmp(root_device_name, "/dev/", 5) == 0) root_device_name += 5; } [6] if (initrd_load()) goto out; [7] /* wait for any asynchronous scanning to complete */ if ((ROOT_DEV == 0) && root_wait) { printk(KERN_INFO "Waiting for root device %s.../n", saved_root_name); while (driver_probe_done() != 0 || (ROOT_DEV = name_to_dev_t(saved_root_name)) == 0) msleep(100); async_synchronize_full(); } is_floppy = MAJOR(ROOT_DEV) == FLOPPY_MAJOR; if (is_floppy && rd_doload && rd_load_disk(0)) ROOT_DEV = Root_RAM0; mount_root(); out: [9] sys_mount(".", "/", NULL, MS_MOVE, NULL); [10] sys_chroot("."); } |
代码[1]:资料中提到,对于将根文件系统存放到USB或者SCSI设备上的情况,Kernel需要等待这些耗费时间比较久的设备驱动加载完毕,所以这里存在一个Delay。
代码[2]:从字面的意思来看,这里也是来等待根文件系统所在的设备探测函数的完成。
代码[3]:参数saved_root_name存放的是Kernel参数root=所指定的设备文件,这点不再赘述,可以参照代码。
代码[4]:按照资料中的解释,这里相当于将saved_root_nam指定的设备进行加载。如下面传递给内核的command line:
| CONFIG_CMDLINE="console=ttyS0,115200 mem=108M rdinit=/linuxrc root=/dev/mtdblock2" |
实际上就是加载/dev/mtdblock2。
代码[5]:参数ROOT_DEV存放设备节点号。
代码[6]:挂载initrd,这里进行的操作相当的复杂,可以参照后续关于该函数的详细解释。
代码[7]:如果指定mount_initrd为true,即没有指定在函数initrd_load中mount的话,则在这里重新realfs的mount操作。
代码[9]:将挂载点从当前目录(实际当前的目录在mount_root中或者在mount_block_root中指定)移到根目录。对于上面的command line的话,当前的目录就是/dev/mtdblock2。
代码[10]:将当前目录当作系统的根目录,至此虚拟系统根目录文件系统切换到了实际的根目录文件系统。
接下来看一下函数initrd_load()的代码:
| int __init initrd_load(void) { [1] if (mount_initrd) { [2] create_dev("/dev/ram", Root_RAM0); /* * Load the initrd data into /dev/ram0. Execute it as initrd * unless /dev/ram0 is supposed to be our actual root device, * in that case the ram disk is just set up here, and gets * mounted in the normal path. */ [3] if (rd_load_image("/initrd.image") && ROOT_DEV != Root_RAM0) { sys_unlink("/initrd.image"); [4] handle_initrd(); return 1; } } sys_unlink("/initrd.image"); return 0; } |
代码[1]:可以通过Kernel的参数“noinitrd“来配置mount_initrd的值,默认为1,很少看到有项目区配置该值,所以一般情况下,mount_initrd的值应该为1;
代码[2]:创建一个Root_RAM0的设备节点/dev/ram;
代码[3]:如果根文件设备号不是Root_RAM0则程序就会执行代码[4],换句话说,就是给内核指定的参数不是/dev/ram,例如上面指定的/dev/mtdblock2设备节点肯定就不是Root_RAM0。
另外这行代码还将文件initrd.image释放到节点/dev/ram0,也就是对应image-initrd的操作。
代码[4]:函数handle_initrd主要功能是执行Initrd中的linuxrc文件,并且将realfs的根目录设置为当前目录。其实前面也已经提到了,这些操作只对image-cpio的情况下才会去执行。
函数handle_initrd的代码如下:
| static void __init handle_initrd(void) { int error; int pid; [1] real_root_dev = new_encode_dev(ROOT_DEV); [2] create_dev("/dev/root.old", Root_RAM0); /* mount initrd on rootfs' /root */ mount_block_root("/dev/root.old", root_mountflags & ~MS_RDONLY); [3] sys_mkdir("/old", 0700); root_fd = sys_open("/", 0, 0); old_fd = sys_open("/old", 0, 0); /* move initrd over / and chdir/chroot in initrd root */ [4] sys_chdir("/root"); sys_mount(".", "/", NULL, MS_MOVE, NULL); sys_chroot("."); /* * In case that a resume from disk is carried out by linuxrc or one of * its children, we need to tell the freezer not to wait for us. */ current->flags |= PF_FREEZER_SKIP; [5] pid = kernel_thread(do_linuxrc, "/linuxrc", SIGCHLD); if (pid > 0) while (pid != sys_wait4(-1, NULL, 0, NULL)) yield(); current->flags &= ~PF_FREEZER_SKIP; /* move initrd to rootfs' /old */ sys_fchdir(old_fd); sys_mount("/", ".", NULL, MS_MOVE, NULL); /* switch root and cwd back to / of rootfs */ [6] sys_fchdir(root_fd); sys_chroot("."); sys_close(old_fd); sys_close(root_fd); [7] if (new_decode_dev(real_root_dev) == Root_RAM0) { sys_chdir("/old"); return; } [8] ROOT_DEV = new_decode_dev(real_root_dev); mount_root(); [9] printk(KERN_NOTICE "Trying to move old root to /initrd ... "); error = sys_mount("/old", "/root/initrd", NULL, MS_MOVE, NULL); if (!error) printk("okay/n"); else { int fd = sys_open("/dev/root.old", O_RDWR, 0); if (error == -ENOENT) printk("/initrd does not exist. Ignored./n"); else printk("failed/n"); printk(KERN_NOTICE "Unmounting old root/n"); sys_umount("/old", MNT_DETACH); printk(KERN_NOTICE "Trying to free ramdisk memory ... "); if (fd < 0) { error = fd; } else { error = sys_ioctl(fd, BLKFLSBUF, 0); sys_close(fd); } printk(!error ? "okay/n" : "failed/n"); } } |
代码[1]:real_root_dev为一个全局变量,用来保存realfs的设备号。
代码[2]:调用mount_block_root将realfs加载到VFS的/root下。
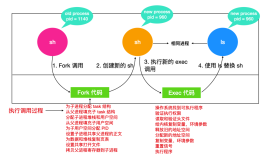
代码[3]:提取rootfs的根文件描述符并将其保存到root_fd,资料中提及其用处就是在后续调用sys_chroot到initrd的文件系统后,处理完init请求后,还能够再次切回到rootfs,这一点在一份IBM官方有关cpio-initrd和image-initrd的执行流程图中可以看到,如下:
代码[4]:sys_chroot到initrd文件系统,前面已经挂载initrd到VFS的root目录下;
代码[5]:执行initrd中的linuxrc,并等待执行结束;
代码[6]:initrd执行结束后,切回到rootfs,不知道为什么直接用节点切呢?
代码[7]:如果real_root_dev直接配置为Root_RAM0,也即直接使用直接使用initrd作为realfs,改变当前目录到initrd中,并直接返回。
代码[8]:执行完Linuxrc后,realfs已经确定,则调用mount_root将realfs挂载到VFS的/root目录下,并将当前的目录配置为VFS的/root。
代码[9]:收尾的工作,例如释放内存等。
4. 真实根文件系统挂载后的操作
下面回过头来再看上面提到的init_post,该函数实际上是在Kernel_init中最后执行的函数。其代码如下:
| /* This is a non __init function. Force it to be noinline otherwise gcc * makes it inline to init() and it becomes part of init.text section */ static noinline int init_post(void) { /* need to finish all async __init code before freeing the memory */ async_synchronize_full(); free_initmem(); unlock_kernel(); mark_rodata_ro(); system_state = SYSTEM_RUNNING; numa_default_policy(); if (sys_open((const char __user *) "/dev/console", O_RDWR, 0) < 0) printk(KERN_WARNING "Warning: unable to open an initial console./n"); (void) sys_dup(0); (void) sys_dup(0); current->signal->flags |= SIGNAL_UNKILLABLE; if (ramdisk_execute_command) { run_init_process(ramdisk_execute_command); printk(KERN_WARNING "Failed to execute %s/n", ramdisk_execute_command); } /* * We try each of these until one succeeds. * * The Bourne shell can be used instead of init if we are * trying to recover a really broken machine. */ if (execute_command) { run_init_process(execute_command); printk(KERN_WARNING "Failed to execute %s. Attempting " "defaults.../n", execute_command); } run_init_process("/sbin/init"); run_init_process("/etc/init"); run_init_process("/bin/init"); run_init_process("/bin/sh"); panic("No init found. Try passing init= option to kernel."); } |
可以看到,在该函数的最后,以此会去搜索文件并执行ramdisk_execute_command、execute_command、/sbin/init、/etc/init、/bin/init和/bin/sh,如果发现这些文件均不存在的话,则通过panic输出错误命令,并将当前的系统Halt在那里。