使用nginx搭建媒体点播服务器
最新由于兴趣,对ubuntu和安卓上的视频点播直播等应用比较感兴趣,所以在vmware的虚拟机里面搭建了一个视频点播网站,参考了fengzhanhai的文章Nginx搭建视频点播服务器(仿真专业流媒体软件)。
1,环境的准备
1)下载vmware,当然破解版本
2)安装ubuntu 64bit版本,老的电脑可能需要bios里面设置,设置方法百度去。
3)执行sudo apt-get update & sudo apt-get install yum
4)执行sudo apt-get install g++;编译安装pcre的时候需要
2,软件准备
openssl-1.0.1f.zip
JW_Player5.2 ##flash播放器控件
nginx-1.3.3.tar.gz ##服务器主程序
yamdi-1.4.tar.gz ##渐进式流支持模块(抓取视频资源关键帧实现播放时的随意拖动效果)
nginx-accesskey-2.0.3
zlib-1.2.3.tar.gz
nginx_mod_h264_streaming-2.2.7.tar.gz ##MP4支持模块
zlib-1.2.3.tar.gz.1
openssl-1.0.1f.tar.gz
pcre-8.32.tar.gz
3, 编译
1)安装yamdi
A)、解压下载的文件tar –zxvf yamdi-1.8.tar.gz
B)、进入解压后的目录cd yamdi-1.8.
C)、编译并安装 make && make install
D)、使用该软件为视频添加关键帧信息实现拖动效果
具体使用方法如下yamdi -i input.mp4 -o out.mp4 (拖拽功能必须的一步呀)
2) 安装Nginx
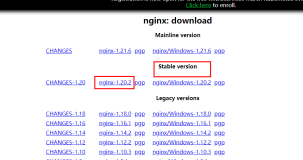
A)下载最新版本的Nginx程序(为了安装教程,使用的并不是最新版本)
wget http://nginx.org/download/nginx-1.3.3.tar.gz
3) 访问http://h264.code-shop.com官网下载最新版本的MP4支持模块
wget http://h264.code-shop.com/download/nginx_mod_h264_streaming-2.2.7.tar.gz
下载pcre包
wget http://autosetup1.googlecode.com/files/pcre-8.32.tar.gz
4) 下载zlib包
wget http://google-desktop-for-Linux-mirror.googlecode.com/files/zlib-1.2.3.tar.gz
5) 加压并编译pcre
tar pcre-8.32.tar.gz
Cd pcre-8.32
./configure –prefix=/usr/local/pcre
Make
Sudo make install
6) 编译nginnx
./configure --add-module=../nginx_mod_h264_streaming-2.2.7 --with-pcre=../pcre-8.32 --with-zlib=../zlib-1.2.3 --prefix=/usr/local/nginx --with-http_flv_module --with-http_stub_status_module --with-http_mp4_module --with-cc-opt='-O3' --with-openssl=../openssl-1.0.1f
Make
继续编译该软体使用make命令,哈哈报错啦!(有error信息打印不见的是一件坏事哦)报错信息如下:
make[1]: *** [objs/addon/src/ngx_http_h264_streaming_module.o] Error 1
make: *** [build] Error 2
解决方法:
进入支持MP4格式播放的库/nginx/nginx_mod_h264_streaming-2.2.7/src修改ngx_http_h264_streaming_module.c该文件。修改内容如下所示:
将如下几行注释
/* TODO: Win32 */
if (r->zero_in_uri)
{
return NGX_DECLINED;
}后我们再次make clean && make一下nginx,呵呵这次终于成功了。
Sudo make install
注意,所有其他软件包都必须使用zip或者tar命令解开,而且注意configure的时候路径一致。
3)配置nginx服务器
sudo gedit /usr/local/nginx/conf/nginx.conf
修改为
#user nobody;
#user videoapp video; ##管理用户
worker_processes 8;
#error_log logs/error.log;
#error_log logs/error.log notice;
#error_log logs/error.log info;
#pid logs/nginx.pid;
pid /usr/local/nginx/logs/nginx.pid;
events {
use epoll;
worker_connections 1024;
}
http {
include mime.types;
default_type application/octet-stream;
log_format main '$remote_addr - $remote_user [$time_local] "$request" '
'$status $body_bytes_sent "$http_referer" '
'"$http_user_agent" "$http_x_forwarded_for"';
access_log logs/access.log main;
sendfile on;
tcp_nopush on;
#keepalive_timeout 0;
keepalive_timeout 65;
#gzip on;
server {
listen 801;
server_name localhost;
#charset koi8-r;
limit_rate_after 5m;
limit_rate 512k;
charset utf-8;
#access_log logs/host.access.log main;
location / {
root html;
index index.html index.htm;
}
location ~ \.flv$ {
flv;
}
location ~ \.mp4$ {
mp4;
}
location ~(favicon.ico) {
log_not_found off;
expires 30d;
break;
}
#error_page 404 /404.html;
# redirect server error pages to the static page /50x.html
#
error_page 500 502 503 504 /50x.html;
location = /50x.html {
root html;
}
# proxy the PHP scripts to Apache listening on 127.0.0.1:80
#
#location ~ \.php$ {
# proxy_pass http://127.0.0.1;
#}
# pass the PHP scripts to FastCGI server listening on 127.0.0.1:9000
#
#location ~ \.php$ {
# root html;
# fastcgi_pass 127.0.0.1:9000;
# fastcgi_index index.php;
# fastcgi_param SCRIPT_FILENAME /scripts$fastcgi_script_name;
# include fastcgi_params;
#}
# deny access to .htaccess files, if Apache's document root
# concurs with nginx's one
#
#location ~ /\.ht {
# deny all;
#}
}
# another virtual host using mix of IP-, name-, and port-based configuration
#
#server {
# listen 8000;
# listen somename:8080;
# server_name somename alias another.alias;
# location / {
# root html;
# index index.html index.htm;
# }
#}
# HTTPS server
#
#server {
# listen 443;
# server_name localhost;
# ssl on;
# ssl_certificate cert.pem;
# ssl_certificate_key cert.key;
# ssl_session_timeout 5m;
# ssl_protocols SSLv2 SSLv3 TLSv1;
# ssl_ciphers HIGH:!aNULL:!MD5;
# ssl_prefer_server_ciphers on;
# location / {
# root html;
# index index.html index.htm;
# }
#}
}
4)启动服务器
Sudo /usr/local/nginx/sbin/nginx -c /usr/local/nginx/conf/nginx.conf
在/usr/local/nginx/html目录下建立video目录,拷贝视频及falsh播放器到video目录下
5)播放
http://127.0.0.1:801/player.swf?type=http&file=xxy.mp4
使用nginx搭建媒体点播服务器
最新由于兴趣,对ubuntu和安卓上的视频点播直播等应用比较感兴趣,所以在vmware的虚拟机里面搭建了一个视频点播网站,参考了fengzhanhai的文章Nginx搭建视频点播服务器(仿真专业流媒体软件)。
1,环境的准备
1)下载vmware,当然破解版本
2)安装ubuntu 64bit版本,老的电脑可能需要bios里面设置,设置方法百度去。
3)执行sudo apt-get update & sudo apt-get install yum
4)执行sudo apt-get install g++;编译安装pcre的时候需要
2,软件准备
openssl-1.0.1f.zip
JW_Player5.2 ##flash播放器控件
nginx-1.3.3.tar.gz ##服务器主程序
yamdi-1.4.tar.gz ##渐进式流支持模块(抓取视频资源关键帧实现播放时的随意拖动效果)
nginx-accesskey-2.0.3
zlib-1.2.3.tar.gz
nginx_mod_h264_streaming-2.2.7.tar.gz ##MP4支持模块
zlib-1.2.3.tar.gz.1
openssl-1.0.1f.tar.gz
pcre-8.32.tar.gz
3, 编译
1)安装yamdi
A)、解压下载的文件tar –zxvf yamdi-1.8.tar.gz
B)、进入解压后的目录cd yamdi-1.8.
C)、编译并安装 make && make install
D)、使用该软件为视频添加关键帧信息实现拖动效果
具体使用方法如下yamdi -i input.mp4 -o out.mp4 (拖拽功能必须的一步呀)
2) 安装Nginx
A)下载最新版本的Nginx程序(为了安装教程,使用的并不是最新版本)
wget http://nginx.org/download/nginx-1.3.3.tar.gz
3) 访问http://h264.code-shop.com官网下载最新版本的MP4支持模块
wget http://h264.code-shop.com/download/nginx_mod_h264_streaming-2.2.7.tar.gz
下载pcre包
wget http://autosetup1.googlecode.com/files/pcre-8.32.tar.gz
4) 下载zlib包
wget http://google-desktop-for-linux-mirror.googlecode.com/files/zlib-1.2.3.tar.gz
5) 加压并编译pcre
tar pcre-8.32.tar.gz
Cd pcre-8.32
./configure –prefix=/usr/local/pcre
Make
Sudo make install
6) 编译nginnx
./configure --add-module=../nginx_mod_h264_streaming-2.2.7 --with-pcre=../pcre-8.32 --with-zlib=../zlib-1.2.3 --prefix=/usr/local/nginx --with-http_flv_module --with-http_stub_status_module --with-http_mp4_module --with-cc-opt='-O3' --with-openssl=../openssl-1.0.1f
Make
继续编译该软体使用make命令,哈哈报错啦!(有error信息打印不见的是一件坏事哦)报错信息如下:
make[1]: *** [objs/addon/src/ngx_http_h264_streaming_module.o] Error 1
make: *** [build] Error 2
解决方法:
进入支持MP4格式播放的库/nginx/nginx_mod_h264_streaming-2.2.7/src修改ngx_http_h264_streaming_module.c该文件。修改内容如下所示:
将如下几行注释
/* TODO: Win32 */
if (r->zero_in_uri)
{
return NGX_DECLINED;
}后我们再次make clean && make一下nginx,呵呵这次终于成功了。
Sudo make install
注意,所有其他软件包都必须使用zip或者tar命令解开,而且注意configure的时候路径一致。
3)配置nginx服务器
sudo gedit /usr/local/nginx/conf/nginx.conf
修改为
#user nobody;
#user videoapp video; ##管理用户
worker_processes 8;
#error_log logs/error.log;
#error_log logs/error.log notice;
#error_log logs/error.log info;
#pid logs/nginx.pid;
pid /usr/local/nginx/logs/nginx.pid;
events {
use epoll;
worker_connections 1024;
}
http {
include mime.types;
default_type application/octet-stream;
log_format main '$remote_addr - $remote_user [$time_local] "$request" '
'$status $body_bytes_sent "$http_referer" '
'"$http_user_agent" "$http_x_forwarded_for"';
access_log logs/access.log main;
sendfile on;
tcp_nopush on;
#keepalive_timeout 0;
keepalive_timeout 65;
#gzip on;
server {
listen 801;
server_name localhost;
#charset koi8-r;
limit_rate_after 5m;
limit_rate 512k;
charset utf-8;
#access_log logs/host.access.log main;
location / {
root html;
index index.html index.htm;
}
location ~ \.flv$ {
flv;
}
location ~ \.mp4$ {
mp4;
}
location ~(favicon.ico) {
log_not_found off;
expires 30d;
break;
}
#error_page 404 /404.html;
# redirect server error pages to the static page /50x.html
#
error_page 500 502 503 504 /50x.html;
location = /50x.html {
root html;
}
# proxy the PHP scripts to Apache listening on 127.0.0.1:80
#
#location ~ \.php$ {
# proxy_pass http://127.0.0.1;
#}
# pass the PHP scripts to FastCGI server listening on 127.0.0.1:9000
#
#location ~ \.php$ {
# root html;
# fastcgi_pass 127.0.0.1:9000;
# fastcgi_index index.php;
# fastcgi_param SCRIPT_FILENAME /scripts$fastcgi_script_name;
# include fastcgi_params;
#}
# deny access to .htaccess files, if Apache's document root
# concurs with nginx's one
#
#location ~ /\.ht {
# deny all;
#}
}
# another virtual host using mix of IP-, name-, and port-based configuration
#
#server {
# listen 8000;
# listen somename:8080;
# server_name somename alias another.alias;
# location / {
# root html;
# index index.html index.htm;
# }
#}
# HTTPS server
#
#server {
# listen 443;
# server_name localhost;
# ssl on;
# ssl_certificate cert.pem;
# ssl_certificate_key cert.key;
# ssl_session_timeout 5m;
# ssl_protocols SSLv2 SSLv3 TLSv1;
# ssl_ciphers HIGH:!aNULL:!MD5;
# ssl_prefer_server_ciphers on;
# location / {
# root html;
# index index.html index.htm;
# }
#}
}
4)启动服务器
Sudo /usr/local/nginx/sbin/nginx -c /usr/local/nginx/conf/nginx.conf
在/usr/local/nginx/html目录下建立video目录,拷贝视频及falsh播放器到video目录下
5)播放
http://127.0.0.1:801/player.swf?type=http&file=xxy.mp4