原文:Developing a Custom Control for Silverlight 2.0
译者:张善友
介绍
这篇文章主要展示了你制作一个Silverlight 2.0的自定义空间需要哪些步骤和在你的Silverlight项目中重用代码。
本文基于Mix08上发布的Silverlight 2.0 beta1。
文章中我会创建一个控件库和实现自定义控件按钮类,没有任何新增功能只是继承缺省Button类,但是带一个不同原来的button的缺省样式。重用这个控件你不需要为你的项目中的所有控件实例添加Style属性。
让我们开始吧
创建项目
使用Visual Studio 2008新建一个Silerlight 类库项目。

因为这是一个控件库,我们要添加程序集System.Windows.Controls的引用,这个程序集在Silverlight 2.0 beta 1的版本号是1.0.0.0(不要问为什么:-) ),默认会并放在"C:\Program Files\Microsoft SDKs\Silverlight\v2.0\Libraries\Client\System.Windows.Controls.dll"。
下一步是给我们的控件程序集加入XmlnsDefinitionAttribute。
这个特性帮助XAML处理器找到和匹配Xml命名空间和CLR的命名空间,因此添加这个特性带下面的参数:
[assembly: System.Windows.Markup.XmlnsDefinition ("http://schemas.eyedea.hu/silverlight/2008/xaml/presentation", "Eyedea.Controls")]
创建控件类
解决方案内找到Class1.cs文件,利用Visual Studio的重构功能,将Class1.cs重命名为MediaButton.cs。
下一步我们添加我们XAML文件,里面包含这个控件库里面的控件要使用的缺省样式。
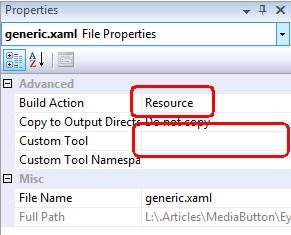
让我们添加一个文本类型的项目到公秤里,命名为generic.xaml。

选择generic.xaml文件并设置为嵌入式资源。通过删除Custom Tool属性值并设置Build Action为Resource。
现在轮到编辑我们的主要对象:MediaButton.cs文件。打开这个文件,添加命令空间System.Windows.Controls的引用修改MediaButton类从系统内建的Button类继承。
我们的MediaButton类看起来像这个样子:
 using
System.Windows.Controls;
namespace
Eyedea.Controls
using
System.Windows.Controls;
namespace
Eyedea.Controls {
{ public class MediaButton : Button
 { public MediaButton() {
 } }
} } }
}
给我们的控件加入默认的样式
打开文件general.xmal
首先添加下面的缺省内容到XAML文件和一个引用到我们的XML命名空间:
<
ResourceDictionary
xmlns
="http://schemas.microsoft.com/winfx/2006/xaml/presentation"
xmlns:x
="http://schemas.microsoft.com/winfx/2006/xaml"
xmlns:local
="clr-namespace:Eyedea.Controls;assembly=Eyedea.Controls"
>
</
ResourceDictionary
>
请注意local这个Xml命名空间前缀将被用于这个控件库里面控件的样式引用。
添加Style标签到我们定义样式的地方,在Style标签有个TargeType属性指定该样式将使用在哪类控件,在这里指向我们的MediaButton,你还必须和TargeType属性一样指定ControlTemplate属性
<
Style
TargetType
="local:MediaButton"
>
<
Setter
property
="Template"
>
<
Setter.Value
>
<
ControlTemplate
TargetType
="local:MediaButton"
>
<
Grid
x:Name
="RootElement"
>
</
Grid
>
</
ControlTemplate
>
</
Setter.Value
>
</
Setter
>
</
Style
>
在Style标签内可以定义充分的控件外观包括StoryBoards式的视觉状态转换,视觉元素和StoryBoards的名称非常重要,因为他们是Silverlight的样式可以工作的不可或缺的一部分,这里我们不讨论,将在另外的文章中讨论。
当前控件设计有一个固定的宽度和高度,因此我们可以通过用Setter来指定。
我们也指定控件的最小和最大尺寸以保护我们设计的按钮。
提示:简单的属性Setters应直接放在Style标签之后和在Template标签之前。
<!--
Common properties
-->
<
Setter
property
="IsEnabled"
Value
="true"
/>
<
Setter
property
="IsTabStop"
Value
="true"
/>
<
Setter
property
="Margin"
Value
="0"
/>
<
Setter
property
="HorizontalContentAlignment"
Value
="Center"
/>
<
Setter
property
="VerticalContentAlignment"
Value
="Center"
/>
<
Setter
property
="Cursor"
Value
="Arrow"
/>
<
Setter
property
="Foreground"
Value
="#CC808080"
/>
<!--
Text related properties
-->
<
Setter
property
="TextAlignment"
Value
="Left"
/>
<
Setter
property
="TextWrapping"
Value
="NoWrap"
/>
<
Setter
property
="FontSize"
Value
="11"
/>
<!--
Default Size Constraints
-->
<
Setter
property
="Width"
Value
="50"
/>
<
Setter
property
="MinWidth"
Value
="50"
/>
<
Setter
property
="MaxWidth"
Value
="50"
/>
<
Setter
property
="Height"
Value
="22"
/>
<
Setter
property
="MinHeight"
Value
="22"
/>
<
Setter
property
="MaxHeight"
Value
="22"
/>
这个设计包含一个背景矩形,一个大纲,两个亮点将在和用户交互的时候动画显示。
在底部你发现有一个ContentPresenter元素,它是Button的Content属性的占位符。
添加下列内容到Grid标签:
<
Grid.Resources
>
<
Storyboard
x:Key
="MouseOver State"
>
<
DoubleAnimationUsingKeyFrames
BeginTime
="00:00:00"
Storyboard.TargetName
="HighlightTop"
Storyboard.Targetproperty
="(UIElement.Opacity)"
>
<
SplineDoubleKeyFrame
KeyTime
="00:00:00.3000000"
Value
="0.3"
/>
</
DoubleAnimationUsingKeyFrames
>
<
DoubleAnimationUsingKeyFrames
BeginTime
="00:00:00"
Storyboard.TargetName
="HighlightBottom"
Storyboard.Targetproperty
="(UIElement.Opacity)"
>
<
SplineDoubleKeyFrame
KeyTime
="00:00:00.3000000"
Value
="0"
/>
</
DoubleAnimationUsingKeyFrames
>
<
DoubleAnimationUsingKeyFrames
BeginTime
="00:00:00"
Storyboard.TargetName
="Border"
Storyboard.Targetproperty
="(UIElement.Opacity)"
>
<
SplineDoubleKeyFrame
KeyTime
="00:00:00.3000000"
Value
="0.7"
/>
</
DoubleAnimationUsingKeyFrames
>
</
Storyboard
>
<
Storyboard
x:Key
="Pressed State"
>
<
DoubleAnimationUsingKeyFrames
BeginTime
="00:00:00"
Storyboard.TargetName
="HighlightTop"
Storyboard.Targetproperty
="(UIElement.Opacity)"
>
<
SplineDoubleKeyFrame
KeyTime
="00:00:00.3000000"
Value
="0"
/>
</
DoubleAnimationUsingKeyFrames
>
<
DoubleAnimationUsingKeyFrames
BeginTime
="00:00:00"
Storyboard.TargetName
="HighlightBottom"
Storyboard.Targetproperty
="(UIElement.Opacity)"
>
<
SplineDoubleKeyFrame
KeyTime
="00:00:00.3000000"
Value
="0.3"
/>
</
DoubleAnimationUsingKeyFrames
>
<
DoubleAnimationUsingKeyFrames
BeginTime
="00:00:00"
Storyboard.TargetName
="Border"
Storyboard.Targetproperty
="(UIElement.Opacity)"
>
<
SplineDoubleKeyFrame
KeyTime
="00:00:00.3000000"
Value
="0.5"
/>
</
DoubleAnimationUsingKeyFrames
>
</
Storyboard
>
<
Storyboard
x:Key
="Normal State"
/>
<
Storyboard
x:Key
="Disabled State"
>
<
DoubleAnimationUsingKeyFrames
BeginTime
="00:00:00"
Storyboard.TargetName
="HighlightTop"
Storyboard.Targetproperty
="(UIElement.Opacity)"
>
<
SplineDoubleKeyFrame
KeyTime
="00:00:00.1500000"
Value
="0"
/>
</
DoubleAnimationUsingKeyFrames
>
<
DoubleAnimationUsingKeyFrames
BeginTime
="00:00:00"
Storyboard.TargetName
="HighlightBottom"
Storyboard.Targetproperty
="(UIElement.Opacity)"
>
<
SplineDoubleKeyFrame
KeyTime
="00:00:00.1500000"
Value
="0"
/>
</
DoubleAnimationUsingKeyFrames
>
<
DoubleAnimationUsingKeyFrames
BeginTime
="00:00:00"
Storyboard.TargetName
="ContentPresenter"
Storyboard.Targetproperty
="(UIElement.Opacity)"
>
<
SplineDoubleKeyFrame
KeyTime
="00:00:00.1500000"
Value
="0.7"
/>
</
DoubleAnimationUsingKeyFrames
>
</
Storyboard
>
</
Grid.Resources
>
<
Rectangle
Fill
="#FF000000"
Margin
="2,2,2,2"
RadiusX
="1"
RadiusY
="1"
Opacity
="0.3"
/>
<
Rectangle
x:Name
="Border"
Stroke
="#FF808080"
RadiusX
="2"
RadiusY
="2"
Opacity
="0.3"
/>
<
Path
x:Name
="HighlightTop"
Margin
="2,2,2,11"
Opacity
="0.2"
Data
="M0,1 C0,0.45 0.45,0 1,0 L45,0 C45.55,0 46,0.45 46,1 C46,1 46,9 46,9 C46,9 0,9 0,9 C0,9 0,1 0,1 z"
>
<
Path.Fill
>
<
LinearGradientBrush
EndPoint
="0,1"
StartPoint
="0,0"
>
<
GradientStop
Color
="#FFFFFFFF"
Offset
="0"
/>
<
GradientStop
Color
="#FFE1E1E1"
Offset
="1"
/>
</
LinearGradientBrush
>
</
Path.Fill
>
</
Path
>
<
Path
x:Name
="HighlightBottom"
Margin
="2,11,2,2"
Opacity
="0"
Data
="M0,0 C0,0 31,0 46,0 C46,0 46,8 46,8 C46,8.55 45.55,9 45,9 L1,9 C0.45,9 0,8.55 0,8 C0,8 0,0 0,0 z"
>
<
Path.Fill
>
<
LinearGradientBrush
EndPoint
="0,1"
StartPoint
="0,0"
>
<
GradientStop
Color
="#FFD6D6D6"
Offset
="0"
/>
<
GradientStop
Color
="#FFFFFFFF"
Offset
="1"
/>
</
LinearGradientBrush
>
</
Path.Fill
>
</
Path
>
<
ContentPresenter
x:Name
="ContentPresenter"
Content
="{TemplateBinding Content}"
ContentTemplate
="{TemplateBinding ContentTemplate}"
FontFamily
="{TemplateBinding FontFamily}"
FontSize
="{TemplateBinding FontSize}"
FontStretch
="{TemplateBinding FontStretch}"
FontStyle
="{TemplateBinding FontStyle}"
FontWeight
="{TemplateBinding FontWeight}"
Foreground
="{TemplateBinding Foreground}"
HorizontalContentAlignment
="{TemplateBinding HorizontalContentAlignment}"
Padding
="{TemplateBinding Padding}"
TextAlignment
="{TemplateBinding TextAlignment}"
TextDecorations
="{TemplateBinding TextDecorations}"
TextWrapping
="{TemplateBinding TextWrapping}"
VerticalContentAlignment
="{TemplateBinding VerticalContentAlignment}"
/>
编译工程,如果一切正常,一个自定义控件就完成了
测试控件
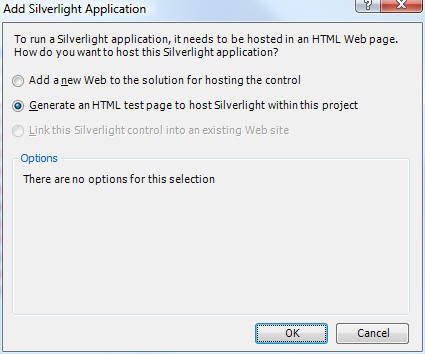
要测试空间,我们需要创建一个Silverlight 应用工程。在解决方案浏览器中右击Solution节点选择添加一个Silverlight应用类型项目:

对于Silverlight应用,Visual Studio会问我们用那种方法测试Silverlight应用。为目前为止,我们选择一个HTML页面来测试比较合适。
设置TestApplication项目作为我们的启动项目,右击该项目的节点,并选择"设置为启动项目" 。
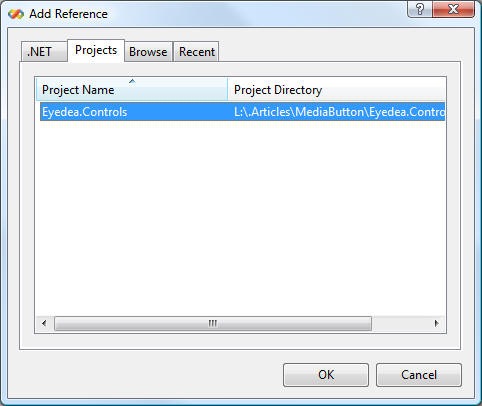
将我们控件加入测试项目
在测试项目TestApplication中测试我们的自定义控件,我们需要添加控件工程的引用。
在设计器打开Page.xaml文件并切换到XAML视图,为了在页面上使用MediaButton 控件,我们要在页面的XAMLUserControl标签中注册控件命名空间。
测试页面包含一个4乘3的网格Grid和两个MediaButton实例,内容为“Play”和“Stop”:
完成的Page.xaml内容如下:
<
UserControl
x:Class
="TestApplication.Page"
xmlns
="http://schemas.microsoft.com/client/2007"
xmlns:x
="http://schemas.microsoft.com/winfx/2006/xaml"
xmlns:eyedea
="clr-namespace:Eyedea.Controls;assembly=Eyedea.Controls"
Width
="320"
Height
="240"
>
<
Grid
x:Name
="LayoutRoot"
Background
="Black"
Margin
="50,50,50,50"
>
<
Grid.ColumnDefinitions
>
<
ColumnDefinition
Width
="*"
/>
<
ColumnDefinition
Width
="Auto"
/>
<
ColumnDefinition
Width
="Auto"
/>
<
ColumnDefinition
Width
="*"
/>
</
Grid.ColumnDefinitions
>
<
Grid.RowDefinitions
>
<
RowDefinition
Height
="*"
/>
<
RowDefinition
Height
="Auto"
/>
<
RowDefinition
Height
="*"
/>
</
Grid.RowDefinitions
>
<
Grid.RenderTransform
>
<
ScaleTransform
CenterX
="0.5"
CenterY
="0.5"
ScaleX
="2"
ScaleY
="2"
/>
</
Grid.RenderTransform
>
<
Rectangle
Grid.ColumnSpan
="2"
Grid.Column
="1"
Grid.Row
="1"
Stroke
="#FF808080"
RadiusX
="2"
RadiusY
="2"
Opacity
="0.3"
/>
<
eyedea:MediaButton
Grid.Column
="1"
Grid.Row
="1"
Margin
="2,2,2,2"
Content
="Play"
>
</
eyedea:MediaButton
>
<
eyedea:MediaButton
Grid.Column
="2"
Grid.Row
="1"
Margin
="2,2,2,2"
Content
="Stop"
>
</
eyedea:MediaButton
>
</
Grid
>
</
UserControl
>
按F5测试控件,Silverlight2.0的键盘支持比Silverlight1.0要好得多。
下一步做什么
- 我计划写一篇文章,我将在这篇文章知识的基础之上建立一个可更换皮肤的控件。
- 和很多更多silverlight 2.0特性 ;-)
兴趣点
- Our first How-Do-I video: The design of the MediaButton control (English).
- Our first How-Do-I video: The design of the MediaButton control (Hungarian).
