http://blog.csdn.net/ahutzh/article/details/6911095
Android ListView没行加入CheckBox,实现选择列表,既可点击复选框进行选中,也可以点击list一行进行选中,效果图如下:
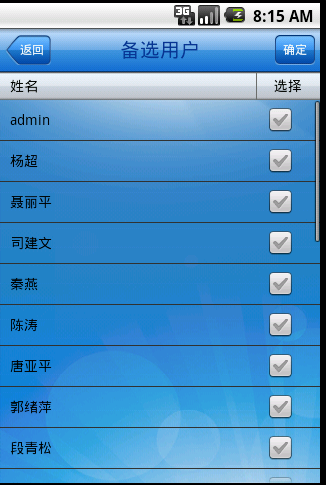
下面贴下主要代码的实现:
对于列表中复选框,我们需要在复选框的状态发生变化时,保存复选框的状态,不然在拖动列表过程中,会丢失复选框的状态。
在这里我们采用下面方式保存:
- public class Person implements Serializable{
- /**
- *
- */
- private static final long serialVersionUID = 1L;
- private String userCode;
- private String userName;
- private boolean checked; //保存复选框的状态
此对象保存的数据对象列表中的每一列。
实现ListView的Adapter类代码如下:
- /**
- *
- * <dl>
- * <dt>DispatchSelectUserAdapter.java</dt>
- * <dd>Description: 选择用户界面Adapter类</dd>
- * <dd>Copyright: Copyright (C) 2011</dd>
- * <dd>CreateDate: 2011-10-26</dd>
- * </dl>
- *
- * @author ZhanHua
- */
- public class DispatchSelectUserAdapter extends BaseAdapter {
- private Context mContext;
- private List<Person> mPersonList;
- private int mResource;
- private LayoutInflater mInflater;
- public DispatchSelectUserAdapter(Context context, List<Person> personList,
- int resource) {
- mContext = context;
- mPersonList = personList;
- mResource = resource;
- mInflater = LayoutInflater.from(mContext);
- }
- @Override
- public int getCount() {
- return mPersonList.size();
- }
- @Override
- public Object getItem(int position) {
- return mPersonList.get(position);
- }
- @Override
- public long getItemId(int position) {
- return position;
- }
- @Override
- public View getView(final int position, View convertView, ViewGroup parent) {
- if (convertView == null) {
- convertView = mInflater.inflate(mResource, parent, false);
- }
- TextView tvUserName = (TextView) convertView.findViewById(
- R.id.dispatch_item_select_user_name);
- final CheckBox ckbItem = (CheckBox) convertView.findViewById(
- R.id.dispatch_item_select_user_ckb);
- Person person = mPersonList.get(position);
- tvUserName.setText(person.getUserName());
- System.out.println(person.getUserName());
- ckbItem.setChecked(person.isChecked());
- ckbItem.setOnClickListener(new View.OnClickListener() {
- @Override
- public void onClick(View v) {
- mPersonList.get(position).setChecked(ckbItem.isChecked());//保存checkbox状态至位置对应的列表对象Person中
- }
- });
- person = null;
- return convertView;
- }
- }
- /**
- *
- * Desc:初始化列表数据
- * @param personList
- */
- private void initListData(List<Person> personList) {
- DispatchSelectUserAdapter adapter = new DispatchSelectUserAdapter(
- DispatchSelectUserActivity.this, personList,
- R.layout.dispatch_select_user_item);
- getListView().setAdapter(adapter);
- }
- /**
- * 列表点击
- */
- @Override
- protected void onListItemClick(ListView l, View v, int position, long id) {
- super.onListItemClick(l, v, position, id);
- CheckBox checkbox = (CheckBox) v.findViewById(R.id.dispatch_item_select_user_ckb);
- checkbox.setChecked(!checkbox.isChecked());
- mPersonList.get(position).setChecked(checkbox.isChecked());
- }
下面贴下界面设计的XML代码:
主界面的xml:
- <?xml version="1.0" encoding="utf-8"?>
- <RelativeLayout
- xmlns:android="http://schemas.android.com/apk/res/android"
- android:orientation="vertical"
- android:background="@drawable/common_background"
- android:layout_width="fill_parent"
- android:layout_height="fill_parent">
- <include android:id="@+id/dispatch_select_user_title"
- layout="@layout/common_title"
- android:layout_alignParentTop="true"/>
- <LinearLayout
- android:id="@+id/section_title_layout"
- android:background="@drawable/bg_sencend_title"
- android:orientation="horizontal"
- android:layout_width="fill_parent"
- android:layout_height="28dip" android:weightSum="10"
- android:layout_below="@id/dispatch_select_user_title">
- <TextView
- android:id="@+id/dispatch_section_user_name"
- android:layout_marginLeft="10dip"
- android:text="@string/dispatch_section_user_name"
- android:layout_weight="2"
- android:layout_width="fill_parent"
- android:layout_height="fill_parent"
- android:textColor="@drawable/color_black"
- android:clickable="false" android:enabled="false" android:gravity="center_vertical">
- </TextView>
- <LinearLayout
- android:id="@+id/dispatch_lineLayout02"
- android:background="#6d6d6e"
- android:layout_width="1dip"
- android:layout_height="fill_parent"
- ></LinearLayout>
- <TextView
- android:id="@+id/dispatch_section_select"
- android:text="@string/dispatch_section_select"
- android:layout_weight="8"
- android:gravity="center"
- android:layout_width="fill_parent"
- android:layout_height="fill_parent"
- android:textColor="@drawable/color_black"
- android:background="@drawable/bg_sencend_title" android:clickable="false" android:enabled="false">
- </TextView>
- </LinearLayout>
- <LinearLayout
- android:layout_width="fill_parent"
- android:layout_height="fill_parent"
- android:layout_below="@id/section_title_layout">
- <ListView
- android:id="@+id/android:list"
- android:layout_height="wrap_content"
- android:cacheColorHint="#00000000"
- android:layout_width="fill_parent"></ListView>
- </LinearLayout>
- </RelativeLayout>
ListView中单个Item的xml:
- <?xml version="1.0" encoding="utf-8"?>
- <LinearLayout
- xmlns:android="http://schemas.android.com/apk/res/android"
- android:orientation="vertical"
- android:layout_width="fill_parent"
- android:layout_height="fill_parent">
- <LinearLayout
- android:gravity="center"
- android:orientation="horizontal"
- android:layout_width="fill_parent"
- android:layout_height="40dip" android:weightSum="10">
- <TextView
- android:id="@+id/dispatch_item_select_user_name"
- android:textColor="#000000"
- android:layout_marginLeft="10dip"
- android:layout_weight="2"
- android:layout_width="fill_parent"
- android:layout_height="wrap_content"
- >
- </TextView>
- <LinearLayout
- android:gravity="center"
- android:layout_width="fill_parent"
- android:layout_weight="8"
- android:layout_height="wrap_content">
- <CheckBox
- style="@style/CustomCheckBox"
- android:id="@+id/dispatch_item_select_user_ckb"
- android:focusable="false"
- android:layout_width="wrap_content"
- android:layout_height="wrap_content">
- </CheckBox>
- </LinearLayout>
- </LinearLayout>
- </LinearLayout>
这样就可以实现上图中的选择列表效果了,也可以在title区域添加全选复选框,点击后,实现全选效果。