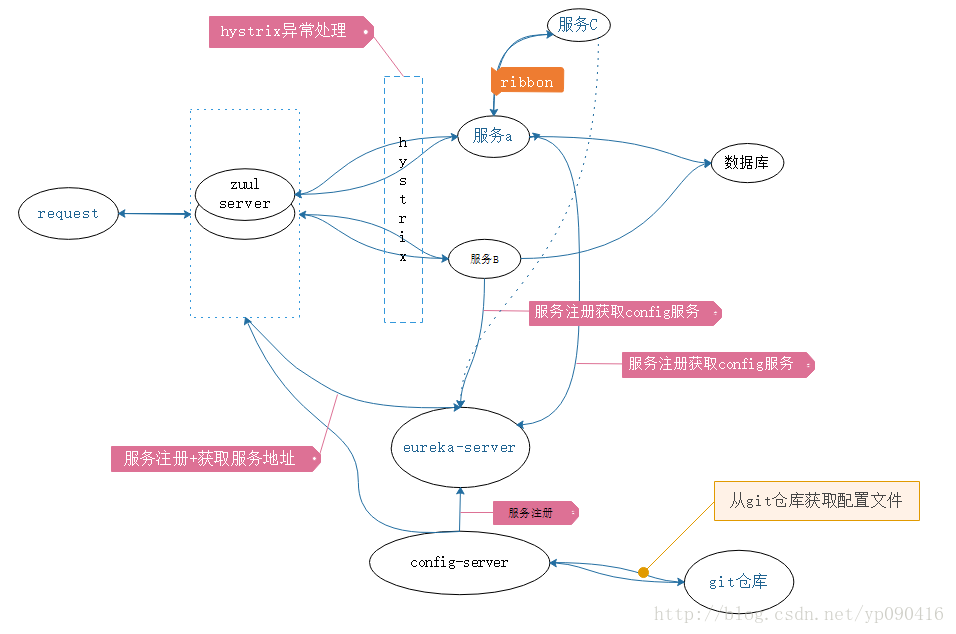
springcloud微服务架构搭建:Consul+sleuth+zipkin+Feign/Ribbon+SpringConfig+Zuul+Hystrix Dash-Board-Turbine
相信现在已经有很多小伙伴已经或者准备使用springcloud微服务了,接下来为大家搭建一个微服务框架,后期可以自己进行扩展。会提供一个小案例: 服务提供者和服务消费者 ,消费者会调用提供者的服务,新建的项目都是用springboot,附源码下载,推荐使用coding地址下载,因为可以切换分支,后期可以及时更新。
coding仓库地址(推荐下载),请选择consul分支哦,默认的分支使用的是eureka: coding地址 csdn下载地址: csdn下载地址 远程配置仓库地址 远程配置仓库地址
如果有问题请在下边评论,或者200909980加群交流。
Consul/Eureka:服务发现 (根据情况选择一个)
Hystrix:断路器
Zuul:智能路由
Ribbon/Feign:客户端负载均衡 (Feign用的更多)
Turbine:集群监控
Springcloud-config:远程获取配置文件
接下来,我们开始搭建项目,首先我们到spring为我们提供的一个网站快速搭建springboot项目,点击访问,我这里用的是gradle,如果各位客官喜欢用maven,好吧你可以到http://mvnrepository.com/查看对应的依赖,点我访问。重点内容
一、搭建spring-consul服务
使用 eureka 作为服务发现 请参考点击查看使用eureka作为服务注册中心
spring-consul作为服务发现的核心,第一个搭建,后面的服务都要注册到consul上,意思是告诉spring-consul自己的服务地址是啥。当然还可以用zookeeper或者eureka。
- 1下载安装consul
consul的下载地址consul下载地址,根据自己电脑系统下载对应的包。
我这里是windows64,网上说要配置环境变量,就可以直接使用,但是我这里不行。具体方法是,下载解压后是一个.exe可执行文件,然后配置当前路劲到path中,然后直接在cmd命令窗口中,输入consul agent -dev就可以启动了,如果不行的话,就在cmd命令窗口进如到consul的下载目录,然后执行上面的命令。然后consul的默认端口是8500,直接在浏览器打开http://localhost:8500,就可以看到控制台了
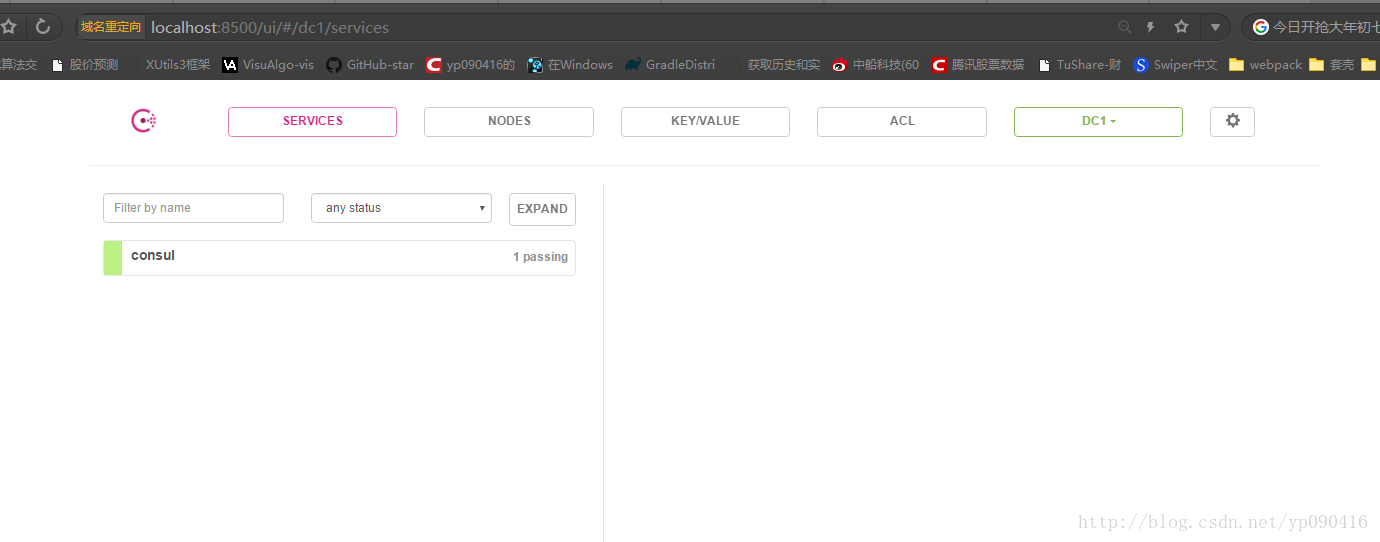 consul控制台
到这里,说明consul搭建好了,简单吧,这一步一定要成功,否则后面的就不能继续进行下去了。
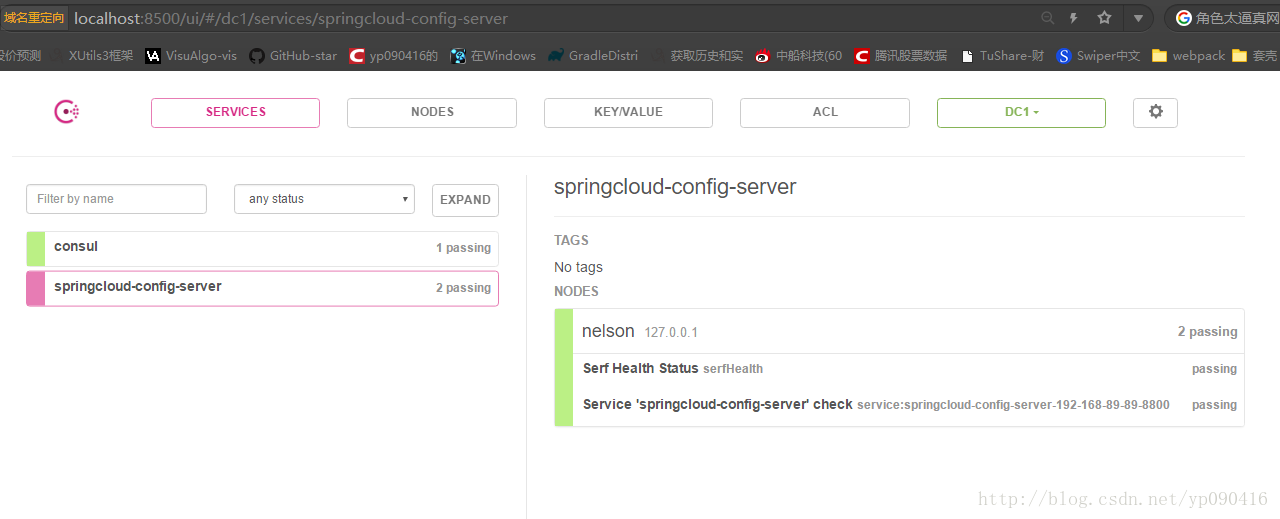
二、搭建config-server服务springcloud-config-server
springcloud-config-server是用来将远程git仓库的配置文件动态拉下来,这样配置文件就可以动态的维护了。当然也可以选择本地仓库。远程配置仓库地址 远程配置仓库地址
新建一个springboot项目,修改maven私服地址,并加入一下依赖。
- 1.修改build.gradle文件
compile group: 'org.springframework.cloud', name: 'spring-cloud-starter-consul-discovery', version: '1.3.1.RELEASE'
compile group: 'org.springframework.cloud', name: 'spring-cloud-config-server', version: '1.3.2.RELEASE'
compile group: 'org.springframework.boot', name: 'spring-boot-actuator', version: '1.5.6.RELEASE'
compile group: 'org.springframework.boot', name: 'spring-boot-starter-security', version: '1.5.6.RELEASE'
- 2.修改application.yml文件
server:
  port: 8800
spring:
  application:
    name: springcloud-config-server
  cloud:
    consul:
      host: localhost
      port: 8500
      discovery:
        instance-id: ${spring.application.name}:${spring.cloud.client.ipAddress}:${spring.application.instance_id:${server.port}}
    config:
      server:
        git:
          uri: https://git.coding.net/yirenyishi/springcloud-config-profile
          searchPaths: '{application}'
security:
  basic:
    enabled: true
  user:
    name: root
    password: booszy
- 3.修改启动类
修改启动类,要加入这三个注解,因为要注册到consul上,所以需要@EnableDiscoveryClient这个注解
@SpringBootApplication
@EnableConfigServer
@EnableDiscoveryClient
public class ConfigServerApplication {

    public static void main(String[] args) {
        SpringApplication.run(ConfigServerApplication.class, args);
    }
}
然后运行启动springboot项目,等启动成功后访问consul的页面,会发现springcloud-config-server已经注册到上面了,如果启动报错,请检查错误信息。
三、搭建服务提供者服务springcloud-provider-config
编写一个服务提供者,提供两个接口,即获取单个用户的信息和获取一个用户列表。用到了spring-data-jpa 和 spring-webmvc ,当然你们公司用什么你还是继续用什么。
- 注意 : 这里除了application.xml,还需要一个bootstrap.yml, 因为bootstrap.yml得加载顺序是在application.xml前边
-
- 修改build.gradle文件
compile('org.springframework.boot:spring-boot-starter-data-jpa')
compile('org.springframework.boot:spring-boot-starter-web')
compile("com.alibaba:druid-spring-boot-starter:1.1.2")
compile group: 'org.springframework.cloud', name: 'spring-cloud-starter-consul-discovery', version: '1.3.1.RELEASE'
compile group: 'org.springframework.boot', name: 'spring-boot-actuator', version: '1.5.6.RELEASE'
compile group: 'org.springframework.cloud', name: 'spring-cloud-starter-config', version: '1.3.2.RELEASE'
compile group: 'com.alibaba', name: 'fastjson', version: '1.2.38'
runtime('mysql:mysql-connector-java')
- 2.编写配置文件bootstrap.yml
** 注意 : 这里除了application.xml,还需要一个bootstrap.yml*
application.xml我是放到远程仓库地址的,大家可以直接到我的远程仓库,根据项目名(springcloud-provider-config)查询。配置文件的仓库地址:点击访问。
spring:
  application:
    name: springcloud-provider-config
  cloud:
    consul:
        host: localhost
        port: 8500
        discovery:
          instance-id: ${spring.application.name}:${spring.cloud.client.ipAddress}:${spring.application.instance_id:${server.port}}
          service-name: springcloud-provider-config
    config:
      discovery:
        enabled: true
        service-id: springcloud-config-server
      fail-fast: true
      username: root
      password: booszy
      profile: csdn
- 3.编写代码
编写主类
@SpringBootApplication
@EnableDiscoveryClient
public class ProviderApplication {

    public static void main(String[] args) {
        SpringApplication.run(ProviderApplication.class, args);
    }

}
新建UserController, 考虑篇幅 UserService 和 UserRepository就不贴代码了,想看的可以下载我的代码。
@RequestMapping("user")
@RestController
public class UserController {

    @Autowired
    private UserService userService;

    /**
     * @param id
     * @return
     */
    @GetMapping("{id}")
    public User getuser(@PathVariable String id) {
        User user = null;
        try {
            System.out.println(id);
            user = userService.find(id);
        } catch (Exception e) {
            e.printStackTrace();
        }
        return user;
    }

    /**
     * @return
     */
    @GetMapping("list")
    public List<User> users() {
        try {
            List<User> user = userService.findAll();
            if (user != null && user.size() != 0) {
                return user;
            }
            return null;
        } catch (Exception e) {
            e.printStackTrace();
        }
        return null;
    }
}
运行springboot项目,去consul查看,有没有注册上。
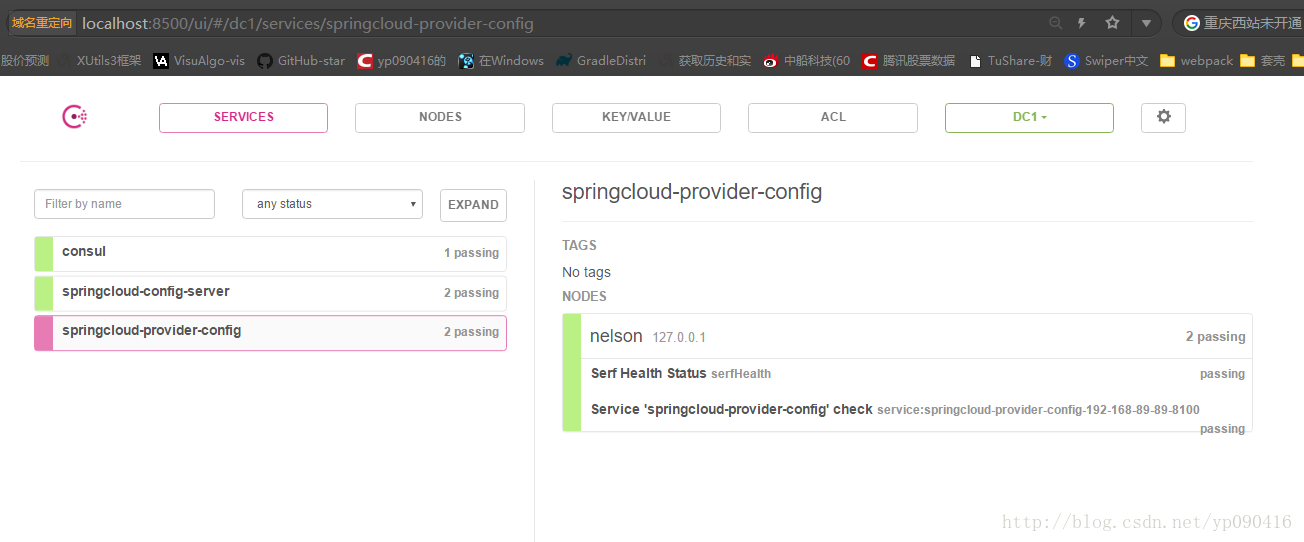
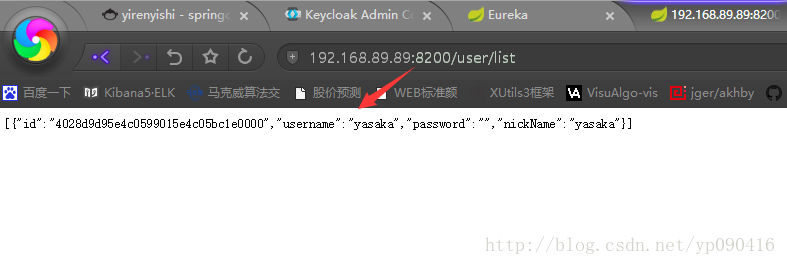
看到我们的springcloud-provider-config已经注册到consul上了,访问接口,成功。

四、搭建消费者服务springcloud-consumer-ribbon-config-swagger
消费者要访问服务提供者的服务,这里用的是通过RestTemplate请求resetful接口,使用ribbon做客户端负载均衡,hystrix做错误处理,swagger生成接口文档。文章结尾处会更新feign的案例,feign和ribbon二选一,也可以都用。
还是熟悉的配方,熟悉的味道,新建springboot项目,添加项目依赖。
- 1.修改build.gradle文件
compile('org.springframework.boot:spring-boot-starter-web')
compile group: 'org.springframework.cloud', name: 'spring-cloud-starter-consul-discovery', version: '1.3.1.RELEASE'
compile group: 'org.springframework.boot', name: 'spring-boot-actuator', version: '1.5.6.RELEASE'
compile group: 'org.springframework.cloud', name: 'spring-cloud-starter-config', version: '1.3.2.RELEASE'
compile group: 'org.springframework.cloud', name: 'spring-cloud-starter-hystrix', version: '1.3.4.RELEASE'
compile(
    "io.springfox:springfox-swagger2:2.7.0",
    "io.springfox:springfox-swagger-ui:2.7.0"
)
- 2.修改bootstrap.yml文件
application.yml 在git仓库,请前往git仓库查看。
spring:
  application:
    name: springcloud-consumer-config
  cloud:
    consul:
      host: localhost
      port: 8500
      discovery:
        instance-id: ${spring.application.name}:${spring.cloud.client.ipAddress}:${spring.application.instance_id:${server.port}}
    config:
      discovery:
        enabled: true
        service-id: springcloud-config-server
      fail-fast: true
      username: root
      password: booszy
      profile: csdn
- 3.编写代码
启动类代码
@RibbonClient 指定服务使用的负载均衡类型,name不指定服务则为所有的服务打开负载均衡,也可以在用yml中进行配置。
@EnableHystrix 是支持hystrix打开断路器,在规定时间内失败参数超过一定参数,就会打开断路器,不会发起请求,而是直接进入到错误处理方法。
@SpringBootApplication
@EnableDiscoveryClient
@RibbonClient(name = "springcloud-provider-config", configuration = RibbonConfiguration.class)
@ComponentScan(excludeFilters = {@ComponentScan.Filter(type = FilterType.ANNOTATION, value = ExtendRibbon.class)})
@EnableHystrix
public class ConsumerApplication {
    @Autowired
    private RestTemplateBuilder builder;

    @Bean
    @LoadBalanced
    public RestTemplate restTemplate() {
        return builder.build();
    }

    public static void main(String[] args) {
        SpringApplication.run(ConsumerApplication.class, args);
    }
}
新建UserController
ribbon一个坑,不能接受List类型,要使用数组接收。
@Api xxx 是swagger的注解
@HystrixCommand(fallbackMethod="userFallbackMethod")
如果请求失败,会进入userFallbackMethod这个方法,userFallbackMethod这个方法要求参数和返回值与回调他的方法保持一致。
ribbon这个方法就是通过service-id获取获取服务实际的地址,这样服务的地址就不用硬编码了。
@Api("springcloud consumer user 控制器")
@RequestMapping("user")
@RestController
public class UserController {

    @Autowired
    private RestTemplate restTemplate;

    @Autowired
    private LoadBalancerClient loadBalancerClient;

    /**
     * @param id
     * @return
     */
    @ApiOperation(value = "根据用户id查询用户信息", httpMethod = "GET", produces = "application/json")
    @ApiResponse(code = 200, message = "success", response = User.class)
    @GetMapping("{id}")
    @HystrixCommand(fallbackMethod="userFallbackMethod")
    public User getUser(@ApiParam(name = "id", required = true, value = "用户Id") @PathVariable String id) {
        return this.restTemplate.getForObject("http://springcloud-provider-config/user/" + id, User.class);
    }

    public User userFallbackMethod(String id){
        return null;
    }

    /**
     * 这块ribbon不支持复杂数据类型list,所以要用数组接受,然后转list
     * @return
     */
    @GetMapping("list")
    @HystrixCommand(fallbackMethod = "userList")
    public List<User> users(HttpServletRequest request) {
        try {
            User[] forObject = this.restTemplate.getForObject("http://springcloud-provider-config/user/list", User[].class);
            List<User> users = Arrays.asList(forObject);
            return users == null ? new ArrayList<User>() : users;
        } catch (Exception e) {
            e.printStackTrace();
        }
        return null;
    }

    public List<User> userList(HttpServletRequest request) {
        return null;
    }

    /**
     * 通过服务id获取服务的地址
     * @return
     */
    @GetMapping("ribbon")
    public String ribbon(){
        ServiceInstance serviceInstance = loadBalancerClient.choose("springcloud-provider-config");
        return serviceInstance.getUri().toString();
    }
}
运行springboot项目,先看有没有注册到consul上。
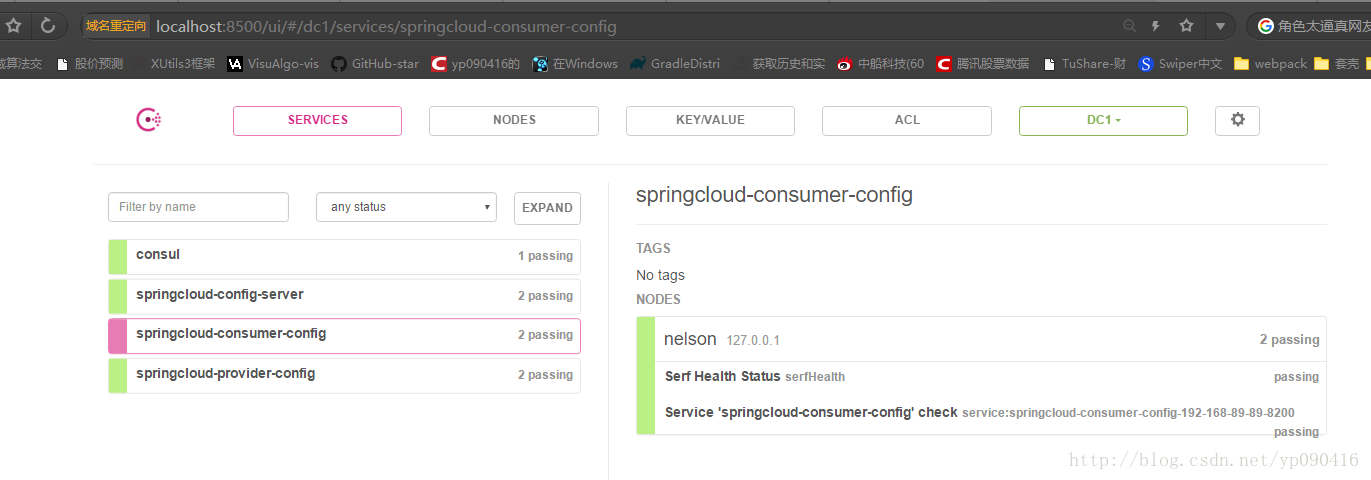
注册成功后,访问接口,测试是否正确。
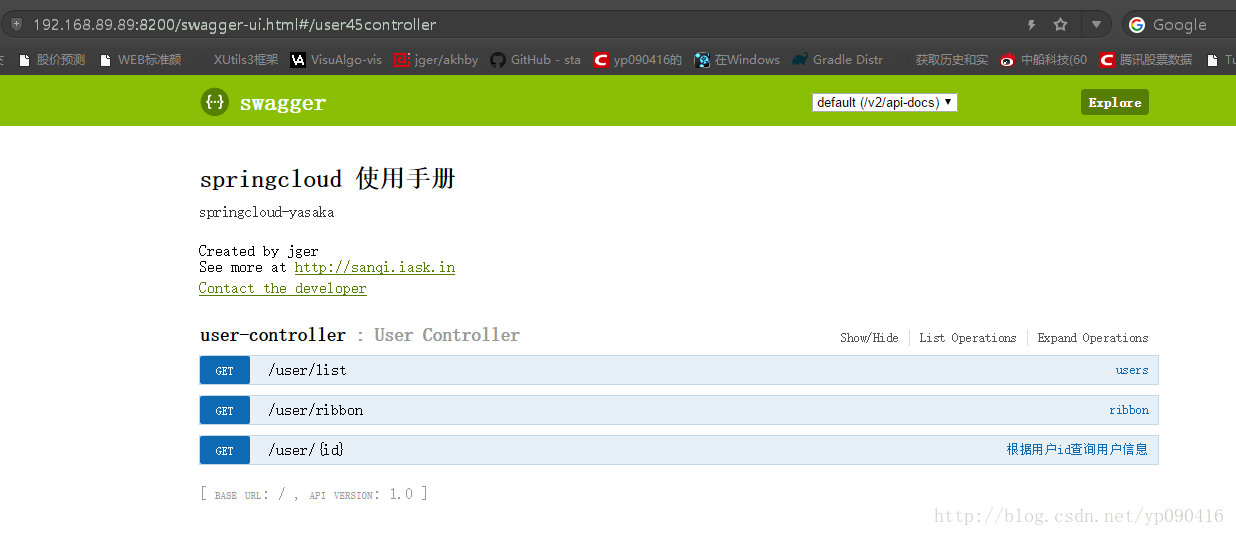
测试swagger-ui,访问localhost:8200/swagger-ui.html
到这里消费者服务就算是完成了,后边大家自己进行扩展。
五、用zuul做路由转发和负载均衡
这些微服务都是隐藏在后端的,用户是看不到,或者不是直接接触,可以用nginx或者zuul进行路由转发和负载均衡,zuul负载均衡默认用的是ribbon。
- 1.修改build.gradle文件
compile group: 'org.springframework.cloud', name: 'spring-cloud-starter-consul-discovery', version: '1.3.1.RELEASE'
compile group: 'org.springframework.cloud', name: 'spring-cloud-starter-zuul', version: '1.3.4.RELEASE'
compile group: 'org.springframework.boot', name: 'spring-boot-actuator', version: '1.5.6.RELEASE'
compile group: 'org.springframework.cloud', name: 'spring-cloud-starter-config', version: '1.3.2.RELEASE'
- 2.修改bootstrap.yml
还是原来的配方,application.yml在git仓库
spring:
  application:
    name: springcloud-zuul
  cloud:
    consul:
        host: localhost
        port: 8500
        discovery:
          instance-id: ${spring.application.name}:${spring.cloud.client.ipAddress}:${spring.application.instance_id:${server.port}}
          service-name: springcloud-zuul
    config:
      discovery:
        enabled: true
        service-id: springcloud-config-server
      fail-fast: true
      username: root
      password: booszy
      profile: csdn
- 3.启动类
@RefreshScope这个注解是当application.yml配置文件发生变化的时候,不需要手动的进行重启,调用localhost:8400/refresh,就会加载新的配置文件,当然正在访问的客户并不影响还是使用旧的配置文件,因为不是重启,后来的用户会使用新的配置文件。注意这块的刷新要用post请求。
@SpringBootApplication
@EnableZuulProxy
@EnableDiscoveryClient
@RefreshScope
public class ZuulApplication {
    public static void main(String[] args) {
        SpringApplication.run(ZuulApplication.class, args);
    }

}
启动springboot项目,访问consul ui
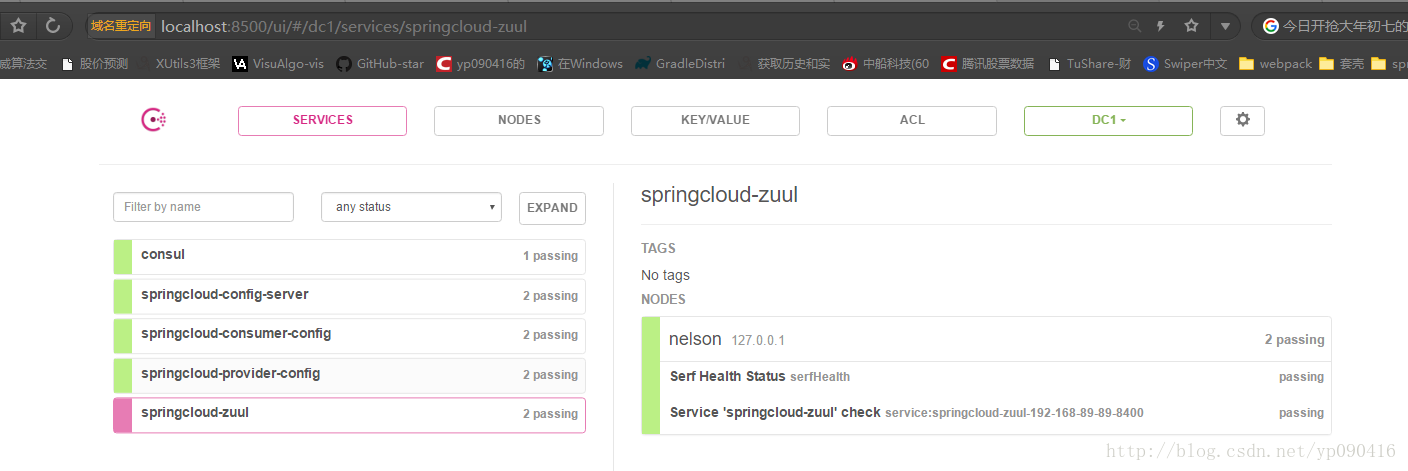
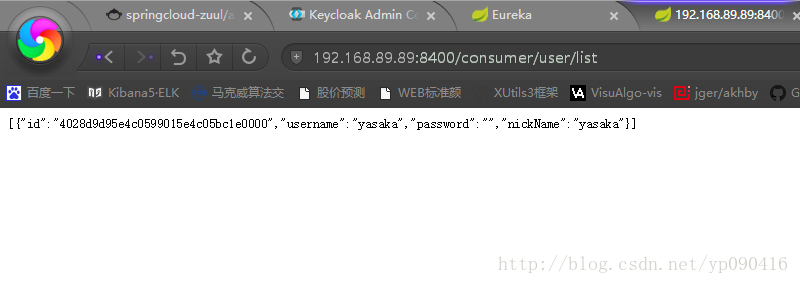
这时候,我们就要通过zuul访问微服务了,而不是直接去访问微服务。
应该访问地址http://192.168.89.89:8400/springcloud-consumer-config/user/list,这块你要换成你的zuul地址。
但是有些人就会说,这样以后用户请求会不会太长,比较反感,所以可以通过配置进行修改访问地址。
zuul:
  routes:
    springcloud-consumer-config: /consumer/**
    springcloud-provider-config: /provider/**
在application.yml中加入这样一段配置,其实就是nginx中的反向代理,使用一下简短的可以代理这个微服务。这个时候我们就可以这样去访问了http://192.168.89.89:8400/consumer/user/list,是不是简短了很多
六、用hystrix-turbine-dashboard 做集群监控
项目在生产环境中,每个服务的访问量都不通,有些服务的访问量比较大,有时候有些服务挂了,不能继续服务,需要重启的时候,我们并不知道,所以这时候就需要使用hystrix-turbine-dashboard做一个监控,监控所有的微服务,可以看到这个接口实时访问量,和健康状况。
新建一个springboot项目,老套路,加入如下依赖
- 1 添加依赖
compile('org.springframework.boot:spring-boot-starter-web')
compile group: 'org.springframework.cloud', name: 'spring-cloud-starter-consul-discovery', version: '1.3.1.RELEASE'
compile group: 'org.springframework.cloud', name: 'spring-cloud-netflix-turbine', version: '1.3.4.RELEASE'
compile group: 'org.springframework.boot', name: 'spring-boot-actuator', version: '1.5.6.RELEASE'
compile group: 'org.springframework.cloud', name: 'spring-cloud-starter-hystrix', version: '1.3.4.RELEASE'
compile group: 'org.springframework.cloud', name: 'spring-cloud-starter-hystrix-dashboard', version: '1.3.4.RELEASE'
- 2 修改application.yml配置文件
server:
  port: 8900
turbine:
  aggregator:
    clusterConfig: default
  appConfig: springcloud-consumer-config,springcloud-provider-config
  clusterNameExpression: new String('default')
#  clusterNameExpression: "'default'"
spring:
  application:
    name: springcloud-turbine-dashboard
  cloud:
    consul:
      host: localhost
      port: 8500
      discovery:
        instance-id: ${spring.application.name}:${spring.cloud.client.ipAddress}:${spring.application.instance_id:${server.port}}
        service-name: springcloud-turbine-dashboard
appConfig 后面是要检测的注册在consul上的服务名,必须要有
- 3 修改主类
@EnableTurbine ,@EnableHystrixDashboard 一个都不能少
@SpringBootApplication
@EnableTurbine
@EnableHystrix
@EnableDiscoveryClient
@EnableHystrixDashboard
public class TurbineDashboardApplication {
    public static void main(String[] args) {
        SpringApplication.run(TurbineDashboardApplication.class, args);
    }
}
- 4 访问测试
这块的端口是8900,访问地址http://localhost:8900/hystrix.stream,看到的是下面的页面。

然后在那个网址的输入框里输网址http://localhost:8900/turbine.stream,点击monitor stream。刚打开的时候可能是空的,什么也没有,这并不表示你已经错了。这时候你访问消费者服务的接口,例如访问http://localhost:8200/user/list,多访问几次,然后看控制台有没有出现一个监控面板,没有就等会刷新一次,如果一直不出现,应该是配置有问题。

后边更新会追加到后边,后边随时更新
2018-01-25 更新:补充使用feign
七、使用feign
在实际开发中,feign使用的还是挺多的,feign底层还是使用了ribbon。废话不多说,直接上步骤,在服务消费者中使用feign访问服务提供者。新建一个springboot项目,或者复制一个。
- 1加入依赖
swagger不使用的话,可以删掉。
compile('org.springframework.boot:spring-boot-starter-web')
compile group: 'org.springframework.cloud', name: 'spring-cloud-starter-consul-discovery', version: '1.3.1.RELEASE'
compile group: 'org.springframework.boot', name: 'spring-boot-actuator', version: '1.5.6.RELEASE'
compile group: 'org.springframework.cloud', name: 'spring-cloud-starter-config', version: '1.3.2.RELEASE'
compile group: 'org.springframework.cloud', name: 'spring-cloud-starter-feign', version: '1.3.4.RELEASE'
compile group: 'org.springframework.cloud', name: 'spring-cloud-starter-hystrix', version: '1.3.4.RELEASE'
compile(
    "io.springfox:springfox-swagger2:2.7.0",
    "io.springfox:springfox-swagger-ui:2.7.0"
)
- 2修改配置文件
这里修改的是bootstrap.yml,这里吧application.yml的配置也贴出来,这个是放在远程仓库的,通过config动态拉取下来。
spring:
  application:
    name: springcloud-consumer-feign
  cloud:
    consul:
      host: localhost
      port: 8500
      discovery:
        instance-id: ${spring.application.name}:${spring.cloud.client.ipAddress}:${spring.application.instance_id:${server.port}}
        service-name: springcloud-consumer-feign
    config:
      discovery:
        enabled: true
        service-id: springcloud-config-server
      fail-fast: true
      username: root
      password: booszy
      profile: csdn
application.yml
server:
  port: 8201
logging:
  level:
    com.yasaka.stock.feign.MFeignClient: debug
feign:
  hystrix:
    enabled: true
ribbon:
  ReadTimeout:  30000
  ConnectTimeout:  15000
hystrix:
  command:
    default:
      execution:
        isolation:
          thread:
            timeoutInMilliseconds: 10000
feign的默认请求超时时间是1s,所以经常会出现超时的问题,这里我设置的是10s,因为我的数据库服务器在美国,所以有时候请求会比较慢。ribbon的请求时间也要设置,因为feign用的是ribbon。
- 3 编码
1、主类注解
@EnableFeignClients
@EnableCircuitBreaker
@EnableHystrix
这三个都要,hystrix主要作用是断路器,会进如fein的fallback中。
@SpringBootApplication
@EnableDiscoveryClient
@EnableFeignClients
@EnableCircuitBreaker
@EnableHystrix
public class ConsumerApplication {
    public static void main(String[] args) {
        SpringApplication.run(ConsumerApplication.class, args);
    }
}
2、编写feign接口,MFeignClient.class
name是指要请求的服务名称。这里请求的是服务提供者
fallback 是指请求失败,进入断路器的类,和使用ribbon是一样的。
configuration 是feign的一些配置,例如编码器等。
@FeignClient(name = "springcloud-provider-config",fallback = HystrixFeignFallback.class, configuration = MFeignConfig.class)
public interface MFeignClient {

    //这里是使用feign请求的地址
    @RequestMapping(method = RequestMethod.GET, value = "/user/{id}")
    User getUser(@PathVariable("id") String id);

    //新版本支持使用GetMapping,之前的老版本可能不支持
    @GetMapping(value = "/user/list")
    List<User> getUsers();
}
- 3 MFeignConfig.class feign的配置
这里配置了feign的打印日志等级
@Configuration
public class MFeignConfig {
    @Bean
    Logger.Level feignLoggerLevel() {
        return Logger.Level.FULL;
    }
}
- 4 HystrixFeignFallback.class ,断路器回调方法
断路器要实现上边定义的MFeignClient接口,请求失败,进入断路器时,会回调这里的方法。
@Component
public class HystrixFeignFallback implements MFeignClient {
    @Override
    public User getUser(String id) {
        User user = new User();
        user.setId("233");
        return user;
    }

    @Override
    public List<User> getUsers() {
        return new ArrayList<User>();
    }
}
- 5 在controller中使用feign
@Api("springcloud consumer user 控制器")
@RequestMapping("user")
@RestController
public class UserController {

    @Autowired
    private MFeignClient feignClient;

    /**
     * @param id
     * @return
     */
    @ApiOperation(value = "根据用户id查询用户信息", httpMethod = "GET", produces = "application/json")
    @ApiResponse(code = 200, message = "success", response = User.class)
    @GetMapping("{id}")
    public User getUser(@ApiParam(name = "id",   required = true, value = "用户Id") @PathVariable String id) {
        User user = feignClient.getUser(id);
        return user;
    }


    @GetMapping("list")
    public List<User> users(HttpServletRequest request) {
        try {
            List<User> users = feignClient.getUsers();
            return users == null ? new ArrayList<User>() : users;
        } catch (Exception e) {
            e.printStackTrace();
        }
        return null;
    }
}
20180125更新: 补充使用sleuth+zipkin 实现链路追踪服务
八、使用sleuth+zipkin 实现链路追踪服务
在使用微服务的时候,我们发现,有时候排错不好排查,所以就给大家整个这个链路追踪,很方便知道是哪一个服务调用哪一个服务出现了问题。因为有些项目可能服务比较多。
- 1 添加依赖
新建一个springboot项目
虽然其他服务调用zipkin不是从consul上动态过去服务地址,而是硬编码,但是这块还是考虑吧zipkin注册到consul上。
compile group: 'io.zipkin.java', name: 'zipkin-server', version: '2.4.4'
compile group: 'io.zipkin.java', name: 'zipkin-autoconfigure-ui', version: '2.4.4'
compile group: 'org.springframework.cloud', name: 'spring-cloud-starter-consul-discovery', version: '1.3.1.RELEASE'
- 2 修改application配置文件
server:
  port: 9411
spring:
  application:
    name: springcloud-zipkin-server
  cloud:
    consul:
      host: localhost
      port: 8500
      discovery:
        instance-id: ${spring.application.name}:${spring.cloud.client.ipAddress}:${spring.application.instance_id:${server.port}}
        service-name: springcloud-zipkin-server
- 3 主类注解添加
@EnableZipkinServer 主要是这个注解
启动服务后访问http://localhost:9411,就可以打开zipkin的控制台页面,这时候应该是什么都没有
@SpringBootApplication
@EnableZipkinServer
@EnableDiscoveryClient
public class ZipkinServerApplication {
    public static void main(String[] args) {
        SpringApplication.run(ZipkinServerApplication.class, args);
    }
}
- 4 其他服务中调用
这里我们在消费者服务和提供者服务里都加入如下依赖
....
compile group: 'org.springframework.cloud', name: 'spring-cloud-starter-sleuth', version: '1.3.1.RELEASE'
compile group: 'org.springframework.cloud', name: 'spring-cloud-sleuth-zipkin', version: '1.3.1.RELEASE'
...
然后修改配置文件,bootstrap.yml、
这块zipkin的地址是硬编码的,目前还没发现怎么从服务注册中心consul上动态获取,以后有解决方案,会更新帖子
sleuth这个是配置提取率,可以配置也可以不配置
spring:
  zipkin:
    base-url: http://localhost:9411
  sleuth:
    sampler:
      percentage: 1.0
启动服务,然后访问消费者服务的接口,这时候访问zipkin的控制台http://localhost:9411
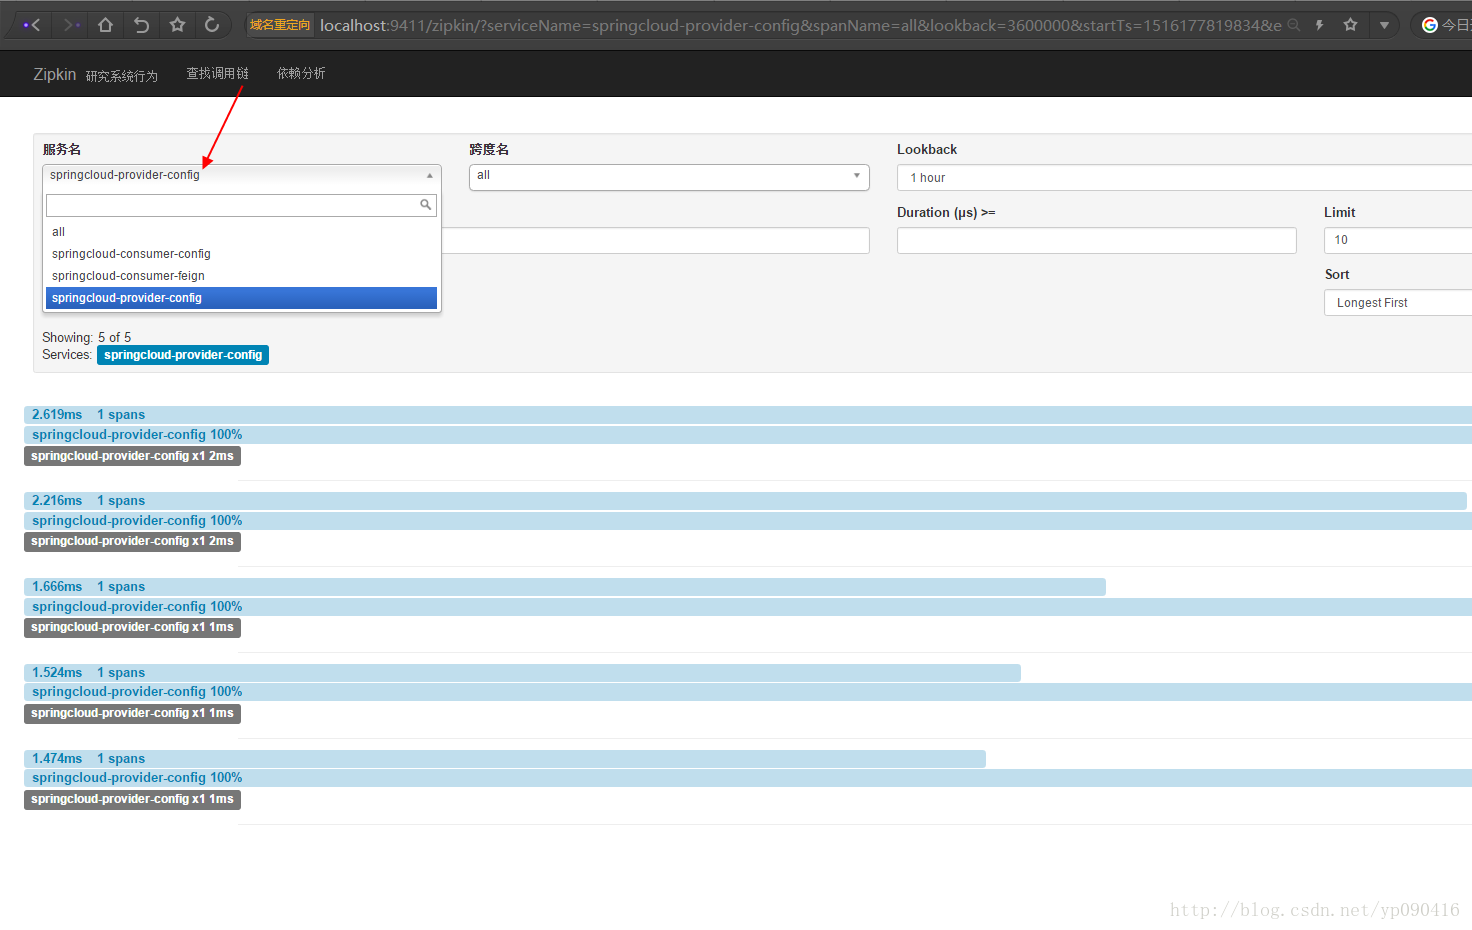
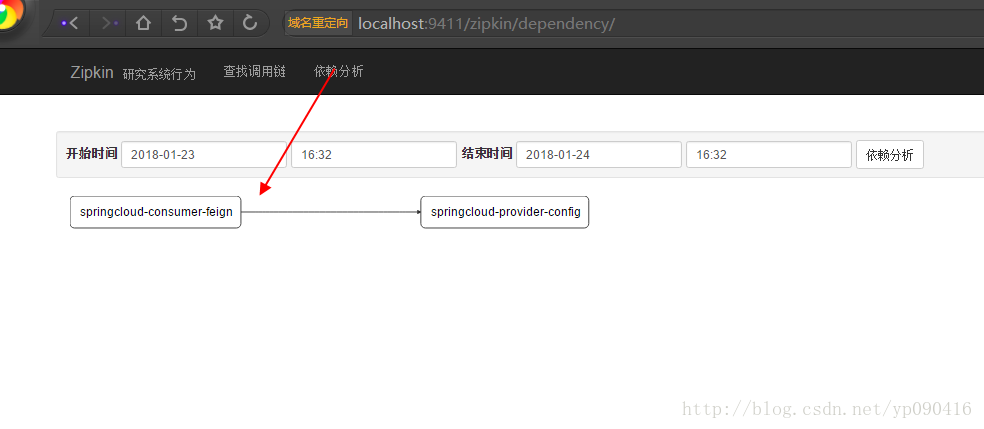
点击依赖分析,可以看到调用服务链,因为这块只涉及到两个服务,所以只有两个,在实际生产环境中,这块可能有很多,到时候看起来就特别直观了。
关注
如果有问题,请在下方评论,或者加群讨论 200909980
关注下方微信公众号,可以及时获取到各种技术的干货哦,如果你有想推荐的帖子,也可以联系我们的。