数据类型
8种基本数据类型和引用类型
| 数据类型 | 占用位数 | 存储方式 | 最小值 | 最大值 | 默认值 |
| byte | 8 | 1+7 | -128(-2^7) | 127(2^7-1) | 0 |
| short | 16 | 1+15 | -32768(-2^15) | 32767(2^15-1) | 0 |
| int | 32 | 1+31 | -2147483648(-2^31) | 2147483647(2^31-1) | 0 |
| long | 64 | 1+63 | -2^63 | 2^63-1 | 0L |
| float | 32 | 1实数符号位+1指数符号位+7指数位+23实数位 (与整数不同,符号位1为正,0为负,有效位数为1+23位 ) |
1.4E-45 | 3.4028235E38 | 0.0f |
| double | 64 | 1实数符号位+1指数符号位+10位指数位+52实数位 | 4.9E-324 | 1.7976931348623157E308 | 0.0f |
| char | 16 | 0 | 2^16 | 0 | |
| boolean | false |
基本类型对应的包装类
1 // 自动装箱
2 Integer iobj = 1;
3 Integer iobj = Integer.valueOf(1);
4 // 自动拆箱
5 int i = iboj;
6 int i = iobj.intValue();
特别的,像Integer使用了缓存机制,我看了下Short的源代码也有,别的没去看了
1 Integer i1 = 127;
2 Integer i2 = 127;
3 Integer i3 = 128;
4 Integer i4 = 128;
5 System.out.println(i1 == i2); // true
6 System.out.println(i3 == i4); // false
这个可以在源代码中看到

另外基本数据类型与包装类型可以区分变量是否被赋值
引用类型
引用数据类型存放对象,对象可分为数组,类对象,接口对象,枚举对象
引用类型变量的值存于栈中,变量引用的对象存在于堆中。
java中数组也是对象,并且继承自Object,这一点就算大家没听过,在ide环境的代码提示下也会看到数组集成了Object的方法
1 int arr [] = new int[12];
2 System.out.println(arr.getClass().getSuperclass());//class java.lang.Object
接口中方法缺省为abstract public 表示必须实现的抽象方法,字段缺省为public static final,表示全局常量,因为接口要体现比抽象类更高的抽象原则。
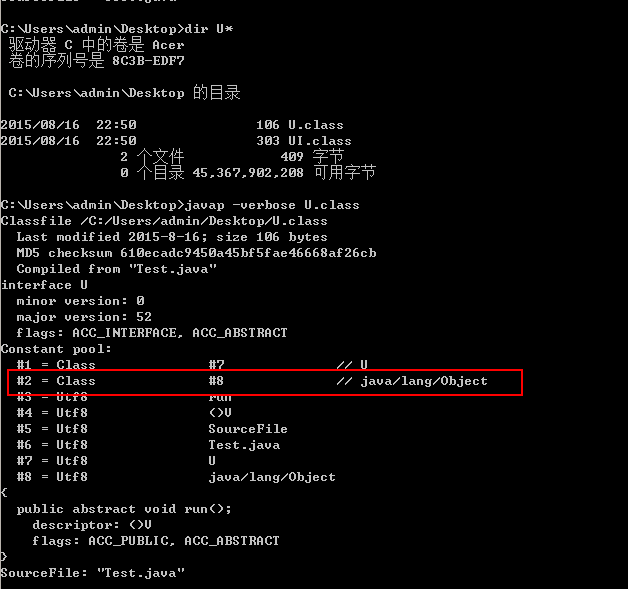
另外接口在运行时也应是以Class的方式实现的,并继承自Object类。
看下面的代码
 1 interface U {
 2     void run();
 3     //void wait();    //Test.java:3: 错误: U中的wait()无法覆盖Object中的wait()
 4 }
 5 class PU{
 6     public String toString(){
 7         return "PUPU";
 8     }
 9 }
10 class UI extends PU implements U{
11     public void run(){
12
13     }
14     public String toString(){
15         return "UU";
16     }
17 }
18 public class Test{
19     public static void main(String [] a){
20         U u = new UI();
21         System.out.println(u instanceof Object); // true
22         System.out.println(u.toString()); // UU
23         Object obj = u;
24         System.out.println(obj);    // UU
25         //
26         System.out.println(Object.class.isAssignableFrom(U.class)); // true
27         System.out.println(U.class.getGenericInterfaces()); // [Ljava.lang.Class;@15db9742
28         System.out.println(UI.class.getGenericInterfaces());// [Ljava.lang.Class;@6d06d69c
29         System.out.println(U.class.getGenericSuperclass()); // null
30         System.out.println(U.class.getSuperclass());    // null
31         System.out.println(U.class.isInterface());  // true
32
33     }
34 }
反编译看U.class也可看到接口与Object存在关系
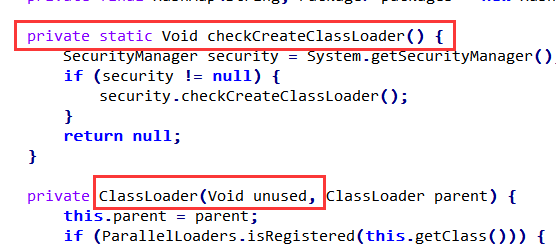
这里我有个疑问,像上面的UI继承PU类并实现U接口,而按照之前的分析,UI应该应有Object的方法拷贝,那是不是意味着Java虽然不直接支持多继承,但还是不可避免的出现这种疑似多副本的问题,但很显然Java并不存在这个问题。那么Java设计者是怎么做的,像C++虚基类那样么?只保留唯一一个Object的多个引用吗?这个问题暂时没有找到答案。
枚举类型基于类来实现,所有枚举类型继承自java.lang.Enum。从jdk文档中可以看到Enum类有静态方法valueOf方法,但却看不到常用的values方法,那么这个values方法从哪来呢?编译时加的。详情参考文档 http://docs.oracle.com/javase/tutorial/java/javaOO/enum.html 。另外可以发现Enum很神奇的泛型定义,为毛要这么定义,因为Enum要实现Comparable接口,并且只希望同一类系的枚举对象进行比较。参考 http://www.it165.net/pro/html/201305/5643.html
类是java核心,我也见了很多人总在说着java中万物皆对象。类的整个生命周期包括,加载、验证、准备、解析、初始化、使用、销毁,这篇文章写的非常不错。java有好几个类加载器,但很显然总有一个类加载器不是java写的,就像总有一个编译器,是由最底层代码写的。以前看过一篇文章,记得是C++写的。
类的初始化过程
1、父类静态成员初始化
2、父类静态代码块执行
3、子类静态成员初始化
4、子类静态代码块执行
5、父类构造代码块执行
6、父类构造函数执行
7、子类构造代码块执行
8、子类构造函数执行
 1 package org.devlyh.clazz;
 2
 3 class PClass extends Object{
 4     int anInt = 10;
 5     static int sVal = 20;
 6
 7     static int initVal = init();
 8     static {
 9         System.out.println("父类静态代码块执行:"+sVal);
10         sVal = 100;
11     }
12
13     {
14         System.out.println("父类构造代码块执行");
15         anInt = 30;
16     }
17
18     public PClass(){
19         System.out.println("父类构造函数执行 :"+anInt);
20     }
21
22     public static int init(){
23         System.out.println(PClass.class.getName()+"静态成员初始化");
24         return 1000;
25     }
26 }
27
28 public class ClassInitDemo extends PClass{
29     private int anInt = 4;
30
31     static private int sVal = 3;
32
33     static int initVal = init();
34
35     static {
36         System.out.println("子类静态代码执行 sval:"+sVal);
37         sVal = 10;
38     }
39
40     {
41         System.out.println("子类构造代码块执行");
42         anInt = 10;
43     }
44
45     public static int init(){
46         System.out.println(ClassInitDemo.class.getName()+"静态成员初始化");
47         return 1000;
48     }
49
50     public ClassInitDemo(){
51         System.out.println("子类构造函数执行:"+anInt);
52         System.out.println(this.anInt);
53         System.out.println(super.anInt);
54         System.out.println(sVal);
55     }
56
57     public static void main(String[] args) {
58         new ClassInitDemo();
59     }
60
61 }
运行结果
 1 org.devlyh.clazz.PClass静态成员初始化
 2 父类静态代码块执行:20
 3 org.devlyh.clazz.ClassInitDemo静态成员初始化
 4 子类静态代码执行 sval:3
 5 父类构造代码块执行
 6 父类构造函数执行 :30
 7 anInt:4
 8 子类构造代码块执行
 9 sval:10
10 子类构造函数执行:10
11 10
12 30
13 10
且注意看,java中类默认继承Object,但我也可以显式继承。静态方法在类被类加载器加载后就存在静态代码区中,所以初始化类的静态成员是,静态方法已经存在
方法的重载与重写
方法的方法名+形参列表构成了方法的签名,返回值和其他修饰符并不能作为签名,因为并不一定能够通过函数调用动态绑定到确定的方法,只有在方法名相同,形参列表不同(形参名无所谓)方可构成重载或重写。重写针对覆想盖父类的方法而言,重载则对该类已经存在的方法定义另一个接口。说到这个我想说下现在包括一些大学老师也持有的错误观点,就是子类不会继承父类的私有属性或方法。我觉得这大错特错,子类的对象拥有父类所有的内容,只是某些内容不可直接访问,但并不代表没有,因此,我觉的java应该有第五种成员权限--不可访问。子类重写父类的方法,不能缩小权限。只能相同或放大。
异常处理
java有着其非常完善的异常体系,它的基础是Throwable类
以此为两处
Error
Exception
其中Exception的直接子类一般表示编译时异常,只有RuntimeException及其子类,属于运行时异常。
在方法声明上使用throws 可以指明方法可能抛出的异常类,在代码块中,使用throw 实际抛出异常对象,异常的接收者必须处理或者继续向上层调用者抛
 1 public class Main{
 2     public  static  int i = 9;
 3     public static void main(String[] args) throws Exception{
 4         exceptionDemo();
 5     }
 6
 7     public static int exceptionDemo() throws Exception{
 8         // 如果程序没有执行到try代码块,finally也不会执行
 9         //  exit();
10
11         try {
12             if(i>10){
13                 throw  new Exception("抛出异常");
14             }
15             // System.exit(0); // 可以是finally块不执行
16             return returnVal();// 先执行return 表达式的计算,再执行finally,再然后返回运算结果,然后弹栈
17         }catch (Exception e){
18             e.printStackTrace();
19         }finally {
20             System.out.println("finally执行");
21         }
22         return returnVal() ;// 先执行finally在执行这里
23      }
24
25
26     public static int returnVal(){
27         System.out.println("return");
28         return 0;
29     }
30
31     public static void exit(){
32         System.exit(0);
33     }
34 }
可以看到finally会在两种情况下不执行
- 没有执行到try代码块
- 虚拟机结束
finally和return的执行顺序也更代码位置有关
另外也可以自定义异常
 1 public  class MyException extends Throwable {
 2     protected int level = 0;
 3
 4     private String location = null;
 5
 6     public void findLocation(int level)
 7     {
 8         StackTraceElement element = null;
 9         int currentLine;
10         String fileName;
11         element = Thread.currentThread().getStackTrace()[level];
12         currentLine = element.getLineNumber();
13         fileName = element.getFileName();
14
15         location = "File: "+fileName+" Line: "+currentLine;
16     }
17
18     private static final long serialVersionUID = -9198495466584632327L;
19
20     private String info = null;
21
22     public String getInfo() {
23         return info;
24     }
25
26     public void setInfo(String info) {
27         this.info = info;
28     }
29
30     public MyException() {
31
32     }
33
34     public MyException(String info) {
35         this.info = info;
36     }
37
38     public  void printInfo(){
39         System.out.println("Exception Type : "+this.getClass().getName());
40         System.out.println("Exception Info : "+this.info);
41         System.out.println("Location       : "+this.location);
42     }
43 }
泛型
java泛型是伪泛型,程序中的泛型在编译时擦除,以Object或其他对象取代,也就是运行时并不存在泛型。
首先,泛型必须保持一致,例如下面的代码是不行的,哪怕是继承关系
1 Collection<Person> arr = new Collection<Worker>();//这样是不行的,泛型要保持一致,有继承关系也不行。
泛型可以在继承中继续泛型也可明确。
泛型上限
? extends E : 上限 表示可以接受所有E,或继承于E的对象,?是E的子类。一般用于存元素
1 private static void interatorCollection(Collection<? extends Person> arr) {
2     //            这叫泛型的限定,且是上限
3     for (Iterator<? extends Person>iterator = arr.iterator(); iterator.hasNext();) {
4         Person p = iterator.next();
5         System.out.println(p.getName()+"..."+p.getAge());
6 //            ? it = iterator.next();//这样不行
7     }
8 }
泛型下限
? super E : 下限 表示可以接受所有E,或者派生出E的对象,E是?的子类。
1 private static void interatorCollection(Collection<? super Student> arr) {
2     //            这叫泛型的限定,且是下限
3     for (Iterator<? super Student>iterator = arr.iterator(); iterator.hasNext();) {
4         System.out.println(iterator.next());
5 //            ? it = iterator.next();//这样不行
6     }
7 }
多线程
多线程是java的一个亮点,它基于Thread体系
最简单的线程方法
是创建直接接触Thread类或实现Runnable接口,
 1 new Thread(new Runnable() {
 2     @Override
 3     public void run() {
 4         System.out.println("Runnable 方法");
 5     }
 6 }) {
 7     @Override
 8     public void run() {
 9         System.out.println("Thread子类 方法");
10         //super.run();
11     }
12 }.start();
从Thread 的实现也就是jdk的源码不难看出,上面执行的结果输出的是Thread 子类方法
解决线程互斥的问题
主要是同步代码块、同步方法。也就是加锁
 1 import java.util.concurrent.locks.*;
 2
 3 class BoundedBuffer {
 4     final Lock lock = new ReentrantLock();
 5     final Condition notFull = lock.newCondition();
 6     final Condition notEmpty = lock.newCondition();
 7
 8     final Object[] items = new Object[100];
 9     int putptr, takeptr, count;
10
11     public void put(Object x) throws InterruptedException {
12         lock.lock();
13         try {
14             while (count == items.length)
15                 notFull.await();
16             items[putptr] = x;
17 //            System.out.println(Thread.currentThread().getName() + "--生产--" + x);
18             if (++putptr == items.length)
19                 putptr = 0;
20             ++count;
21             notEmpty.signal();
22         } finally {
23             lock.unlock();
24
25         }
26
27     }
28
29     public Object take() throws InterruptedException {
30         lock.lock();
31         try {
32             while (count == 0)
33                 notEmpty.await();
34             Object x = items[takeptr];
35 //            System.out.println(Thread.currentThread().getName() + "--消费-" + x);
36             if (++takeptr == items.length)
37                 takeptr = 0;
38             --count;
39             notFull.signal();
40             return x;
41         } finally {
42             lock.unlock();
43         }
44     }
45 }
46
47 class Game implements Runnable {
48     private char ch = '你';
49     private BoundedBuffer  buffer = new BoundedBuffer();
50     public void run() {
51         show();
52     }
53
54     private void show() {
55         // TODO 自动生成的方法存根
56         for (int i = 0; i < 6; i++) {
57             try {
58                 buffer.put(i);
59             } catch (Exception e) {
60                 // TODO: handle exception
61             }
62             try {
63                 Thread.sleep(10);
64             } catch (Exception e) {
65                 // TODO: handle exception
66             }
67         }
68     }
69 }
70
71 public class ThreadTest_1 {
72     public static void main(String[] args) {
73         // TODO 自动生成的方法存根
74         Game g = new Game();
75         Thread t1 = new Thread(g);
76         Thread t2 = new Thread(g);
77         t1.start();
78         t2.start();
79
80     }
81 }
jdk1.5之后引入了很多新的线程方法
也就是线程并发库
Timer--定时器方法


 1 import java.util.Date;
 2 import java.util.Timer;
 3 import java.util.TimerTask;
 4
 5 public class TimerDemo {
 6
 7     public static int i = 0;
 8
 9     @SuppressWarnings("deprecation")
10     public static void main(String[] args) {
11         class MyTimerTask extends TimerTask{
12             long [] timer = {2000,3000};
13             @Override
14             public void run() {
15                 System.out.println("bombing");
16                 new Timer().schedule(new MyTimerTask(), timer[i = (i +1)%2]);
17             }
18         }
19
20         new Timer().schedule(new MyTimerTask(), 2000);
21
22         while (true) {
23             System.out.println(new Date().getSeconds());
24             try {
25                 Thread.sleep(1000);
26             } catch (InterruptedException e) {
27                 e.printStackTrace();
28             }
29         }
30     }
31
32 }
ThreadLocal--线程之间共享数据
 1 import java.util.Random;
 2 class MyThreadScopeData{
 3
 4     private MyThreadScopeData(){}
 5
 6     public static  MyThreadScopeData getInstance(){
 7         MyThreadScopeData mtsd = map.get();
 8         if(null == mtsd){
 9             mtsd = new MyThreadScopeData();
10             map.set(mtsd);
11         }
12         return mtsd;
13     }
14     private static ThreadLocal<MyThreadScopeData> map = new ThreadLocal<MyThreadScopeData>();
15     private String name;
16     public String getName() {
17         return name;
18     }
19     public void setName(String name) {
20         this.name = name;
21     }
22     private int age;
23     public int getAge() {
24         return age;
25     }
26     public void setAge(int age) {
27         this.age = age;
28     }
29 }
30 public class ThreadLocalTest {
31 //    private static int data = 0;
32 //    private static Map<Thread,Integer> threadData = new HashMap<Thread,Integer>();
33     private static ThreadLocal<Integer> x = new ThreadLocal<Integer>();
34     public static void main(String[] args) {
35         for(int i=0;i<2;i++){
36             new Thread(new Runnable() {
37                 @Override
38                 public void run() {
39                         int data = new Random().nextInt();
40                         System.out.println(Thread.currentThread().getName()+
41                                 " has put data:"+data);
42                         x.set( data);
43 //                        MyThreadScopeData currentdata = new MyThreadScopeData();
44 //                        currentdata.setName("name"+data);
45 //                        currentdata.setAge(data);
46 //                        myData.set(currentdata);
47                         MyThreadScopeData.getInstance().setName("name"+data);;
48                         MyThreadScopeData.getInstance().setAge(data);
49                         new A().getData();
50                         new B().getData();
51                     }
52             }).start();
53         }
54     }
55
56     static class A{
57         public int getData(){
58             int data = x.get();
59 //            System.out.println(Thread.currentThread().getName()+
60 //                " get data:"+data);
61 //            System.out.println(Thread.currentThread().getName()+
62 //                    " get data:"+myData.get().getName()+":"+myData.get().getAge());
63             MyThreadScopeData mtsd = MyThreadScopeData.getInstance();
64             System.out.println(Thread.currentThread().getName()+
65                     " get data:"+mtsd.getName()+":"+mtsd.getAge());
66
67             return data;
68         }
69     }
70     static class B{
71         public int getData(){
72             int data = x.get();
73 //            System.out.println(Thread.currentThread().getName()+
74 //                " get data:"+data);
75 //            System.out.println(Thread.currentThread().getName()+
76 //                " get data:"+myData.get().getName()+":"+myData.get().getAge());
77             MyThreadScopeData mtsd = MyThreadScopeData.getInstance();
78             System.out.println(Thread.currentThread().getName()+
79                     " get data:"+mtsd.getName()+":"+mtsd.getAge());
80             return data;
81         }
82     }
83 }
concurrent线程工具包
atomic原子操作包
用来处理数值加减的原子操作,基本对应了基本数据类型的包装类
ThreadPool 线程池--Executors工具类
public static ExecutorService newFixedThreadPool(int nThreads) 新建一个固定大小的线程池
 1 ExecutorService threadPool =  Executors.newFixedThreadPool(3);//新建一个固定的线程池,池中可以放3 个线程
 2 for(int i=0;i<10;i++){
 3     final int task = i ;
 4     threadPool.execute(new Runnable(){
 5         public void run(){
 6             for(int j = 0;j<10;j++){
 7                 try {
 8                     Thread.sleep(20);
 9                 } catch (InterruptedException e) {
10                     e.printStackTrace();
11                 }
12                 System.out.println(Thread.currentThread().getName()+ " : "+j +" run "+ task);
13             }
14         }
15     });
16 }
17 //因为线程池的大小为3,所以每次只有3个任务被进行,某个任务完了,就补充一个进来
18 System.out.println("10 个任务提交完了");
public static ExecutorService newCachedThreadPool() 创建一个可变大小的线程池
 1 ExecutorService threadPool = Executors.newCachedThreadPool();
 2 for(int i=0;i<10;i++){
 3     final int task = i ;
 4     threadPool.execute(new Runnable(){
 5         public void run(){
 6             for(int j = 0;j<10;j++){
 7                 try {
 8                     Thread.sleep(20);
 9                 } catch (InterruptedException e) {
10                     e.printStackTrace();
11                 }
12                 System.out.println(Thread.currentThread().getName()+ " : "+j +" run "+ task);
13             }
14         }
15     });
16 }
17 //因为线程池的大小可变,可以多个被进行,某个任务完了,就会被删除
18 System.out.println("10 个任务提交完了");
public static ScheduledExecutorService newScheduledThreadPool(int corePoolSize) 创建定时任务线程池
 1 Executors.newScheduledThreadPool(3).schedule(new Runnable(){
 2     public void run(){
 3         for(int j = 0;j<10;j++){
 4             try {
 5                 Thread.sleep(20);
 6             } catch (InterruptedException e) {
 7                 e.printStackTrace();
 8             }
 9             System.out.println(Thread.currentThread().getName()+ " : "+j +" run ");
10         }
11     }
12 }, 2, TimeUnit.SECONDS);
等等
Future -- 异步等待计算结果
 1 ExecutorService threadPool = Executors.newSingleThreadExecutor();
 2 Future<String> future = threadPool.submit(new Callable<String>() {
 3     @Override
 4     public String call() throws Exception {
 5         Thread.sleep(1000);
 6         return "hello world";
 7     }
 8 });
 9 System.out.println("等待结果");
10 try{
11     System.out.println("拿到结果:"+future.get());
12 }
13 catch (Exception e) {
14     e.printStackTrace();
15 }
这个貌似作用不是很大,也许需要在哪种另一个线程只执行一部分就可产生数据的方法
Locks 锁对象
作用主要是将原来的锁用面向对象的方式封装
 1 import java.util.concurrent.locks.Condition;
 2 import java.util.concurrent.locks.Lock;
 3 import java.util.concurrent.locks.ReentrantLock;
 4
 5 public class LockTest {
 6
 7     final Lock lock = new ReentrantLock();
 8     final Condition notFull = lock.newCondition();
 9     final Condition notEmpty = lock.newCondition();
10
11     final Object[] items = new Object[100];
12     int putptr, takeptr, count;
13
14     public void put(Object x) throws InterruptedException {
15         lock.lock();
16         try {
17             while (count == items.length)
18                 notFull.await();
19             items[putptr] = x;
20             if (++putptr == items.length)
21                 putptr = 0;
22             ++count;
23             notEmpty.signal();
24         } finally {
25             lock.unlock();
26         }
27     }
28
29     public Object take() throws InterruptedException {
30         lock.lock();
31         try {
32             while (count == 0)
33                 notEmpty.await();
34             Object x = items[takeptr];
35             if (++takeptr == items.length)
36                 takeptr = 0;
37             --count;
38             notFull.signal();
39             return x;
40         } finally {
41             lock.unlock();
42         }
43     }
44
45     public static void main(String[] args) {
46         final LockTest lt = new LockTest();
47         new Thread(put(lt),"生产线程1").start();
48         new Thread(put(lt),"生产线程2").start();
49         new Thread(get(lt),"消费线程1").start();
50         new Thread(get(lt),"消费线程2").start();
51
52     }
53
54     private static Runnable get(final LockTest lt) {
55         return new Runnable() {
56             @Override
57             public void run() {
58                 while(true){
59                     try {
60                         System.out.println(Thread.currentThread().getName()+"取得一个"+lt.take());
61                         Thread.sleep(100);
62                     } catch (Exception e) {
63                         // TODO 自动生成的 catch 块
64                         e.printStackTrace();
65                     }
66                 }
67             }
68         };
69     }
70
71     private static Runnable put(final LockTest lt) {
72         return new Runnable() {
73             @Override
74             public void run() {
75                 while(true){
76                     try {
77                         lt.put("产品");
78                         System.out.println(Thread.currentThread().getName()+"生产了个产品");
79                         Thread.sleep(100);
80                     } catch (Exception e) {
81                         // TODO 自动生成的 catch 块
82                         e.printStackTrace();
83                     }
84                 }
85
86             }
87         };
88     }
89 }
Condition 监视器对象
 1 import java.util.concurrent.locks.Condition;
 2 import java.util.concurrent.locks.Lock;
 3 import java.util.concurrent.locks.ReentrantLock;
 4
 5 public class ThreadTest {
 6     public static void main(String[] args) {
 7         // TODO 自动生成的方法存根
 8         final Lock lock = new ReentrantLock();
 9         final Condition subThread = lock.newCondition();
10         final Condition mainThread  = lock.newCondition();
11
12         Thread t = new Thread(){
13             public void run(){
14                 int i = 0;
15                 while (true) {
16 //                    synchronized (ThreadTest.class) {
17                         i++;
18                         lock.lock();
19                         if (i % 11 == 0) {
20                             i = 1;
21                             try {
22                                 mainThread.signal();
23                                 subThread.await();
24                             } catch (InterruptedException e) {
25                                 e.printStackTrace();
26                             }
27                             finally{
28                                 lock.unlock();
29                             }
30
31                         }
32                         try {
33                             Thread.sleep(20);
34                         } catch (InterruptedException e) {
35                             // TODO 自动生成的 catch 块
36                             e.printStackTrace();
37                         }
38                         System.out.println("次线程执行了" + i + "次");
39 //                    }
40                 }
41             }
42         };
43         t.start();
44         try {
45             Thread.sleep(300);
46         } catch (InterruptedException e1) {
47             // TODO 自动生成的 catch 块
48             e1.printStackTrace();
49         }
50         int n = 0;
51         while(true){
52 //            synchronized (ThreadTest.class) {
53                 lock.lock();
54                 n++;
55                 if(n%101 == 0){
56                     n = 1;
57                     try {
58                         subThread.signal();
59                         mainThread.await();
60                     } catch (InterruptedException e) {
61                         // TODO 自动生成的 catch 块
62                         e.printStackTrace();
63                     }
64                     finally{
65                         lock.unlock();
66                     }
67                 }
68                 try {
69                     Thread.sleep(20);
70                 } catch (InterruptedException e) {
71                     // TODO 自动生成的 catch 块
72                     e.printStackTrace();
73                 }
74                 System.out.println("主线程执行了"+n+"次");
75 //            }
76         }
77     }
78
79 }
Semaphore 信号量
用来控制对资源访问线程的数量
 1 import java.util.concurrent.ExecutorService;
 2 import java.util.concurrent.Executors;
 3 import java.util.concurrent.Semaphore;
 4
 5 public class SemaphoreTest {
 6     public static void main(String[] args) {
 7         ExecutorService service = Executors.newCachedThreadPool();
 8         final  Semaphore sp = new Semaphore(3);
 9         for(int i=0;i<10;i++){
10             Runnable runnable = new Runnable(){
11                     public void run(){
12                     try {
13                         sp.acquire();
14                     } catch (InterruptedException e1) {
15                         e1.printStackTrace();
16                     }
17                     System.out.println("线程" + Thread.currentThread().getName() +
18                             "进入,当前已有" + (3-sp.availablePermits()) + "个并发");
19                     try {
20                         Thread.sleep((long)(Math.random()*10000));
21                     } catch (InterruptedException e) {
22                         e.printStackTrace();
23                     }
24                     System.out.println("线程" + Thread.currentThread().getName() +
25                             "即将离开");
26                     sp.release();
27                     //下面代码有时候执行不准确,因为其没有和上面的代码合成原子单元
28                     System.out.println("线程" + Thread.currentThread().getName() +
29                             "已离开,当前已有" + (3-sp.availablePermits()) + "个并发");
30                 }
31             };
32             service.execute(runnable);
33         }
34     }
35
36 }
CyclicBarrier 循环等待线程
各个线程走到一个屏障点集合,再一同出发,再前往下一个屏障点集合
 1 import java.util.concurrent.CyclicBarrier;
 2 import java.util.concurrent.ExecutorService;
 3 import java.util.concurrent.Executors;
 4
 5 public class CyclicBarrierTest {
 6
 7     public static void main(String[] args) {
 8         ExecutorService service = Executors.newCachedThreadPool();
 9         final  CyclicBarrier cb = new CyclicBarrier(3);
10         for(int i=0;i<3;i++){
11             Runnable runnable = new Runnable(){
12                     public void run(){
13                     try {
14                         Thread.sleep((long)(Math.random()*10000));
15                         System.out.println("线程" + Thread.currentThread().getName() +
16                                 "即将到达集合地点1,当前已有" + (cb.getNumberWaiting()+1) + "个已经到达," + (cb.getNumberWaiting()==2?"都到齐了,继续走啊":"正在等候"));
17                         cb.await();
18
19                         Thread.sleep((long)(Math.random()*10000));
20                         System.out.println("线程" + Thread.currentThread().getName() +
21                                 "即将到达集合地点2,当前已有" + (cb.getNumberWaiting()+1) + "个已经到达," + (cb.getNumberWaiting()==2?"都到齐了,继续走啊":"正在等候"));
22                         cb.await();
23
24                         Thread.sleep((long)(Math.random()*10000));
25                         System.out.println("线程" + Thread.currentThread().getName() +
26                                 "即将到达集合地点3,当前已有" + (cb.getNumberWaiting() + 1) + "个已经到达," + (cb.getNumberWaiting()==2?"都到齐了,继续走啊":"正在等候"));
27                         cb.await();
28                     } catch (Exception e) {
29                         e.printStackTrace();
30                     }
31                 }
32             };
33             service.execute(runnable);
34         }
35         service.shutdown();
36     }
37 }
CountDownLatch 计数器
计数器可以实现类似吹哨员和运动员的效果
 1 import java.util.concurrent.CountDownLatch;
 2 import java.util.concurrent.ExecutorService;
 3 import java.util.concurrent.Executors;
 4
 5 public class CountdownLatchTest {
 6
 7     public static void main(String[] args) {
 8         ExecutorService service = Executors.newCachedThreadPool();
 9         final CountDownLatch cdOrder = new CountDownLatch(1);//吹哨员
10         final CountDownLatch cdAnswer = new CountDownLatch(3);//运动员
11         for(int i=0;i<3;i++){
12             Runnable runnable = new Runnable(){
13                     public void run(){
14                     try {
15                         System.out.println("线程" + Thread.currentThread().getName() +
16                                 "正准备接受命令");
17                         cdOrder.await();
18                         System.out.println("线程" + Thread.currentThread().getName() +
19                         "已接受命令");
20                         Thread.sleep((long)(Math.random()*10000));
21                         System.out.println("线程" + Thread.currentThread().getName() +
22                                 "回应命令处理结果");
23                         cdAnswer.countDown();
24                     } catch (Exception e) {
25                         e.printStackTrace();
26                     }
27                 }
28             };
29             service.execute(runnable);
30         }
31         try {
32             Thread.sleep((long)(Math.random()*10000));
33
34             System.out.println("线程" + Thread.currentThread().getName() +
35                     "即将发布命令");
36             cdOrder.countDown();
37             System.out.println("线程" + Thread.currentThread().getName() +
38             "已发送命令,正在等待结果");
39             cdAnswer.await();
40             System.out.println("线程" + Thread.currentThread().getName() +
41             "已收到所有响应结果");
42         } catch (Exception e) {
43             e.printStackTrace();
44         }
45         service.shutdown();
46
47     }
48 }
Exchanger 数据交换
实现两个线程数据交换
 1 import java.util.concurrent.Exchanger;
 2 import java.util.concurrent.ExecutorService;
 3 import java.util.concurrent.Executors;
 4
 5 public class ExchangerTest {
 6
 7     @SuppressWarnings("rawtypes")
 8     public static void main(String[] args) {
 9         ExecutorService service = Executors.newCachedThreadPool();
10         final Exchanger exchanger = new Exchanger();
11         service.execute(new Runnable(){
12             @SuppressWarnings("unchecked")
13             public void run() {
14                 try {
15
16                     String data1 = "zxx";
17                     System.out.println("线程" + Thread.currentThread().getName() +
18                     "正在把数据" + data1 +"换出去");
19                     Thread.sleep((long)(Math.random()*10000));
20                     String data2 = (String)exchanger.exchange(data1);
21                     System.out.println("线程" + Thread.currentThread().getName() +
22                     "换回的数据为" + data2);
23                 }catch(Exception e){
24
25                 }
26             }
27         });
28         service.execute(new Runnable(){
29             @SuppressWarnings("unchecked")
30             public void run() {
31                 try {
32
33                     String data1 = "lhm";
34                     System.out.println("线程" + Thread.currentThread().getName() +
35                     "正在把数据" + data1 +"换出去");
36                     Thread.sleep((long)(Math.random()*10000));
37                     String data2 = (String)exchanger.exchange(data1);
38                     System.out.println("线程" + Thread.currentThread().getName() +
39                     "换回的数据为" + data2);
40                 }catch(Exception e){
41
42                 }
43             }
44         });
45     }
46 }
集合
java集合主要分Collection和Map两系,借图一张,原图地址 http://www.ntu.edu.sg/home/ehchua/programming/java/J5c_Collection.html。java集合框架命名非常规范,往往名称的前一个单词表示数据结构,后面的单词表示所属体系。
 、
、
Collection系的主要方法如下
- 添加
- boolean add(Object obj);
- boolean addAll(Collection coll);
- 删除
- boolean remove(Object obj);
- boolean remove(Collection coll);
- void clear(); //删除全部
- 判断
- boolean contains(Object obj);
- boolean containsAll(Collection coll);
- boolean isEmpty();
- 获取
- int size();
- Iterator iterator();
// 迭代器。取出集合中的元素,返回值是迭代器对象
该对象必须依赖于具体容器,因为每一个容器的数据结构不同
所以该迭代器对象是在容器中进行内部实现的
对于使用者而言,具体的实现不重要,只要通过容器获取到迭代器的对象即可
也就是iterator方法
Iterator接口就是所有Collection容器进行元素取出的公共接口
- 其他
- boolean retainAll(Collection coll); //取交集,和removeAll的区别
List特有方法
- 添加
- void add(index,element);
- void add(index,collection);
- 删除
- Object remove(index);
- 修改
- Object set(index,element);
- 获取
- Object get(index);
- int indexOf(object);
- int lastIndexof(object);
- List subList(from,to);//包含头不包含尾
llist元素可重复。Set元素唯一,最多只能有一个null。这个重复指的是不存在equals相等的
Map
map也有人称双列集合,存储键值对,且必须保证键唯一,这一点被HashSet巧妙的利用了。
都知道HashSet为了就是使用的HashMap实现,且只使用了HashMap的key这一列,至于value所有的HashSet成员添加到map中后都指向了同一个value,这个value也是HashSet的静态常成员。
Map常用的API主要有
- 添加
- oldValue put(key,newValue);
- 删除
- void clear(); //清空map集合
- value remove(key);根据指定的key删除键值对
- 判断
- boolean containsKey(key);
- boolean containsValue(value);
- 获取
- value get(key);通过键获取值,如果没有该键返回null
- int size(); 获取键值对个数
IO处理
IO按流的方向可分为输入输出流,按数据处理方式可分为字节流和字符流。
JAVA IO体系首先可按数据处理方式分为两个子体系
字符流 Reader & Writer
字符流可看做字节流和编码表结合的产物,在FileReader源码中也可看到它借助了字节流实现。
字节流 InputStream & OutputStream
字节流可以处理所有的数据类型。
IO操作的对象主要是下面四种
磁盘-输入输出可以是File
键盘-通过System.in可以操作
内存-数组或者对象
网络-Socket流
IO常用的装饰类
字符流 1、BufferedReader 2、BufferedWriter
字节流 1、BufferedInputStream 2、BufferedOutputStream
IO常用的桥梁类
InputSteramReader: 字节流到字符流的桥梁。解码
OutputStreamWriter: 字符流到字节流的桥梁。编码
网络
组成网络的核心为ISO/OSI七层模型。
- 物理层
- USB
- 数据链路层
- IEEE 802.5/ 802.2, IEEE 802.3/802.2 ,IEEE 802.11 (WiFi)等
- 网络层
- IPV4,IPV6,ICMP(Internet Control Message Protocol),IGMP(Internet Group Management Protocol) 等
- 介乎网络层与数据链路层之间的 ARP(Address Resolution Protocol),RARP(Reverse Address Resolution Protocol)等
- 传输层
- TCP(Transmission Control Protocol),UDP(User Datagram Protocol)等
- 会话层
- SOCKS(SOCKetS),NFS( Network File System)等
- 表示层
- JPEG,MP3等
- 应用层
- HTTP(Hypertext Transfer Protocol),HTTPS (Hypertext Transfer Protocol Secure),Telnet(a remote terminal access protocol),SSH(Secure Shell),SMTP(Simple Mail Transfer Protocol),POP3(Post Office Protocol Version 3),IMAP(Internet Message Access Protocol),NTP(Network Time Protocol),DHCP(Dynamic Host Configuration Protocol)等
一般确定了协议、地址、端口就可确定一个网络行为。
地址一般为IP地址
IP地址
分类编址方式
按最基本的分类编址方式可分为5类,图片摘自这里

其中前三类为单播地址,一对一通信,D类为多播地址可以一对多通信
当网络号和主机号出现全0或全1等等情况还可组成一些特殊的IP地址,下面是三个比较特殊的IP地址
- 127.0.0.1 也叫环回地址,代表本机,我曾试着去掉hosts主机静态表中的dns localhsot A记录,但是发现localhost依然被解析到127.0.0.1
- 0.0.0.0 代表着一个集合,表示任何一个无法被路由指定的地址,也就是说你向一台主机发送数据,但路由不到这个主机对应的端口,这是数据会发给0.0.0.0。换言之,127.0.0.1 只能监听本地的网络请求,而0.0.0.0不光可以监听本机,还可监听外部访问。有时我们用SSH连接不到服务器,可服务器明明开了SSH service,这个时候如果用netstat -nl 可以看到 22端口监听的IP只有127.0.0.1 而没有0.0.0.0:22,亦或者有些数据库只能在本机访问,而不能在外部访问,也是一样的。
- 255.255.255.255 限制广播地址 它不被路由发送,但会被送到相同物理段上的所有主机
IP的另外一种编址方式
子网划分
众所周知,上面的分类的IP只有两级,依然不能满足如今庞大的计算机群,
子网的划分在主机号的高位拿出一部分来,作为子网号,对外部网络而言,它依然表现为以前分类IP中的一个网络。
也就是 网络号+子网号+主机号
当一个要发送到一个IP比如 141.14.72.24 ,这个时候需要先得到这个IP的子网网络地址,需要结合子网掩码255.255.192.0进行二进制&,那么就会得到 145.14.64.0,这个代表了一个子网的网络地址。
A类地址的默认子网掩码 255.0.0.0
B类地址的默认子网掩码 255.255.0.0
C类地址的默认子网掩码 255.255.255.0
子网划分的个数取决于子网号的位数,也就四子网掩码中除去与网络号对应的连续为1的位数,比如对一个B类地址使用掩码255.255.192.0,除去B类IP的网络号对应的1,也就是前面的255.255,剩下192,192转换成二进制恰好为11000000刚好两位为1,则子网数则为 2^2-2,为什么减去2,是因为要排除全0或全1的情况,身下的只有128和64了,也就是对于网络号145.14而言,如果使用子网掩码255.255.192.0,则可以划分子网2个,分别是145.14.64.0和145.14.128.0
无分类地址CIDR
最后一种IP编址方式为无分类地址CIDR
这种方式回到2级模式,将IP分成两个部分,网络前缀+主机号,前者表示网络,后者表示主机。更第一种分类方法很相似,但这却是没有进行分类的两级偏址。
CIDR使用 IP/前缀位数 的方式描述IP,前缀数一般也表示了子网掩码为连续多少个1,比如
128.14.32.0/20
表示掩码为连续20个1+12个0,也就是255.255.240.0
端口
针对运输层而言,个人把它认为需要跟外部通信的程序的另一个进程ID,应为像windows PID这样的进程ID是随机的,而端口一般都是有默认的,所以可以通过端口将数据指明交给主机的哪个进程处理。这是我认为端口的意义
TCP/IP层用16Bit表示一个端口号,也就是0-65535,其中
- 0-1023 : 称为系统端口号,这些端口号被一些TCP/IP层重要的程序占用,当然也有些因出现的比较早也占用了这里面的端口的游戏-毁灭战士游戏
- 1024-49151:称为登记端口号,这类端口使用比较宽松,我们开发也一般选这里面的端口使用
- 49152-65535:又叫短暂端口号,该段端口属于“动态端口”范围,没有端口可以被正式地注册占用,这里面的端口号一般用在客户端与服务端临时通信中,通信之前客户端告诉服务端这个临时分配的端口,然后服务端将数据发往这个端口,通信完后这个端口就会被释放。
Java的位于传输层的网络
主要基于Socket
基于TCP协议的java网络
主要分下面几个过程
客户端:
- 创建tcp客户端socket服务,使用Socket对象
- 如果连接建立成功,说明数据传输通道建立
- 使用输出流,将数据写出
- 关闭资源
1 Socket sk = new Socket(InetAddress.getByName("127.0.0.1"),10000);
2 OutputStream out = sk.getOutputStream();
3 out.write("nihao".getBytes());
4 sk.close();
服务端:
- 创建服务端socket 服务,通过ServerSocket对象
- 服务端必须对外提供一个端口,否则客户端无法连接
- 拿到客户端的socket对象
- 使用该对象获得流读取客户端发来的数据
- 关闭资源(要关两个,服务端,客户端)
1 ServerSocket ss = new ServerSocket(10000);
2 Socket sk  = ss.accept();
3 InputStream in = sk.getInputStream();
4 byte [] buf = new byte[1024];
5 int len = in.read(buf);
6 String str = new String(buf,0,len);
7 System.out.println(sk.getInetAddress()+":"+str);
8 sk.close();
9 ss.close();
基于UDP协议
发送端
- 建立udp的socket服务。
- 将要发送的数据封装到数据包中
- 通过udp的socket服务奖数据包发送出去
- 关闭socket服务
 1 //    1、udpsocket服务,使用DatagramSocket
 2 DatagramSocket ds = new DatagramSocket();
 3
 4 //    2、装数据包
 5 String str = "12334234";
 6 DatagramPacket dp = new DatagramPacket(str.getBytes(), str.length(), InetAddress.getByName("127.0.0.1"), 10000);
 7
 8 //    3、将数据包发送出去
 9
10 ds.send(dp);
11
12 ds.close();
接收端
- 建立udp socket服务
- 准备数据包,方便用数据包的方法解析数据
- 接受发送端传过来的数据包
- 通过数据包的方法解析数据包中的数据
- 关闭socket服务
 1 DatagramSocket ds = new DatagramSocket(10000);
 2
 3 byte [] buf  = new byte[1024];
 4 DatagramPacket dp = new DatagramPacket(buf, buf.length);
 5
 6 ds.receive(dp);
 7
 8 String data = new String(dp.getData(),0,dp.getLength());
 9 String ip = dp.getAddress().getHostAddress();
10 int port = dp.getPort();
11 System.out.println(ip+".."+data+".."+port);
12
13 ds.close();
至于应用层的一些网络操作如HttpURLConnection就不再赘述
反射
反射在web开发中无处不见,但像我这种层次的人,写过的反射确实不多,记得以前学反射,还拿着跟设计模式结合,顿时觉得反射技术相当强大
反射专业的解释是在程序运行时动态访问、检测和修改程序状态和行为的能力。一般而言,反射就是将一些有特殊含义的字符串,比如类名或者方法名,或者代码块。转换成相应的引用或者调用。java反射一般是基于一个类文件,动态加载字节码文件实例化对象,并访问这个对象的属性或方法
 1 import java.lang.reflect.Constructor;
 2 import java.lang.reflect.Field;
 3 import java.lang.reflect.InvocationTargetException;
 4 import java.lang.reflect.Method;
 5
 6 public class ReflectDemo {
 7     private String name = null;
 8     private int num = 0;
 9
10     public ReflectDemo() {
11     }
12
13     public ReflectDemo(String str, int num) {
14         System.out.println(str + "..." + num);
15     }
16
17     public static void main(String[] args) throws ClassNotFoundException, InstantiationException, IllegalAccessException, NoSuchMethodException, SecurityException, IllegalArgumentException, InvocationTargetException, Exception {
18         getMethodDemo();
19     }
20
21     public static void getMethodDemo() throws Exception {
22         String className = "dj.reflect.demo.ReflectDemo";
23         Class clazz = Class.forName(className);
24         Method[] methods = clazz.getMethods();
25         Method[] var6 = methods;
26         int var5 = methods.length;
27
28         Method method;
29         for(int var4 = 0; var4 < var5; ++var4) {
30             method = var6[var4];
31             System.out.println(method);
32         }
33
34         method = clazz.getMethod("createNewObject", (Class[])null);
35         System.out.println(method);
36     }
37
38     public static void getFieldsDemo() throws ClassNotFoundException, NoSuchFieldException, SecurityException, Exception, IllegalAccessException {
39         String className = "dj.reflect.demo.ReflectDemo";
40         Class clazz = Class.forName(className);
41         Field field = null;
42         field = clazz.getDeclaredField("name");
43         Object obj = clazz.newInstance();
44         Object fobj = field.get(obj);
45         System.out.println(fobj);
46     }
47
48     public static void createNewObject() throws ClassNotFoundException, InstantiationException, IllegalAccessException, NoSuchMethodException, SecurityException, IllegalArgumentException, InvocationTargetException {
49         new ReflectDemo();
50         String className = "dj.reflect.demo.ReflectDemo";
51         Class clazz = Class.forName(className);
52         Object obj = clazz.newInstance();
53         Constructor con = clazz.getConstructor(new Class[]{String.class, Integer.TYPE});
54         con.newInstance(new Object[]{"sads", Integer.valueOf(23)});
55         Constructor[] cons = clazz.getConstructors();
56     }
57 }
另外下面两个小程序是关于反射的应用实例
先整理这么多了,上面的代码有的是以前写的,有的是为了这篇博客临时写的,基于的环境是jdk1.8 ,目测博客园net程序员居多,可能不会有多少人有兴趣。剩下的大概就是复习Java一些常用的API了。