2017年对人工智能和加密货币来说是重要的一年, 我们见证了许多新的研究进展和突破。毋庸置疑,人工智能是当今甚至今后很长一段时间内最令人瞩目的技术之一。 而加密货币在这一年中的热度之高是我所没有预料到的,这是加密货币的一波大牛市,投资加密货币(例如,如比特币,以太币,莱特币,瑞波币等)的资回报率几近疯狂。
我从2017年初开始深入研究机器学习的相关技术。如同其他机器学习专家和爱好者一样,我也认为把这些技术应用于加密货币市场是非常具有吸引力的。把机器学习和深度学习中的模型通过各种方法运用到证券市场或加密货币市场的研究是非常有趣的。
我认为构建单点预测模型来探索深度学习在时间序列数据(如,证券价格数据)的应用是一个不错的入手方法。 当然这只是刚刚起步,还有许多可以改进的空间。 我目前正在尝试使用深度强化学习来进行程序化交易。但是,学习使用长短期记忆网络(LSTM – Long Short-Term Memory)并构建一个良好的预测模型则是第一步。
先决条件和开发环境
在开始下面的内容之前,你可能需要掌握Python的基本编程技巧,机器学习的基础知识,特别是和深度学习相关的知识。 如果你还不具备这些知识,建议先浏览这篇文章。
我选择的开发环境是谷歌的Colab。因为其环境设置的易操作性,并且有着免费的GPU资源,这对训练时间有着很大的帮助。 这里有一个
有关如何在Google云盘中设置和使用Colab的教程。 你也可以在GitHub上找到我自己写的关于Colab的笔记。
如果你希望使用AWS环境,我还写了一篇关于如何在GPU上使用Docker设置AWS实例的教程。 这是教程的链接。
什么是循环神经网络(RNN)?
为了解释循环神经网络,我们先来看看一个简单的例子,这是只有一层隐藏层的感知器网络。 这样的网络能够胜任简单的分类问题。 通过添加更多隐藏层,网络将能够推断更复杂数据模式,并增加预测的准确性。但是,这种类型的网络只能够对于时序无关的数据做很好的分类。例如训练中的先前样本的图像分类不会影响下一个样本的分析。 换句话说,感知器是没有记忆的。专为图像识别而设计的卷积神经网络来说也是一样的。
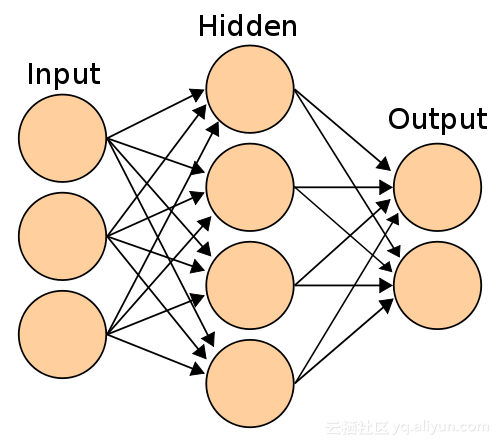
具有一个隐藏层和两个输出的简单感知器神经网络
而循环神经网络则是用来解决那些数据与时序相关的问题。它通过把前一个隐藏状态中的输出,循环输入到感知器中,作为当前的输入一起进入网络进行处理。
具体来说,每次有新样本的作为网络的输入时,网络并不具备记忆上一步处理的数据。要解决处理时序相关数据的问题,一种方法就是把上一步的输入样本和当前这步的输入样本一并输入到网络中,这样我们的网络就能获知之前发生的情况了。但是,这种方式仍然不能获知所有之前发生的情况。这样我们就想到了一个更好的方法,那就是把之前得到的隐藏层结果(隐藏层的权重矩阵)作为当前输入样本来反馈到网络中。
我将隐藏层的权重矩阵看作神经网络的思考过程的一个状态,这样隐藏层已经以权重分布的形式记住了之前步骤的神经元中的数据。下图展示了循环神经网络的处理过程。
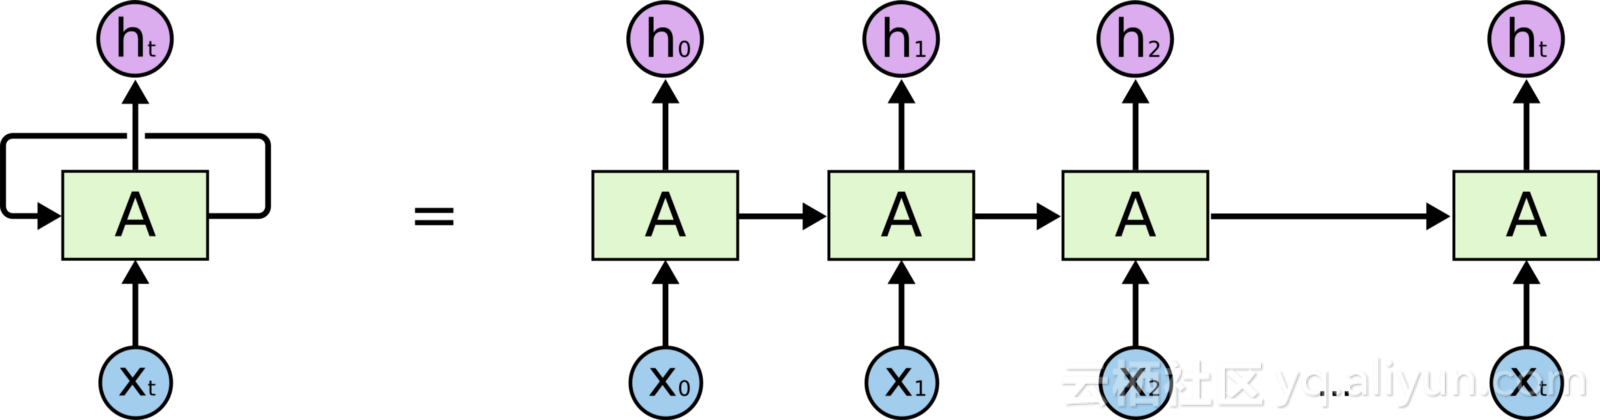
当Xt进入时,来自Xt-1的隐藏状态将与Xt共同成为在时间t时的输入,进入网络。 这个过程将按照时间顺序对每个样本重复进行。
以上是对循环神经网络原理的介绍。这里是其他关于循环神经网络的一些资源,我强烈建议你能对它们进行阅读:
- Introduction to RNNs (循环神经网络简介)
- Recurrent Neural Networks for Beginners (循环神经网络入门)
- The Unreasonable Effectiveness of Recurrent Neural Networks (高效的循环神经网络)
什么是长短期记忆网络(LSTM)
在开始了解LSTM之前,让我们先看看循环神经网络最大的问题。 目前为止,神经网络的训练看起来都不错,直到涉及到反向传播。 随着我们训练样本的梯度在网络中的反向传播,它变得越来越弱,直到它们到那些更老的数据点时,已经无法正确的进行调整了。 这就是梯度消失(Vanishing Gradient)。 LSTM是一种存储过往重要信息的一类循环神经网络。 这样,当梯度进行反向传播时,它将不会被不必要的信息干扰。
比如我们在阅读一本书时,往往会忘记前一章所讲的内容,不一定能记住所有的要点。为了解决这个问题,我们摘录并记下这些问题的要点,同时忽略那些过于细节并且和主题关联度不高的内容。Christopher Olah的理解LSTM网络深入解释了其中的原理。
首先让我们开始导入需要的库
import gc
import datetime
import pandas as pd
import numpy as np
import matplotlib.pyplot as plt

import keras
from keras.models import Sequential
from keras.layers import Activation, Dense
from keras.layers import LSTM
from keras.layers import Dropout
这里,我使用了www.coinmarketcap.com的历史数据,当然你也可以使用任何其他资源,只是我觉得使用它非常顺手。 从中我们可以获得比特币的每日价格数据。 我还在Colab笔记里添加了关于以太币价格的代码,这是为了让我的代码能够重用于其他加密货币。下面就是如何获取市场数据的函数。
def get_market_data(market, tag=True):
  """
  market: the full name of the cryptocurrency as spelled on coinmarketcap.com. eg.: 'bitcoin'
  tag: eg.: 'btc', if provided it will add a tag to the name of every column.
  returns: panda DataFrame
  This function will use the coinmarketcap.com url for provided coin/token page.
  Reads the OHLCV and Market Cap.
  Converts the date format to be readable.
  Makes sure that the data is consistant by converting non_numeric values to a number very close to 0.
  And finally tags each columns if provided.
  """
  market_data = pd.read_html("https://coinmarketcap.com/currencies/" + market +
                             "/historical-data/?start=20130428&end="+time.strftime("%Y%m%d"), flavor='html5lib')[0]
  market_data = market_data.assign(Date=pd.to_datetime(market_data['Date']))
  market_data['Volume'] = (pd.to_numeric(market_data['Volume'], errors='coerce').fillna(0))
  if tag:
    market_data.columns = [market_data.columns[0]] + [tag + '_' + i for i in market_data.columns[1:]]
return market_databtc_data = get_market_data("bitcoin", tag='btc')
btc_data.head()
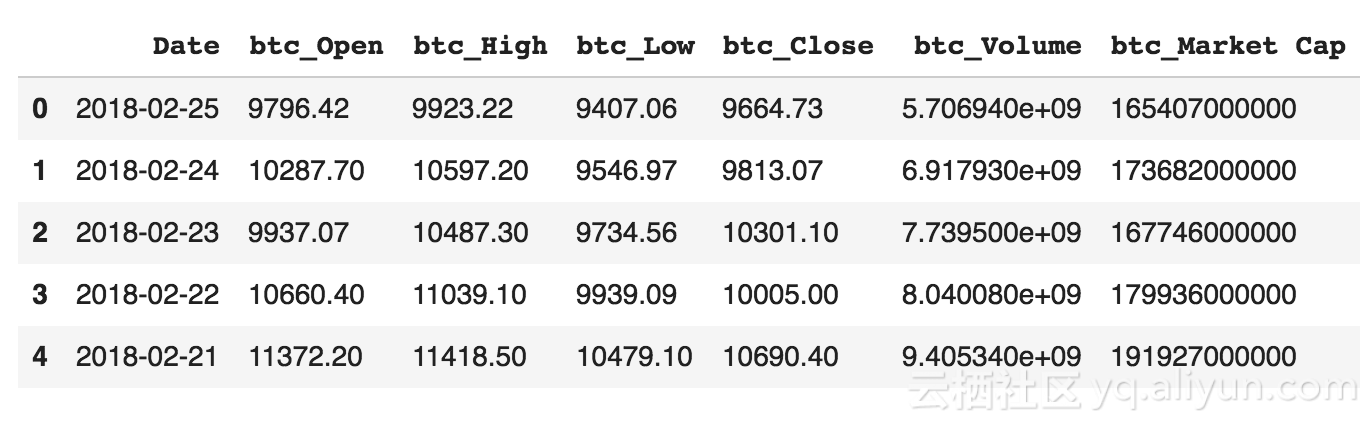
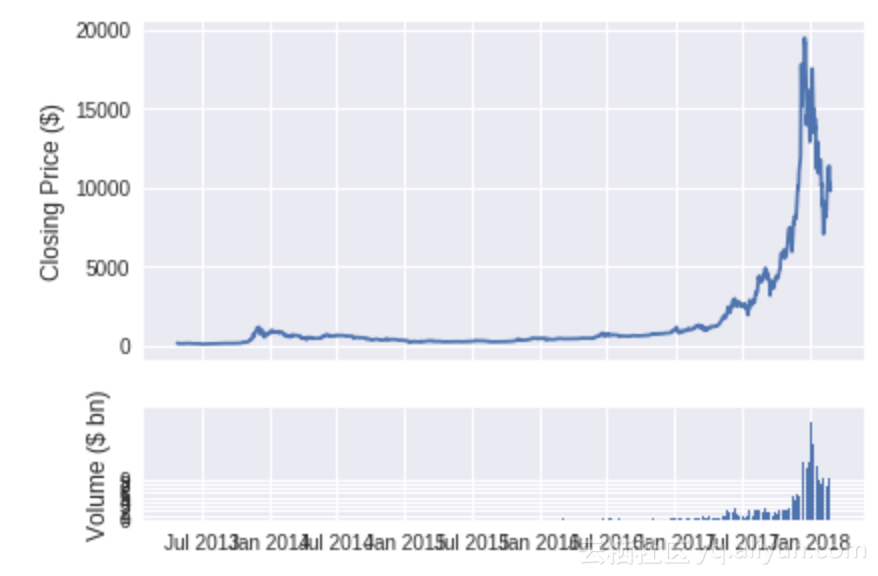
比特币市场数据
让我们来看看比特币的收盘价以及随着时间推移的日交易量。
show_plot(btc_data, tag='BTC')
数据准备
构建任何深度学习模型的很大一部分是工作是准备数据,这些数据将被神经网络用于训练或预测。 这一步我们称其为预处理,其中根据我们使用数据的类型,可能包括多个步骤。 在此,我们将要做以下这些预处理:
- 数据清理,填充缺失的数据点
- 合并不同的数据,把比特币和以太币的数据放在一个数据框架下
- 去除不必要的数据列
- 对数据根据日期进行升序排序
- 分离出训练样本和测试样本数据
- 创建输入样本并对其进行0和1的范式化
- 创建训练样本和测试样本集的目标输出,并对其进行0和1的范式化
- 将数据转换为 Numpy 数组以供模型使用
数据清理部分已经在我们加载数据时中完成了。 在下面的代码中,你可以找到相关的必要功能:
def merge_data(a, b, from_date=merge_date):
  """
  a: first DataFrame
  b: second DataFrame
  from_date: includes the data from the provided date and drops the any data before that date.
  returns merged data as Pandas DataFrame
  """
  merged_data = pd.merge(a, b, on=['Date'])
  merged_data = merged_data[merged_data['Date'] >= from_date]
  return merged_data


def add_volatility(data, coins=['BTC', 'ETH']):
  """
  data: input data, pandas DataFrame
  coins: default is for 'btc and 'eth'. It could be changed as needed
  This function calculates the volatility and close_off_high of each given coin in 24 hours,
  and adds the result as new columns to the DataFrame.
  Return: DataFrame with added columns
  """
  for coin in coins:
    # calculate the daily change
    kwargs = {coin + '_change': lambda x: (x[coin + '_Close'] - x[coin + '_Open']) / x[coin + '_Open'],
             coin + '_close_off_high': lambda x: 2*(x[coin + '_High'] - x[coin + '_Close']) / (x[coin + '_High'] - x[coin + '_Low']) - 1,
             coin + '_volatility': lambda x: (x[coin + '_High'] - x[coin + '_Low']) / (x[coin + '_Open'])}
    data = data.assign(**kwargs)
  return data


def create_model_data(data):
  """
  data: pandas DataFrame
  This function drops unnecessary columns and reverses the order of DataFrame based on decending dates.
  Return: pandas DataFrame
  """
  #data = data[['Date']+[coin+metric for coin in ['btc_', 'eth_'] for metric in ['Close','Volume','close_off_high','volatility']]]
  data = data[['Date']+[coin+metric for coin in ['BTC_', 'ETH_'] for metric in ['Close','Volume']]]
  data = data.sort_values(by='Date')
  return data


def split_data(data, training_size=0.8):
  """
  data: Pandas Dataframe
  training_size: proportion of the data to be used for training
  This function splits the data into training_set and test_set based on the given training_size
  Return: train_set and test_set as pandas DataFrame
  """
  return data[:int(training_size*len(data))], data[int(training_size*len(data)):]


def create_inputs(data, coins=['BTC', 'ETH'], window_len=window_len):
  """
  data: pandas DataFrame, this could be either training_set or test_set
  coins: coin datas which will be used as the input. Default is 'btc', 'eth'
  window_len: is an intiger to be used as the look back window for creating a single input sample.
  This function will create input array X from the given dataset and will normalize 'Close' and 'Volume' between 0 and 1
  Return: X, the input for our model as a python list which later needs to be converted to numpy array.
  """
  norm_cols = [coin + metric for coin in coins for metric in ['_Close', '_Volume']]
  inputs = []
  for i in range(len(data) - window_len):
    temp_set = data[i:(i + window_len)].copy()
    inputs.append(temp_set)
    for col in norm_cols:
      inputs[i].loc[:, col] = inputs[i].loc[:, col] / inputs[i].loc[:, col].iloc[0] - 1
  return inputs


def create_outputs(data, coin, window_len=window_len):
  """
  data: pandas DataFrame, this could be either training_set or test_set
  coin: the target coin in which we need to create the output labels for
  window_len: is an intiger to be used as the look back window for creating a single input sample.
  This function will create the labels array for our training and validation and normalize it between 0 and 1
  Return: Normalized numpy array for 'Close' prices of the given coin
  """
  return (data[coin + '_Close'][window_len:].values / data[coin + '_Close'][:-window_len].values) - 1


def to_array(data):
  """
  data: DataFrame
  This function will convert list of inputs to a numpy array
  Return: numpy array
  """
  x = [np.array(data[i]) for i in range (len(data))]
  return np.array(x)
train_set = train_set.drop('Date', 1)
test_set = test_set.drop('Date', 1)
X_train = create_inputs(train_set)
Y_train_btc = create_outputs(train_set, coin='BTC')
X_test = create_inputs(test_set)
Y_test_btc = create_outputs(test_set, coin='BTC')
Y_train_eth = create_outputs(train_set, coin='ETH')
Y_test_eth = create_outputs(test_set, coin='ETH')
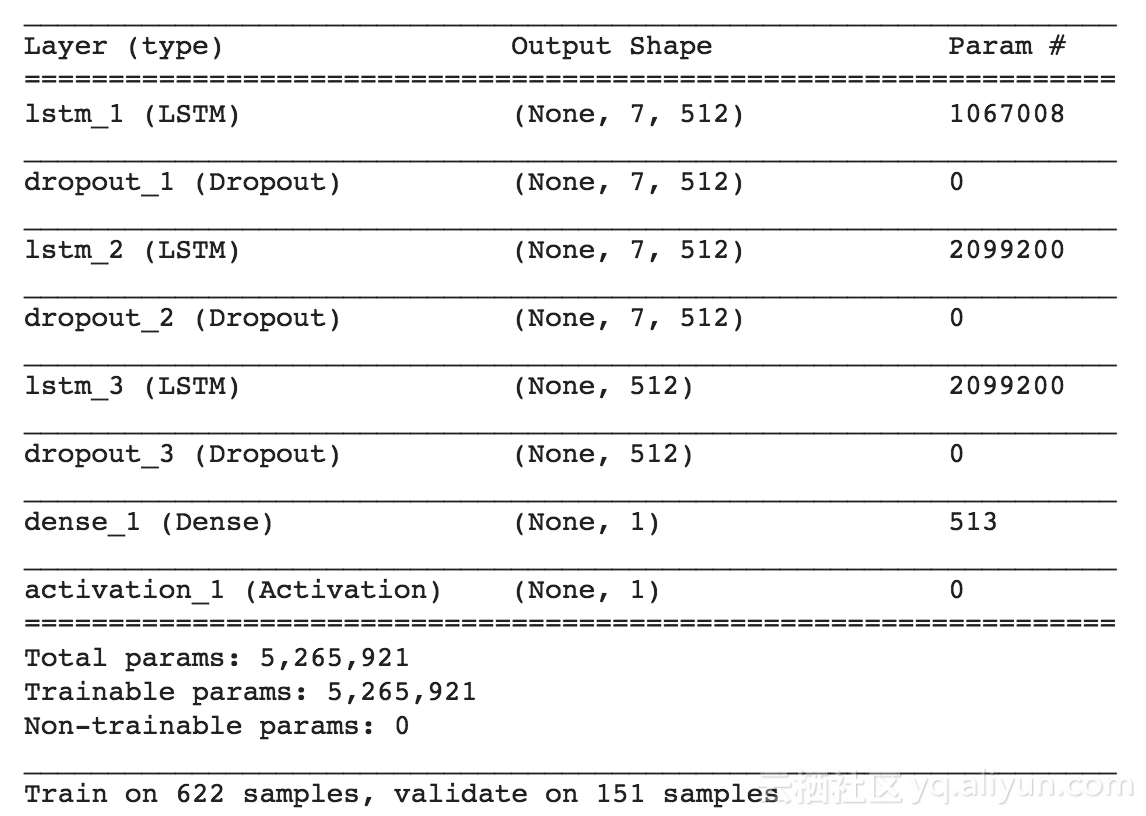
X_train, X_test = to_array(X_train), to_array(X_test)现在我们来构建LSTM-RNN模型。 在这个模型中,我使用了三层LSTM层,每层512个神经元,每层LSTM之后设置了 0.25 的Dropout,以防止过拟合。最后是全链接层来进行输出。
def build_model(inputs, output_size, neurons, activ_func=activation_function, dropout=dropout, loss=loss, optimizer=optimizer):
  """
  inputs: input data as numpy array
  output_size: number of predictions per input sample
  neurons: number of neurons/ units in the LSTM layer
  active_func: Activation function to be used in LSTM layers and Dense layer
  dropout: dropout ration, default is 0.25
  loss: loss function for calculating the gradient
  optimizer: type of optimizer to backpropagate the gradient
  This function will build 3 layered RNN model with LSTM cells with dripouts after each LSTM layer
  and finally a dense layer to produce the output using keras' sequential model.
  Return: Keras sequential model and model summary
  """
  model = Sequential()
  model.add(LSTM(neurons, return_sequences=True, input_shape=(inputs.shape[1], inputs.shape[2]), activation=activ_func))
  model.add(Dropout(dropout))
  model.add(LSTM(neurons, return_sequences=True, activation=activ_func))
  model.add(Dropout(dropout))
  model.add(LSTM(neurons, activation=activ_func))
  model.add(Dropout(dropout))
  model.add(Dense(units=output_size))
  model.add(Activation(activ_func))
  model.compile(loss=loss, optimizer=optimizer, metrics=['mae'])
  model.summary()
  return model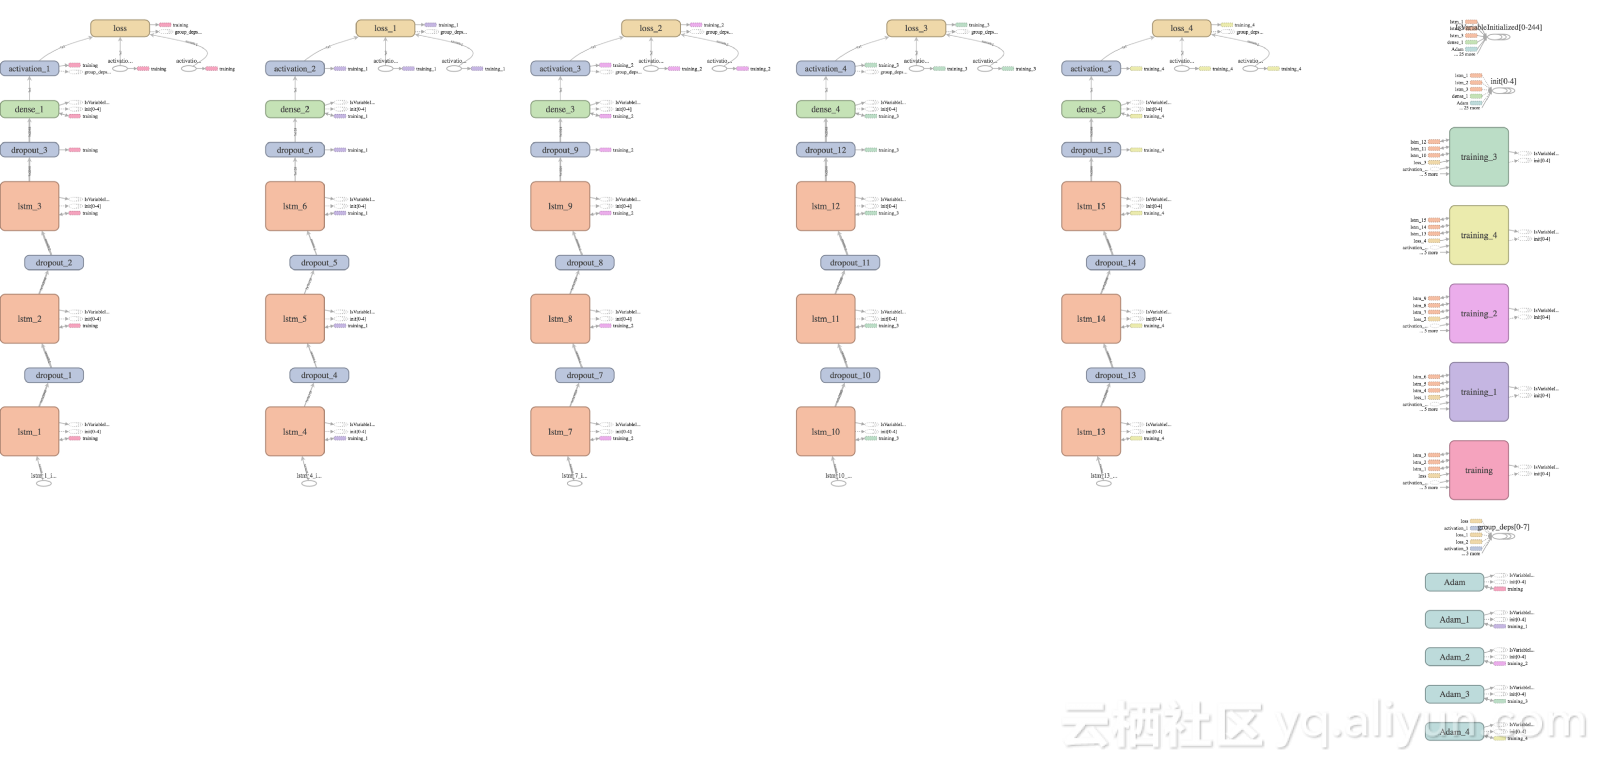
TensorBoard导出的TensorFlow 计算图
我用'tanh'作为激活函数,均方误差作为损失和'adam'作为优化者。 你也可以试试不同的设置选项,看看它们如何影响模型的性能。
这是该模型的概述:
我代码的开始部分已经声明了超参数,这样对于不同情况的调参比较方便一点。这是我设的超参数:
neurons = 512
activation_function = 'tanh'
loss = 'mse'
optimizer="adam"
dropout = 0.25
batch_size = 12
epochs = 53
window_len = 7
training_size = 0.8
# clean up the memory
gc.collect()
# random seed for reproducibility
np.random.seed(202)
# initialise model architecture
btc_model = build_model(X_train, output_size=1, neurons=neurons)
# train model on data
btc_history = btc_model.fit(X_train, Y_train_btc, epochs=epochs, batch_size=batch_size, verbose=1, validation_data=(X_test, Y_test_btc), shuffle=False)
根据你机器的性能,上述代码可能需要一段时间完成。一旦程序运行结束,你的训练模型也就完成了:)
我们来看看BTC和ETH的结果
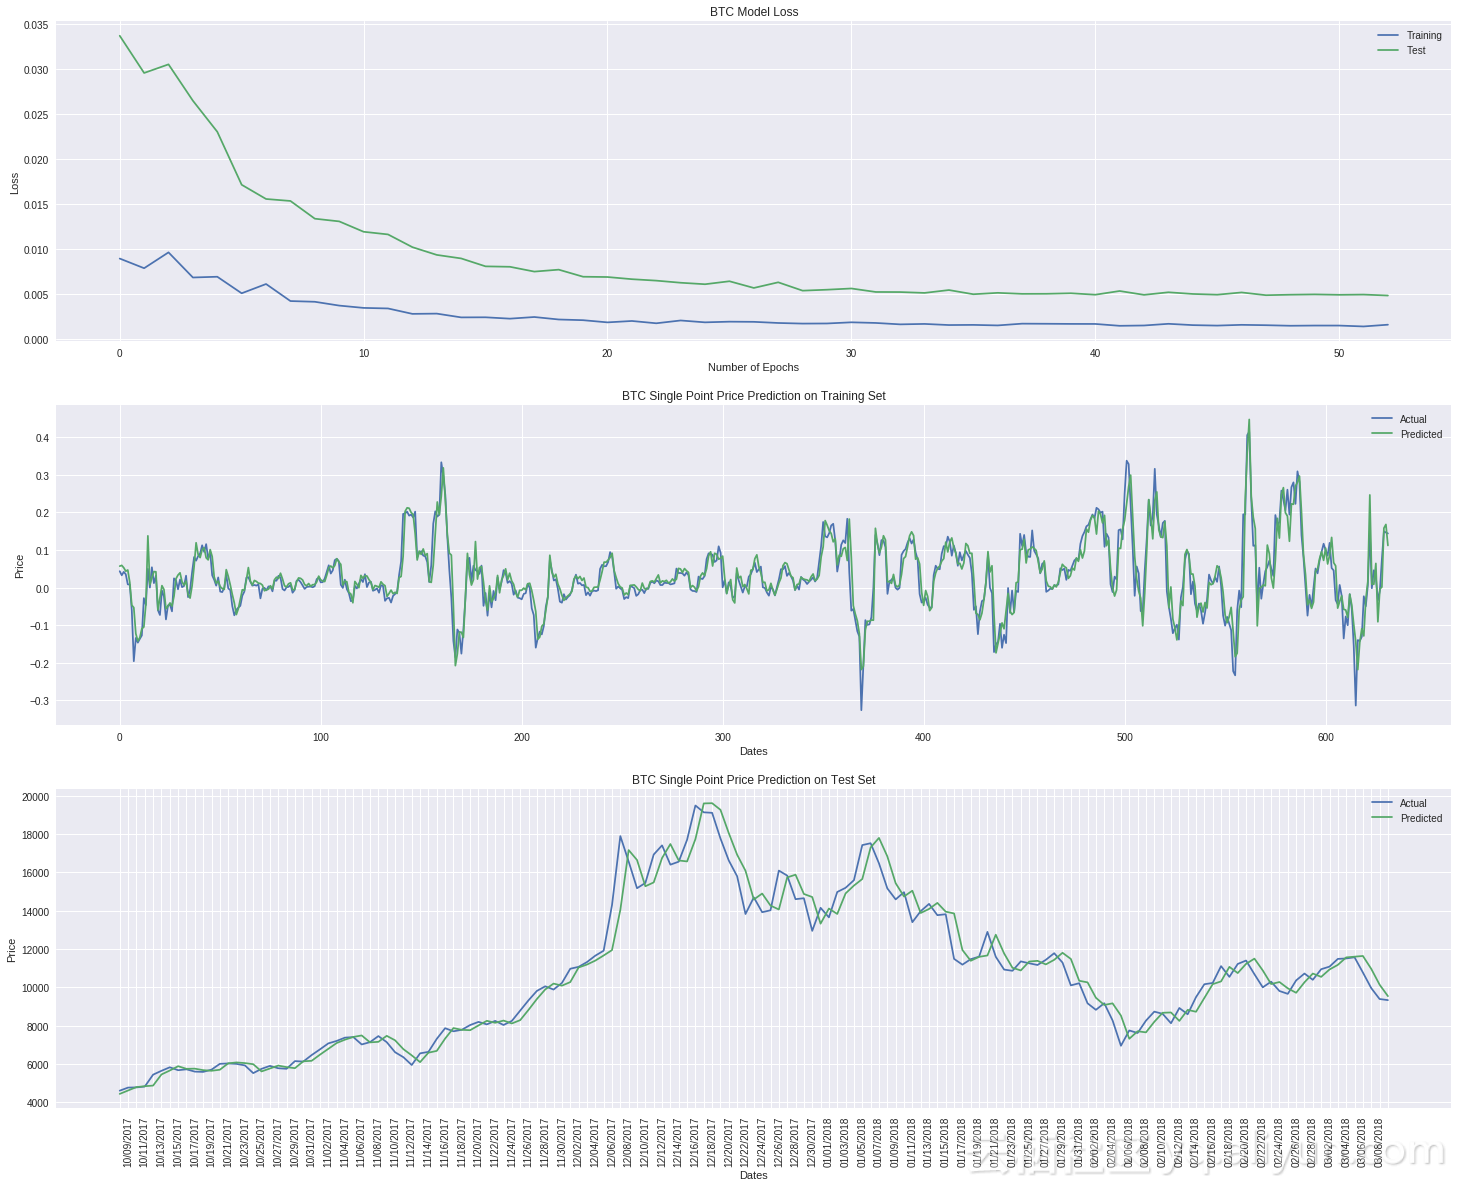
结果看来还不错 :)
这是David Sheehan写的一篇很棒的关于如何使用LSTM进行加密货币价格预测的博客文章。希望你也能像我一样从中收益!
以上为译文。
本文由北邮@爱可可-爱生活 老师推荐,阿里云云栖社区组织翻译。
文章原标题《How to predict Bitcoin and Ethereum price with RNN-LSTM in Keras》
作者:Siavash Fahimi
译者:friday012,审校:。
文章为简译,更为详细的内容,请查看原文。