一、了解WAF
1.1 什么是WAF
Web应用防护系统(也称:网站应用级入侵防御系统 。英文:Web Application Firewall,简称: WAF)。利用国际上公认的一种说法:Web应用 防火墙 是通过执行一系列针对HTTP/HTTPS的 安全策略 来专门为Web应用提供保护的一款产品。
1.2 WAF的功能
-
支持IP白名单和黑名单功能,直接将黑名单的IP访问拒绝。
-
支持URL白名单,将不需要过滤的URL进行定义。
-
支持User-Agent的过滤,匹配自定义规则中的条目,然后进行处理(返回403)。
-
支持CC攻击防护,单个URL指定时间的访问次数,超过设定值,直接返回403。
-
支持Cookie过滤,匹配自定义规则中的条目,然后进行处理(返回403)。
-
支持URL过滤,匹配自定义规则中的条目,如果用户请求的URL包含这些,返回403。
-
支持URL参数过滤,原理同上。
-
支持日志记录,将所有拒绝的操作,记录到日志中去
1.3 WAF的特点
-
异常检测协议
Web应用防火墙会对HTTP的请求进行异常检测,拒绝不符合HTTP标准的请求。并且,它也可以只允许HTTP协议的部分选项通过,从而减少攻击的影响范围。甚至,一些Web应用防火墙还可以严格限定HTTP协议中那些过于松散或未被完全制定的选项。
-
增强的输入验证
增强输入验证,可以有效防止网页篡改、信息泄露、木马植入等恶意网络入侵行为。从而减小Web服务器被攻击的可能性。 -
及时补丁
修补Web安全漏洞,是Web应用开发者最头痛的问题,没人会知道下一秒有什么样的漏洞出现,会为Web应用带来什么样的危害。WAF可以为我们做这项工作了——只要有全面的漏洞信息WAF能在不到一个小时的时间内屏蔽掉这个漏洞。当然,这种屏蔽掉漏洞的方式不是非常完美的,并且没有安装对应的补丁本身就是一种安全威胁,但我们在没有选择的情况下,任何保护措施都比没有保护措施更好。 -
基于规则的保护和基于异常的保护
基于规则的保护可以提供各种Web应用的安全规则,WAF生产商会维护这个规则库,并时时为其更新。用户可以按照这些规则对应用进行全方面检测。还有的产品可以基于合法应用数据建立模型,并以此为依据判断应用数据的异常。但这需要对用户企业的应用具有十分透彻的了解才可能做到,可现实中这是十分困难的一件事情。 -
状态管理
WAF能够判断用户是否是第一次访问并且将请求重定向到默认登录页面并且记录事件。通过检测用户的整个操作行为我们可以更容易识别攻击。状态管理模式还能检测出异常事件(比如登陆失败),并且在达到极限值时进行处理。这对暴力攻击的识别和响应是十分有利的。 -
其他防护技术
WAF还有一些安全增强的功能,可以用来解决WEB程序员过分信任输入数据带来的问题。比如:隐藏表单域保护、抗入侵规避技术、响应监视和信息泄露保护。
1.3WAF与网络防火墙的区别
网络防火墙作为访问控制设备,主要工作在OSI模型三、四层,基于IP报文进行检测。只是对端口做限制,对TCP协议做封堵。其产品设计无需理解HTTP会话,也就决定了无法理解Web应用程序语言如HTML、SQL语言。因此,它不可能对HTTP通讯进行输入验证或攻击规则分析。针对Web网站的恶意攻击绝大部分都将封装为HTTP请求,从80或443端口顺利通过防火墙检测。
一些定位比较综合、提供丰富功能的防火墙,也具备一定程度的应用层防御能力,如能根据TCP会话异常性及攻击特征阻止网络层的攻击,通过IP分拆和组合也能判断是否有攻击隐藏在多个数据包中,但从根本上说他仍然无法理解HTTP会话,难以应对如SQL注入、跨站脚本、cookie窃取、网页篡改等应用层攻击。
web应用防火墙能在应用层理解分析HTTP会话,因此能有效的防止各类应用层攻击,同时他向下兼容,具备网络防火墙的功能。
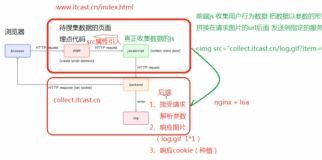
二、使用nginx配置简单实现403和404
2.1 小试身手之rerurn 403
修改nginx配置文件在server中加入以下内容
set $block_user_agent 0; if ( $http_user_agent ~ "Wget|AgentBench"){ set $block_user_agent 1; } if ($block_user_agent = 1) { return 403 ; }
通过其他机器去wget,结果如下 
2.2小试身手之rerurn 404
在nginx配置文件中加入如下内容,让访问sql|bak|zip|tgz|tar.gz的请求返回404
location ~* "\.(sql|bak|zip|tgz|tar.gz)$"{ return 404 }
在网站根目录下放一个tar.gz
[root@iZ28t900vpcZ www]# tar zcvf abc.tar.gz wp-content/
通过浏览器访问结果如下,404已生效 
三、深入实现WAF
3.1 WAF实现规划
分析步骤如下:解析HTTP请求==》匹配规则==》防御动作==》记录日志
具体实现如下:
-
解析http请求:协议解析模块
-
匹配规则:规则检测模块,匹配规则库
-
防御动作:return 403 或者跳转到自定义界面
-
日志记录:记录到elk中,画出饼图,建议使用json格式

3.2安装nginx+lua
由于nginx配置文件书写不方便,并且实现白名单功能很复杂,nginx的白名单也不适用于CC攻击,所以在这里使用nginx+lua来实现WAF,如果想使用lua,须在编译nginx的时候配置上lua,或者结合OpenResty使用,此方法不需要编译nginx时候指定lua
3.2.1 编译nginx的时候加载lua
环境准备:Nginx安装必备的Nginx和PCRE软件包。
[root@nginx-lua ~]# cd /usr/local/src [root@nginx-lua src]# wget http://nginx.org/download/nginx-1.9.4.tar.gz[root@nginx-lua src]# wget ftp://ftp.csx.cam.ac.uk/pub/software/programming/pcre/pcre-8.37.tar.gz
其次,下载当前最新的luajit和ngx_devel_kit (NDK),以及春哥编写的lua-nginx-module
[root@nginx-lua src]# wget http://luajit.org/download/LuaJIT-2.0..tar.gz[root@nginx-lua src]# wget https://github.com/simpl/ngx_devel_kit/archive/v0.2.19.tar.gz[root@nginx-lua src]# wget https://github.com/openresty/lua-nginx-module/archive/v0.9.16.tar.gz
最后,创建Nginx运行的普通用户
[root@nginx-lua src]# useradd -s /sbin/nologin -M www
解压NDK和lua-nginx-module
[root@openstack-compute-node5 src]# tar zxvf v0.2.19.tar.gz[root@openstack-compute-node5 src]# tar zxvf v0.9.16.tar.gz
安装LuaJIT Luajit是Lua即时编译器
[root@openstack-compute-node5 src]# tar zxvf LuaJIT-2.0.3.tar.gz [root@openstack-compute-node5 src]# cd LuaJIT-2.0.3[root@openstack-compute-node5 LuaJIT-2.0.3]# make && make install
安装Nginx并加载模块
[root@openstack-compute-node5 src]# tar zxvf nginx-1.9.4.tar.gz [root@openstack-compute-node5 src]# cd nginx-1.9.4[root@openstack-compute-node5 nginx-1.9.4]# export LUAJIT_LIB=/usr/local/lib[root@openstack-compute-node5 nginx-1.9.4]# export LUAJIT_INC=/usr/local/include/luajit-2.0[root@openstack-compute-node5 nginx-1.9.4]# ./configure --prefix=/usr/local/nginx --user=www --group=www --with-http_ssl_module --with-http_stub_status_module --with-file-aio --with-http_dav_module --add-module=../ngx_devel_kit-0.2.19/ --add-module=../lua-nginx-module-0.9.16/ --with-pcre=/usr/local/src/pcre-8.37 [root@openstack-compute-node5 nginx-1.5.12]# make -j2 && make install[root@openstack-compute-node5 ~]# ln -s /usr/local/lib/libluajit-5.1.so.2 /lib64/libluajit-5.1.so.2 #一定创建此软连接,否则报错
安装完毕后,下面可以测试安装了,修改nginx.conf 增加第一个配置
location /hello { default_type 'text/plain'; content_by_lua 'ngx.say("hello,lua")'; }[root@openstack-compute-node5 ~]# /usr/local/nginx-1.9.4/sbin/nginx –t[root@openstack-compute-node5 ~]# /usr/local/nginx-1.9.4/sbin/nginx
效果如下 
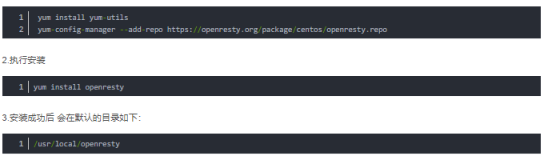
3.2.3 Openresty部署
安装依赖包
[root@iZ28t900vpcZ ~]#yum install -y readline-devel pcre-devel openssl-devel
下载并编译安装openresty
[root@iZ28t900vpcZ ~]#cd /usr/local/src[root@iZ28t900vpcZ src]#wget https://openresty.org/download/ngx_openresty-1.9.3.2.tar.gz[root@iZ28t900vpcZ src]#tar zxf ngx_openresty-1.9.3.2.tar.gz[root@iZ28t900vpcZ src]#cd ngx_openresty-1.9.3.2[root@iZ28t900vpcZ ngx_openresty-1.9.3.2]# ./configure --prefix=/usr/local/openresty-1.9.3.2 --with-luajit --with-http_stub_status_module --with-pcre --with-pcre-jit[root@iZ28t900vpcZ ngx_openresty-1.9.3.2]#gmake && gmake installln -s /usr/local/openresty-1.9.3.2/ /usr/local/openresty
测试openresty安装
[root@iZ28t900vpcZ ~]#vim /usr/local/openresty/nginx/conf/nginx.confserver { location /hello { default_type text/html; content_by_lua_block { ngx.say("HelloWorld") } }}
测试并启动nginx
[root@iZ28t900vpcZ ~]#/usr/local/openresty/nginx/sbin/nginx -tnginx: the configuration file /usr/local/openresty-1.9.3.2/nginx/conf/nginx.conf syntax is oknginx: configuration file /usr/local/openresty-1.9.3.2/nginx/conf/nginx.conf test is successful[root@iZ28t900vpcZ ~]#/usr/local/openresty/nginx/sbin/nginx
3.2.4WAF部署
在github上克隆下代码
[root@iZ28t900vpcZ ~]#git clone https://github.com/unixhot/waf.git[root@iZ28t900vpcZ ~]#cp -a ./waf/waf /usr/local/openresty/nginx/conf/
修改Nginx的配置文件,加入(http字段)以下配置。注意路径,同时WAF日志默认存放在/tmp/日期_waf.log
#WAF lua_shared_dict limit 50m; #防cc使用字典,大小50M lua_package_path "/usr/local/openresty/nginx/conf/waf/?.lua"; init_by_lua_file "/usr/local/openresty/nginx/conf/waf/init.lua"; access_by_lua_file "/usr/local/openresty/nginx/conf/waf/access.lua";[root@openstack-compute-node5 ~]# /usr/local/openresty/nginx/sbin/nginx –t[root@openstack-compute-node5 ~]# /usr/local/openresty/nginx/sbin/nginx
根据日志记录位置,创建日志目录
[root@iZ28t900vpcZ ~]#mkdir /tmp/waf_logs[root@iZ28t900vpcZ ~]#chown nginx.nginx /tmp/waf_logs
3.3学习模块
3.3.1学习配置模块
WAF上生产之前,建议不要直接上生产,而是先记录日志,不做任何动作。确定WAF不产生误杀
config.lua即WAF功能详解
[root@iZ28t900vpcZ waf]# pwd/usr/local/nginx/conf/waf[root@iZ28t900vpcZ waf]# cat config.lua --WAF config file,enable = "on",disable = "off" --waf status config_waf_enable = "on" #是否开启配置 --log dir config_log_dir = "/tmp/waf_logs" #日志记录地址 --rule setting config_rule_dir = "/usr/local/nginx/conf/waf/rule-config" #匹配规则缩放地址 --enable/disable white url config_white_url_check = "on" #是否开启url检测 --enable/disable white ip config_white_ip_check = "on" #是否开启IP白名单检测 --enable/disable block ip config_black_ip_check = "on" #是否开启ip黑名单检测 --enable/disable url filtering config_url_check = "on" #是否开启url过滤 --enalbe/disable url args filtering config_url_args_check = "on" #是否开启参数检测 --enable/disable user agent filtering config_user_agent_check = "on" #是否开启ua检测 --enable/disable cookie deny filtering config_cookie_check = "on" #是否开启cookie检测 --enable/disable cc filtering config_cc_check = "on" #是否开启防cc攻击 --cc rate the xxx of xxx seconds config_cc_rate = "10/60" #允许一个ip60秒内只能访问10此 --enable/disable post filtering config_post_check = "on" #是否开启post检测 --config waf output redirect/html config_waf_output = "html" #action一个html页面,也可以选择跳转 --if config_waf_output ,setting url config_waf_redirect_url = "http://www.baidu.com" config_output_html=[[ #下面是html的内容 <html> <head> <meta http-equiv="Content-Type" content="text/html; charset=utf-8" /> <meta http-equiv="Content-Language" content="zh-cn" /> <title>网站防火墙</title> </head> <body> <h1 align="center"> # 您的行为已违反本网站相关规定,注意操作规范。详情请联微信公众号:chuck-blog。 </body> </html> ]]
3.4 学习access.lua的配置
[root@iZ28t900vpcZ waf]# pwd/usr/local/openresty/nginx/conf/waf[root@iZ28t900vpcZ waf]# cat access.lua require 'init'function waf_main() if white_ip_check() then elseif black_ip_check() then elseif user_agent_attack_check() then elseif cc_attack_check() then elseif cookie_attack_check() then elseif white_url_check() then elseif url_attack_check() then elseif url_args_attack_check() then --elseif post_attack_check() then else return endendwaf_main()
书写书序:先检查白名单,通过即不检测;再检查黑名单,不通过即拒绝,检查UA,UA不通过即拒绝;检查cookie;URL检查;URL参数检查,post检查;
3.5 启用WAF并测试
3.5.1模拟sql注入即url攻击
显示效果如下 
日志显示如下,记录了UA,匹配规则,URL,客户端类型,攻击的类型,请求的数据 
3.5.2 使用ab压测工具模拟防cc攻击
[root@linux-node3 ~]# ab -c 100 -n 100 http://www.chuck-blog.com/index.phpThis is ApacheBench, Version 2.3 <$Revision: 1430300 $>Copyright 1996 Adam Twiss, Zeus Technology Ltd, http://www.zeustech.net/Licensed to The Apache Software Foundation, http://www.apache.org/Benchmarking www.chuck-blog.com (be patient).....doneServer Software: openrestyServer Hostname: www.chuck-blog.comServer Port: 80Document Path: /index.phpDocument Length: 0 bytesConcurrency Level: 100Time taken for tests: 0.754 secondsComplete requests: 10Failed requests: 90 #config.lua中设置的,60秒内只允许10个请求Write errors: 0Non-2xx responses: 90Total transferred: 22700 bytesHTML transferred: 0 bytesRequests per second: 132.65 [#/sec] (mean)Time per request: 753.874 [ms] (mean)Time per request: 7.539 [ms] (mean, across all concurrent requests)Transfer rate: 29.41 [Kbytes/sec] receivedConnection Times (ms) min mean[+/-sd] median maxConnect: 23 69 20.2 64 105Processing: 32 180 144.5 157 629Waiting: 22 179 144.5 156 629Total: 56 249 152.4 220 702Percentage of the requests served within a certain time (ms) 50% 220 66% 270 75% 275 80% 329 90% 334 95% 694 98% 701 99% 702 100% 702 (longest request) ```###3.5.3 模拟ip黑名单将请求ip放入ip黑名单中
[root@iZ28t900vpcZ rule-config]# echo “1.202.193.133” >>/usr/local/openresty/nginx/conf/waf/rule-config/blackip.rule
显示结果如下###3.5.4 模拟ip白名单将请求ip放入ip白名单中,此时将不对此ip进行任何防护措施,所以sql注入时应该返回404
[root@iZ28t900vpcZ rule-config]# echo “1.202.193.133” >>/usr/local/openresty/nginx/conf/waf/rule-config/whiteip.rule
显示结果如下###3.5.5 模拟URL参数检测浏览器输入www.chuck-blog.com/?a=select * from table显示结果如下详细规定在arg.rule中有规定,对请求进行了规范```bash[root@iZ28t900vpcZ rule-config]# /usr/local/openresty/nginx/conf/waf/rule-config/cat args.rule \.\./\:\$\$\{select.+(from|limit)(?:(union(.*?)select))having|rongjitestsleep\((\s*)(\d*)(\s*)\)benchmark\((.*)\,(.*)\)base64_decode\((?:from\W+information_schema\W)(?:(?:current_)user|database|schema|connection_id)\s*\((?:etc\/\W*passwd)into(\s+)+(?:dump|out)file\s*group\s+by.+\(xwork.MethodAccessor(?:define|eval|file_get_contents|include|require|require_once|shell_exec|phpinfo|system|passthru|preg_\w+|execute|echo|print|print_r|var_dump|(fp)open|alert|showmodaldialog)\(xwork\.MethodAccessor(gopher|doc|php|glob|file|phar|zlib|ftp|ldap|dict|ogg|data)\:\/java\.lang\$_(GET|post|cookie|files|session|env|phplib|GLOBALS|SERVER)\[\<(iframe|script|body|img|layer|div|meta|style|base|object|input)(|onerror|onload)\=[root@iZ28t900vpcZ rule-config]# pwd/usr/local/openresty/nginx/conf/waf/rule-config
四、防cc攻击利器之httpgrard
4.1 httpgrard介绍
HttpGuard是基于openresty,以lua脚本语言开发的防cc攻击软件。而openresty是集成了高性能web服务器Nginx,以及一系列的Nginx模块,这其中最重要的,也是我们主要用到的nginx lua模块。HttpGuard基于nginx lua开发,继承了nginx高并发,高性能的特点,可以以非常小的性能损耗来防范大规模的cc攻击。
4.2 httpgrard防cc特效
-
限制访客在一定时间内的请求次数
-
向访客发送302转向响应头来识别恶意用户,并阻止其再次访问
-
向访客发送带有跳转功能的js代码来识别恶意用户,并阻止其再次访问
-
向访客发送cookie来识别恶意用户,并阻止其再次访问
-
支持向访客发送带有验证码的页面,来进一步识别,以免误伤
-
支持直接断开恶意访客的连接
-
支持结合iptables来阻止恶意访客再次连接
-
支持白名单功能
-
支持根据统计特定端口的连接数来自动开启或关闭防cc模式
详见github地址,在后续的博文中会加入此功能
五、WAF上线
-
初期上线只记录日志,不开启WAF,防止误杀
-
WAF规则管理使用saltstack工具
-
要知道并不是有了WAF就安全,存在人为因素