引言
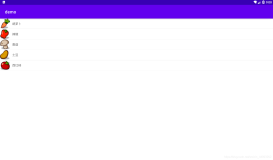
相信大家对GridView都不陌生,是非常有用的控件,用于平铺有序的显示多个内容项。打开任何WinRT应用或者是微软合作商的网站,都会在APP中发现GridView的使用。“Tiles”提供了一个简单易用,平铺方式来组织内容显示。Windows8的开始菜单是最典型的GridView 示例。“开始菜单”显示了系统中安装的所有应用程序,而且支持重新排列。
本文源于我们项目的开发人员,他们想在项目中提供与GridView相同的用户体验,想要创建类GridView控件。
GridView 可以显示大小不定的内容项,并且以有序的方式显示。如果各个内容项无序,并且内容尺寸大小相同,GirdView还支持拖拽操作。然而,这些功能并不是默认提供的,需要编写一定的代码才能实现。
本文主要介绍了扩展GridView控件——称为GridViewEx, GridViewEx主要实现GridView在不同大小的内容项中的拖拽功能。
背景
首先了解GridView的基本属性和功能,GridView包含一些属性集和 ItemTemplate。为了实现通过拖拽操作执行重排列功能,必须完成以下三件事:
1. 设置AllowDrop属性为true;
2. 设置CanReorderItems 属性值为True;
3. 绑定数据源,该数据源必须支持数据修改或支持重排序。例如,使用ObservableCollection或IList数据源。
<GridView ItemsSource="{Binding}" AllowDrop="True" CanReorderItems="True">
    <GridView.ItemTemplate>
        <DataTemplate>
            <Border BorderBrush="Aqua" BorderThickness="1" Background="Peru">
                <Grid Margin="12">
                    <Grid.RowDefinitions>
                        <RowDefinition />
                        <RowDefinition Height="Auto"/>
                    </Grid.RowDefinitions>
                    <TextBlock Text="{Binding}"/>
                    <TextBlock Grid.Row="1">item</TextBlock>
                </Grid>
            </Border>
        </DataTemplate>
    </GridView.ItemTemplate></GridView>
扩展后的GridView使用拖拽操作将会非常方便快捷。
GridViewEx 控件
GridViewEx控件弥补了GridView,功能如下:
-
实现Item Panel 拖拽操作,而不是WrapGrid,StackPanel、VirtualizingStackPanel等
-
分组时,实现拖拽功能;
我们也为GridViewEx增加了新建分组的功能,如果用户将内容项拖到控件左边或右边时会触发新建分组操作。
实现拖拽代码:
1: public class GridViewEx : GridView
2: {
3: /// <summary>
4: /// Initializes a new instance of the <see cref="GridViewEx"/> control.
5: /// </summary>
6: public GridViewEx()
7: {
8: // see attached sample
9: }
10:
11: private void GridViewEx_DragItemsStarting(object sender, DragItemsStartingEventArgs e)
12: {
13: // see attached sample
14: }
15:
16: /// <summary>
17: /// Stores dragged items into DragEventArgs.Data.Properties["Items"] value.
18: /// Override this method to set custom drag data if you need to.
19: /// </summary>
20: protected virtual void OnDragStarting(DragItemsStartingEventArgs e)
21: {
22: // see attached sample
23: }
该控件包含几个变量,用来存储拖放内容的索引。OnDragStarting 事件在DragEventArgs.Data.Properties[“Items”] 中存储拖拽的内容。OnDragStarting 需要根据自己的需求重写。
当用户拖拽某一项内容时,需要给用户提示来引导用户将内容放在合适的位置上。标准的GriView对象是通过滑动相邻的内实项来实现的。本文将在GridViewEx中完善此操作。
1: /// <summary>
2: /// Shows reoder hints while custom dragging.
3: /// </summary>
4: protected override void OnDragOver(DragEventArgs e)
5: {
6: // see attached sample }
7:
8: private int GetDragOverIndex(DragEventArgs e)
9: {
10: // see attached sample
11: }
实现拖放代码
首先需要重写GridView.OnDrop方法,该方法会当用户释放某一项内容时触发。重写Ondrop方法,代码如下:
1: /// <summary>
2: /// Handles drag and drop for cases when it is not supported by the Windows.UI.Xaml.Controls.GridView control
3: /// </summary>
4: protected override async void OnDrop(DragEventArgs e)
5: {
6: // see attached sample
7: }
OnDrop方法主要实现了内容项从源分组移到目标分组的逻辑代码,以及创建新分组的功能。
添加新分组
如果GrideView通过将IsSourceGrouped值为True来绑定CollectionViewSource情况下,GridView提供分组功能,这就意味着分组必须对数据源进行分组,但GridView没有访问数据的权限。因此本文在执行拖放操作时,实现添加新分组功能。GridViewEx.BeforeDrop事件处理此需求,并且提供更多的数据信息,如DragEventArgs数据。
当用户执行拖放操作时,触发BeforeDrop 事件。
1: /// <summary>
2: /// Occurs before performing drop operation,
3: /// </summary>
4: public event EventHandler<BeforeDropItemsEventArgs> BeforeDrop;
5: /// <summary>
6: /// Rises the <see cref="BeforeDrop"/> event.
7: /// </summary>
8: /// <param name="e">Event data for the event.</param>
9: protected virtual void OnBeforeDrop(BeforeDropItemsEventArgs e)
10: {
11: // see attached sample
12: }
BeforeDropItemEventArgs包含关于被拖拽的内容项的重要信息,该信息在OnDrop事件中可使用的。
1: /// <summary>
2: /// Provides data for the <see cref="GridViewEx.BeforeDrop"/> event.
3: /// </summary>
4: public sealed class BeforeDropItemsEventArgs : System.ComponentModel.CancelEventArgs
5: {
6: /// <summary>
7: /// Gets the item which is being dragged.
8: /// </summary>
9: public object Item
10: {
11: get;
12: }
13: /// <summary>
14: /// Gets the current item index in the underlying data source.
15: /// </summary>
16: public int OldIndex
17: {
18: get;
19: }
20: /// <summary>
21: /// Gets the index in the underlying data source where
22: /// the item will be inserted by the drop operation.
23: /// </summary>
24: public int NewIndex
25: {
26: get;
27: }
28: /// <summary>
29: /// Gets the bool value determining whether end-user actions requested
30: /// creation of the new group in the underlying data source.
31: /// This property only makes sense if GridViewEx.IsGrouping property is true.
32: /// </summary>
33: /// <remarks>
34: /// If this property is true, create the new data group and insert it into
35: /// the groups collection at the positions, specified by the
36: /// <see cref="BeforeDropItemsEventArgs.NewGroupIndex"/> property value.
37: /// Then the <see cref="GridViewEx"/> will insert dragged item
38: /// into the newly added group.
39: /// </remarks>
40: public bool RequestCreateNewGroup
41: {
42: get;
43: }
44: /// <summary>
45: /// Gets the current item data group index in the underlying data source.
46: /// This property only makes sense if GridViewEx.IsGrouping property is true.
47: /// </summary>
48: public int OldGroupIndex
49: {
50: get;
51: }
52: /// <summary>
53: /// Gets the data group index in the underlying data source
54: /// where the item will be inserted by the drop operation.
55: /// This property only makes sense if GridViewEx.IsGrouping property is true.
56: /// </summary>
57: public int NewGroupIndex
58: {
59: get;
60: }
61: /// <summary>
62: /// Gets the original <see cref="DragEventArgs"/> data.
63: /// </summary>
64: public DragEventArgs DragEventArgs
65: {
66: get;
67: }
68: }
AllowNewGroup属性确定用户拖拽某一内容项到控件边界时,是否创建新组。GridView并没有提供此功能,在GridViewEX添加此功能。
1: /// <summary>
2: /// Gets or sets the value determining whether new group should be created at
3: /// dragging the item to the empty space.
4: /// </summary>
5: public bool AllowNewGroup
6: {
7: get { return (bool)GetValue(AllowNewGroupProperty); }
8: set { SetValue(AllowNewGroupProperty, value); }
9: }
10:
11: /// <summary>
12: /// Identifies the <see cref="AllowNewGroup"/> dependency property.
13: /// </summary>
14: public static readonly DependencyProperty AllowNewGroupProperty =
15: DependencyProperty.Register("AllowNewGroup", typeof(bool),
16: typeof(GridViewEx), new PropertyMetadata(false));
为了在拖拽过程中添加分组,需要将AllowNewGroup属性设置为True。处理GridViewEx.BeforeDrop事件,该事件的参数能够帮助决定单项内容的起始位置和目的位置。在BeforeDrop事件的Handler中,使用 NewGroupIndex 创建新的数据组,并插入到已有组集合。最后,需要实现的扩展GridView控件模板。在用户可拖拽的项目的位置创建新分组,并使用占位符来代替。一旦用户拖某一内容放置到控件的边界时,触发创建新分组,ItemsPresenter的两个边界元素是新组的占位符。
GridViewEx控件模板generic.xaml,如下:
1: <Style TargetType="local:GridViewEx">
2: <Setter Property="Padding" Value="0,0,0,10" />
3: <Setter Property="IsTabStop" Value="False" />
4: <Setter Property="TabNavigation" Value="Once" />
5: <Setter Property="ScrollViewer.HorizontalScrollBarVisibility" Value="Auto"/>
6: <Setter Property="ScrollViewer.VerticalScrollBarVisibility" Value="Disabled"/>
7: <Setter Property="ScrollViewer.HorizontalScrollMode" Value="Enabled" />
8: <Setter Property="ScrollViewer.IsHorizontalRailEnabled" Value="False" />
9: <Setter Property="ScrollViewer.VerticalScrollMode" Value="Disabled" />
10: <Setter Property="ScrollViewer.IsVerticalRailEnabled" Value="False" />
11: <Setter Property="ScrollViewer.ZoomMode" Value="Disabled" />
12: <Setter Property="ScrollViewer.IsDeferredScrollingEnabled" Value="False" />
13: <Setter Property="ScrollViewer.BringIntoViewOnFocusChange" Value="True" />
14: <Setter Property="IsSwipeEnabled" Value="True" />
15: <Setter Property="Template">
16: <Setter.Value>
17: <ControlTemplate TargetType="local:GridViewEx">
18: <Border BorderBrush="{TemplateBinding BorderBrush}"
19: Background="{TemplateBinding Background}"
20: BorderThickness="{TemplateBinding BorderThickness}">
21: <ScrollViewer x:Name="ScrollViewer"
22: TabNavigation="{TemplateBinding TabNavigation}"
23: HorizontalScrollMode="
24: {TemplateBinding ScrollViewer.HorizontalScrollMode}"
25: HorizontalScrollBarVisibility=
26: "{TemplateBinding
27: ScrollViewer.HorizontalScrollBarVisibility}"
28: IsHorizontalScrollChainingEnabled=
29: "{TemplateBinding
30: ScrollViewer.IsHorizontalScrollChainingEnabled}"
31: VerticalScrollMode="
32: {TemplateBinding ScrollViewer.VerticalScrollMode}"
33: VerticalScrollBarVisibility=
34: "{TemplateBinding
35: ScrollViewer.VerticalScrollBarVisibility}"
36: IsVerticalScrollChainingEnabled=
37: "{TemplateBinding
38: ScrollViewer.IsVerticalScrollChainingEnabled}"
39: IsHorizontalRailEnabled="
40: {TemplateBinding ScrollViewer.IsHorizontalRailEnabled}"
41: IsVerticalRailEnabled="
42: {TemplateBinding ScrollViewer.IsVerticalRailEnabled}"
43: ZoomMode="{TemplateBinding
44: ScrollViewer.ZoomMode}"
45: IsDeferredScrollingEnabled="
46: {TemplateBinding ScrollViewer.IsDeferredScrollingEnabled}"
47: BringIntoViewOnFocusChange="
48: {TemplateBinding ScrollViewer.BringIntoViewOnFocusChange}">
49: <StackPanel Orientation="Horizontal">
50: <Border Width="60"
51: x:Name="NewGroupPlaceHolderFirst"
52: Background="Transparent"
53: Padding="{TemplateBinding Padding}"
54: Visibility="{Binding AllowNewGroup,
55: Converter={StaticResource
56: VisibilityConverter},
57: RelativeSource={RelativeSource TemplatedParent}}"/>
58: <ItemsPresenter
59: Header="{TemplateBinding Header}"
60: HeaderTemplate="{TemplateBinding HeaderTemplate}"
61: HeaderTransitions="{TemplateBinding HeaderTransitions}"
62: Padding="{TemplateBinding Padding}"/>
63: <Border Width="60"
64: x:Name="NewGroupPlaceHolderLast"
65: Background="Transparent"
66: Padding="{TemplateBinding Padding}"
67: Visibility="{Binding AllowNewGroup,
68: Converter={StaticResource
69: VisibilityConverter},
70: RelativeSource={RelativeSource TemplatedParent}}"/>
71: </StackPanel>
72: </ScrollViewer>
73: </Border>
74: </ControlTemplate>
75: </Setter.Value>
76: </Setter>
77: </Style>
丰富GridViewEx功能
如上所示,我们已经实现了基本的拖拽操作,与Windows8 开始菜单类似的功能,接下来讨论如何实现以下功能:
-
尺寸大小不定的内容项
-
分组
-
添加新组
-
节省跨会话布局空间
大小不定的内容项
Windows8展示了不同大小的Tiles,但是目前GridView或GridViewEx还不支持此功能。因为GridView使用WrapGrid作为默认的ItemsPanel,WrapPanel只能创建一种布局,即所有的条目尺寸相同的。因此微软提供了VariableSizedWrapGrid,支持不同大小块的布局创建。
GridViewEx控件的优势在于能够使用VariableSizedWrapGrid,并且很好的支持拖放操作。为了使用VariableSizedWrapGrid 并显示不同大小的内容项,必须实现以下功能:
将GridViewEx.ItemsPanel 设置为VariableSizedWrapGrid
在GridView中重写GridView 的PrepareContainerForItemOverride 方法。在该方法中,可以设置Item的RowSpan或ColumnSpan属性来识别内容项的大小。
即生成继承GridViewEx的新控件MyGridView。为什么需要扩展GridViewEx控件而不是重写GridViewEx的PrepareContainerForItemOverride方法?因为指定Item尺寸的逻辑必须放在数据模型中,而不是控件内部。
如想将某一项显示较大一点,需要在数据项中创建一个属性返回比1大的整型数值,来设置RowSpanhuoColumnSpan属性。
1: public class Item
2: {
3: public int Id { get; set; }
4: public int ItemSize { get; set; }
5: /* */
6: }
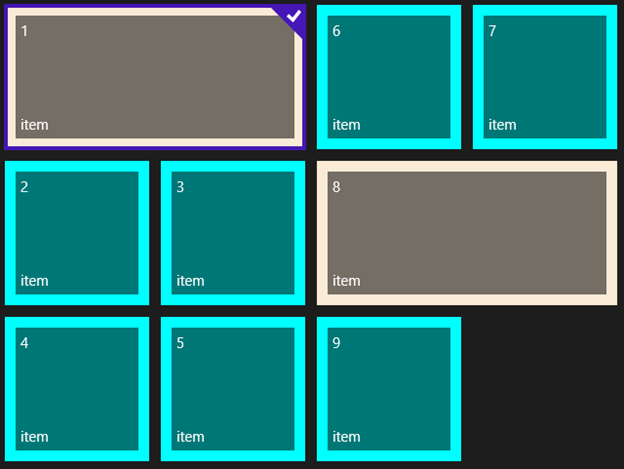
因此,当创建新的内容项,我们要指定ItemSize属性。如果值为1则表明常规尺寸,如果值为2则表明大尺寸,ColumnSpan属性则设置为2。
1: /// <summary>
2: /// This class sets VariableSizedWrapGrid.ColumnSpanProperty for GridViewItem controls,
3: /// so that every item can have different size in the VariableSizedWrapGrid.
4: /// </summary>
5: public class MyGridView : GridViewSamples.Controls.GridViewEx
6: {
7: // set ColumnSpan according to the business logic
8: // (maybe some GridViewSamples.Samples.Item or group properties)
9: protected override void PrepareContainerForItemOverride(
10: Windows.UI.Xaml.DependencyObject element, object item)
11: {
12: try
13: {
14: GridViewSamples.Samples.Item it = item as GridViewSamples.Samples.Item;
15: if (it != null)
16: {
17: element.SetValue(
18: Windows.UI.Xaml.Controls.VariableSizedWrapGrid.ColumnSpanProperty, it.ItemSize);
19: }
20: }
21: catch
22: {
23: element.SetValue(Windows.UI.Xaml.Controls.VariableSizedWrapGrid.ColumnSpanProperty, 1);
24: }
25: finally
26: {
27: base.PrepareContainerForItemOverride(element, item);
28: }
29: }
30: }
创建MyGridView实例,并绑定到数据集合。
1: <local:MyGridView AllowDrop="True" CanReorderItems="True"
2: CanDragItems="True" IsSwipeEnabled="True"
3: ItemsSource="{Binding}"
4: ItemTemplate="{StaticResource ItemTemplate}" >
5: <GridView.ItemsPanel>
6: <ItemsPanelTemplate>
7: <VariableSizedWrapGrid ItemHeight="160"
8: ItemWidth="160" />
9: </ItemsPanelTemplate>
10: </GridView.ItemsPanel>
11: <GridView.ItemContainerStyle>
12: <Style TargetType="GridViewItem">
13: <Setter Property="HorizontalContentAlignment"
14: Value="Stretch"/>
15: <Setter Property="VerticalContentAlignment"
16: Value="Stretch"/>
17: </Style>
18: </GridView.ItemContainerStyle>
19: </local:MyGridView>
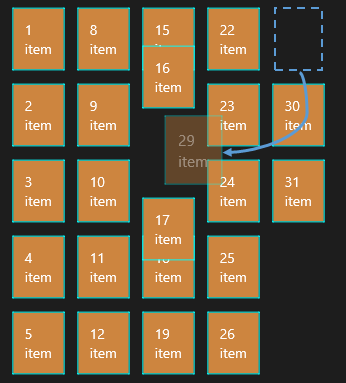
如上所示,我们将指定内容项的ItemSize属性设置为2,效果如图所示:
分组
使用GridViewEx控件,能够实现添加新分组和拖拽等功能,也是在App中最为常见的功能,实现分组必须完成以下设置:
-
为GridView绑定
CollectionViewSource,必须使用支持分组的数据源。CollectionViewSource可视为代理服务器。 -
使用GroupStyle确定分组结果如何显示,GroupStyle包含Header Tempate及Panel,因此需要指定子项目的排序方式。
在GridViewEx中添加支持不同大小的内容项,逻辑代码:
1: <local:MyGridView AllowDrop="True" CanReorderItems="True"
2: CanDragItems="True" IsSwipeEnabled="True"
3: ItemsSource="{Binding}"
4: ItemTemplate="{StaticResource ItemTemplate}" >
5: <GridView.ItemsPanel>
6: <ItemsPanelTemplate>
7: <VirtualizingStackPanel Orientation="Horizontal"/>
8: </ItemsPanelTemplate>
9: </GridView.ItemsPanel>
10: <GridView.GroupStyle>
11: <GroupStyle>
12: <GroupStyle.HeaderTemplate>
13: <DataTemplate>
14: <Grid Background="LightGray"
15: Margin="0">
16: <TextBlock Foreground="Black"
17: Margin="10"
18: Style="{StaticResource
19: GroupHeaderTextStyle}">
20: <Run Text="{Binding Id}"/>
21: <Run Text=" group"/>
22: </TextBlock>
23: </Grid>
24: </DataTemplate>
25: </GroupStyle.HeaderTemplate>
26:
27: <GroupStyle.ContainerStyle>
28: <Style TargetType="GroupItem">
29: <Setter Property="BorderBrush"
30: Value="DarkGray"/>
31: <Setter Property="BorderThickness"
32: Value="2"/>
33: <Setter Property="Margin"
34: Value="3,0"/>
35: </Style>
36: </GroupStyle.ContainerStyle>
37:
38: <GroupStyle.Panel>
39: <ItemsPanelTemplate>
40: <VariableSizedWrapGrid ItemHeight="160"
41: ItemWidth="160" />
42: </ItemsPanelTemplate>
43: </GroupStyle.Panel>
44: </GroupStyle>
45: </GridView.GroupStyle>
46:
47: <GridView.ItemContainerStyle>
48: <Style TargetType="GridViewItem">
49: <Setter Property="HorizontalContentAlignment"
50: Value="Stretch"/>
51: <Setter Property="VerticalContentAlignment"
52: Value="Stretch"/>
53: </Style>
54: </GridView.ItemContainerStyle>
55: </local:MyGridView>
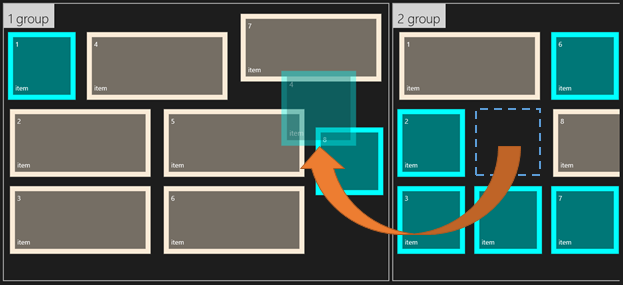
运行演示:
添加新分组
自定义的GridViewEx控件支持新分组的创建,因此需要设置AllowNewGroup为True。其次处理添加新分组的数据层,处理GridViewEx.BeforeDrop 事件。
1: /// <summary>
2: /// Creates new CollectionViewSource and updates page DataContext.
3: /// </summary>
4: private void UpdateDataContext()
5: {
6: CollectionViewSource source = new CollectionViewSource();
7: source.Source = _groups;
8: source.ItemsPath = new PropertyPath("Items");
9: source.IsSourceGrouped = true;
10: this.DataContext = source;
11: }
12: // creates new group in the data source,
13: // if end-user drags item to the new group placeholder
14: private void MyGridView_BeforeDrop(object sender, Controls.BeforeDropItemsEventArgs e)
15: {
16: if (e.RequestCreateNewGroup)
17: {
18: // create new group and re-assign datasource
19: Group group = Group.GetNewGroup();
20: if (e.NewGroupIndex == 0)
21: {
22: _groups.Insert(0, group);
23: }
24: else
25: {
26: _groups.Add(group);
27: }
28: UpdateDataContext();
29: }
30: }
也可以使用Drop事件删除空分组
1: // removes empty groups (except the last one)
2: private void MyGridView_Drop(object sender, DragEventArgs e)
3: {
4: bool needReset = false;
5: for (int i = _groups.Count - 1; i >= 0; i--)
6: {
7: if (_groups[i].Items.Count == 0 && _groups.Count > 1)
8: {
9: _groups.RemoveAt(i);
10: needReset = true;
11: }
12: }
13: if (needReset)
14: {
15: UpdateDataContext();
16: }
17: }
节省布局空间
Windows8支持挂起或终止功能,为了提供更好的用户体验,我们继续改善此前实现的功能,当用户离开当前页面,将当前的布局暂存。在本示例中,我们使用JSON 字符串简化数据序列化。根据已有的数据、数据的大小及需求,以其他格式来保存数据。我们主要将“业务对象集合”保存。
为了节省布局空间。重写LayoutAwarePage方法:
1: /// <summary>
2: /// Populates the page with content passed during navigation. Any saved state is also
3: /// provided when recreating a page from a prior session.
4: /// </summary>
5: /// <param name="navigationParameter">The parameter value passed to
6: /// <see cref="Frame.Navigate(Type,
7: /// Object)"/> when this page was initially requested.
8: /// </param>
9: /// <param name="pageState"
10: /// >A dictionary of state preserved by this page during an earlier
11: /// session. This will be null the first time a page is visited.</param>
12: protected override void LoadState(Object navigationParameter,
13: Dictionary<String, Object> pageState)
14: {
15: base.LoadState(navigationParameter, pageState);
16: if (pageState != null && pageState.Count > 0
17: && pageState.ContainsKey("Groups"))
18: {
19: // restore groups and items from the previously serialized state
20: System.Runtime.Serialization.Json.DataContractJsonSerializer rootSer =
21: new System.Runtime.Serialization.Json.DataContractJsonSerializer(typeof(List<Group>));
22: var stream = new MemoryStream(System.Text.Encoding.UTF8.GetBytes
23: ((string)pageState["Groups"]));
24: _groups = (List<Group>)rootSer.ReadObject(stream);
25: }
26: else
27: {
28: // if we get here for the first time and don't have
29: // serialized content, fill groups and items from scratch
30: for (int j = 1; j <= 12; j++)
31: {
32: Group group = Group.GetNewGroup();
33: for (int i = 1; i <= 7 + j % 3; i++)
34: {
35: group.Items.Add(new Item()
36: {
37: Id = i,
38: GroupId = group.Id
39: });
40: }
41: _groups.Add(group);
42: }
43: }
44: UpdateDataContext();
45: }
46:
47: /// <summary>
48: /// Preserves state associated with this page in case the application is suspended or the
49: /// page is discarded from the navigation cache. Values must conform to the serialization
50: /// requirements of <see cref="SuspensionManager.SessionState"/>.
51: /// </summary>
52: /// <param name="pageState">
53: /// An empty dictionary to be populated with serializable state.</param>
54: protected override void SaveState(Dictionary<String, Object> pageState)
55: {
56: // save groups and items to JSON string so that
57: // it's possible to restore page state later
58: base.SaveState(pageState);
59: System.Runtime.Serialization.Json.DataContractJsonSerializer rootSer =
60: new System.Runtime.Serialization.Json.DataContractJsonSerializer
61: (typeof(List<Group>));
62: var stream = new MemoryStream();
63: rootSer.WriteObject(stream, _groups);
64: string str = System.Text.Encoding.UTF8.GetString(stream.ToArray(),
65: 0, (int)stream.Length);
66: pageState.Add("Groups", str);
67: }
68:
69: /// <summary>
70: /// Invoked when this page is about to be displayed in a Frame.
71: /// </summary>
72: /// <param name="e">Event data that describes
73: /// how this page was reached. The Parameter
74: /// property is typically used to configure the page.</param>
75: protected override void OnNavigatedTo(NavigationEventArgs e)
76: {
77: // restore page state
78: var frameState =
79: GridViewSamples.Common.SuspensionManager.SessionStateForFrame(this.Frame);
80: if (frameState.ContainsKey("TilePageData"))
81: {
82: this.LoadState(e.Parameter,
83: (Dictionary<String, Object>)frameState["TilePageData"]);
84: }
85: else
86: {
87: this.LoadState(e.Parameter, null);
88: }
89: }
90:
91: protected override void OnNavigatedFrom(NavigationEventArgs e)
92: {
93: // save page state with "TilePageData" key
94: var frameState =
95: GridViewSamples.Common.SuspensionManager.SessionStateForFrame(this.Frame);
96: var pageState = new Dictionary<String, Object>();
97: this.SaveState(pageState);
98: frameState["TilePageData"] = pageState;
99: }
总结
GridViewEx控件丰富了GirdView控件功能,改进了基础功能,提升用户体验。到此已经实现了GridView项与Windows8开始菜单具有的相同用户体验,如果你想了解如何在Windows10平台下开发UWP引用,请持续关注下篇文章:如何在Windows10中开发UWP应用
本文转自 powertoolsteam 51CTO博客,原文链接:http://blog.51cto.com/powertoolsteam/1704417,如需转载请自行联系原作者