步骤一:flume的下载

当然,这里也可以使用wget命令在线下载,很简单,不多说。
步骤二:flume的上传

[hadoop@djt002 flume]$ ls
apache-flume-1.6.0-bin apache-flume-1.6.0-bin.tar.gz
[hadoop@djt002 flume]$ rm apache-flume-1.6.0-bin.tar.gz
[hadoop@djt002 flume]$ ls
apache-flume-1.6.0-bin
[hadoop@djt002 flume]$ mv apache-flume-1.6.0-bin/ flume-1.6.0
[hadoop@djt002 flume]$ clear
[hadoop@djt002 flume]$
步骤三:flume的配置

[root@djt002 flume]# vim /etc/profile

#flume
export FLUME_HOME=/usr/local/flume/flume-1.6.0
export FLUME_CONF_DIR=/usr/local/flume/flume-1.6.0/conf
export PATH=$PATH:$FLUME_HOME/bin
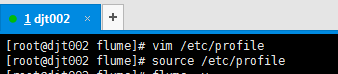
[root@djt002 flume]# vim /etc/profile
[root@djt002 flume]# source /etc/profile
进入flume/conf目录,拷贝配置文件

[hadoop@djt002 flume]$ pwd
/usr/local/flume
[hadoop@djt002 flume]$ ls
flume-1.6.0
[hadoop@djt002 flume]$ cd flume-1.6.0/
[hadoop@djt002 flume-1.6.0]$ ls
bin CHANGELOG conf DEVNOTES docs lib LICENSE NOTICE README RELEASE-NOTES tools
[hadoop@djt002 flume-1.6.0]$ cd conf/
[hadoop@djt002 conf]$ ls
flume-conf.properties.template flume-env.ps1.template flume-env.sh.template log4j.properties
[hadoop@djt002 conf]$
修改flume-conf.properties配置文件。这里收集日志文件到收集端。配置参数的详细说明可以参考官方文档。

[hadoop@djt002 conf]$ ls
flume-conf.properties.template flume-env.ps1.template flume-env.sh.template log4j.properties
[hadoop@djt002 conf]$ cp flume-conf.properties.template flume-conf.properties
[hadoop@djt002 conf]$ ls
flume-conf.properties flume-conf.properties.template flume-env.ps1.template flume-env.sh.template log4j.properties
[hadoop@djt002 conf]$
注意:
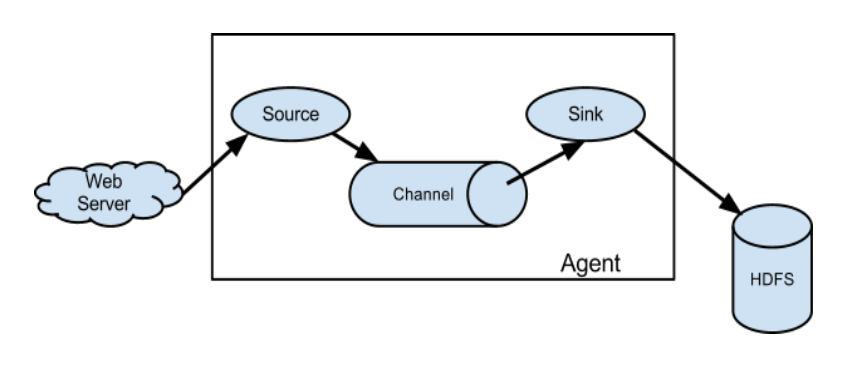
我这里,是为了学习环境。source为了收集,sink为了传到hdfs上,可以配置多个source(在实际生产中)。
但我这里,单节点且仅为了学习,只配置一个source。
修改配置文件

[hadoop@djt002 conf]$ vim flume-conf.properties
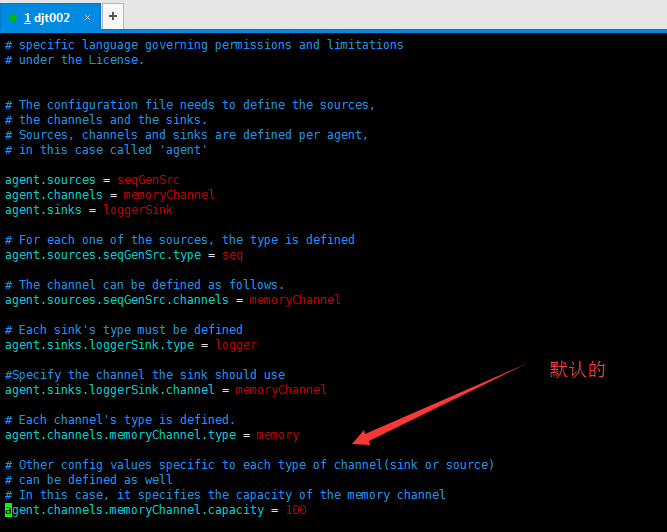

# Licensed to the Apache Software Foundation (ASF) under one
# or more contributor license agreements. See the NOTICE file
# distributed with this work for additional information
# regarding copyright ownership. The ASF licenses this file
# to you under the Apache License, Version 2.0 (the
# "License"); you may not use this file except in compliance
# with the License. You may obtain a copy of the License at
#
# http://www.apache.org/licenses/LICENSE-2.0
#
# Unless required by applicable law or agreed to in writing,
# software distributed under the License is distributed on an
# "AS IS" BASIS, WITHOUT WARRANTIES OR CONDITIONS OF ANY
# KIND, either express or implied. See the License for the
# specific language governing permissions and limitations
# under the License.


# The configuration file needs to define the sources,
# the channels and the sinks.
# Sources, channels and sinks are defined per agent,
# in this case called 'agent'

agent.sources = seqGenSrc
agent.channels = memoryChannel
agent.sinks = loggerSink

# For each one of the sources, the type is defined
agent.sources.seqGenSrc.type = seq

# The channel can be defined as follows.
agent.sources.seqGenSrc.channels = memoryChannel

# Each sink's type must be defined
agent.sinks.loggerSink.type = logger

#Specify the channel the sink should use
agent.sinks.loggerSink.channel = memoryChannel

# Each channel's type is defined.
agent.channels.memoryChannel.type = memory

# Other config values specific to each type of channel(sink or source)
# can be defined as well
# In this case, it specifies the capacity of the memory channel
agent.channels.memoryChannel.capacity = 100
修改为(版本1)(推荐!)

# under the License.


# The configuration file needs to define the sources,
# the channels and the sinks.
# Sources, channels and sinks are defined per agent,
# in this case called 'agent'

agent1.sources = spool-source1
agent1.sinks = hdfs-sink1
agent1.channels = ch1

#Define and configure an Spool directory source
agent1.sources.spool-source1.channels=ch1
agent1.sources.spool-source1.type=spooldir
agent1.sources.spool-source1.spoolDir=/home/hadoop/test
agent1.sources.spool-source1.ignorePattern=event(_\d{4}\-d{2}\-d{2}\_d{2}\_d{2})?\.log(\.COMPLETED)?
agent1.sources.spool-source1.deserializer.maxLineLength=10240

#Configure channel
agent1.channels.ch1.type = file
agent1.channels.ch1.checkpointDir = /home/hadoop/flume/checkpointDir
agent1.channels.ch1.dataDirs = /home/hadoop/flume/dataDirs

#Define and configure a hdfs sink
agent1.sinks.hdfs-sink1.channel = ch1
agent1.sinks.hdfs-sink1.type = hdfs
agent1.sinks.hdfs-sink1.hdfs.path = hdfs://djt002:9000/flume/%Y%m%d
agent1.sinks.hdfs-sink1.hdfs.useLocalTimeStamp = true
agent1.sinks.hdfs-sink1.hdfs.rollInterval = 300
agent1.sinks.hdfs-sink1.hdfs.rollSize = 67108864
agent1.sinks.hdfs-sink1.hdfs.rollCount = 0
agent1.sinks.hdfs-sink1.hdfs.codeC = snappy
注意,这个版本的话,需要安装snappy。当然,不安装也可以,你可以将这行注释掉。#agent1.sinks.hdfs-sink1.hdfs.codeC = snappy
监控的是哪个目录?是这个/home/hadoop/test目录。
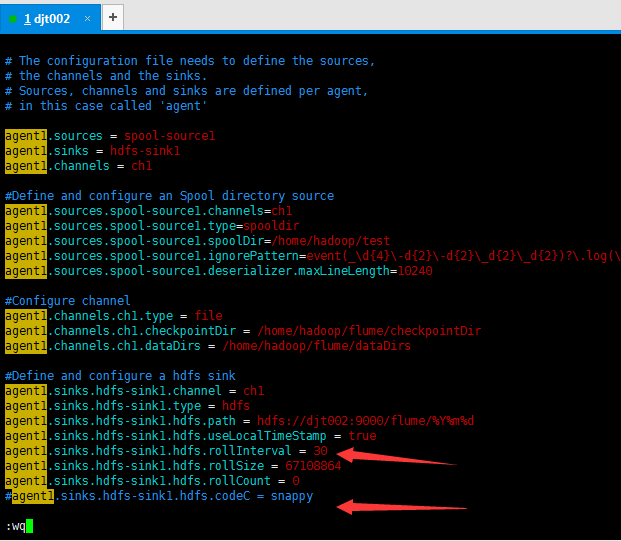
agent1.sinks.hdfs-sink1.hdfs.rollInterval = 30

#agent1.sinks.hdfs-sink1.hdfs.codeC = snappy


有时候啊,记得加上这个,避免出现超时的问题

agent1.sinks.hdfs.callTimeout=30000
或修改为(版本2)
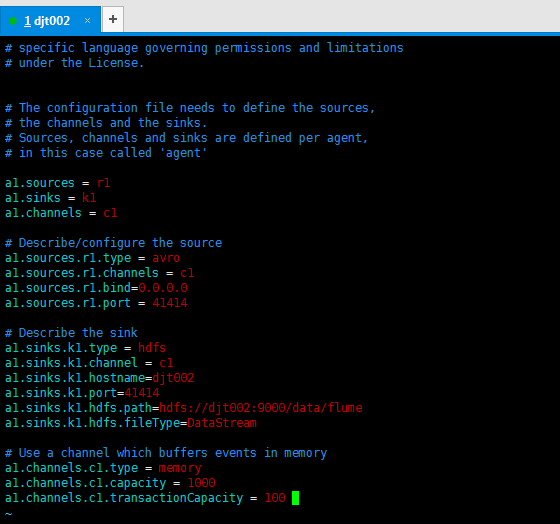
a1.sources = r1
a1.sinks = k1
a1.channels = c1

# Describe/configure the source
a1.sources.r1.type = avro
a1.sources.r1.channels = c1
a1.sources.r1.bind=0.0.0.0
a1.sources.r1.port = 41414

# Describe the sink
a1.sinks.k1.type = hdfs
a1.sinks.k1.channel = c1
a1.sinks.k1.hostname=djt002
a1.sinks.k1.port=41414
a1.sinks.k1.hdfs.path=hdfs://djt002:9000/data/flume
a1.sinks.k1.hdfs.fileType=DataStream

# Use a channel which buffers events in memory
a1.channels.c1.type = memory
a1.channels.c1.capacity = 1000
a1.channels.c1.transactionCapacity = 100
有时候啊,记得加上这个,避免出现超时的问题

a1.sinks.hdfs.callTimeout=30000
步骤四:启动flume
事先,得启动hadoop集群,并正常运行。

[hadoop@djt002 conf]$ cd $HADOOP_HOME
[hadoop@djt002 hadoop-2.6.0]$ pwd
/usr/local/hadoop/hadoop-2.6.0
[hadoop@djt002 hadoop-2.6.0]$ sbin/start-all.sh
This script is Deprecated. Instead use start-dfs.sh and start-yarn.sh
17/01/17 18:38:04 WARN util.NativeCodeLoader: Unable to load native-hadoop library for your platform... using builtin-java classes where applicable
Starting namenodes on [djt002]
djt002: starting namenode, logging to /usr/local/hadoop/hadoop-2.6.0/logs/hadoop-hadoop-namenode-djt002.out
djt002: starting datanode, logging to /usr/local/hadoop/hadoop-2.6.0/logs/hadoop-hadoop-datanode-djt002.out
Starting secondary namenodes [0.0.0.0]
0.0.0.0: starting secondarynamenode, logging to /usr/local/hadoop/hadoop-2.6.0/logs/hadoop-hadoop-secondarynamenode-djt002.out
17/01/17 18:39:32 WARN util.NativeCodeLoader: Unable to load native-hadoop library for your platform... using builtin-java classes where applicable
starting yarn daemons
starting resourcemanager, logging to /usr/local/hadoop/hadoop-2.6.0/logs/yarn-hadoop-resourcemanager-djt002.out
djt002: starting nodemanager, logging to /usr/local/hadoop/hadoop-2.6.0/logs/yarn-hadoop-nodemanager-djt002.out
[hadoop@djt002 hadoop-2.6.0]$ jps
3181 ResourceManager
3280 NodeManager
2851 DataNode
2980 SecondaryNameNode
3310 Jps
2755 NameNode
[hadoop@djt002 hadoop-2.6.0]$
事先也可以准备好一个有数据的文件,
此步,推荐看这篇博客 http://blog.csdn.net/technology_2016/article/details/51132471
比如,我这里有这么一份数据

我现在,将它上传到/home/hadoop/tvdata目录下。
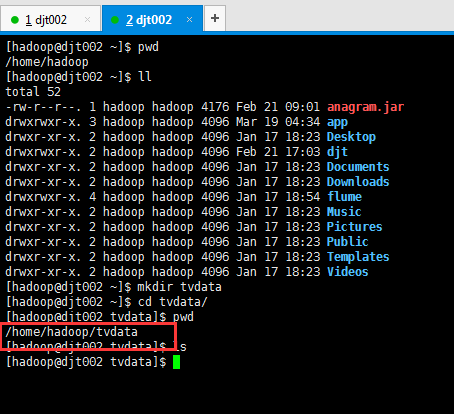
[hadoop@djt002 ~]$ mkdir tvdata
[hadoop@djt002 ~]$ cd tvdata/
[hadoop@djt002 tvdata]$ pwd
/home/hadoop/tvdata
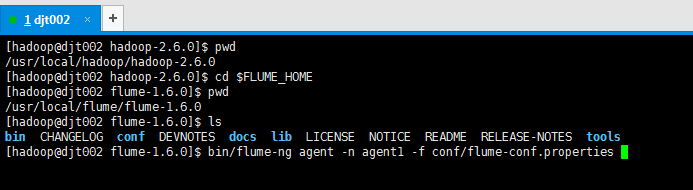
[hadoop@djt002 hadoop-2.6.0]$ pwd
/usr/local/hadoop/hadoop-2.6.0
[hadoop@djt002 hadoop-2.6.0]$ cd $FLUME_HOME
[hadoop@djt002 flume-1.6.0]$ pwd
/usr/local/flume/flume-1.6.0
[hadoop@djt002 flume-1.6.0]$ ls
bin CHANGELOG conf DEVNOTES docs lib LICENSE NOTICE README RELEASE-NOTES tools
[hadoop@djt002 flume-1.6.0]$ bin/flume-ng agent -n agent1 -f conf/flume-conf.properties
或者,后台启动
[hadoop@djt002 flume-1.6.0]$ nohub bin/flume-ng agent -n agent1 -f conf/flume-conf.properties -Dflume.root.logger=INFO,console &

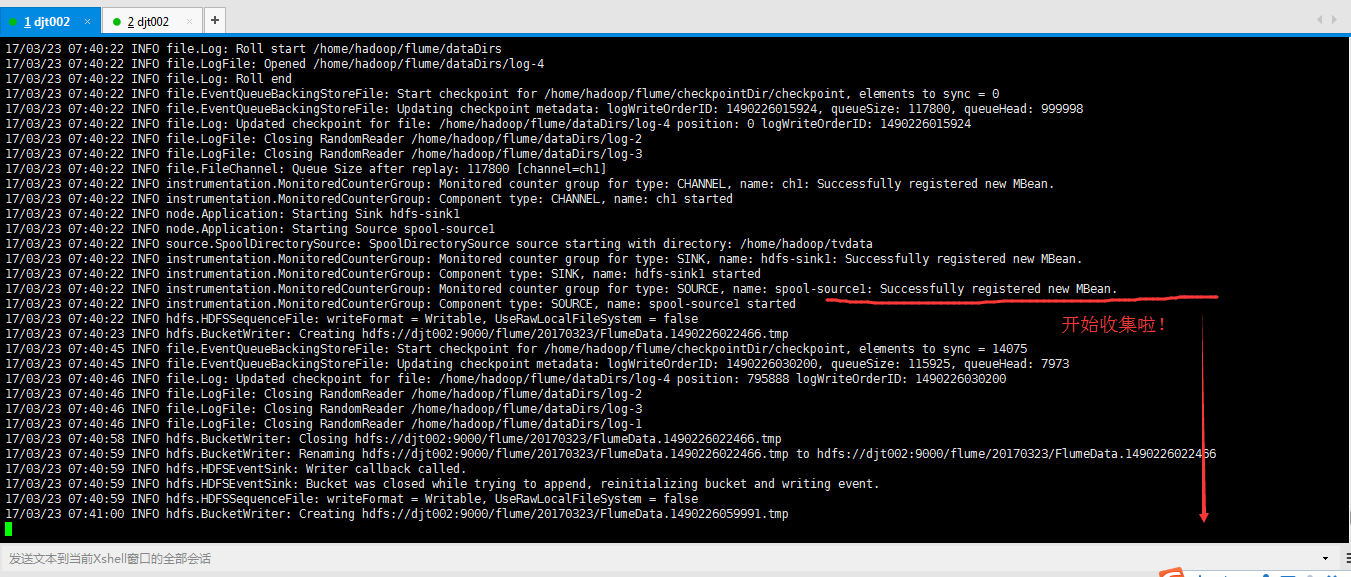
随时待命,等待监控收集。
现在,往/home/Hadoop/tvdata目录下,传模拟数据tvplay.txt,来收集
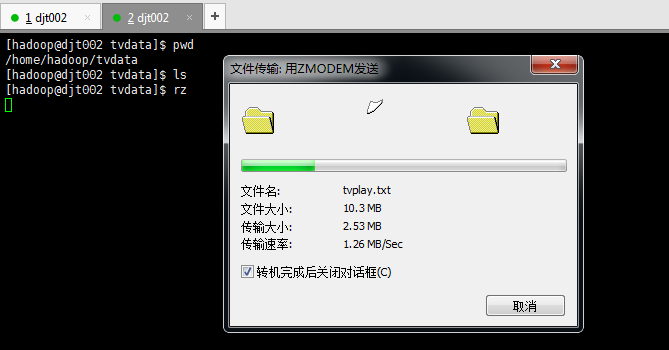
需要等待一段时间
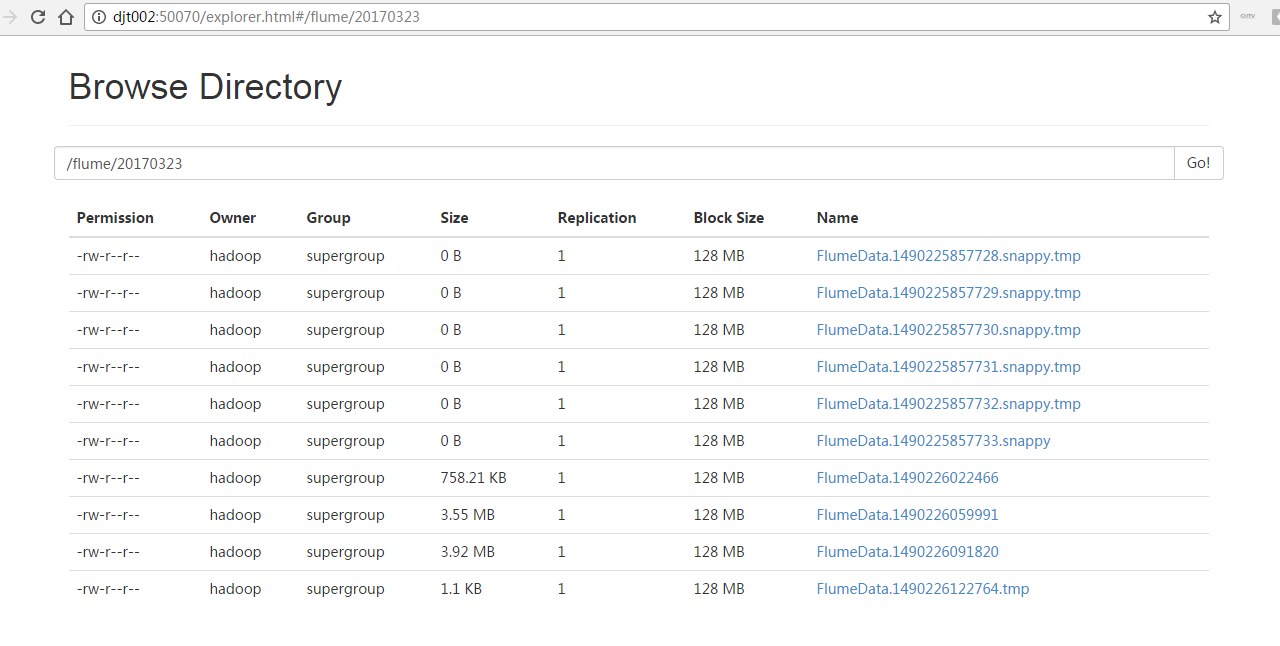
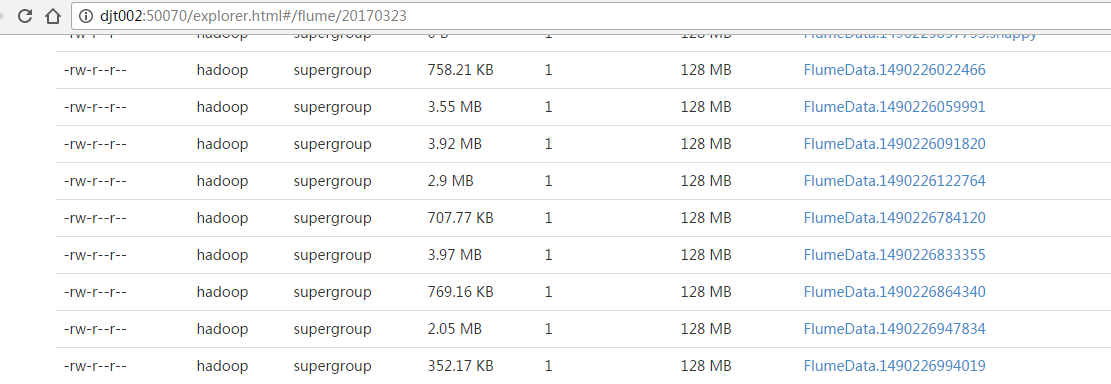
正在收集中...等到收集完成之后,这些tmp就没啦!
遇到的问题
大文件(我这里是10MB)拷贝(mv,cp, scp等)到监控目录,确实出现了exception的问题(Uncaught exception in SpoolDirectorySource thread. Restart or reconfigure Flume to continue processing.)

17/03/23 07:41:13 ERROR source.SpoolDirectorySource: FATAL: Spool Directory source spool-source1: { spoolDir: /home/hadoop/tvdata }: Uncaught exception in SpoolDirectorySource thread. Restart or reconfigure Flume to continue processing.
解决方法:
Spooling Directory Source提供了下面一个参数:当对文件完成采集时将文件结尾添加后缀名
fileSuffix .COMPLETED Suffix to append to completely ingested files
所以我们只需要把要移动的文件名加上后缀后移动到监控目录(我这里是/home/hadoop/tvdata),然后再修改文件名将后缀去掉就可以解决这个异常。
先,
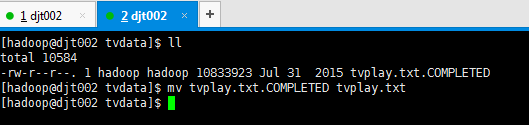
再,

附:福利
为了,我后续的学习方便,我这里,贴出我的配置。

agent1.sources = spool-source1
agent1.sinks = hdfs-sink1
agent1.channels = ch1

#Define and configure an Spool directory source
agent1.sources.spool-source1.channels=ch1
agent1.sources.spool-source1.type=spooldir
agent1.sources.spool-source1.spoolDir=/home/hadoop/tvdata
agent1.sources.spool-source1.ignorePattern=event(_\d{4}\-d{2}\-d{2}\_d{2}\_d{2})?\.log(\.COMPLETED)?
agent1.sources.spool-source1.deserializer.maxLineLength=10240

#Configure channel
agent1.channels.ch1.type = file
agent1.channels.ch1.checkpointDir = /home/hadoop/flume/checkpointDir
agent1.channels.ch1.dataDirs = /home/hadoop/flume/dataDirs

#Define and configure a hdfs sink
agent1.sinks.hdfs-sink1.channel = ch1
agent1.sinks.hdfs-sink1.type = hdfs
agent1.sinks.hdfs-sink1.hdfs.path = hdfs://djt002:9000/flume/%Y%m%d
agent1.sinks.hdfs-sink1.hdfs.useLocalTimeStamp = true
agent1.sinks.hdfs-sink1.hdfs.rollInterval = 30
监控的是哪个目录?是/home/hadoop/tvdata这个目录。

所以,这里,没牵扯到sinkgroups。
下面的这篇博客,具体,我详细分析了,如何去配置到sinkgroups
flume-1.6.0(3节点)安装与配置(数据读取涉及到snappy、自定义flume拦截器、flume采集节点和flume客户端)(升级)
单个flume的agent部署(适用本博客)


本文转自大数据躺过的坑博客园博客,原文链接:http://www.cnblogs.com/zlslch/p/6290052.html,如需转载请自行联系原作者