原文:
Javscript轮播 支持平滑和渐隐两种效果(可以只有两张图)
先上两种轮播效果:渐隐和移动
效果一:渐隐


效果二:移动
接下来,我们来大致说下整个轮播的思路:
一、先来看简单的,移动的,先上来一个图----移动效果图:
说明:
基本原则就是顺序是按照当前显示的为基准:如当前为2,那么顺序就是2,3,4,1;如当前为3,那么顺序就是3,4,1,2。以此类推。
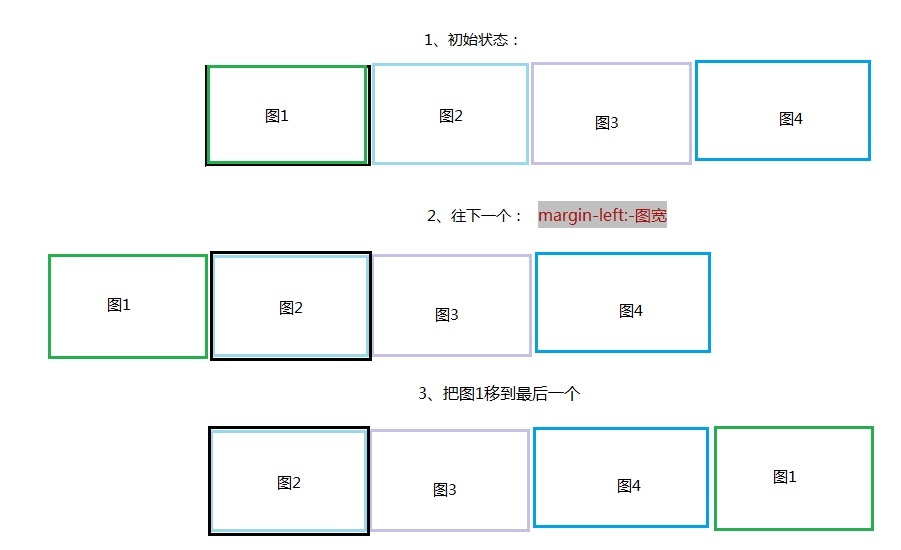
整个移动划分为三种:1、下一个 2、上一个 3、任意个
1、下一个:margin-left:-图宽;然后将“图1”移到最后一个位置
   next: function () {
            var oThis = this;
            var firstItem = oThis.itemArray.shift();
            oThis.itemArray.push(firstItem);
            rotatePrivate.clealNvActive.call(oThis, oThis.itemArray[0].index);
            //移动wrap到第二个元素
            oThis.wrap.animate({ marginLeft: -oThis.itemW }, {
                duration: oThis.actionTime,
                easing: 'easeInOutQuint',
                complete: function () {
                    //第一元素移到最后
                    oThis.wrap.append(firstItem.item);
                    oThis.wrap.css('margin-left', 0);
                    rotatePrivate.timeRun.call(oThis);
                }
            });
        },
2、上一个:将最后一个(图4)移到第一个,设置margin-left:-图宽,然后动作设置成margin-left:0
  pre: function () {
            var oThis = this;
            //找到最后一张,并移到第一张
            var lastItem = oThis.itemArray.pop();
            oThis.wrap.prepend(lastItem.item);
            oThis.wrap.css('margin-left', -oThis.itemW);
            rotatePrivate.clealNvActive.call(oThis, lastItem.index);
            oThis.wrap.animate({ marginLeft: 0 }, {
                duration: oThis.actionTime,
                easing: 'easeInOutQuint',
                complete: function () {
                    //变化数组
                    oThis.itemArray.splice(0, 0, lastItem);
                    rotatePrivate.timeRun.call(oThis);
                }

            });
        },
3、任意个:先判断向前移,还是向后移动,然后根据基本原则就是顺序是按照当前显示的为基准,从新排列顺序。
curstom: function (i) {
            var oThis = this;
            var customItem = null;
            for (var h in oThis.itemArray) {
                if (oThis.itemArray[h].index == i) {
                    customItem = oThis.itemArray[h];
                    break;
                }
            }
            var firstItem = oThis.itemArray[0];
            //在活动的后面
            if (customItem.index > firstItem.index) {
                //把curstomItem移到后面
                firstItem.item.after(customItem.item);
                rotatePrivate.clealNvActive.call(oThis, customItem.index);
                //foucus move to curstomitem
                oThis.wrap.animate({ marginLeft: -oThis.itemW }, {
                    duration: oThis.actionTime,
                    complete: function () {
                        //sort by customitem
                        rotatePrivate.sortItem.call(oThis, customItem);
                        oThis.wrap.css('margin-left', 0);
                        rotatePrivate.timeRun.call(oThis);
                    }
                });
            } else {
                //把curstomItem移到当前的前面,并margin-left -itemWidth
                firstItem.item.before(customItem.item);
                oThis.wrap.css('margin-left', -oThis.itemW);
                rotatePrivate.clealNvActive.call(oThis, customItem.index);
                //foucus move to curstomitem
                oThis.wrap.animate({ marginLeft: 0 }, {
                    duration: oThis.actionTime,
                    complete: function () {
                        //sort by customitem
                        rotatePrivate.sortItem.call(oThis, customItem);
                        rotatePrivate.timeRun.call(oThis);
                    }
                });
            }
        }
二、再来看渐隐轮播效果
这个在原来的效果上,唯一比较有亮点的就是“渐隐如何不让图片白一下”?
图1 图2 图3 图4
图1克隆
图2 图3 图4 图1
我采用clone了一张当前,并设置position: absolute;这样当当前这样的opacity变为0时,底下的图2就显示出来,这样就不那么生硬了。
    next: function () {
            var oThis = this;
            var firstItem = oThis.itemArray.shift();
            oThis.itemArray.push(firstItem);
            //将第一个clone一个,覆在上面
            var firstClone = firstItem.item.clone();
            firstClone.addClass('rotate-trans');
            firstClone.removeClass('rotate-item');
            oThis.wrap.append(firstClone);
            //first ele move to last
            oThis.wrap.append(firstItem.item);
            var secondItem = oThis.itemArray[0];
            rotatePrivate.clealNvActive.call(oThis, secondItem.index);
            firstClone.animate({ opacity: 0 }, {
                duration: oThis.actionTime,
                complete: function () {
                    //移走clone
                    firstClone.remove();
                    rotatePrivate.timeRun.call(oThis);
                }
            });
        },


